
DTX402K/DTX432K/DTX452K Owners Manual
Page 2
... with an amplifier and headphones or speaker/s, may not cause harmful interference, and 2) this product to produce products that may result in your dealer before damage occurs. Batteries MUST be dealer assembled or installed. The use "household" type batteries. NAME PLATE LOCATION: The name plate is approximately five years. For Instrument SPECIAL MESSAGE SECTION This product utilizes batteries or an external power supply (adapter). If...
... with an amplifier and headphones or speaker/s, may not cause harmful interference, and 2) this product to produce products that may result in your dealer before damage occurs. Batteries MUST be dealer assembled or installed. The use "household" type batteries. NAME PLATE LOCATION: The name plate is approximately five years. For Instrument SPECIAL MESSAGE SECTION This product utilizes batteries or an external power supply (adapter). If...
DTX402K/DTX432K/DTX452K Owners Manual
Page 3
... adaptor and Instrument FCC INFORMATION (U.S.A.) 1. NOTE: This product has been tested and found in harmful interference with the requirements listed in this product in a residential environment will not occur in the USA. 3. In the case of other electronic devices. IMPORTANT: When connecting this product MUST be used according to those products distributed by YAMAHA CORPORATION OF AMERICA. (class B) DTX402K...
... adaptor and Instrument FCC INFORMATION (U.S.A.) 1. NOTE: This product has been tested and found in harmful interference with the requirements listed in this product in a residential environment will not occur in the USA. 3. In the case of other electronic devices. IMPORTANT: When connecting this product MUST be used according to those products distributed by YAMAHA CORPORATION OF AMERICA. (class B) DTX402K...
DTX402K/DTX432K/DTX452K Owners Manual
Page 5
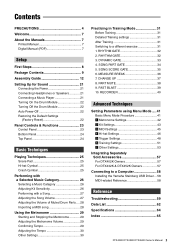
... Manual 7 Digital Manual (PDF 7 Setup First Steps 8 Package Contents 9 Assembly Guide 12 Setting Up for Sound 21 Connecting the Power 21 Connecting Headphones or Speakers 21 Connecting a Music Player 21 Turning On the Drum Module 22 Turning Off the Drum Module 22 Auto Power-Off 22 Restoring the Default Settings (Factory Reset 22 Panel Controls & Functions 23 Control Panel 23 Bottom Panel 24 Top Panel 24 Basic Techniques Playing Techniques 25 Snare Pad 25 Hi-hat Cymbal 25 Crash Cymbal 25 Performing with a Selected Music Category 26 Selecting a Music Category 26 Adjusting...
... Manual 7 Digital Manual (PDF 7 Setup First Steps 8 Package Contents 9 Assembly Guide 12 Setting Up for Sound 21 Connecting the Power 21 Connecting Headphones or Speakers 21 Connecting a Music Player 21 Turning On the Drum Module 22 Turning Off the Drum Module 22 Auto Power-Off 22 Restoring the Default Settings (Factory Reset 22 Panel Controls & Functions 23 Control Panel 23 Bottom Panel 24 Top Panel 24 Basic Techniques Playing Techniques 25 Snare Pad 25 Hi-hat Cymbal 25 Crash Cymbal 25 Performing with a Selected Music Category 26 Selecting a Music Category 26 Adjusting...
DTX402K/DTX432K/DTX452K Owners Manual
Page 6
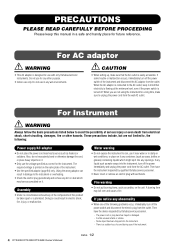
... setting up, make sure to the AC outlet, keep this product be taken apart or customized. These precautions include, but are not using the instrument for the instrument. Then have the device inspected by qualified Yamaha service personnel. • Never insert or remove an electric plug with only Yamaha electronic instruments. Do not use for use only. When the AC adaptor is connected to unplug the power cord...
... setting up, make sure to the AC outlet, keep this product be taken apart or customized. These precautions include, but are not using the instrument for the instrument. Then have the device inspected by qualified Yamaha service personnel. • Never insert or remove an electric plug with only Yamaha electronic instruments. Do not use for use only. When the AC adaptor is connected to unplug the power cord...

DTX402K/DTX432K/DTX452K Owners Manual
Page 7
... electrical storms. Assembly • Read carefully the attached documentation explaining the assembly process. Connections • Before connecting the instrument to other electronic components, turn the power off for the instrument. Failure to assemble the instrument in the proper sequence might trip over , possibly causing injury. • Take care when setting up cables. Even when the power switch is turned off the power for a long time, make sure to unplug the power cord...
... electrical storms. Assembly • Read carefully the attached documentation explaining the assembly process. Connections • Before connecting the instrument to other electronic components, turn the power off for the instrument. Failure to assemble the instrument in the proper sequence might trip over , possibly causing injury. • Take care when setting up cables. Even when the power switch is turned off the power for a long time, make sure to unplug the power cord...
DTX402K/DTX432K/DTX452K Owners Manual
Page 8
... may generate noise. and other electric devices. You should note this serial number in the space provided below . Handling and Maintenance • Do not use the instrument in water and tightly wrung out. If a pad is used under license. • The company names and product names in this manual are allowed to distribute medium in which your performance or music production using...
... may generate noise. and other electric devices. You should note this serial number in the space provided below . Handling and Maintenance • Do not use the instrument in water and tightly wrung out. If a pad is used under license. • The company names and product names in this manual are allowed to distribute medium in which your performance or music production using...
DTX402K/DTX432K/DTX452K Owners Manual
Page 9
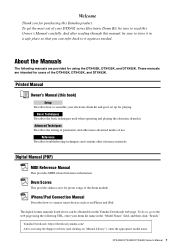
...." Printed Manual Owner's Manual (this book) Setup Describes how to read this Yamaha product. Reference Describes troubleshooting techniques and contains other more advanced modes of the DTX402K, DTX432K, and DTX452K. Welcome Thank you can be sure to it set up for playing. About the Manuals The following URL, enter your electronic drum kit and get the most out of the drum module. Digital Manual (PDF) MIDI Reference Manual This provides MIDI-related...
...." Printed Manual Owner's Manual (this book) Setup Describes how to read this Yamaha product. Reference Describes troubleshooting techniques and contains other more advanced modes of the DTX402K, DTX432K, and DTX452K. Welcome Thank you can be sure to it set up for playing. About the Manuals The following URL, enter your electronic drum kit and get the most out of the drum module. Digital Manual (PDF) MIDI Reference Manual This provides MIDI-related...

DTX402K/DTX432K/DTX452K Owners Manual
Page 12
Check with your area. Owner's Manual (this booklet) Setup Package Contents DTX432K Rack (Large) Rack (Small) Hi-hat holder Stopper Cymbal holders (×2) No Stopper Cymbal/hi-hat pads (×2) Crash cymbal pad Drum module HH65 Hi-hat controller Sensor (bumps) KP65 Kick pad FP6110A Foot pedal Nine-channel snake cable Drum key 10 DTX402K DTX432K DTX452K Owner's Manual Cable bands (×2) AC adaptor * May not be included depending on your Yamaha dealer.
Check with your area. Owner's Manual (this booklet) Setup Package Contents DTX432K Rack (Large) Rack (Small) Hi-hat holder Stopper Cymbal holders (×2) No Stopper Cymbal/hi-hat pads (×2) Crash cymbal pad Drum module HH65 Hi-hat controller Sensor (bumps) KP65 Kick pad FP6110A Foot pedal Nine-channel snake cable Drum key 10 DTX402K DTX432K DTX452K Owner's Manual Cable bands (×2) AC adaptor * May not be included depending on your Yamaha dealer.

DTX402K/DTX432K/DTX452K Owners Manual
Page 22
... OUT>DTX jack. Two of the joints should be played when the PAD>IN jack is used. 3. No sound will be placed differently from being pulled out. Congratulations-You have finished assembling your electronic drum kit! Setup Assembly Guide Step 14 Connecting the pads to prevent them from this setup for righthanded drummers. Insert the nine-channel snake cable's standard plugs* into the correct trigger input jacks (SNARE to KICK/ PAD) on the drum module...
... OUT>DTX jack. Two of the joints should be played when the PAD>IN jack is used. 3. No sound will be placed differently from being pulled out. Congratulations-You have finished assembling your electronic drum kit! Setup Assembly Guide Step 14 Connecting the pads to prevent them from this setup for righthanded drummers. Insert the nine-channel snake cable's standard plugs* into the correct trigger input jacks (SNARE to KICK/ PAD) on the drum module...
DTX402K/DTX432K/DTX452K Owners Manual
Page 23
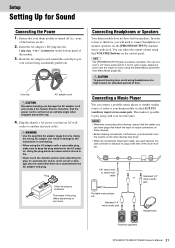
... input) stereo mini-jack. Plug the adaptor's AC power cord into the [ ] connector on the control panel. Using the wrong AC adaptor can connect a 1/4" mono-audio jack to it possible to the AC adaptor. Standard 1/4" mono-audio jack or Standard 1/4" stereo-audio jack Headphones Powered speakers DTX402K DTX432K DTX452K Owner's Manual 21 Insert the AC adaptor's DC plug into an AC wall socket or another similar source of the drum module. 1/8" stereo-mini to your favorite tunes. Connecting a Music Player You can adjust the output volume using the Stereo...
... input) stereo mini-jack. Plug the adaptor's AC power cord into the [ ] connector on the control panel. Using the wrong AC adaptor can connect a 1/4" mono-audio jack to it possible to the AC adaptor. Standard 1/4" mono-audio jack or Standard 1/4" stereo-audio jack Headphones Powered speakers DTX402K DTX432K DTX452K Owner's Manual 21 Insert the AC adaptor's DC plug into an AC wall socket or another similar source of the drum module. 1/8" stereo-mini to your favorite tunes. Connecting a Music Player You can adjust the output volume using the Stereo...
DTX402K/DTX432K/DTX452K Owners Manual
Page 24
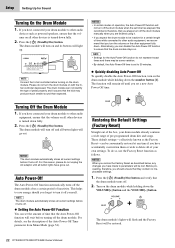
... songs. Hold The drum module's lights will flash and the Factory Reset will turn off yourself. Setup Setting Up for a certain length of time while connected to other audio equipment, we recommend that you turn the volume on the other equipment fully down. The drum module can disable the Auto Power-Off function to ensure that the volume on . NOTE • Settings for the Auto Power-Off function do so, use the Factory Reset function as powered speakers...
... songs. Hold The drum module's lights will flash and the Factory Reset will turn off yourself. Setup Setting Up for a certain length of time while connected to other audio equipment, we recommend that you turn the volume on the other equipment fully down. The drum module can disable the Auto Power-Off function to ensure that the volume on . NOTE • Settings for the Auto Power-Off function do so, use the Factory Reset function as powered speakers...
DTX402K/DTX432K/DTX452K Owners Manual
Page 26
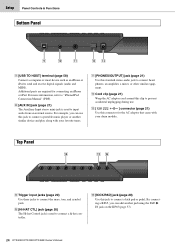
... adaptor cord around this clip to prevent accidental unplugging during use this jack to send and receive digital signals (audio and MIDI). For more information, refer to "iPhone/iPad Connection Manual" (PDF). ⁄0 [AUX IN] jack (page 21) The Auxiliary Input stereo mini-jack is used to connect a kick pad or pedal. Top Panel ⁄4 ⁄5 ⁄6 ⁄4 Trigger input jacks (page 20) Use these jacks to connect the snare, tom, and cymbal pads. ⁄5 [HI-HAT CTL] jack...
... adaptor cord around this clip to prevent accidental unplugging during use this jack to send and receive digital signals (audio and MIDI). For more information, refer to "iPhone/iPad Connection Manual" (PDF). ⁄0 [AUX IN] jack (page 21) The Auxiliary Input stereo mini-jack is used to connect a kick pad or pedal. Top Panel ⁄4 ⁄5 ⁄6 ⁄4 Trigger input jacks (page 20) Use these jacks to connect the snare, tom, and cymbal pads. ⁄5 [HI-HAT CTL] jack...

DTX402K/DTX432K/DTX452K Owners Manual
Page 36
... number button [4] to start the exercise. The song will be automatically unmuted. - To end the exercise, press the [ ] button. 34 DTX402K DTX432K DTX452K Owner's Manual Scoring Your score will be muted. - TIPS • The music category can be changed (by the voice guidance after ending the exercise. If the pad corresponding to the muted drum part is ON, press the Mode switch to turn on the "PLAY" button...
... number button [4] to start the exercise. The song will be automatically unmuted. - To end the exercise, press the [ ] button. 34 DTX402K DTX432K DTX452K Owner's Manual Scoring Your score will be muted. - TIPS • The music category can be changed (by the voice guidance after ending the exercise. If the pad corresponding to the muted drum part is ON, press the Mode switch to turn on the "PLAY" button...

DTX402K/DTX432K/DTX452K Owners Manual
Page 37
.... - NOTE When the "TRAINING" light is half-lit. - TIPS • You can change the music category (by pressing a corresponding number key). • The volume of the song can mute specific parts of the exercise can set whether the pads produce sound whenever they are struck or only when they are effective while the [DRUM ON/OFF] button is ON, press the Mode switch to turn on the "PLAY" button, and...
.... - NOTE When the "TRAINING" light is half-lit. - TIPS • You can change the music category (by pressing a corresponding number key). • The volume of the song can mute specific parts of the exercise can set whether the pads produce sound whenever they are struck or only when they are effective while the [DRUM ON/OFF] button is ON, press the Mode switch to turn on the "PLAY" button, and...
DTX402K/DTX432K/DTX452K Owners Manual
Page 40
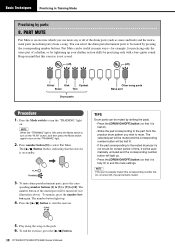
... turned off), the pad remains muted. 5. Play along the song on the "TRAINING" light. 2. Basic Techniques Practicing in mind that this exercise is not scored. (off) (off) Hi-hat Kick Cymbal Snare Tom Drum parts Other song parts Bass part Procedure 1. Press number button [8] to start the exercise. Press the [ ] button to select Part Mute. TIPS Drum parts can be muted by practicing only with a bass guitar sound. Part Mute can be useful...
... turned off), the pad remains muted. 5. Play along the song on the "TRAINING" light. 2. Basic Techniques Practicing in mind that this exercise is not scored. (off) (off) Hi-hat Kick Cymbal Snare Tom Drum parts Other song parts Bass part Procedure 1. Press number button [8] to start the exercise. Press the [ ] button to select Part Mute. TIPS Drum parts can be muted by practicing only with a bass guitar sound. Part Mute can be useful...

DTX402K/DTX432K/DTX452K Owners Manual
Page 43
... value zero. Pedal Type Page 50 5-5. Ignore Timing Page 51 6-4. Fast Blast Timer Page 53 m Other Settings 7-1. Hold down the Mode switch to turn the "PLAY" and "TRAINING" on the left.) To select "1-2. Delete Song Page 55 7-9. Beats Page 42 1-3. Dynamic Gate Low Limit Page 52 6-6. DTX402K DTX432K DTX452K Owner's Manual 41 Pad Volume Page 43 2-3. Pad Velocity Curve Page 48 5-2. Advanced Techniques Setting Parameters using the corresponding number button. • When...
... value zero. Pedal Type Page 50 5-5. Ignore Timing Page 51 6-4. Fast Blast Timer Page 53 m Other Settings 7-1. Hold down the Mode switch to turn the "PLAY" and "TRAINING" on the left.) To select "1-2. Delete Song Page 55 7-9. Beats Page 42 1-3. Dynamic Gate Low Limit Page 52 6-6. DTX402K DTX432K DTX452K Owner's Manual 41 Pad Volume Page 43 2-3. Pad Velocity Curve Page 48 5-2. Advanced Techniques Setting Parameters using the corresponding number button. • When...
DTX402K/DTX432K/DTX452K Owners Manual
Page 45
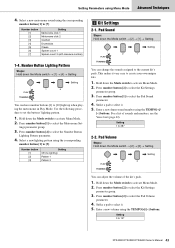
...; Setting Setting You can have number buttons [1] to 127 DTX402K DTX432K DTX452K Owner's Manual 43 Hold down the Mode switch [1] [4] Setting Setting You can adjust the volume of sounds and numbers, see the Voice List (page 62). Press number button [4] to select it . 5. Enter a new drum-sound number using Menu Mode Advanced Techniques 4. Strike a pad to select the Number Button Lighting Pattern parameter. 4. Press number button [2] to select the Metronome Set- For a list of the kit's pads. 1. Pad Volume Steps: Hold down the Mode switch...
...; Setting Setting You can have number buttons [1] to 127 DTX402K DTX432K DTX452K Owner's Manual 43 Hold down the Mode switch [1] [4] Setting Setting You can adjust the volume of sounds and numbers, see the Voice List (page 62). Press number button [4] to select it . 5. Enter a new drum-sound number using Menu Mode Advanced Techniques 4. Strike a pad to select the Number Button Lighting Pattern parameter. 4. Press number button [2] to select the Metronome Set- For a list of the kit's pads. 1. Pad Volume Steps: Hold down the Mode switch...

DTX402K/DTX432K/DTX452K Owners Manual
Page 46
... the Mode switch to select the Reverb parame- Hold down the Mode switch [2] [5] Setting Setting Reverb effects add a warm ambience to the [HI-HAT CONTROL] trigger input jack. Press number button [5] to activate Menu Mode. 2. Number button [1] [2] [3] [4] [5] [6] [7] [8] [9] [10] Setting Off Hall Studio Room 1 Room 2 Stage Small Stage Plate Early Reflection Gate Reverb 44 DTX402K DTX432K DTX452K Owner's Manual The "cent" is enabled, you will be unable to use the hi-hat controller plugged into the [HI-HAT CONTROL] trigger input jack...
... the Mode switch to select the Reverb parame- Hold down the Mode switch [2] [5] Setting Setting Reverb effects add a warm ambience to the [HI-HAT CONTROL] trigger input jack. Press number button [5] to activate Menu Mode. 2. Number button [1] [2] [3] [4] [5] [6] [7] [8] [9] [10] Setting Off Hall Studio Room 1 Room 2 Stage Small Stage Plate Early Reflection Gate Reverb 44 DTX402K DTX432K DTX452K Owner's Manual The "cent" is enabled, you will be unable to use the hi-hat controller plugged into the [HI-HAT CONTROL] trigger input jack...

DTX402K/DTX432K/DTX452K Owners Manual
Page 61
... 41) • Adjust the following instructions do not turn the drum module on with numerical values by restoring the default settings (Factory Reset). Pedal Type (See page 50) - Reference Troubleshooting Reference Some problems may be produced depending on the particular headphones you are using a KU100 Kick Unit, connect an HH40 hi-hat controller before turning on the drum module. No sound is produced when a pad is struck, or the volume is connected to a small value...
... 41) • Adjust the following instructions do not turn the drum module on with numerical values by restoring the default settings (Factory Reset). Pedal Type (See page 50) - Reference Troubleshooting Reference Some problems may be produced depending on the particular headphones you are using a KU100 Kick Unit, connect an HH40 hi-hat controller before turning on the drum module. No sound is produced when a pad is struck, or the volume is connected to a small value...
DTX402K/DTX432K/DTX452K Owners Manual
Page 67
... Last Power On 56 RHYTHM GATE 32 Rim 25 S S wing bolt 11 Score 31 Sensitivity 26 Separately Sold Accessories .......... 57 Snare Pad 25 Song 27 SONG PART GATE 34 SONG SCORE GATE 35 Speakers 21 T Tap tempo 30 Tempo 29 Toms 13 Top Panel 24 TP70S Snare pad 11, 25 Training Mode 23, 31 Trigger input jacks 24 V Voice guidance 29, 53 Voice list 62 Y Yamaha Steinberg USB Driver ....... 58 DTX402K DTX432K DTX452K Owner's Manual...
... Last Power On 56 RHYTHM GATE 32 Rim 25 S S wing bolt 11 Score 31 Sensitivity 26 Separately Sold Accessories .......... 57 Snare Pad 25 Song 27 SONG PART GATE 34 SONG SCORE GATE 35 Speakers 21 T Tap tempo 30 Tempo 29 Toms 13 Top Panel 24 TP70S Snare pad 11, 25 Training Mode 23, 31 Trigger input jacks 24 V Voice guidance 29, 53 Voice list 62 Y Yamaha Steinberg USB Driver ....... 58 DTX402K DTX432K DTX452K Owner's Manual...


