

DGX-660 Owners Manual
Page 1
Before using the instrument, be sure to the instructions on pages 5-6. Keyboard Stand Assembly For information on assembling the keyboard stand, refer to read this manual carefully so that you can fully take advantage of the advanced and convenient functions of this Yamaha Digital Piano! Setting Up Basic Guide Reference Owner's Manual Thank you for future reference. EN Appendix We recommend that you read "PRECAUTIONS" on page 12 of the instrument. We also recommend that you keep this manual in a safe and handy place for purchasing this manual.
Before using the instrument, be sure to the instructions on pages 5-6. Keyboard Stand Assembly For information on assembling the keyboard stand, refer to read this manual carefully so that you can fully take advantage of the advanced and convenient functions of this Yamaha Digital Piano! Setting Up Basic Guide Reference Owner's Manual Thank you for future reference. EN Appendix We recommend that you read "PRECAUTIONS" on page 12 of the instrument. We also recommend that you keep this manual in a safe and handy place for purchasing this manual.
DGX-660 Owners Manual
Page 2
... may also use "household" type batteries. Note: Check with both user safe and environmentally friendly. a cart, rack, or stand that are therefore the owners responsibility. SPECIFICATIONS SUBJECT TO CHANGE: The information contained in this manual carefully and consult your area for...be rechargeable. Warning: Do not attempt to any kind. For DGX-660 SPECIAL MESSAGE SECTION This product utilizes batteries or an external power supply (adapter). If a cart, etc., is recommended by Yamaha. Some Yamaha products may be installed correctly. No other than one could ...
... may also use "household" type batteries. Note: Check with both user safe and environmentally friendly. a cart, rack, or stand that are therefore the owners responsibility. SPECIFICATIONS SUBJECT TO CHANGE: The information contained in this manual carefully and consult your area for...be rechargeable. Warning: Do not attempt to any kind. For DGX-660 SPECIAL MESSAGE SECTION This product utilizes batteries or an external power supply (adapter). If a cart, etc., is recommended by Yamaha. Some Yamaha products may be installed correctly. No other than one could ...
DGX-660 Owners Manual
Page 4
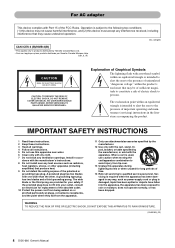
... persons. WARNING TO REDUCE THE RISK OF FIRE OR ELECTRIC SHOCK, DO NOT EXPOSE THIS APPARATUS TO RAIN OR MOISTURE. (UL60065_03) 4 DGX-660 Owner's Manual Operation is intended to alert the user to the presence of electric shock to the following two conditions: (1) this device may...not use attachments/accessories specified by the manufacturer. 12 Use only with the cart, stand, tripod, bracket, or table specified by Yamaha Canada Music Ltd. • Ceci ne s'applique qu'aux produits distribués par Yamaha Canada Musique Ltée. (can_b_01) CAUTION RISK OF ELECTRIC SHOCK DO NOT OPEN ...
... persons. WARNING TO REDUCE THE RISK OF FIRE OR ELECTRIC SHOCK, DO NOT EXPOSE THIS APPARATUS TO RAIN OR MOISTURE. (UL60065_03) 4 DGX-660 Owner's Manual Operation is intended to alert the user to the presence of electric shock to the following two conditions: (1) this device may...not use attachments/accessories specified by the manufacturer. 12 Use only with the cart, stand, tripod, bracket, or table specified by Yamaha Canada Music Ltd. • Ceci ne s'applique qu'aux produits distribués par Yamaha Canada Musique Ltée. (can_b_01) CAUTION RISK OF ELECTRIC SHOCK DO NOT OPEN ...
DGX-660 Owners Manual
Page 6
...8226; Before connecting the instrument to other objects into the gaps on the panel or keyboard. Yamaha cannot be held responsible for damage caused by yourself may damage your weight on, or place... electronic components, turn off the power switch and disconnect the plug from the wall AC outlet. 6 DGX-660 Owner's Manual DMI-5 2/2 Handling caution • Do not insert a finger or hand in any hearing...; When removing the electric plug from the wall AC outlet. • Use only the stand specified for a long period of time at their minimum levels and gradually raise the volume ...
...8226; Before connecting the instrument to other objects into the gaps on the panel or keyboard. Yamaha cannot be held responsible for damage caused by yourself may damage your weight on, or place... electronic components, turn off the power switch and disconnect the plug from the wall AC outlet. 6 DGX-660 Owner's Manual DMI-5 2/2 Handling caution • Do not insert a finger or hand in any hearing...; When removing the electric plug from the wall AC outlet. • Use only the stand specified for a long period of time at their minimum levels and gradually raise the volume ...
DGX-660 Owners Manual
Page 8
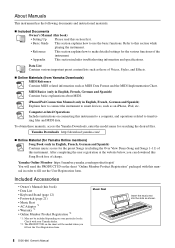
...To obtain these manuals, access the Yamaha Downloads, enter the model name for the preset Songs (excluding the Over View Demo Song and Songs 1-11) of charge. Included Accessories • Owner's Manual (this book) • Data List • Keyboard Stand (page 12) • Footswitch...out the User Registration form. Yamaha Downloads http://download.yamaha.com/ Online Material (for Yamaha Online members) Song Book (only in English, French, German and Spanish) Explains how to connect the instrument to smart devices, such as shown. 8 DGX-660 Owner's Manual iPhone/iPad ...
...To obtain these manuals, access the Yamaha Downloads, enter the model name for the preset Songs (excluding the Over View Demo Song and Songs 1-11) of charge. Included Accessories • Owner's Manual (this book) • Data List • Keyboard Stand (page 12) • Footswitch...out the User Registration form. Yamaha Downloads http://download.yamaha.com/ Online Material (for Yamaha Online members) Song Book (only in English, French, German and Spanish) Explains how to connect the instrument to smart devices, such as shown. 8 DGX-660 Owner's Manual iPhone/iPad ...
DGX-660 Owners Manual
Page 9
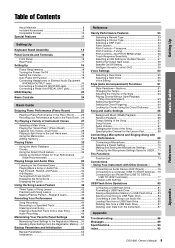
Table of Contents Setting Up Basic Guide About Manuals 8 Included Accessories 8 Compatible Format 10 Special Features 11 Setting Up Keyboard Stand Assembly 12 Panel Controls and Terminals 16 Front Panel 16 Rear Panel 17 Setting Up 18 Power Requirements 18 Turning the Power On/Off 18 ... Drive 86 Deleting files from a USB Flash Drive 87 Deleting User Data from the Instrument 87 Appendix Troubleshooting 88 Messages 89 Specifications 90 Index 92 DGX-660 Owner's Manual 9 Reference Appendix
Table of Contents Setting Up Basic Guide About Manuals 8 Included Accessories 8 Compatible Format 10 Special Features 11 Setting Up Keyboard Stand Assembly 12 Panel Controls and Terminals 16 Front Panel 16 Rear Panel 17 Setting Up 18 Power Requirements 18 Turning the Power On/Off 18 ... Drive 86 Deleting files from a USB Flash Drive 87 Deleting User Data from the Instrument 87 Appendix Troubleshooting 88 Messages 89 Specifications 90 Index 92 DGX-660 Owner's Manual 9 Reference Appendix
DGX-660 Owners Manual
Page 12
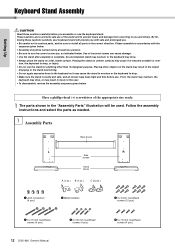
...confuse parts, and be carried out by at least two persons. • Be sure to you and others. Placing the stand on a flat, stable surface. Placing other than its designed purpose. Follow the assembly instructions and select the parts as indicated below... the correct screw size, as needed. 1 Assembly Parts Back board L R Side boards Stand bases A (1 pc.) B (1 pc.) C (2 pcs.) q Joint connectors (4 pcs.) w Metal brackets e 3 x 8 mm roundhead screws (12 pcs.) r 6 x 70 mm roundhead screws (4 pcs.) 12 DGX-660 Owner's Manual t 6 x 30 mm roundhead screws (4 pcs.) y 5 x 16 mm...
...confuse parts, and be carried out by at least two persons. • Be sure to you and others. Placing the stand on a flat, stable surface. Placing other than its designed purpose. Follow the assembly instructions and select the parts as indicated below... the correct screw size, as needed. 1 Assembly Parts Back board L R Side boards Stand bases A (1 pc.) B (1 pc.) C (2 pcs.) q Joint connectors (4 pcs.) w Metal brackets e 3 x 8 mm roundhead screws (12 pcs.) r 6 x 70 mm roundhead screws (4 pcs.) 12 DGX-660 Owner's Manual t 6 x 30 mm roundhead screws (4 pcs.) y 5 x 16 mm...
DGX-660 Owners Manual
Page 13
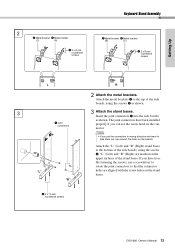
...) and "R" (Right) are aligned with the screw holes on the upper surfaces of the side boards, using the screws r. DGX-660 Owner's Manual 13 Setting Up 2 w Metal bracket w Metal bracket (C) (A) e 3 x 8 mm roundhead screws Keyboard Stand Assembly w Metal bracket w Metal bracket (B) (C) e 3 x 8 mm roundhead screws L 3 q Joint connectors "L" "R" r 6 ...can see the screw head on the boards. Insert the joint connectors q into the side boards as shown. 3 Attach the stand bases. Attach the metal brackets w to take them out, tap around the holes on the connector. If you have been ...
...) and "R" (Right) are aligned with the screw holes on the upper surfaces of the side boards, using the screws r. DGX-660 Owner's Manual 13 Setting Up 2 w Metal bracket w Metal bracket (C) (A) e 3 x 8 mm roundhead screws Keyboard Stand Assembly w Metal bracket w Metal bracket (B) (C) e 3 x 8 mm roundhead screws L 3 q Joint connectors "L" "R" r 6 ...can see the screw head on the boards. Insert the joint connectors q into the side boards as shown. 3 Attach the stand bases. Attach the metal brackets w to take them out, tap around the holes on the connector. If you have been ...
DGX-660 Owners Manual
Page 14
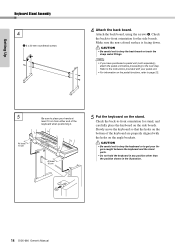
.... • Do not hold the keyboard in any position other than the position shown in the illustration. 14 DGX-660 Owner's Manual Setting Up Keyboard Stand Assembly 4 t 6 x 30 mm roundhead screws 4 Attach the back board. Attach the back board, using the screws t. CAUTION • Be careful not to drop the keyboard ... get your hands at least 10 cm from either end of the keyboard are properly aligned with your pedal unit. • For information on the stand. Check the back-to -front orientation for stand, and carefully place the keyboard on the angle brackets.
.... • Do not hold the keyboard in any position other than the position shown in the illustration. 14 DGX-660 Owner's Manual Setting Up Keyboard Stand Assembly 4 t 6 x 30 mm roundhead screws 4 Attach the back board. Attach the back board, using the screws t. CAUTION • Be careful not to drop the keyboard ... get your hands at least 10 cm from either end of the keyboard are properly aligned with your pedal unit. • For information on the stand. Check the back-to -front orientation for stand, and carefully place the keyboard on the angle brackets.
DGX-660 Owners Manual
Page 15
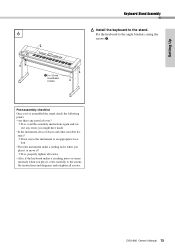
Fix the keyboard to the stand. DGX-660 Owner's Manual 15 Setting Up Keyboard Stand Assembly 6 6 Install the keyboard to the angle brackets, using the screws y. y 5 x 16 mm roundhead screws Post-assembly checklist Once you've assembled the stand, check the following points: • Are there any parts left over? If so, read the assembly...
Fix the keyboard to the stand. DGX-660 Owner's Manual 15 Setting Up Keyboard Stand Assembly 6 6 Install the keyboard to the angle brackets, using the screws y. y 5 x 16 mm roundhead screws Post-assembly checklist Once you've assembled the stand, check the following points: • Are there any parts left over? If so, read the assembly...
DGX-660 Owners Manual
Page 22
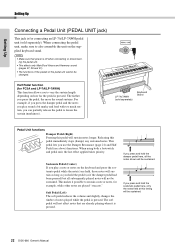
... you can partially release the pedal to sustain a note or notes, for connecting an LP-7A/LP-7AWH pedal unit (sold separately) Keyboard Stand Pedal Unit functions Damper Pedal (Right) Pressing this pedal will be changed. Half Pedal function (for FC3A and LP-7A/LP-7AWH) This ...sustain (murkiness). Soft Pedal (Left) The soft pedal reduces the volume and slightly changes the timbre of the pedal unit cannot be sustained. 22 DGX-660 Owner's Manual The soft pedal will be sustained. When using both a footswitch and pedal unit, the last effect applied takes priority. If you ...
... you can partially release the pedal to sustain a note or notes, for connecting an LP-7A/LP-7AWH pedal unit (sold separately) Keyboard Stand Pedal Unit functions Damper Pedal (Right) Pressing this pedal will be changed. Half Pedal function (for FC3A and LP-7A/LP-7AWH) This ...sustain (murkiness). Soft Pedal (Left) The soft pedal reduces the volume and slightly changes the timbre of the pedal unit cannot be sustained. 22 DGX-660 Owner's Manual The soft pedal will be sustained. When using both a footswitch and pedal unit, the last effect applied takes priority. If you ...

DGX-660 Owners Manual
Page 70
... setting provides optimum response over the entire frequency spectrum ensuring all vocals sound good. The BRIGHTER setting emphasizes higher frequencies making vocals stand out more in the mix. MIC SETTING 2 display 2 Use the CATEGORY [r] or [f] button to select the specific parameter...including those on each parameter, see next section. Only one of "STANDARD", "BRIGHTER" and "LOUDER" by rotating the dial. Reference 70 DGX-660 Owner's Manual Connecting a Microphone and Singing Along with Your Performance Selecting a Preset Setting 1 Press the [MIC SETTING] button once or ...
... setting provides optimum response over the entire frequency spectrum ensuring all vocals sound good. The BRIGHTER setting emphasizes higher frequencies making vocals stand out more in the mix. MIC SETTING 2 display 2 Use the CATEGORY [r] or [f] button to select the specific parameter...including those on each parameter, see next section. Only one of "STANDARD", "BRIGHTER" and "LOUDER" by rotating the dial. Reference 70 DGX-660 Owner's Manual Connecting a Microphone and Singing Along with Your Performance Selecting a Preset Setting 1 Press the [MIC SETTING] button once or ...
DGX-660 Owners Manual
Page 90
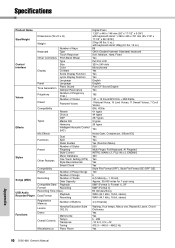
...Format Recording Recording Time (max.) Data Format Playback Recording Registration Memory Number of Buttons Lesson Yamaha Education Suite (Y.E.S.) Demo Metronome Overall Controls Tempo Transpose Tuning Miscellaneous Piano Room Digital Piano 1,397 x 445 ...x 146 mm (55" x 17-1/2" x 5-3/4") with keyboard stand: 1,399 x 445 x 761 mm (55-1/16" x 17-1/2" x 29-15/16") 21kg (46 lbs. 5 oz.) with keyboard stand: 28kg (61 lbs. 12 oz.) 88 GHS (Graded Hammer Standard...Yes 5 - 280 -12 to 0, 0 to +12 415.3 - 440.0 - 466.2 Hz Yes 90 DGX-660 Owner's Manual Appendix Voice, 10 Live!
...Format Recording Recording Time (max.) Data Format Playback Recording Registration Memory Number of Buttons Lesson Yamaha Education Suite (Y.E.S.) Demo Metronome Overall Controls Tempo Transpose Tuning Miscellaneous Piano Room Digital Piano 1,397 x 445 ...x 146 mm (55" x 17-1/2" x 5-3/4") with keyboard stand: 1,399 x 445 x 761 mm (55-1/16" x 17-1/2" x 29-15/16") 21kg (46 lbs. 5 oz.) with keyboard stand: 28kg (61 lbs. 12 oz.) 88 GHS (Graded Hammer Standard...Yes 5 - 280 -12 to 0, 0 to +12 415.3 - 440.0 - 466.2 Hz Yes 90 DGX-660 Owner's Manual Appendix Voice, 10 Live!
DGX-660 Owners Manual
Page 91
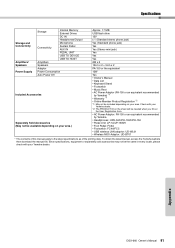
...* The contents of this manual apply to the latest specifications as of the printing date. Appendix DGX-660 Owner's Manual 91 Check with your Yamaha dealer. Specifications Storage and Connectivity Amplifiers/ Speakers Power Supply Storage Internal Memory External Drives DC IN ... PA-150 or the equivalent 13W Yes • Owner's Manual • Data List • Keyboard Stand • Footswitch • Music Rest • AC Power Adaptor (PA-150 or an equivalent recommended by Yamaha) *1 • Warranty *1 • Online Member Product Registration *2 *1: May not be included depending ...
...* The contents of this manual apply to the latest specifications as of the printing date. Appendix DGX-660 Owner's Manual 91 Check with your Yamaha dealer. Specifications Storage and Connectivity Amplifiers/ Speakers Power Supply Storage Internal Memory External Drives DC IN ... PA-150 or the equivalent 13W Yes • Owner's Manual • Data List • Keyboard Stand • Footswitch • Music Rest • AC Power Adaptor (PA-150 or an equivalent recommended by Yamaha) *1 • Warranty *1 • Online Member Product Registration *2 *1: May not be included depending ...
DGX-660 Data List
Page 22
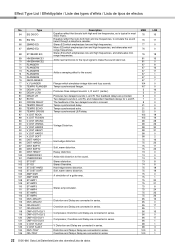
... 73 74 75 75 75 75 75 75 75 75 75 75 95 95 95 95 96 96 96 96 98 98 100 100 22 DGX-660 Data List/Datenliste/Liste des données/Lista de datos LSB 16 17 0 0 18 16 0 8 16 17 1 0 7 0 0 16 0 0 0 0 0 8 0 18 19 28 29 30 31... a guitar amp. Compressor, Distortion and Delay are connected in series. Stereo Overdrive. Equalizer effect that boosts both high and low frequencies, to make the sound stand out. Adds new harmonics to the input signal to simulate the sound heard through a telephone receiver. Produces three delayed sounds: L, R and C (center). Overdrive and Tempo...
... 73 74 75 75 75 75 75 75 75 75 75 75 95 95 95 95 96 96 96 96 98 98 100 100 22 DGX-660 Data List/Datenliste/Liste des données/Lista de datos LSB 16 17 0 0 18 16 0 8 16 17 1 0 7 0 0 16 0 0 0 0 0 8 0 18 19 28 29 30 31... a guitar amp. Compressor, Distortion and Delay are connected in series. Stereo Overdrive. Equalizer effect that boosts both high and low frequencies, to make the sound stand out. Adds new harmonics to the input signal to simulate the sound heard through a telephone receiver. Produces three delayed sounds: L, R and C (center). Overdrive and Tempo...


