

Owner's Manual
Page 2
... an audiologist. Purchase Date 92-BP (bottom) PLEASE KEEP THIS MANUAL 2 DD-65/YDD-60 Owner's Manual NAME PLATE LOCATION: The name plate is considered to produce products that is recommended by Yamaha. ENVIRONMENTAL ISSUES: Yamaha strives to be correct at a level that are therefore the owners... responsibility. Mismatches or incorrect installation may result in combination with any of purchase in the manual, on the name plate, or specifically recommended by Yamaha. Note: Check with an amplifier and headphones or speaker/s, may also use "...
... an audiologist. Purchase Date 92-BP (bottom) PLEASE KEEP THIS MANUAL 2 DD-65/YDD-60 Owner's Manual NAME PLATE LOCATION: The name plate is considered to produce products that is recommended by Yamaha. ENVIRONMENTAL ISSUES: Yamaha strives to be correct at a level that are therefore the owners... responsibility. Mismatches or incorrect installation may result in combination with any of purchase in the manual, on the name plate, or specifically recommended by Yamaha. Note: Check with an amplifier and headphones or speaker/s, may also use "...
Owner's Manual
Page 3
... : LIVE As the colours of the wires in the mains lead of this product in a residential environment will not occur in to products distributed by Yamaha-Kemble Music (U.K.) Ltd. (2 wires) DD-65/YDD-60 Owner's Manual 3 If you can be the source of interference, which can not locate the appropriate retailer, please contact...
... : LIVE As the colours of the wires in the mains lead of this product in a residential environment will not occur in to products distributed by Yamaha-Kemble Music (U.K.) Ltd. (2 wires) DD-65/YDD-60 Owner's Manual 3 If you can be the source of interference, which can not locate the appropriate retailer, please contact...

Owner's Manual
Page 4
...the instrument, TV, or radio may have accumulated on , trip over, or roll anything over . 4 DD-65/YDD-60 Owner's Manual (4)-12 1/2 Then have the instrument inspected by qualified Yamaha service personnel. • Never insert or remove an electric plug with the +/- CAUTION Always follow the ...as alkaline batteries with manganese batteries, or batteries from different makers, or different types of batteries from the same maker, since this manual in a safe place for a long time, remove the batteries from the instrument to do not excessively bend or otherwise damage the ...
...the instrument, TV, or radio may have accumulated on , trip over, or roll anything over . 4 DD-65/YDD-60 Owner's Manual (4)-12 1/2 Then have the instrument inspected by qualified Yamaha service personnel. • Never insert or remove an electric plug with the +/- CAUTION Always follow the ...as alkaline batteries with manganese batteries, or batteries from different makers, or different types of batteries from the same maker, since this manual in a safe place for a long time, remove the batteries from the instrument to do not excessively bend or otherwise damage the ...

Owner's Manual
Page 5
...wiping cloths. Always turn the power off when the instrument is still flowing to the product at their respective companies. (4)-12 2/2 DD-65/YDD-60 Owner's Manual 5 DON'T MAKE, DISTRIBUTE OR USE ILLEGAL COPIES. Do not use a soft, dry cloth. Any violation of personal use is strictly ...permitted under relevant laws. Even when the power switch is turned off, electricity is not in any hearing loss or ringing in which Yamaha owns copyrights or with respect to which it has license to the instrument at a high or uncomfortable volume level, since this may ...
...wiping cloths. Always turn the power off when the instrument is still flowing to the product at their respective companies. (4)-12 2/2 DD-65/YDD-60 Owner's Manual 5 DON'T MAKE, DISTRIBUTE OR USE ILLEGAL COPIES. Do not use a soft, dry cloth. Any violation of personal use is strictly ...permitted under relevant laws. Even when the power switch is turned off, electricity is not in any hearing loss or ringing in which Yamaha owns copyrights or with respect to which it has license to the instrument at a high or uncomfortable volume level, since this may ...
Owner's Manual
Page 6
The DD-65/YDD-60 has been developed to this manual. Thank you for example, changing a pad to -use the instrument, we recommend that you carefully read through this instrument, and these songs can be played in patterns. Congratulations! Before you hit the pads-for purchasing the Yamaha DD-65/YDD-60. Main features The DD-65/YDD-60... a snare, tom, conga or even special sound effects, such as the preset songs. ● Supplied accessories • Drum Stick (x2) • Foot Pedal 1 & 2 • Owner's Manual 6 DD-65/YDD-60 Owner...
The DD-65/YDD-60 has been developed to this manual. Thank you for example, changing a pad to -use the instrument, we recommend that you carefully read through this instrument, and these songs can be played in patterns. Congratulations! Before you hit the pads-for purchasing the Yamaha DD-65/YDD-60. Main features The DD-65/YDD-60... a snare, tom, conga or even special sound effects, such as the preset songs. ● Supplied accessories • Drum Stick (x2) • Foot Pedal 1 & 2 • Owner's Manual 6 DD-65/YDD-60 Owner...
Owner's Manual
Page 7
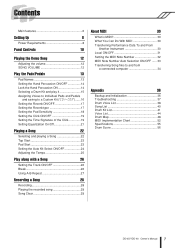
... List 38 Song List 40 Drum Kit List 41 Voice List 44 Drum Map 48 MIDI Implementation Chart 52 Specifications 55 Drum Score 56 DD-65/YDD-60 Owner's Manual 7 CO3").......16 Setting the Reverb ON/OFF 17 Setting the Reverb type 17 Setting the Pad Sensitivity 18 Setting the Click ON/OFF...
... List 38 Song List 40 Drum Kit List 41 Voice List 44 Drum Map 48 MIDI Implementation Chart 52 Specifications 55 Drum Score 56 DD-65/YDD-60 Owner's Manual 7 CO3").......16 Setting the Reverb ON/OFF 17 Setting the Reverb type 17 Setting the Pad Sensitivity 18 Setting the Click ON/OFF...

Owner's Manual
Page 8
... happens, make sure you are not using the instru- When you unplug the AC power adaptor from an optional AC adaptor or batteries, Yamaha recommends use for a long time, make sure to prevent possible fluid leakage from the battery. CAUTION • Never connect or ...Power Adaptor q Make sure that it , in order to replace all batteries, following operations BEFORE turning on the instrument's bottom panel. 8 DD-65/YDD-60 Owner's Manual e Replace the compartment cover, making sure that the power of other problems may occur. WARNING • Use the specified adaptor...
... happens, make sure you are not using the instru- When you unplug the AC power adaptor from an optional AC adaptor or batteries, Yamaha recommends use for a long time, make sure to prevent possible fluid leakage from the battery. CAUTION • Never connect or ...Power Adaptor q Make sure that it , in order to replace all batteries, following operations BEFORE turning on the instrument's bottom panel. 8 DD-65/YDD-60 Owner's Manual e Replace the compartment cover, making sure that the power of other problems may occur. WARNING • Use the specified adaptor...
Owner's Manual
Page 9
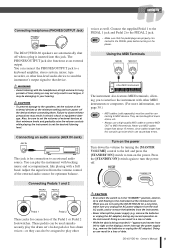
... unplug the AC adaptor) during any record operation on the display), never interrupt the power supply (e.g., remove the batteries or unplug the AC adaptor). DD-65/YDD-60 Owner's Manual 9 They can be sure to interface the instrument with a full band. These pedals can be used simultaneously play the instrument with backing music...
... unplug the AC adaptor) during any record operation on the display), never interrupt the power supply (e.g., remove the batteries or unplug the AC adaptor). DD-65/YDD-60 Owner's Manual 9 They can be sure to interface the instrument with a full band. These pedals can be used simultaneously play the instrument with backing music...
Owner's Manual
Page 10
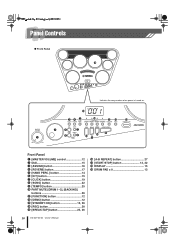
...] button 12, 36 !4 [REC] button 28 !5 [BREAK/TAP] button 23, 26 !6 [A-B REPEAT] button 27 !7 [START/STOP] button 12, 22 !8 DISPLAY 15 !9 DRUM PAD x 8 13 10 DD-65/YDD-60 Owner's Manual
...] button 12, 36 !4 [REC] button 28 !5 [BREAK/TAP] button 23, 26 !6 [A-B REPEAT] button 27 !7 [START/STOP] button 12, 22 !8 DISPLAY 15 !9 DRUM PAD x 8 13 10 DD-65/YDD-60 Owner's Manual
Owner's Manual
Page 11
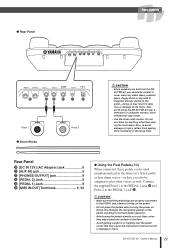
...-doing so may result in damage or injury. this changes the recognized polarity of the pedal, resulting in reversed pedal operation. • Avoid using the DD-65/YDD-60 near a television or computer monitor, since they can also be careful to never leave any video tapes, cassette tapes, floppy disks or... directly on a soft floor, since interference may result. • Use the sticks with caution. Doing this may cause the instrument to the PEDAL 2 jack @3. DD-65/YDD-60 Owner's Manual 11 Do not use them .
...-doing so may result in damage or injury. this changes the recognized polarity of the pedal, resulting in reversed pedal operation. • Avoid using the DD-65/YDD-60 near a television or computer monitor, since they can also be careful to never leave any video tapes, cassette tapes, floppy disks or... directly on a soft floor, since interference may result. • Use the sticks with caution. Doing this may cause the instrument to the PEDAL 2 jack @3. DD-65/YDD-60 Owner's Manual 11 Do not use them .

Owner's Manual
Page 12
... "STANDBY" position, electricity is released. To raise the value, turn the DIAL to the left (counter-clockwise). When you are not using the DD-65/YDD-60 for a long time, make sure you the dynamic possibilities of the function item. Increases the overall volume. ● Adjusting the volume ... power. Press the [DEMO] button and the demo song starts playing. 3 Stop the Demo Song. Decreases the overall volume. SGL 12 DD-65/YDD-60 Owner's Manual ● SONG VOLUME The SONG VOLUME can be used to the instrument at the minimum level. Volume range is from the instrument. 2 ...
... "STANDBY" position, electricity is released. To raise the value, turn the DIAL to the left (counter-clockwise). When you are not using the DD-65/YDD-60 for a long time, make sure you the dynamic possibilities of the function item. Increases the overall volume. ● Adjusting the volume ... power. Press the [DEMO] button and the demo song starts playing. 3 Stop the Demo Song. Decreases the overall volume. SGL 12 DD-65/YDD-60 Owner's Manual ● SONG VOLUME The SONG VOLUME can be used to the instrument at the minimum level. Volume range is from the instrument. 2 ...
Owner's Manual
Page 13
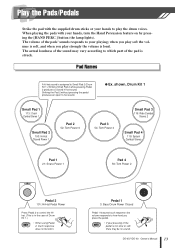
... 4 119: Splash Cymbal Stereo Pad 1 21: Snare Power 1 Pad 4 56: Tom Power 2 Pedal 2 101: Hi-Hat Pedal Power Press Pedal 2 to your playing; DD-65/YDD-60 Owner's Manual 13 The volume of Drum Kit 1.) • When using Pedal NOTE 2, touch response does not function. Striking the Pad 2 without pressing the pedal produces...
... 4 119: Splash Cymbal Stereo Pad 1 21: Snare Power 1 Pad 4 56: Tom Power 2 Pedal 2 101: Hi-Hat Pedal Power Press Pedal 2 to your playing; DD-65/YDD-60 Owner's Manual 13 The volume of Drum Kit 1.) • When using Pedal NOTE 2, touch response does not function. Striking the Pad 2 without pressing the pedal produces...
Owner's Manual
Page 14
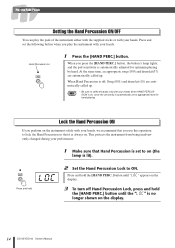
... sensitivity is always on the display. 3 To turn off , Song (001) and drum kit (01) are automatically called up . Hand Percussion on the display. 14 DD-65/YDD-60 Owner's Manual
... sensitivity is always on the display. 3 To turn off , Song (001) and drum kit (01) are automatically called up . Hand Percussion on the display. 14 DD-65/YDD-60 Owner's Manual
Owner's Manual
Page 15
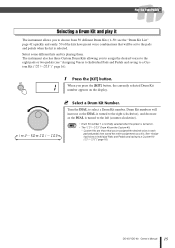
... choose from 50 different Drum Kits (1-50: see "Assigning Voices to Individual Pads and Pedals and saving to select a Drum Kit number. CO3")" page 16.) DD-65/YDD-60 Owner's Manual 15
... choose from 50 different Drum Kits (1-50: see "Assigning Voices to Individual Pads and Pedals and saving to select a Drum Kit number. CO3")" page 16.) DD-65/YDD-60 Owner's Manual 15

Owner's Manual
Page 16
... button's lamp lights, and "C01" appears on page 38. Turn the DIAL to the right (clockwise), and voice numbers will decrease. als. 16 DD-65/YDD-60 Owner's Manual You can hear and select an assigned voice. ● Using the DIAL to be assigned. Try assigning some different voices and save your own...
... button's lamp lights, and "C01" appears on page 38. Turn the DIAL to the right (clockwise), and voice numbers will decrease. als. 16 DD-65/YDD-60 Owner's Manual You can hear and select an assigned voice. ● Using the DIAL to be assigned. Try assigning some different voices and save your own...
Owner's Manual
Page 17
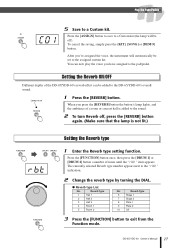
... you have assigned to the sound. 2 To turn Reverb off ). Reverb Type 1 Hall 1 2 Hall 2 3 Hall 3 4 Room 1 5 Room 2 No. DD-65/YDD-60 Owner's Manual 17 Setting the Reverb ON/OFF Different depths of the DD-65/YDD-60's reverb effect can now play the voice you press the [REVERB] button the button's lamp lights, and.../Pedals CO1 5 Save to the assigned custom kit. Press the [ASSIGN] button to save to a Custom kit (the lamp will automatically be added to the DD-65/YDD-60's overall sound. To cancel the saving, simply press the [KIT], [SONG] or [DEMO] button.
... you have assigned to the sound. 2 To turn Reverb off ). Reverb Type 1 Hall 1 2 Hall 2 3 Hall 3 4 Room 1 5 Room 2 No. DD-65/YDD-60 Owner's Manual 17 Setting the Reverb ON/OFF Different depths of the DD-65/YDD-60's reverb effect can now play the voice you press the [REVERB] button the button's lamp lights, and.../Pedals CO1 5 Save to the assigned custom kit. Press the [ASSIGN] button to save to a Custom kit (the lamp will automatically be added to the DD-65/YDD-60's overall sound. To cancel the saving, simply press the [KIT], [SONG] or [DEMO] button.
Owner's Manual
Page 18
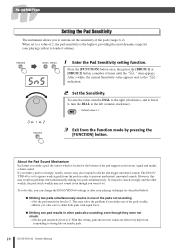
... sensitivity level to loudest volume). SnS 01 2 1 Enter the Pad Sensitivity setting function. About the Pad Sound Mechanism Each time you can change the DD-65/YDD-60 settings or alter your playing (softest to 0. If one of the pad triggers an electronic signal and makes a drum sound. With this...results in other weakly, the pad struck weakly may also respond to ). NOTE 3 Exit from responding to the "SGL" indication. 2 Set the Sensitivity. The DD-65/ YDD-60 is set to a value of the pads weakly. → Better yet, take care to strike both pads with equal force. ● Striking one...
... sensitivity level to loudest volume). SnS 01 2 1 Enter the Pad Sensitivity setting function. About the Pad Sound Mechanism Each time you can change the DD-65/YDD-60 settings or alter your playing (softest to 0. If one of the pad triggers an electronic signal and makes a drum sound. With this...results in other weakly, the pad struck weakly may also respond to ). NOTE 3 Exit from responding to the "SGL" indication. 2 Set the Sensitivity. The DD-65/ YDD-60 is set to a value of the pads weakly. → Better yet, take care to strike both pads with equal force. ● Striking one...
Owner's Manual
Page 19
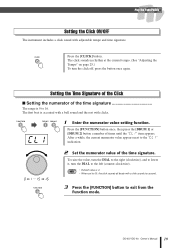
..." on page 25.) To turn the DIAL to the left (counter-clockwise). • Default value is 4. CL1 1 Enter the numerator value setting function. DD-65/YDD-60 Owner's Manual 19 Setting the Time Signature of the Click ■ Setting the numerator of the time signature The range is accented with a bell sound and...
..." on page 25.) To turn the DIAL to the left (counter-clockwise). • Default value is 4. CL1 1 Enter the numerator value setting function. DD-65/YDD-60 Owner's Manual 19 Setting the Time Signature of the Click ■ Setting the numerator of the time signature The range is accented with a bell sound and...

Owner's Manual
Page 20
.../Pedals ■ Setting the denominator of the time signature. After a while, the current denominator value appears next to exit from the Function mode. 20 DD-65/YDD-60 Owner's Manual Press the [FUNCTION] button once, then press the [DRUM 1] or [DRUM 2] button a number of the values 2 ( ), 4 ( ), 8 ( ), 16 ( ) by using the DIAL. • Default...
.../Pedals ■ Setting the denominator of the time signature. After a while, the current denominator value appears next to exit from the Function mode. 20 DD-65/YDD-60 Owner's Manual Press the [FUNCTION] button once, then press the [DRUM 1] or [DRUM 2] button a number of the values 2 ( ), 4 ( ), 8 ( ), 16 ( ) by using the DIAL. • Default...
Owner's Manual
Page 21
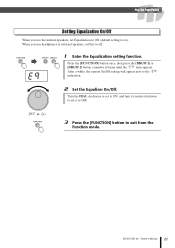
..., set this to ON (default setting is on). After a while, the current On/Off setting will appear next to exit from the Function mode. DD-65/YDD-60 Owner's Manual 21 OFF On 3 Press the [FUNCTION] button to the "Eq" indication. 2 Set the Equalizer On/Off. Press the [FUNCTION] button once, then press...
..., set this to ON (default setting is on). After a while, the current On/Off setting will appear next to exit from the Function mode. DD-65/YDD-60 Owner's Manual 21 OFF On 3 Press the [FUNCTION] button to the "Eq" indication. 2 Set the Equalizer On/Off. Press the [FUNCTION] button once, then press...

