
Owner's Manual
Page 2
...location of these graphics appears on this page and those indicated in this plate. CVP-79A CVP-69/69A CVP-59S Model Serial No Purchase Date SPECIAL MESSAGE SECTION PRODUCT SAFETY MARKINGS: Yamaha electronic products may have either labels similar to update existing units. Product performance and... on this product become damaged beyond repair, or for you do so unless specifically authorized by applicable laws. NO USER-SERVICEABLE PARTS INSIDE. We sincerely believe that are tested and approved by the manufacturer's warranty, and are located on the enclosure. See ...
...location of these graphics appears on this page and those indicated in this plate. CVP-79A CVP-69/69A CVP-59S Model Serial No Purchase Date SPECIAL MESSAGE SECTION PRODUCT SAFETY MARKINGS: Yamaha electronic products may have either labels similar to update existing units. Product performance and... on this product become damaged beyond repair, or for you do so unless specifically authorized by applicable laws. NO USER-SERVICEABLE PARTS INSIDE. We sincerely believe that are tested and approved by the manufacturer's warranty, and are located on the enclosure. See ...
Owner's Manual
Page 4
...Assignment List 121 Backed Up Parameters 122 Fingering Chart 123 MIDI Data Format 124 Specifications 135 CVP-79A: Assembly 136 CVP-69/69A: Assembly 142 CVP-59S: Assembly 150 MIDI Implementation Chart 156 1 CVP-79A/69/69A only 26 Left Pedal (Multi-function 27 Accompaniment 28 Style Selection 28...33 Auto Bass Chord (ABC) 34 Single-Finger, Fingered Chord, and Full Keyboard Accompaniment 34 Overall Accompaniment Volume Control 37 Individual Part Volume Control 38 Small ABC 39 Changing the ABC Split Point 39 Chord Assist 40 Harmony 41 One Touch Setting 44 Custom ...
...Assignment List 121 Backed Up Parameters 122 Fingering Chart 123 MIDI Data Format 124 Specifications 135 CVP-79A: Assembly 136 CVP-69/69A: Assembly 142 CVP-59S: Assembly 150 MIDI Implementation Chart 156 1 CVP-79A/69/69A only 26 Left Pedal (Multi-function 27 Accompaniment 28 Style Selection 28...33 Auto Bass Chord (ABC) 34 Single-Finger, Fingered Chord, and Full Keyboard Accompaniment 34 Overall Accompaniment Volume Control 37 Individual Part Volume Control 38 Small ABC 39 Changing the ABC Split Point 39 Chord Assist 40 Harmony 41 One Touch Setting 44 Custom ...
Owner's Manual
Page 5
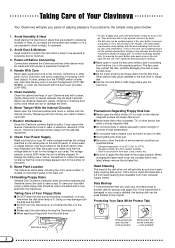
... first. If this occurs, clean the head with the dust cover provided (CVP-59S). 5. Make sure that the correct voltage appears next to protect the keyboard (CVP-79A/ 69/69A), or cover the instrument with a 3.5 inch head cleaning... disk (available from the affected equipment. 8. Dirt or dust on the bottom panel of the main unit. 10.Handling Floppy Disks Yamaha Disk... disk during recording or playback, or at any other parts of your recorded songs a blank floppy disk should be made with the internal circuitry.
... first. If this occurs, clean the head with the dust cover provided (CVP-59S). 5. Make sure that the correct voltage appears next to protect the keyboard (CVP-79A/ 69/69A), or cover the instrument with a 3.5 inch head cleaning... disk (available from the affected equipment. 8. Dirt or dust on the bottom panel of the main unit. 10.Handling Floppy Disks Yamaha Disk... disk during recording or playback, or at any other parts of your recorded songs a blank floppy disk should be made with the internal circuitry.
Owner's Manual
Page 10
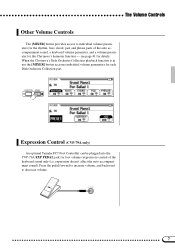
see page 41 for each Disk Orchestra Collection part. The Volume Controls Other Volume Controls The [MIXER] button provides access to decrease volume. FUNCTION MIXER Expression Control (CVP-79A only) An optional Yamaha FC7 Foot Controller can be plugged into the CVP-79A EXP PEDAL jack for foot volume (expression) control of the auto accompaniment...
see page 41 for each Disk Orchestra Collection part. The Volume Controls Other Volume Controls The [MIXER] button provides access to decrease volume. FUNCTION MIXER Expression Control (CVP-79A only) An optional Yamaha FC7 Foot Controller can be plugged into the CVP-79A EXP PEDAL jack for foot volume (expression) control of the auto accompaniment...
Owner's Manual
Page 13
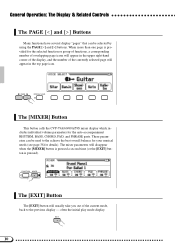
...] button is pressed a second time (or the [EXIT] button is provided for the auto-accompaniment RHYTHM, BASS, CHORD, PAD, and PHRASE parts. often the initial play mode display. General Operation: The Display & Related Controls The PAGE [] Buttons Many functions have several display "pages" that... can be selected by using the PAGE [] buttons. PAGE DISPLAY HOLD The [MIXER] Button This button calls the CVP-79A/69/69A/59S mixer display which includes individual volume parameters for the selected function or group of functions, a corresponding number of overlapping page icons...
...] button is pressed a second time (or the [EXIT] button is provided for the auto-accompaniment RHYTHM, BASS, CHORD, PAD, and PHRASE parts. often the initial play mode display. General Operation: The Display & Related Controls The PAGE [] Buttons Many functions have several display "pages" that... can be selected by using the PAGE [] buttons. PAGE DISPLAY HOLD The [MIXER] Button This button calls the CVP-79A/69/69A/59S mixer display which includes individual volume parameters for the selected function or group of functions, a corresponding number of overlapping page icons...
Owner's Manual
Page 26
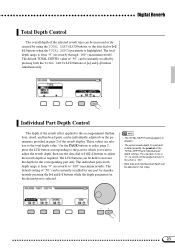
...both the TOTAL DEPTH LCD buttons or [+] and [-] buttons simultaneously. Digital Reverb Total Depth Control The overall depth of the TOTAL DEPTH and individual part depth settings. The total depth range is from "0" (no reverb) through "100" (maximum reverb). Use the PAGE buttons to select page 2,...TOTAL DEPTH LCD buttons, or the data dial or [+]/ [-] buttons when the TOTAL DEPTH parameter is "100". • Both total and individual part depth can be adjusted in page 2 of "50" can be instantly recalled by simultaneously pressing the [+] and [-] buttons while the depth parameter ...
...both the TOTAL DEPTH LCD buttons or [+] and [-] buttons simultaneously. Digital Reverb Total Depth Control The overall depth of the TOTAL DEPTH and individual part depth settings. The total depth range is from "0" (no reverb) through "100" (maximum reverb). Use the PAGE buttons to select page 2,...TOTAL DEPTH LCD buttons, or the data dial or [+]/ [-] buttons when the TOTAL DEPTH parameter is "100". • Both total and individual part depth can be adjusted in page 2 of "50" can be instantly recalled by simultaneously pressing the [+] and [-] buttons while the depth parameter ...

Owner's Manual
Page 41
... second time (or the [EXIT] button is used for details on the Harmony function. Auto Bass Chord (ABC Individual Part Volume Control The CVP-79A/69/69A/59S has five accompaniment parts - RHYTHM, BASS, CHORD, PAD, and PHRASE. - acoustic bass, synth bass, tuba, etc. The mixer parameters ...will change to KBD part volume. 38 This part plays long chords where necessary, using sustained instruments such as follows: ...
... second time (or the [EXIT] button is used for details on the Harmony function. Auto Bass Chord (ABC Individual Part Volume Control The CVP-79A/69/69A/59S has five accompaniment parts - RHYTHM, BASS, CHORD, PAD, and PHRASE. - acoustic bass, synth bass, tuba, etc. The mixer parameters ...will change to KBD part volume. 38 This part plays long chords where necessary, using sustained instruments such as follows: ...
Owner's Manual
Page 42
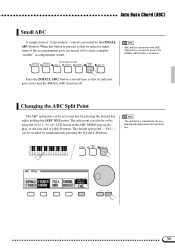
... the [+] and [-] buttons. • The split point is provided by the [SMALL ABC] button. Auto Bass Chord (ABC) Small ABC A simple form of the accompaniment parts are turned off to turn the SMALL ABC function off , even if the [SMALL ABC] button is turned off .
... the [+] and [-] buttons. • The split point is provided by the [SMALL ABC] button. Auto Bass Chord (ABC) Small ABC A simple form of the accompaniment parts are turned off to turn the SMALL ABC function off , even if the [SMALL ABC] button is turned off .
Owner's Manual
Page 45
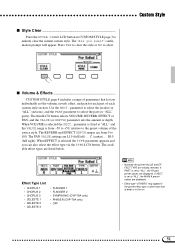
...-up display is off, but only octaves will be produced. Harmony Type List • Duet • Tremolo Oct • Trio • Strumming • 4 Part • Trio Delay • 4 Part Jazz • Vibes & J.Gtr • Country • Add Trp & Sax • Octave • Backing Vocal • Tremolo • Add Strings • Tremolo Duet...
...-up display is off, but only octaves will be produced. Harmony Type List • Duet • Tremolo Oct • Trio • Strumming • 4 Part • Trio Delay • 4 Part Jazz • Vibes & J.Gtr • Country • Add Trp & Sax • Octave • Backing Vocal • Tremolo • Add Strings • Tremolo Duet...
Owner's Manual
Page 49
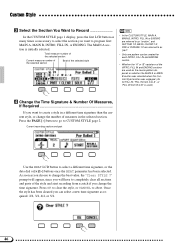
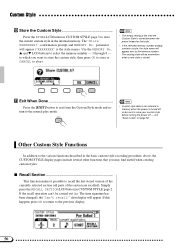
..."section", and RHYTHM 1/2, BASS, CHORD 1/2, PAD or PHRASE 1/2 are used as you change the beat value, the "Clear STYLE ?" Current recording section and part Use the BEAT LCD button to abort. As soon as the source pattern depends on whether the MAIN A or MAIN B section was selected when the...from B to B" is initially selected. prompt will appear, since you will have to completely clear all sections and parts of the INTRO, FILL IN and ENDING sections are referred to as "part". • Only one pattern can select a new time signature as necessary to select the section you want to...
..."section", and RHYTHM 1/2, BASS, CHORD 1/2, PAD or PHRASE 1/2 are used as you change the beat value, the "Clear STYLE ?" Current recording section and part Use the BEAT LCD button to abort. As soon as the source pattern depends on whether the MAIN A or MAIN B section was selected when the...from B to B" is initially selected. prompt will appear, since you will have to completely clear all sections and parts of the INTRO, FILL IN and ENDING sections are referred to as "part". • Only one pattern can select a new time signature as necessary to select the section you want to...
Owner's Manual
Page 50
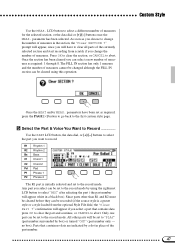
... IN section can select a new number of measures in the section, the "Clear SECTION ?" Once the section has been cleared you choose to clear all parts of the currently selected section and start recording from scratch if you change the number of measures as required: 1 through 8. Once the BEAT and/or...
... IN section can select a new number of measures in the section, the "Clear SECTION ?" Once the section has been cleared you choose to clear all parts of the currently selected section and start recording from scratch if you change the number of measures as required: 1 through 8. Once the BEAT and/or...
Owner's Manual
Page 51
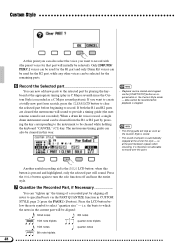
... as a C Major seventh pattern). Another useful recording aid is the SOLO LCD button: when this button is pressed and highlighted, only the selected part will sound to provide a timing guide (the metronome sound is automatically stopped at the end of the style - If both the R1 and R2...recording. i.e. at the appropriate timing (play in CUSTOM STYLE page 2 (press the PAGE [>] button). Only [DRUMS/ PERC.] voices can be used for the R1 part and only Drum Kit voices can be used , a single drum instrument sound can be cleared from scratch, press the CLEAR LCD button to clear the...
... as a C Major seventh pattern). Another useful recording aid is the SOLO LCD button: when this button is pressed and highlighted, only the selected part will sound to provide a timing guide (the metronome sound is automatically stopped at the end of the style - If both the R1 and R2...recording. i.e. at the appropriate timing (play in CUSTOM STYLE page 2 (press the PAGE [>] button). Only [DRUMS/ PERC.] voices can be used for the R1 part and only Drum Kit voices can be used , a single drum instrument sound can be cleared from scratch, press the CLEAR LCD button to clear the...
Owner's Manual
Page 52
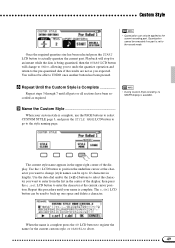
... expected. Name the Custom Style When your name is being quantized, then the START LCD button will change (style names can be executed if no part is complete, use the PAGE buttons to select CUSTOM STYLE page 3, and press the STYLE NAME LCD button to go to the style naming page... the center of the display. The c.del LCD button can be applied to the current recording part. Once the required quantize size has been selected press the START LCD button to actually quantize the current part. The current style name appears in the upper right corner of the display, then press the...
... expected. Name the Custom Style When your name is being quantized, then the START LCD button will change (style names can be executed if no part is complete, use the PAGE buttons to select CUSTOM STYLE page 3, and press the STYLE NAME LCD button to go to the style naming page... the center of the display. The c.del LCD button can be applied to the current recording part. Once the required quantize size has been selected press the START LCD button to actually quantize the current part. The current style name appears in the upper right corner of the display, then press the...
Owner's Manual
Page 53
... style before turning the power off - If this happens press OK to return to recall the last-stored version of the currently selected section (all parts of the section are recalled). s Recall Section ...This function makes it possible to the previous display. 50 If the recall operation can't be sure to...
... style before turning the power off - If this happens press OK to return to recall the last-stored version of the currently selected section (all parts of the section are recalled). s Recall Section ...This function makes it possible to the previous display. 50 If the recall operation can't be sure to...
Owner's Manual
Page 54
... sets the amount or depth. parameter is fixed at "ALL" and the VALUE range is in CUSTOM STYLE page 3 to select the part (or "ALL" parts). The REVERB and EFFECT DEPTH ranges are initially selected. C (center) ... When EFFECT is selected the SECT. The "Are you can...; CHORUS 1 • CHORUS 2 • CHORUS 3 • CELESTE 1 • CELESTE 2 • CELESTE 3 • FLANGER 1 • FLANGER 2 • SYMPHONIC (CVP-79A only) • PHASER (CVP-79A only) • OFF • Normally the preset VALUE and EFFECT TYPE are from -50 to +50, relative to 100. R10 (full right...
... sets the amount or depth. parameter is fixed at "ALL" and the VALUE range is in CUSTOM STYLE page 3 to select the part (or "ALL" parts). The REVERB and EFFECT DEPTH ranges are initially selected. C (center) ... When EFFECT is selected the SECT. The "Are you can...; CHORUS 1 • CHORUS 2 • CHORUS 3 • CELESTE 1 • CELESTE 2 • CELESTE 3 • FLANGER 1 • FLANGER 2 • SYMPHONIC (CVP-79A only) • PHASER (CVP-79A only) • OFF • Normally the preset VALUE and EFFECT TYPE are from -50 to +50, relative to 100. R10 (full right...
Owner's Manual
Page 56
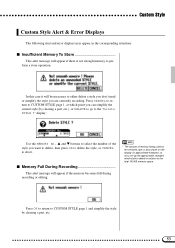
... necessary to set up the approximate standard which point you can simplify the current style (by clearing a part, etc. 53 Press OK to return to CUSTOM STYLE page 1 and simplify the style by clearing a part, etc.), or DELETE to go to perform a store operation. In this case it will appear if there...
... necessary to set up the approximate standard which point you can simplify the current style (by clearing a part, etc. 53 Press OK to return to CUSTOM STYLE page 1 and simplify the style by clearing a part, etc.), or DELETE to go to perform a store operation. In this case it will appear if there...

Owner's Manual
Page 64
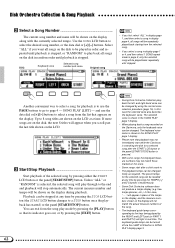
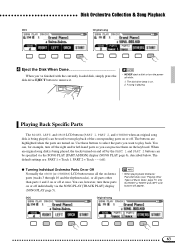
With Disk Orchestra Collection ("DOC") disks the Clavinova will appear depending on optional Yamaha Disk Orchestra Collection disks (one is not engaged, press the [PLAY] button ...disk is not transmitted via the MIDI OUT connector. Insert a disk containing songs you to practice various parts of Music Data" section on page 71. • Playback data is inserted in ensemble" with the ...DISPLAY HOLD EXIT -+ PLAY SONG RECORD GUIDE SONG CONTROL REW FF PAUSE PIANO E. The CVP-79A/69/69A/59S also shows you 've recorded yourself using the song recorder function described in the next ...
With Disk Orchestra Collection ("DOC") disks the Clavinova will appear depending on optional Yamaha Disk Orchestra Collection disks (one is not engaged, press the [PLAY] button ...disk is not transmitted via the MIDI OUT connector. Insert a disk containing songs you to practice various parts of Music Data" section on page 71. • Playback data is inserted in ensemble" with the ...DISPLAY HOLD EXIT -+ PLAY SONG RECORD GUIDE SONG CONTROL REW FF PAUSE PIANO E. The CVP-79A/69/69A/59S also shows you 've recorded yourself using the song recorder function described in the next ...
Owner's Manual
Page 65
... selected song will be shown on the display will not match the actual measure numbers of the selected song by the RIGHT and LEFT part (or PART 1 and PART 2) will stop automatically. CStart/Stop Playback Start playback of the song. • The keyboard guide lamps corresponding to be repeatedly played back starting from...
... selected song will be shown on the display will not match the actual measure numbers of the selected song by the RIGHT and LEFT part (or PART 1 and PART 2) will stop automatically. CStart/Stop Playback Start playback of the song. • The keyboard guide lamps corresponding to be repeatedly played back starting from...
Owner's Manual
Page 66
...played) can practice them on . 2. You can be used to remove it. • NEVER eject a disk or turn the power off by the PART 1 and PART 2 buttons can , however, turn off at once. A song is on the keyboard. When an original song disk is being played, the tracks turned... default settings are turned on and off while: 1. The disk drive lamp is playing. You can, for example, turn these buttons to select the parts you can be specified via the SONG PLAY [TRACK PLAY] display (SONG PLAY page 5). • When playing back Disklavier PianoSoft disks (see "Playing...
...played) can practice them on . 2. You can be used to remove it. • NEVER eject a disk or turn the power off by the PART 1 and PART 2 buttons can , however, turn off at once. A song is on the keyboard. When an original song disk is being played, the tracks turned... default settings are turned on and off while: 1. The disk drive lamp is playing. You can, for example, turn these buttons to select the parts you can be specified via the SONG PLAY [TRACK PLAY] display (SONG PLAY page 5). • When playing back Disklavier PianoSoft disks (see "Playing...
Owner's Manual
Page 68
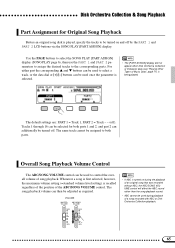
...however, the maximum volume setting (=standard volume level setting) is turned on and off by the PART 1 and PART 2 LCD buttons via the SONG PLAY [PART ASSIGN] display. The default settings are: PART 1 = Track 1, PART 2 = Track - - (off . Overall Song Playback Volume Control The ABC/SONG VOLUME control... sound rather than the song playback sound. • ABC cannot be turned off ). Disk Orchestra Collection & Song Playback Part Assignment for both parts. Tracks 1 through 16 can additionally be used during playback of the ABC/SONG VOLUME control. The song playback volume can...
...however, the maximum volume setting (=standard volume level setting) is turned on and off by the PART 1 and PART 2 LCD buttons via the SONG PLAY [PART ASSIGN] display. The default settings are: PART 1 = Track 1, PART 2 = Track - - (off . Overall Song Playback Volume Control The ABC/SONG VOLUME control... sound rather than the song playback sound. • ABC cannot be turned off ). Disk Orchestra Collection & Song Playback Part Assignment for both parts. Tracks 1 through 16 can additionally be used during playback of the ABC/SONG VOLUME control. The song playback volume can...

