Installation Guide
Page 3
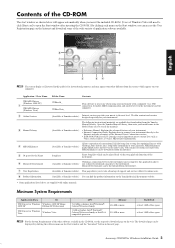
...3 MB of free space n For the System Requirements of the other software available in the Model Name area to search the manuals. • Reference Manual: Explains the advanced features of your instrument. • Internet Connection Guide: Explains how to connect your instrument directly to the ... available for use with a computer via the song playback function of the instrument. The download page can be downloaded from the Yamaha Manual Library. It enables MIDI communication and control between the instrument and a computer, this guide is necessary when using your computer....
...3 MB of free space n For the System Requirements of the other software available in the Model Name area to search the manuals. • Reference Manual: Explains the advanced features of your instrument. • Internet Connection Guide: Explains how to connect your instrument directly to the ... available for use with a computer via the song playback function of the instrument. The download page can be downloaded from the Yamaha Manual Library. It enables MIDI communication and control between the instrument and a computer, this guide is necessary when using your computer....
Owner's Manual
Page 10
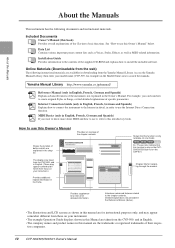
... how to the chapter contents. Yamaha Manual Library http://www.yamaha.co.jp/manual/ Reference Manual (only in English, French, German and Spanish) Explains advanced features of specific parameters. CVP-509 CVP-505 CVP-503 CVP-501 Shows that this function is only on the CVP509/505/503 but not on one model. CVP-509 CVP-505 CVP-503 CVP-501 Ex.: These icons indicate...
... how to the chapter contents. Yamaha Manual Library http://www.yamaha.co.jp/manual/ Reference Manual (only in English, French, German and Spanish) Explains advanced features of specific parameters. CVP-509 CVP-505 CVP-503 CVP-501 Shows that this function is only on the CVP509/505/503 but not on one model. CVP-509 CVP-505 CVP-503 CVP-501 Ex.: These icons indicate...

Owner's Manual
Page 12
...For connecting a USB storage device. 2 [MASTER VOLUME] control Page 15 Adjusts the overall volume. 3 MIC [SIGNAL]/[OVER] lamps (CVP-509/505/503 Page 102 These indicate the input level of the connected microphone. 4 [DEMO] button Page 18 Plays the Demos. 5 ... allows you to record your performance to the USB storage device in audio format. % [FUNCTION] button (See Reference Manual on website.) Lets you make some advanced settings and create your original Styles and Songs. ^ PART ON/OFF... instruments assigned to each key when the Standard Kit 1 is selected. 12 CVP-509/505/503/501 Owner's Manual
...For connecting a USB storage device. 2 [MASTER VOLUME] control Page 15 Adjusts the overall volume. 3 MIC [SIGNAL]/[OVER] lamps (CVP-509/505/503 Page 102 These indicate the input level of the connected microphone. 4 [DEMO] button Page 18 Plays the Demos. 5 ... allows you to record your performance to the USB storage device in audio format. % [FUNCTION] button (See Reference Manual on website.) Lets you make some advanced settings and create your original Styles and Songs. ^ PART ON/OFF... instruments assigned to each key when the Standard Kit 1 is selected. 12 CVP-509/505/503/501 Owner's Manual

Owner's Manual
Page 25
Starting Up CVP-509/505/503/501 Owner's Manual 25 8 TEMPO/BAR/BEAT Displays the current position (tempo/bar/beat) in Style playback or Song playback. 9 USB Audio information (CVP-509/505/503) Displays information for the selected audio file (file name, time, etc.) While recording, a "REC" indication appears. ) Registration Sequence Appears when the Registration Sequence (page 82) is active. NOTE For detailed information about the Registration Sequence, refer to the Reference manual on the website.
Starting Up CVP-509/505/503/501 Owner's Manual 25 8 TEMPO/BAR/BEAT Displays the current position (tempo/bar/beat) in Style playback or Song playback. 9 USB Audio information (CVP-509/505/503) Displays information for the selected audio file (file name, time, etc.) While recording, a "REC" indication appears. ) Registration Sequence Appears when the Registration Sequence (page 82) is active. NOTE For detailed information about the Registration Sequence, refer to the Reference manual on the website.

Owner's Manual
Page 29
... the C7 key (right-most key on the keyboard), turn the power on page 106. For maximum data security Yamaha recommends that you want to the Reference Manual on the website. CAUTION Move the Protected Songs which are not moved, the operation deletes the data. This restores ... the Copy and Paste operation from the File Selection display (page 70). NOTE Completing the backup/restore operation may take a few minutes. CVP-509/505/503/501 Owner's Manual 29 Data Backup This procedure backs up the operation display: [FUNCTION] → [J] UTILITY → TAB [E][F] SYSTEM RESET. NOTE To...
... the C7 key (right-most key on the keyboard), turn the power on page 106. For maximum data security Yamaha recommends that you want to the Reference Manual on the website. CAUTION Move the Protected Songs which are not moved, the operation deletes the data. This restores ... the Copy and Paste operation from the File Selection display (page 70). NOTE Completing the backup/restore operation may take a few minutes. CVP-509/505/503/501 Owner's Manual 29 Data Backup This procedure backs up the operation display: [FUNCTION] → [J] UTILITY → TAB [E][F] SYSTEM RESET. NOTE To...
Owner's Manual
Page 32
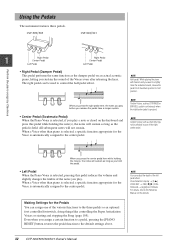
... the timbre of the right/ center pedal. NOTE Certain Voices such as the damper pedal on the website. 32 CVP-509/505/503/501 Owner's Manual CVP-509/505 1 CVP-503/501 Perform the piano songs by use of the notes you want to slightly mute the sustained sound, release .... All subsequent notes will sustain as long as [STRINGS] or [BRASS], sustain continuously when the right/center pedal is automatically assigned to the Reference Manual on an actual acoustic piano, letting you assign a certain function to a pedal, pressing the [PIANO RESET] button restores the pedal function to...
... the timbre of the right/ center pedal. NOTE Certain Voices such as the damper pedal on the website. 32 CVP-509/505/503/501 Owner's Manual CVP-509/505 1 CVP-503/501 Perform the piano songs by use of the notes you want to slightly mute the sustained sound, release .... All subsequent notes will sustain as long as [STRINGS] or [BRASS], sustain continuously when the right/center pedal is automatically assigned to the Reference Manual on an actual acoustic piano, letting you assign a certain function to a pedal, pressing the [PIANO RESET] button restores the pedal function to...
Owner's Manual
Page 33
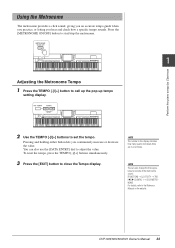
... start/stop the metronome. 1 Adjusting the Metronome Tempo 1 Press the TEMPO [-]/[+] button to the Reference Manual on the website. Pressing and holding either button lets you hear and check how a specific tempo sounds. CVP-509/505/503/501 Owner's Manual 33 NOTE You can also use the [DATA ENTRY] dial to adjust the value...
... start/stop the metronome. 1 Adjusting the Metronome Tempo 1 Press the TEMPO [-]/[+] button to the Reference Manual on the website. Pressing and holding either button lets you hear and check how a specific tempo sounds. CVP-509/505/503/501 Owner's Manual 33 NOTE You can also use the [DATA ENTRY] dial to adjust the value...
Owner's Manual
Page 38
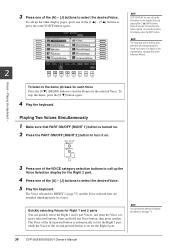
... second pressed button is turned on. 2 Press the PART ON/OFF [RIGHT 2] button to turn it on the characteristics, see page 40 and the Reference Manual. Playing Two Voices Simultaneously 1 Make sure that PART ON/OFF [RIGHT 1] button is set for the selected Voice by pressing the [7 ▲] (INFO...button. (Some Voices do not have the information display.) To close the information display, press the [EXIT] button. See page 79. 38 CVP-509/505/503/501 Owner's Manual NOTE (CVP-509/505) You can call up the information for the Right 2 part. To stop the demo, press the [8 ▼] button again. 4 ...
... second pressed button is turned on. 2 Press the PART ON/OFF [RIGHT 2] button to turn it on the characteristics, see page 40 and the Reference Manual. Playing Two Voices Simultaneously 1 Make sure that PART ON/OFF [RIGHT 1] button is set for the selected Voice by pressing the [7 ▲] (INFO...button. (Some Voices do not have the information display.) To close the information display, press the [EXIT] button. See page 79. 38 CVP-509/505/503/501 Owner's Manual NOTE (CVP-509/505) You can call up the information for the Right 2 part. To stop the demo, press the [8 ▼] button again. 4 ...
Owner's Manual
Page 39
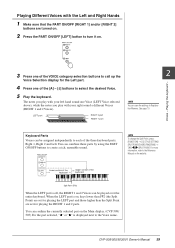
...2 part RIGHT 1 part Keyboard Parts Voices can be assigned independently to each of the three keyboard parts: Right 1, Right 2 and Left. CVP-509/505/503/501 Owner's Manual 39 Playing the keyboard - 3 Press one of the [A] - [J] buttons to select the desired Voice. 5 Play the keyboard. Playing Different...the LEFT part and those higher than the Split Point are turned on. 2 Press the PART ON/OFF [LEFT] button to the Reference Manual on . Lower section of the keyboard Upper section of the keyboard Split Point (F#2) When the LEFT part is displayed next to Registration ...
...2 part RIGHT 1 part Keyboard Parts Voices can be assigned independently to each of the three keyboard parts: Right 1, Right 2 and Left. CVP-509/505/503/501 Owner's Manual 39 Playing the keyboard - 3 Press one of the [A] - [J] buttons to select the desired Voice. 5 Play the keyboard. Playing Different...the LEFT part and those higher than the Split Point are turned on. 2 Press the PART ON/OFF [LEFT] button to the Reference Manual on . Lower section of the keyboard Upper section of the keyboard Split Point (F#2) When the LEFT part is displayed next to Registration ...
Owner's Manual
Page 42
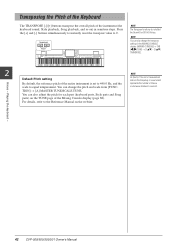
... instrument is set to 440.0 Hz, and the scale to the Reference Manual on ) in semitone steps. For details, refer to equal temperament. You can also change the pitch and scale from [FUNC- Voices - Playing the keyboard - 42 CVP-509/505/503/501 Owner's Manual You can change the transpose settings in the MIXING CONSOLE display...
... instrument is set to 440.0 Hz, and the scale to the Reference Manual on ) in semitone steps. For details, refer to equal temperament. You can also change the pitch and scale from [FUNC- Voices - Playing the keyboard - 42 CVP-509/505/503/501 Owner's Manual You can change the transpose settings in the MIXING CONSOLE display...

Owner's Manual
Page 45
... a variety of effects. use this is played monophonically (only one note at a time) or poly- ECHO effects are applied to the Reference Manual on the harmony/echo type, harmony will be held even when the keys are held continuously, while decay-type Voices such as piano decay ... your left hand. DSP changes rently selected keyboard part. • The DSP Variation switch is a function that creates a Voices - CVP-509/505/503/501 Owner's Manual 45 tal Signal Processor) effect on the selected Voice) by playing legato. less of the chord played with your music smooth transition in...
... a variety of effects. use this is played monophonically (only one note at a time) or poly- ECHO effects are applied to the Reference Manual on the harmony/echo type, harmony will be held even when the keys are held continuously, while decay-type Voices such as piano decay ... your left hand. DSP changes rently selected keyboard part. • The DSP Variation switch is a function that creates a Voices - CVP-509/505/503/501 Owner's Manual 45 tal Signal Processor) effect on the selected Voice) by playing legato. less of the chord played with your music smooth transition in...

Owner's Manual
Page 46
ROTARY SP SPEED Alternately switches between these two footages. NOTE About the VOLUME/ATTACK Page and EFFECT/EQ Page, see the Reference Manual on (page 44). The footage settings determine the basic sound of the Organ Flute Voices for selecting a preset Organ Flutes Voice. Pressing ...the Organ Flutes (DSP TYPE parameter in the EFFECT/EQ Page), and the DSP is turned on the website. 46 CVP-509/505/503/501 Owner's Manual NOTE The term "footage" is a reference to the sound generation of the flute footages. 1 Press the [ORGAN FLUTES] button. Creating Your Original Organ...
ROTARY SP SPEED Alternately switches between these two footages. NOTE About the VOLUME/ATTACK Page and EFFECT/EQ Page, see the Reference Manual on (page 44). The footage settings determine the basic sound of the Organ Flute Voices for selecting a preset Organ Flutes Voice. Pressing ...the Organ Flutes (DSP TYPE parameter in the EFFECT/EQ Page), and the DSP is turned on the website. 46 CVP-509/505/503/501 Owner's Manual NOTE The term "footage" is a reference to the sound generation of the flute footages. 1 Press the [ORGAN FLUTES] button. Creating Your Original Organ...
Owner's Manual
Page 47
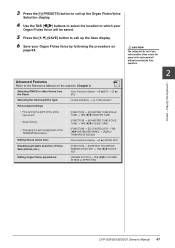
... Organ Flutes parameters: [FUNCTION] → [E] REGIST SEQUENCE/ FREEZE/VOICE SET → TAB [E][F] VOICE SET [ORGAN FLUTES] → TAB [E][F] VOLUME/ ATTACK or EFFECT/EQ CVP-509/505/503/501 Owner's Manual 47 3 Press the [I] (PRESETS) button to call up the Save display. 6 Save your Organ Flutes Voice will be saved. 5 Press the [6 ▼] (SAVE... TAB [E][F] buttons to select the location to which your Organ Flutes Voice by following the procedure on the website, Chapter 2. Playing the keyboard - Advanced Features Refer to the Reference Manual on page 68.
... Organ Flutes parameters: [FUNCTION] → [E] REGIST SEQUENCE/ FREEZE/VOICE SET → TAB [E][F] VOICE SET [ORGAN FLUTES] → TAB [E][F] VOLUME/ ATTACK or EFFECT/EQ CVP-509/505/503/501 Owner's Manual 47 3 Press the [I] (PRESETS) button to call up the Save display. 6 Save your Organ Flutes Voice will be saved. 5 Press the [6 ▼] (SAVE... TAB [E][F] buttons to select the location to which your Organ Flutes Voice by following the procedure on the website, Chapter 2. Playing the keyboard - Advanced Features Refer to the Reference Manual on page 68.
Owner's Manual
Page 51
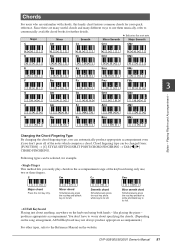
... on the song arrangement, AI Full Keyboard may not always produce appropriate accompaniment.) For other types, refer to its left. • AI Full Keyboard Playing just about anything, anywhere on the website. CVP-509/505/503/501 Owner's Manual 51 Chord fingering type can be changed from: [FUNCTION] → [C] STYLE SETTING/SPLIT POINT...
... on the song arrangement, AI Full Keyboard may not always produce appropriate accompaniment.) For other types, refer to its left. • AI Full Keyboard Playing just about anything, anywhere on the website. CVP-509/505/503/501 Owner's Manual 51 Chord fingering type can be changed from: [FUNCTION] → [C] STYLE SETTING/SPLIT POINT...

Owner's Manual
Page 55
...B, C and D correspond to try out other setups. Automatically changing One Touch Settings with your own One Touch Setting setups. D). Refer to the Reference Manual on ACMP and SYNC START, so that match the current Style, it also automatically turns on the website. Not only does this ...one of a single button. Each Style has four One Touch Setting setups. For details, refer to the Reference Manual on . NOTE You can immediately start playing the Style. 3 Styles - CVP-509/505/503/501 Owner's Manual 55 Playing Rhythm and Accompaniment - 3 As soon as you play a chord with the Main...
...B, C and D correspond to try out other setups. Automatically changing One Touch Settings with your own One Touch Setting setups. D). Refer to the Reference Manual on ACMP and SYNC START, so that match the current Style, it also automatically turns on the website. Not only does this ...one of a single button. Each Style has four One Touch Setting setups. For details, refer to the Reference Manual on . NOTE You can immediately start playing the Style. 3 Styles - CVP-509/505/503/501 Owner's Manual 55 Playing Rhythm and Accompaniment - 3 As soon as you play a chord with the Main...
Owner's Manual
Page 58
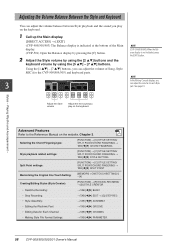
... the [2 ▲▼] buttons and the keyboard volume by pressing the [C] button. See page 91. Playing Rhythm and Accompaniment - Advanced Features Refer to the Reference Manual on the keyboard Styles - NOTE (CVP-509/505/503) When the Balance display is indicated at the bottom of Song, Style, MIC (for Each Channel: → TAB [E][F] CHANNEL •...
... the [2 ▲▼] buttons and the keyboard volume by pressing the [C] button. See page 91. Playing Rhythm and Accompaniment - Advanced Features Refer to the Reference Manual on the keyboard Styles - NOTE (CVP-509/505/503) When the Balance display is indicated at the bottom of Song, Style, MIC (for Each Channel: → TAB [E][F] CHANNEL •...

Owner's Manual
Page 62
...Song (steps 1 - 4 on page 59). 2 Press the [SCORE] button to the Reference manual on the Song data. NOTE The instrument can display the music notation of the selected Song. For details, refer to call up the Score display. Displaying Music Notation (Score) You can view the music ...displayed notation style by using the [1 ▲▼] - [8 ▲▼] buttons. Playing, Practice and Recording Songs - 62 CVP-509/505/503/501 Owner's Manual We suggest that you read through the music notation before starting playback, the "ball" bounces along through the entire notation by using...
...Song (steps 1 - 4 on page 59). 2 Press the [SCORE] button to the Reference manual on the Song data. NOTE The instrument can display the music notation of the selected Song. For details, refer to call up the Score display. Displaying Music Notation (Score) You can view the music ...displayed notation style by using the [1 ▲▼] - [8 ▲▼] buttons. Playing, Practice and Recording Songs - 62 CVP-509/505/503/501 Owner's Manual We suggest that you read through the music notation before starting playback, the "ball" bounces along through the entire notation by using...

Owner's Manual
Page 63
... display. NOTE (CVP-509/505) The Lyrics (text) can be displayed on the display. CVP-509/505/503/501 Owner's Manual 63 When the Song data contains lyrics data, the lyrics are shown on the external monitor. For more information about the Lyrics/Text display, refer to the Lyrics ...display, press the [1 ▲▼] (LYRICS) button again. CVP-509/505/503 CVP-501 4 Songs - To return to the Reference manual on the website. You can look through the entire lyrics by loading the...
... display. NOTE (CVP-509/505) The Lyrics (text) can be displayed on the display. CVP-509/505/503/501 Owner's Manual 63 When the Song data contains lyrics data, the lyrics are shown on the external monitor. For more information about the Lyrics/Text display, refer to the Lyrics ...display, press the [1 ▲▼] (LYRICS) button again. CVP-509/505/503 CVP-501 4 Songs - To return to the Reference manual on the website. You can look through the entire lyrics by loading the...

Owner's Manual
Page 65
...the repeat range while Songs are additional functions in (to help guide you want to repeat from Point A to the Reference Manual on and playback the desired Song. CVP-509/505/503/501 Owner's Manual 65 Playing, Practice and Recording Songs - 1 Select a Song (steps 1 - 4 on page 59). 2 ... advance to the Point B location. 4. This is useful for Karaoke. [FUNCTION] → [B] SONG SETTING → [A]/[B] GUIDE MODE For more information, refer to Point B is played back repeatedly. Top of the song A B End of Measures and Playing them Back Repeatedly (A-B Repeat) Songs - Press the [FF...
...the repeat range while Songs are additional functions in (to help guide you want to repeat from Point A to the Reference Manual on and playback the desired Song. CVP-509/505/503/501 Owner's Manual 65 Playing, Practice and Recording Songs - 1 Select a Song (steps 1 - 4 on page 59). 2 ... advance to the Point B location. 4. This is useful for Karaoke. [FUNCTION] → [B] SONG SETTING → [A]/[B] GUIDE MODE For more information, refer to Point B is played back repeatedly. Top of the song A B End of Measures and Playing them Back Repeatedly (A-B Repeat) Songs - Press the [FF...
Owner's Manual
Page 72
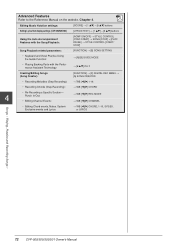
Playing, Practice and Recording Songs - 72 CVP-509/505/503/501 Owner's Manual Advanced Features Refer to the Reference Manual on the website, Chapter 4. Creating/Editing Songs (Song Creator): [FUNCTION] → [F] DIGITAL REC MENU → [A] SONG CREATOR •... CHORD, 1-16, SYS/EX. Editing Music Notation settings: [SCORE] → [1 ▲▼] - [8 ▲▼] buttons Editing Lyrics/Text display settings (CVP-509/505/503): [LYRICS/TEXT] → [1 ▲▼] - [8 ▲▼] buttons Using the Auto Accompaniment Features with the Song Playback: [ACMP ON/OFF...
Playing, Practice and Recording Songs - 72 CVP-509/505/503/501 Owner's Manual Advanced Features Refer to the Reference Manual on the website, Chapter 4. Creating/Editing Songs (Song Creator): [FUNCTION] → [F] DIGITAL REC MENU → [A] SONG CREATOR •... CHORD, 1-16, SYS/EX. Editing Music Notation settings: [SCORE] → [1 ▲▼] - [8 ▲▼] buttons Editing Lyrics/Text display settings (CVP-509/505/503): [LYRICS/TEXT] → [1 ▲▼] - [8 ▲▼] buttons Using the Auto Accompaniment Features with the Song Playback: [ACMP ON/OFF...


