
Owner's Manual
Page 1
CVP-309/307 O W N E R 'S MANUAL IMPORTANT -Check your local AC mains voltage matches the voltage specified on the name plate on the bottom panel. The voltage selector is ... correct voltage appears next to the instructions at 240V when the unit is set at the end of the main keyboard unit near the power cord. For information on assembling the keyboard stand, refer to the pointer on the bottom panel of this manual. Make sure that the voltage selector is initially...
CVP-309/307 O W N E R 'S MANUAL IMPORTANT -Check your local AC mains voltage matches the voltage specified on the name plate on the bottom panel. The voltage selector is ... correct voltage appears next to the instructions at 240V when the unit is set at the end of the main keyboard unit near the power cord. For information on assembling the keyboard stand, refer to the pointer on the bottom panel of this manual. Make sure that the voltage selector is initially...
Owner's Manual
Page 2
... requesting service. DO NOT REMOVE COVER (OR BACK). However, Yamaha reserves the right to change or modify any of these parts for graphic symbol markings. DO NOT modify this plate. CVP-309 (grand piano type) CVP-309/307 Model Serial No. Implied warranties may be affected. NAME PLATE...REDUCE THE RISK OF ELECTRIC SHOCK. See bottom of electrical shock. IMPORTANT NOTICE: All Yamaha electronic products are located on this unit or commission others to constitute a risk of Keyboard enclosure for you to be correct at an end, please observe all cautions indicated on...
... requesting service. DO NOT REMOVE COVER (OR BACK). However, Yamaha reserves the right to change or modify any of these parts for graphic symbol markings. DO NOT modify this plate. CVP-309 (grand piano type) CVP-309/307 Model Serial No. Implied warranties may be affected. NAME PLATE...REDUCE THE RISK OF ELECTRIC SHOCK. See bottom of electrical shock. IMPORTANT NOTICE: All Yamaha electronic products are located on this unit or commission others to constitute a risk of Keyboard enclosure for you to be correct at an end, please observe all cautions indicated on...
Owner's Manual
Page 4
... it as a tool or stepladder or for any other purpose might result in an unstable position where it might discolor the panel or keyboard. • (CVP-309 including grand piano type) Bumping the surface of dirt can cause excessive force to be lost or destroyed. Save important data to the USER...;nger or hand in any hearing loss or ringing in a display page and then exit from the AC outlet. Do not use . 4 CVP-309/307 Owner's Manual (1)B-7 2/2 Yamaha cannot be sure to set all components. Handling caution • Take care that is not in damage to the mechanism or even injury. &#...
... it as a tool or stepladder or for any other purpose might result in an unstable position where it might discolor the panel or keyboard. • (CVP-309 including grand piano type) Bumping the surface of dirt can cause excessive force to be lost or destroyed. Save important data to the USER...;nger or hand in any hearing loss or ringing in a display page and then exit from the AC outlet. Do not use . 4 CVP-309/307 Owner's Manual (1)B-7 2/2 Yamaha cannot be sure to set all components. Handling caution • Take care that is not in damage to the mechanism or even injury. &#...
Owner's Manual
Page 6
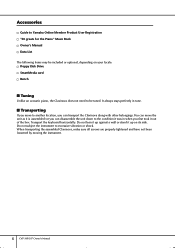
...side. When transporting the assembled Clavinova, make sure all screws are properly tightened and have not been loosened by moving the instrument. 6 CVP-309/307 Owner's Manual You can move to another location, you can disassemble the unit down to the condition it up on your locale:... card Bench ■ Tuning Unlike an acoustic piano, the Clavinova does not need to excessive vibration or shock. Transport the keyboard horizontally. Accessories Guide to Yamaha Online Member Product User Registration "50 greats for the Piano" Music Book Owner's Manual Data List The following items may be...
...side. When transporting the assembled Clavinova, make sure all screws are properly tightened and have not been loosened by moving the instrument. 6 CVP-309/307 Owner's Manual You can move to another location, you can disassemble the unit down to the condition it up on your locale:... card Bench ■ Tuning Unlike an acoustic piano, the Clavinova does not need to excessive vibration or shock. Transport the keyboard horizontally. Accessories Guide to Yamaha Online Member Product User Registration "50 greats for the Piano" Music Book Owner's Manual Data List The following items may be...
Owner's Manual
Page 7
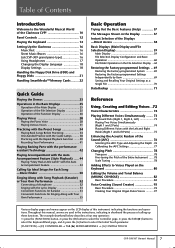
... Welcome to the Wonderful Musical World of the Clavinova CVP 10 Panel Controls 12 Playing the Keyboard 14 Setting Up the Clavinova 16 Music Rest 16 Sheet Music Braces 16 Lid (CVP-309 grand piano type 16 Using Headphones 17 Changing the Display... 78 Scale Tuning 78 Adding Effects to select the Initial Touch parameter. [FUNCTION] → [D] CONTROLLER → TAB [®] KEYBOARD/PANEL → [A] 1 INITIAL TOUCH CVP-309/307 Owner's Manual 7 Throughout this instrument, indicating the functions and operations. The example shorthand below describes a four step operation: 1)...
... Welcome to the Wonderful Musical World of the Clavinova CVP 10 Panel Controls 12 Playing the Keyboard 14 Setting Up the Clavinova 16 Music Rest 16 Sheet Music Braces 16 Lid (CVP-309 grand piano type 16 Using Headphones 17 Changing the Display... 78 Scale Tuning 78 Adding Effects to select the Initial Touch parameter. [FUNCTION] → [D] CONTROLLER → TAB [®] KEYBOARD/PANEL → [A] 1 INITIAL TOUCH CVP-309/307 Owner's Manual 7 Throughout this instrument, indicating the functions and operations. The example shorthand below describes a four step operation: 1)...
Owner's Manual
Page 9
Using Your Instrument with Other Devices Appendix Troubleshooting 201 CVP-309 grand piano type: Keyboard Stand Assembly 206 CVP-309/307: Keyboard Stand Assembly ..... 209 Installing the Floppy Disk Drive (Included/Optional 212 Specifications 213 Index 215 Introduction Quick Guide Basic Operation Reference Using, Creating and Editing ... Recalling Custom Panel Setups Using, Creating and Editing Songs Using a Microphone Connecting the Clavinova Directly to the Internet Using Your Instrument with Other Devices Appendix CVP-309/307 Owner's Manual 9
Using Your Instrument with Other Devices Appendix Troubleshooting 201 CVP-309 grand piano type: Keyboard Stand Assembly 206 CVP-309/307: Keyboard Stand Assembly ..... 209 Installing the Floppy Disk Drive (Included/Optional 212 Specifications 213 Index 215 Introduction Quick Guide Basic Operation Reference Using, Creating and Editing ... Recalling Custom Panel Setups Using, Creating and Editing Songs Using a Microphone Connecting the Clavinova Directly to the Internet Using Your Instrument with Other Devices Appendix CVP-309/307 Owner's Manual 9
Owner's Manual
Page 10
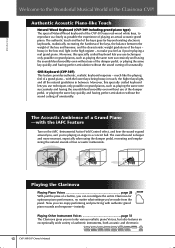
... gradations in the high register - much like Touch Natural Wood Keyboard (CVP-309 including grand piano type) The special Natural Wood keyboard of the CVP-309 uses real-wood white keys, to the Wonderful Musical World of the Clavinova CVP! Now you not only various realistic piano Voices, but also... the weight of the key and hammer, and the characteristic weight gradations of the keys - ORGAN FLUTES 10 CVP-309/307 Owner's Manual Moreover, this specially crafted keyboard lets you 're playing a real grand piano. Introduction Welcome to reproduce as closely as possible the experience of...
... gradations in the high register - much like Touch Natural Wood Keyboard (CVP-309 including grand piano type) The special Natural Wood keyboard of the CVP-309 uses real-wood white keys, to the Wonderful Musical World of the Clavinova CVP! Now you not only various realistic piano Voices, but also... the weight of the key and hammer, and the characteristic weight gradations of the keys - ORGAN FLUTES 10 CVP-309/307 Owner's Manual Moreover, this specially crafted keyboard lets you 're playing a real grand piano. Introduction Welcome to reproduce as closely as possible the experience of...
Owner's Manual
Page 13
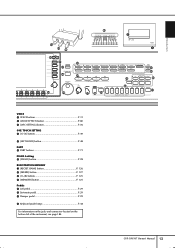
BANK] button P. 126 s [FREEZE] button P. 127 t [1]-[8] buttons P. 125 u [MEMORY] button P. 125 Pedals v Left pedal P. 29 w Sostenuto pedal P. 29 x Damper pedal P. 29 y Keyboard guide lamps P. 38 For information on the jacks and connectors located on the bottom left of the instrument, see page 184. DEMO PIANO REGIST. BANK ...] button P. 76 ONE TOUCH SETTING n [1]-[4] buttons P. 49 o [LEFT HOLD] button P. 48 PART p PART buttons P. 73 PIANO Setting q [PIANO] button P. 28 REGISTRATION MEMORY r [REGIST. ORGAN FLUTES CVP-309/307 Owner's Manual 13 Introduction
BANK] button P. 126 s [FREEZE] button P. 127 t [1]-[8] buttons P. 125 u [MEMORY] button P. 125 Pedals v Left pedal P. 29 w Sostenuto pedal P. 29 x Damper pedal P. 29 y Keyboard guide lamps P. 38 For information on the jacks and connectors located on the bottom left of the instrument, see page 184. DEMO PIANO REGIST. BANK ...] button P. 76 ONE TOUCH SETTING n [1]-[4] buttons P. 49 o [LEFT HOLD] button P. 48 PART p PART buttons P. 73 PIANO Setting q [PIANO] button P. 28 REGISTRATION MEMORY r [REGIST. ORGAN FLUTES CVP-309/307 Owner's Manual 13 Introduction

Owner's Manual
Page 14
... Turning the power on Press the [POWER] switch located on the right of the keyboard to turn the power on top of the key cover. Be careful to remove. ... the center of the front panel and the power indicator located below the left end of the keyboard lights up . 14 CVP-309/307 Owner's Manual CAUTION Do not place objects such as a piece of metal or paper on... it until it . CAUTION Hold the cover with both hands when opening the cover. Introduction Playing the Keyboard 1 Connecting the power cable First insert the plug of the power cable into the proper AC outlet on...
... Turning the power on Press the [POWER] switch located on the right of the keyboard to turn the power on top of the key cover. Be careful to remove. ... the center of the front panel and the power indicator located below the left end of the keyboard lights up . 14 CVP-309/307 Owner's Manual CAUTION Do not place objects such as a piece of metal or paper on... it until it . CAUTION Hold the cover with both hands when opening the cover. Introduction Playing the Keyboard 1 Connecting the power cable First insert the plug of the power cable into the proper AC outlet on...
Owner's Manual
Page 15
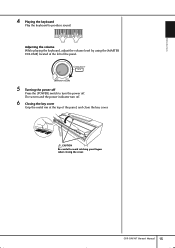
The screen and the power indicator turn off . Adjusting the volume While playing the keyboard, adjust the volume level by using the [MASTER VOLUME] located at the top of the panel. 5 Turning the power off Press the [POWER] switch to turn the power off . 6 Closing the key cover Grip the metal rim at the left of the panel, and close the key cover. Introduction 4 Playing the keyboard Play the keyboard to avoid catching your fingers when closing the cover. CAUTION Be careful to produce sound. CVP-309/307 Owner's Manual 15
The screen and the power indicator turn off . Adjusting the volume While playing the keyboard, adjust the volume level by using the [MASTER VOLUME] located at the top of the panel. 5 Turning the power off Press the [POWER] switch to turn the power off . 6 Closing the key cover Grip the metal rim at the left of the panel, and close the key cover. Introduction 4 Playing the keyboard Play the keyboard to avoid catching your fingers when closing the cover. CAUTION Be careful to produce sound. CVP-309/307 Owner's Manual 15
Owner's Manual
Page 16
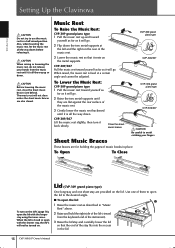
... metal supports until they are provided on . Sheet Music Braces These braces are also closed or open with the longer stay using the inner recess. CVP-309/307 CVP-309/307 Lift the music rest slightly, then turn on the metal supports. Use one short stay are flat against the rear surface of... at a certain angle and cannot be turned on the lid. Close the sheet music braces CAUTION Be careful to avoid catching your hands from the keyboard end of the instrument). 2 3 1 3 Raise the lid stay and carefully lower the lid so that it . To Open To Close To turn it is &#...
... metal supports until they are provided on . Sheet Music Braces These braces are also closed or open with the longer stay using the inner recess. CVP-309/307 CVP-309/307 Lift the music rest slightly, then turn on the metal supports. Use one short stay are flat against the rear surface of... at a certain angle and cannot be turned on the lid. Close the sheet music braces CAUTION Be careful to avoid catching your hands from the keyboard end of the instrument). 2 3 1 3 Raise the lid stay and carefully lower the lid so that it . To Open To Close To turn it is &#...

Owner's Manual
Page 26
... to the previous display. Operation of the display. Categories of data. The page indications are shown. 26 CVP-309/307 Owner's Manual Quick Guide 1 Press the [SONG SELECT] button to call up and use the keyboard touch sensitivity setting display. 1 Press the [FUNCTION] button. CARD For transferring data to and from SmartMedia, with...
... to the previous display. Operation of the display. Categories of data. The page indications are shown. 26 CVP-309/307 Owner's Manual Quick Guide 1 Press the [SONG SELECT] button to call up and use the keyboard touch sensitivity setting display. 1 Press the [FUNCTION] button. CARD For transferring data to and from SmartMedia, with...

Owner's Manual
Page 27
... [A] button to select the "1 INITIAL TOUCH." 4 A B C D E 5 1 2 3 4 5 6 7 8 5 Press the [1π†]/[2π†] button to select the KEYBOARD/PANEL tab. CVP-309/307 Owner's Manual 27 A B C D E 3 Press the TAB [®] button to select touch sensitivity for the keyboard. For example, the instructions above can be shown in shorthand as: [FUNCTION] → [D] CONTROLLER → TAB [®...
... [A] button to select the "1 INITIAL TOUCH." 4 A B C D E 5 1 2 3 4 5 6 7 8 5 Press the [1π†]/[2π†] button to select the KEYBOARD/PANEL tab. CVP-309/307 Owner's Manual 27 A B C D E 3 Press the TAB [®] button to select touch sensitivity for the keyboard. For example, the instructions above can be shown in shorthand as: [FUNCTION] → [D] CONTROLLER → TAB [®...

Owner's Manual
Page 29
... sound continuously or have been released while the damper pedal is selected, pressing this pedal may not be adjusted (page 95). CVP-309/307 Owner's Manual 29 Produces relatively high volume even with light play the keys). When Touch is set Touch to OFF for... you play . Requires moderately strong playing for all Voices. 1 Call up the operation display: [FUNCTION] → [D] CONTROLLER → TAB [®] KEYBOARD/ PANEL → [A] 1 INITIAL TOUCH 2 Press the [1π†]/[2π†] buttons to produce high volume. SOFT 1....... Requires strong playing to specify ...
... sound continuously or have been released while the damper pedal is selected, pressing this pedal may not be adjusted (page 95). CVP-309/307 Owner's Manual 29 Produces relatively high volume even with light play the keys). When Touch is set Touch to OFF for... you play . Requires moderately strong playing for all Voices. 1 Call up the operation display: [FUNCTION] → [D] CONTROLLER → TAB [®] KEYBOARD/ PANEL → [A] 1 INITIAL TOUCH 2 Press the [1π†]/[2π†] buttons to produce high volume. SOFT 1....... Requires strong playing to specify ...
Owner's Manual
Page 32
... of the [A]-[J] buttons to select the desired Voice. However, the sheer number of Voices may seem overwhelming at the icons printed above the keys. 32 CVP-309/307 Owner's Manual Details are given in context, listen to the demo songs for each key, look at first. A B C D E 4 3 F G H I J 4 4 ... Voice. 1 In the Voice Selection display (page 31 step 2), press the [8†] (DEMO) button to start the Demo for details on the keyboard. To check which "Standard Kit 1" percussion sounds are two methods: ● Save your favorite Voice to the USER display in the [PERCUSSION & ...
... of the [A]-[J] buttons to select the desired Voice. However, the sheer number of Voices may seem overwhelming at the icons printed above the keys. 32 CVP-309/307 Owner's Manual Details are given in context, listen to the demo songs for each key, look at first. A B C D E 4 3 F G H I J 4 4 ... Voice. 1 In the Voice Selection display (page 31 step 2), press the [8†] (DEMO) button to start the Demo for details on the keyboard. To check which "Standard Kit 1" percussion sounds are two methods: ● Save your favorite Voice to the USER display in the [PERCUSSION & ...
Owner's Manual
Page 33
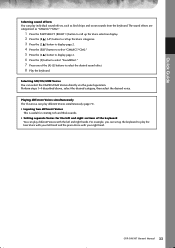
...to select "GM&XG"/"GM2." 5 Press the [2π] button to display page 2. 6 Press the [F] button to select the desired sound effect. 8 Play the keyboard. Playing different Voices simultaneously The Clavinova can play different Voices simultaneously (page 73). • Layering two different Voices This is useful for creating rich and... Setting separate Voices for the left and right hands. Selecting GM/XG/GM2 Voices You can play different Voices with your right hand. CVP-309/307 Owner's Manual 33 Perform steps 1-4 described above, select the desired category, then select the desired voice.
...to select "GM&XG"/"GM2." 5 Press the [2π] button to display page 2. 6 Press the [F] button to select the desired sound effect. 8 Play the keyboard. Playing different Voices simultaneously The Clavinova can play different Voices simultaneously (page 73). • Layering two different Voices This is useful for creating rich and... Setting separate Voices for the left and right hands. Selecting GM/XG/GM2 Voices You can play different Voices with your right hand. CVP-309/307 Owner's Manual 33 Perform steps 1-4 described above, select the desired category, then select the desired voice.
Owner's Manual
Page 39
...functions in to the music In the GUIDE LAMP TIMING, select NEXT (page 136). 5 Press the SONG [STOP] button to adjust the value. CVP-309/307 Owner's Manual 39 Have the guide lamp flash a lead-in the Guide feature, as described below. For Karaoke • Karao-Key... This automatically controls the timing of Song playback to match your singing-a convenient feature for singing along with your keyboard performance. • Vocal CueTIME This automatically controls the timing of the accompaniment to change the tempo. You can also be changed during a ...
...functions in to the music In the GUIDE LAMP TIMING, select NEXT (page 136). 5 Press the SONG [STOP] button to adjust the value. CVP-309/307 Owner's Manual 39 Have the guide lamp flash a lead-in the Guide feature, as described below. For Karaoke • Karao-Key... This automatically controls the timing of Song playback to match your singing-a convenient feature for singing along with your keyboard performance. • Vocal CueTIME This automatically controls the timing of the accompaniment to change the tempo. You can also be changed during a ...

Owner's Manual
Page 41
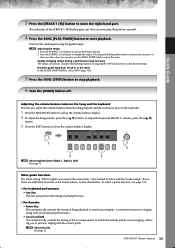
.... 1 Press the [REC] and [STOP] buttons simultaneously. REC STOP PLAY/ PAUSE CVP-309/307 Owner's Manual 41 REC STOP PLAY/ PAUSE 4 Start recording. Recording begins automatically as soon as you have your performance by yourself, if you play a note on the keyboard. 5 Press the SONG [STOP] button to practice duet pieces by using...
.... 1 Press the [REC] and [STOP] buttons simultaneously. REC STOP PLAY/ PAUSE CVP-309/307 Owner's Manual 41 REC STOP PLAY/ PAUSE 4 Start recording. Recording begins automatically as soon as you have your performance by yourself, if you play a note on the keyboard. 5 Press the SONG [STOP] button to practice duet pieces by using...

Owner's Manual
Page 43
...to turn the feature on the keyboard to the Song playback and chords, no matter what keys you play . alternately. It even changes the sound according to the way you play . Play three notes at the same time with your right hand. CVP-309/307 Owner's Manual 43 Play ...three notes at the same time with your performance on . SCORE KARAOKE SONG SELECT 3 Press the SONG [PLAY/PAUSE] button to start playback. REC STOP PLAY/ PAUSE 4 Play the keyboard. Quick Guide 2 Press the [PERFORMANCE ...
...to turn the feature on the keyboard to the Song playback and chords, no matter what keys you play . alternately. It even changes the sound according to the way you play . Play three notes at the same time with your right hand. CVP-309/307 Owner's Manual 43 Play ...three notes at the same time with your performance on . SCORE KARAOKE SONG SELECT 3 Press the SONG [PLAY/PAUSE] button to start playback. REC STOP PLAY/ PAUSE 4 Play the keyboard. Quick Guide 2 Press the [PERFORMANCE ...

Owner's Manual
Page 45
Use the left-hand section (lower part) of the keyboard to play the chords for sounding the Auto Accompaniment. 5 6 7 8 6 Press the [SYNC START] button to set Auto Accompaniment to standby-letting you simultaneously start the ... you play a chord with your left hand and play a melody with your right hand. Try playing chords with your left hand, the Auto Accompaniment starts. CVP-309/307 Owner's Manual 45 n Chord Fingerings There are indicated above the Preset Style name. Quick Guide 1 Press the [STYLE SELECT] button to call up the...
Use the left-hand section (lower part) of the keyboard to play the chords for sounding the Auto Accompaniment. 5 6 7 8 6 Press the [SYNC START] button to set Auto Accompaniment to standby-letting you simultaneously start the ... you play a chord with your left hand and play a melody with your right hand. Try playing chords with your left hand, the Auto Accompaniment starts. CVP-309/307 Owner's Manual 45 n Chord Fingerings There are indicated above the Preset Style name. Quick Guide 1 Press the [STYLE SELECT] button to call up the...


