
Owner's Manual
Page 2
... electrical shock. Keep all cautions indicated on this product become damaged beyond repair, or for graphic symbol markings. Purchase Date CVP-207 In keeping with arrowhead symbol, within the equilateral triangle is properly installed and used in its useful life is soldered in ...products and the production methods used batteries promptly and as a permanent record of these goals. ENVIRONMENTAL ISSUES: Yamaha strives to change or modify any of Keyboard enclosure for some areas, the servicer is operating as designed) are not covered by the manufacturer's warranty,...
... electrical shock. Keep all cautions indicated on this product become damaged beyond repair, or for graphic symbol markings. Purchase Date CVP-207 In keeping with arrowhead symbol, within the equilateral triangle is properly installed and used in its useful life is soldered in ...products and the production methods used batteries promptly and as a permanent record of these goals. ENVIRONMENTAL ISSUES: Yamaha strives to change or modify any of Keyboard enclosure for some areas, the servicer is operating as designed) are not covered by the manufacturer's warranty,...

Owner's Manual
Page 4
... the gaps on the key cover, panel or keyboard. Do not wipe too hard since this might discolor the panel or keyboard. • On the CVP-209, bumping the surface of the instrument with ... loss through media damage, we recom- Then have the instrument inspected by improper use . 4 CVP-209/207 (1)B-7 2/2 Always turn the power off the power to the instrument, or data that you turn...chemical-impregnated wiping cloths. nents, turn off the power for damage caused by qualified Yamaha service personnel. • Do not place vinyl, plastic or rubber objects on or off the ...
... the gaps on the key cover, panel or keyboard. Do not wipe too hard since this might discolor the panel or keyboard. • On the CVP-209, bumping the surface of the instrument with ... loss through media damage, we recom- Then have the instrument inspected by improper use . 4 CVP-209/207 (1)B-7 2/2 Always turn the power off the power to the instrument, or data that you turn...chemical-impregnated wiping cloths. nents, turn off the power for damage caused by qualified Yamaha service personnel. • Do not place vinyl, plastic or rubber objects on or off the ...

Owner's Manual
Page 8
When such messages appear, simply follow the instructions as shown by moving the instrument. 8 CVP-209/207 The document is available as it out of the box. You can move to another location, you can do with other belongings. F G For this example, ... for cleaning. http://www2.yamaha.co.jp/manual/english/ Maintenance Clean the instrument using the Clavinova, be discolored or degraded. I Transporting If you move the unit as a PDF file (in when you first took it is not written for any specific models). Transport the keyboard horizontally. Do not place...
When such messages appear, simply follow the instructions as shown by moving the instrument. 8 CVP-209/207 The document is available as it out of the box. You can move to another location, you can do with other belongings. F G For this example, ... for cleaning. http://www2.yamaha.co.jp/manual/english/ Maintenance Clean the instrument using the Clavinova, be discolored or degraded. I Transporting If you move the unit as a PDF file (in when you first took it is not written for any specific models). Transport the keyboard horizontally. Do not place...
Owner's Manual
Page 9
... Functions 79 Practicing Music with the Clavinova 36 Recording 37 Mastering Your Favorite Songs 38 Basic Operations - Score 81 Displaying the Lyrics 84 CVP-209/207 9 Music Finder Search .... 71 Editing Records - Table of Contents Introduction SPECIAL MESSAGE SECTION 2 PRECAUTIONS 3 About this Owner's Manual and...Reference Playing the Demos 53 Voices 55 Selecting a Voice 55 One-touch Piano Play 56 Layer/Left - Instant Selection of the Keyboard 58 Applying Voice Effects 58 Using the Pedals 59 Styles 60 Playing a style 60 Adjusting the Volume Balance/Channel Muting ...... ...
... Functions 79 Practicing Music with the Clavinova 36 Recording 37 Mastering Your Favorite Songs 38 Basic Operations - Score 81 Displaying the Lyrics 84 CVP-209/207 9 Music Finder Search .... 71 Editing Records - Table of Contents Introduction SPECIAL MESSAGE SECTION 2 PRECAUTIONS 3 About this Owner's Manual and...Reference Playing the Demos 53 Voices 55 Selecting a Voice 55 One-touch Piano Play 56 Layer/Left - Instant Selection of the Keyboard 58 Applying Voice Effects 58 Using the Pedals 59 Styles 60 Playing a style 60 Adjusting the Volume Balance/Channel Muting ...... ...

Owner's Manual
Page 10
... Chord Fingering 139 Making Settings for the Vocal Harmony and Microphone - Voice Set 143 Setting Harmony and Echo 143 10 CVP-209/207 Registration Memory 85 Saving Your Registration Memory Setups 86 Recalling a Registration Memory Setup 87 Editing Voices - Sound Creator 88... Setting Song-related Parameters - Filter 109 Creating Accompaniment Styles - Function 133 Operation 133 Fine Tuning the Pitch/Selecting a Scale - Keyboard/Panel 141 Setting the Registration Sequence, Freeze, and Voice Set 142 Specifying the Order for the Pedals 139 Changing the Touch Sensitivity...
... Chord Fingering 139 Making Settings for the Vocal Harmony and Microphone - Voice Set 143 Setting Harmony and Echo 143 10 CVP-209/207 Registration Memory 85 Saving Your Registration Memory Setups 86 Recalling a Registration Memory Setup 87 Editing Voices - Sound Creator 88... Setting Song-related Parameters - Filter 109 Creating Accompaniment Styles - Function 133 Operation 133 Fine Tuning the Pitch/Selecting a Scale - Keyboard/Panel 141 Setting the Registration Sequence, Freeze, and Voice Set 142 Specifying the Order for the Pedals 139 Changing the Touch Sensitivity...
Owner's Manual
Page 11
... 147 Setting Root Note Channels - Root 147 Setting Chord Channels - System Reset 151 Using Your Clavinova with Other Devices Appendix CVP-209/207 11 Function Using Your Clavinova with Other Devices 152 Using the Headphones (PHONES jacks 152 Connecting the Microphone or Guitar (MIC./...156 What You Can Do With MIDI 158 Data Compatibility 159 Disk format 159 Sequence Format 159 Voice Allocation Format 160 CVP-209/207: Keyboard Stand Assembly 161 Troubleshooting 163 Specifications 165 Index 167 Introduction Quick Guide Basic Operations - Organizing Your Data Playing the Demos ...
... 147 Setting Root Note Channels - Root 147 Setting Chord Channels - System Reset 151 Using Your Clavinova with Other Devices Appendix CVP-209/207 11 Function Using Your Clavinova with Other Devices 152 Using the Headphones (PHONES jacks 152 Connecting the Microphone or Guitar (MIC./...156 What You Can Do With MIDI 158 Data Compatibility 159 Disk format 159 Sequence Format 159 Voice Allocation Format 160 CVP-209/207: Keyboard Stand Assembly 161 Troubleshooting 163 Specifications 165 Index 167 Introduction Quick Guide Basic Operations - Organizing Your Data Playing the Demos ...
Owner's Manual
Page 12
...page 56 Using the three performance control pedals page 59 Playing an accompaniment that may be helpful for the Left and Right Sections of the Keyboard" on page 51 Recording Recording your performance...pages 95, 96 Creating a song by entering notes ...page 98 Creating your music page 70... Clavinova page 121 Playing Calling up ideal panel settings for your original settings Creating voices ...page 88 Creating accompaniment styles...page 110 12 CVP-209/207 or left hands Left - Listening Listening to the internal songs ...page 75 Listening to disk songs Playing Back Songs on Disk" on...
...page 56 Using the three performance control pedals page 59 Playing an accompaniment that may be helpful for the Left and Right Sections of the Keyboard" on page 51 Recording Recording your performance...pages 95, 96 Creating a song by entering notes ...page 98 Creating your music page 70... Clavinova page 121 Playing Calling up ideal panel settings for your original settings Creating voices ...page 88 Creating accompaniment styles...page 110 12 CVP-209/207 or left hands Left - Listening Listening to the internal songs ...page 75 Listening to disk songs Playing Back Songs on Disk" on...

Owner's Manual
Page 13
...on page 153 Connecting a computer Connecting to a Computer (MIDI terminals/TO HOST terminals)" on page 154 Assembling Assembling and disassembling the Clavinova CVP-209/207: Keyboard Stand Assembly" on page 161 Quick solution Basic functions of the Clavinova and how you can best use it pages 12, 14 Resetting the...139 Making detailed settings for MIDI ...page 145 Connecting the Clavinova to the default setting Restoring the Factory-programmed Settings of the CVP-209/207 - System Reset" on page 151 Displaying the Messages About the Display Messages" on page 149 Troubleshooting ...page 163...
...on page 153 Connecting a computer Connecting to a Computer (MIDI terminals/TO HOST terminals)" on page 154 Assembling Assembling and disassembling the Clavinova CVP-209/207: Keyboard Stand Assembly" on page 161 Quick solution Basic functions of the Clavinova and how you can best use it pages 12, 14 Resetting the...139 Making detailed settings for MIDI ...page 145 Connecting the Clavinova to the default setting Restoring the Factory-programmed Settings of the CVP-209/207 - System Reset" on page 151 Displaying the Messages About the Display Messages" on page 149 Troubleshooting ...page 163...
Owner's Manual
Page 14
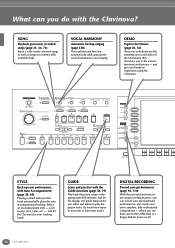
... the Clavinova? DIGITAL RECORDING Record your performances (page 94, 110) With the powerful and easy-touse song recording features, you can record your own keyboard performances, and create your backing band! What can you do with your singing. SONG Playback previously recorded songs (page 21, 36, 74) Enjoy... a wide variety of the instrument, they introduce you to the USER drive or a floppy disk for future recall. 14 CVP-209/207 SETTING TRACK 1 R REC TOP START STOP REW FF REPEAT GUIDE MIN MAX STYLE ACMP AUTO FILL IN OTS LINK BREAK NEW SONG TEMPO SYNC....
... the Clavinova? DIGITAL RECORDING Record your performances (page 94, 110) With the powerful and easy-touse song recording features, you can record your own keyboard performances, and create your backing band! What can you do with your singing. SONG Playback previously recorded songs (page 21, 36, 74) Enjoy... a wide variety of the instrument, they introduce you to the USER drive or a floppy disk for future recall. 14 CVP-209/207 SETTING TRACK 1 R REC TOP START STOP REW FF REPEAT GUIDE MIN MAX STYLE ACMP AUTO FILL IN OTS LINK BREAK NEW SONG TEMPO SYNC....

Owner's Manual
Page 17
... standard stereo headphones can plug them into a standard AC outlet. Using headphones Connect a pair of headphones to match the pin configuration of the keyboard also lights. In some areas, a plug adapter may be plugged in. (If you 're ready to an appropriate level. Setting the volume Use the [MASTER... the other into either of these jacks.) (The shape of the [PHONES] jacks. LINE IN MIC. The drive lamp below the right end of the keyboard will turn off . BACK When you are provided. CVP-209/207 17 INPUT VOLUME MIC.
... standard stereo headphones can plug them into a standard AC outlet. Using headphones Connect a pair of headphones to match the pin configuration of the keyboard also lights. In some areas, a plug adapter may be plugged in. (If you 're ready to an appropriate level. Setting the volume Use the [MASTER... the other into either of these jacks.) (The shape of the [PHONES] jacks. LINE IN MIC. The drive lamp below the right end of the keyboard will turn off . BACK When you are provided. CVP-209/207 17 INPUT VOLUME MIC.
Owner's Manual
Page 19
... playback compatibility with greater functionality and open-ended expandability for MIDI sequence files. CVP-209/207 19 GM System Level 1 "GM System Level 1" is the most common format used for the future. XF Format The Yamaha XF format enhances the SMF (Standard MIDI File) standard with a wide range of...] button P. 56 REGISTRATION MEMORY 64 [FREEZE] button P. 87 65 [1] - [8] buttons (REGISTRATION MEMORY P. 85 66 [MEMORY] button P. 85 67 Floppy disk drive (3.5 P. 6 68 Keyboard guide lamps P. 79 Microphone and Headphone Connectors 69 [INPUT VOLUME] knob P. 152 70 [MIC.
... playback compatibility with greater functionality and open-ended expandability for MIDI sequence files. CVP-209/207 19 GM System Level 1 "GM System Level 1" is the most common format used for the future. XF Format The Yamaha XF format enhances the SMF (Standard MIDI File) standard with a wide range of...] button P. 56 REGISTRATION MEMORY 64 [FREEZE] button P. 87 65 [1] - [8] buttons (REGISTRATION MEMORY P. 85 66 [MEMORY] button P. 85 67 Floppy disk drive (3.5 P. 6 68 Keyboard guide lamps P. 79 Microphone and Headphone Connectors 69 [INPUT VOLUME] knob P. 152 70 [MIC.

Owner's Manual
Page 26
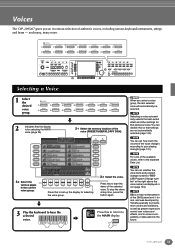
... press of the [A] B - [J] buttons. VOICE PIANO & HARPSI. PIANO ORGAN & ACCORDION PERCUSSION BRASS WOODWIND STRINGS CHOIR & PAD GUITAR SYNTH. Simply press the [8L] button from the keyboard, but you can play two different voices together in a rich sounding layer - C D E Press the corresponding buttons to select the LAYER part. Press the [8L] button...
... press of the [A] B - [J] buttons. VOICE PIANO & HARPSI. PIANO ORGAN & ACCORDION PERCUSSION BRASS WOODWIND STRINGS CHOIR & PAD GUITAR SYNTH. Simply press the [8L] button from the keyboard, but you can play two different voices together in a rich sounding layer - C D E Press the corresponding buttons to select the LAYER part. Press the [8L] button...

Owner's Manual
Page 27
... (or voices). PIANO ORGAN & ACCORDION PERCUSSION BRASS WOODWIND STRINGS CHOIR & PAD GUITAR SYNTH. From here, you can set the particular key on the keyboard that separates the two voices - Split Point LEFT MAIN/LAYER MAIN and LAYER voices are meant to be played with the Left and Right Hands... 1 Press the VOICE PART ON/OFF [LEFT] button to turn the LEFT part on the keyboard. (For more information, see page 138.) F F G G H H I I ] button to select the LEFT part. BASS XG ORGAN FLUTES USER 4 Select a voice, then press the [...
... (or voices). PIANO ORGAN & ACCORDION PERCUSSION BRASS WOODWIND STRINGS CHOIR & PAD GUITAR SYNTH. From here, you can set the particular key on the keyboard that separates the two voices - Split Point LEFT MAIN/LAYER MAIN and LAYER voices are meant to be played with the Left and Right Hands... 1 Press the VOICE PART ON/OFF [LEFT] button to turn the LEFT part on the keyboard. (For more information, see page 138.) F F G G H H I I ] button to select the LEFT part. BASS XG ORGAN FLUTES USER 4 Select a voice, then press the [...

Owner's Manual
Page 29
.... including styles, voices, and more . And there's much more - Playing Styles 3 Turn ACMP on the keyboard that separates the auto accompaniment section and the right-hand section of the keyboard becomes the "Auto Accompaniment" section, and chords played in this example, play a chord with your left hand.... and call them up your left -hand section of the keyboard is called the "split point." The specified left hand, the style starts. Check out these other chords with your favorite panel settings ...
.... including styles, voices, and more . And there's much more - Playing Styles 3 Turn ACMP on the keyboard that separates the auto accompaniment section and the right-hand section of the keyboard becomes the "Auto Accompaniment" section, and chords played in this example, play a chord with your left hand.... and call them up your left -hand section of the keyboard is called the "split point." The specified left hand, the style starts. Check out these other chords with your favorite panel settings ...
Owner's Manual
Page 30
...Since each section is a rhythmic variation of the accompaniment, to your left hand and play with your performance and mix up of the keyboard. INTRO MAIN BREAK ENDING This is used for playing the main part of the song. This is used for the beginning of the song...VOICE EFFECT REVERB DSP VARIATION HARMONY / ECHO MONO LEFT HOLD 2 Turn ACMP on pages 28 and 29. 5 Press the [INTRO] button. The CVP-209/207 has various Harmony/Echo types (page 143). When the intro finishes playing, accompaniment shifts to the separate Data List. Intros, Endings, Main ...
...Since each section is a rhythmic variation of the accompaniment, to your left hand and play with your performance and mix up of the keyboard. INTRO MAIN BREAK ENDING This is used for playing the main part of the song. This is used for the beginning of the song...VOICE EFFECT REVERB DSP VARIATION HARMONY / ECHO MONO LEFT HOLD 2 Turn ACMP on pages 28 and 29. 5 Press the [INTRO] button. The CVP-209/207 has various Harmony/Echo types (page 143). When the intro finishes playing, accompaniment shifts to the separate Data List. Intros, Endings, Main ...

Owner's Manual
Page 32
... way to instantly reconfigure all the settings 1 2 3 4 (voices, effects, etc.) that you want by "tapping" out the tempo with the touch of the keyboard). it also automatically turns on the Clavinova to match the style you can be used to your performance. START, so that match the current style...
... way to instantly reconfigure all the settings 1 2 3 4 (voices, effects, etc.) that you want by "tapping" out the tempo with the touch of the keyboard). it also automatically turns on the Clavinova to match the style you can be used to your performance. START, so that match the current style...

Owner's Manual
Page 37
...same operations as required (pages 39, 45). To keep your important recordings, you record, too - Quick Guide 37 REC 8 To hear your keyboard performance. 1 - 3 Select a voice for recording. Playing and Practicing with the Songs Recording The Clavinova lets you 'll need to save them...SONG [START/STOP] button. REC SONG EXTRA TRACKS (STYLE) TRACK 2 (L) TRACK 1 (R) 6 Recording starts as soon as you start playing the keyboard. 7 When you turn off the power. Try out the Quick Recording feature now and capture your newly recorded performance, return the song to select "New...
...same operations as required (pages 39, 45). To keep your important recordings, you record, too - Quick Guide 37 REC 8 To hear your keyboard performance. 1 - 3 Select a voice for recording. Playing and Practicing with the Songs Recording The Clavinova lets you 'll need to save them...SONG [START/STOP] button. REC SONG EXTRA TRACKS (STYLE) TRACK 2 (L) TRACK 1 (R) 6 Recording starts as soon as you start playing the keyboard. 7 When you turn off the power. Try out the Quick Recording feature now and capture your newly recorded performance, return the song to select "New...

Owner's Manual
Page 49
...SETTING MIXING CONSOLE VOCAL HARMONY MIXING CONSOLE FUNCTION EQ settings MUSIC FINDER SEARCH1 (Searching the records) - - - - EFFECT TYPE selection CONTROLLER KEYBOARD TOUCH selection FREEZE REGISTRATION BANK REGISTRATION EDIT (Editing the REGISTRATION) FUNCTION REGISTRATION SEQUENCE (Creating the REGISTRATION SEQUENCE) RIGHT PEDAL function assignment CONTROLLER ...121 122 123 143 122 138 143 125 71 123 132 123 128 123 141 142 86 142 139 CVP-209/207 49 REVERB setting TALK SETTING EFFECT MIC. Basic Operations - METRONOME settings FADE IN/OUT settings TAP settings ...
...SETTING MIXING CONSOLE VOCAL HARMONY MIXING CONSOLE FUNCTION EQ settings MUSIC FINDER SEARCH1 (Searching the records) - - - - EFFECT TYPE selection CONTROLLER KEYBOARD TOUCH selection FREEZE REGISTRATION BANK REGISTRATION EDIT (Editing the REGISTRATION) FUNCTION REGISTRATION SEQUENCE (Creating the REGISTRATION SEQUENCE) RIGHT PEDAL function assignment CONTROLLER ...121 122 123 143 122 138 143 125 71 123 132 123 128 123 141 142 86 142 139 CVP-209/207 49 REVERB setting TALK SETTING EFFECT MIC. Basic Operations - METRONOME settings FADE IN/OUT settings TAP settings ...
Owner's Manual
Page 55
...refer to hear the selected voice. n For a list of authentic voices, including various keyboard instruments, strings and brass - A B C D E 2-1 Select the memory location of data well into the future. Voices The CVP-209/207 gives you select a voice group, the last selected voice will automatically be selected. BASS...to call up the display for that the display is a major enhancement of the GM System level 1 format, and was developed by Yamaha specially to ensure compatibility of the voice (PRESET/USER/FLOPPY DISK). n You can set whether the voice bank and program change numbers...
...refer to hear the selected voice. n For a list of authentic voices, including various keyboard instruments, strings and brass - A B C D E 2-1 Select the memory location of data well into the future. Voices The CVP-209/207 gives you select a voice group, the last selected voice will automatically be selected. BASS...to call up the display for that the display is a major enhancement of the GM System level 1 format, and was developed by Yamaha specially to ensure compatibility of the voice (PRESET/USER/FLOPPY DISK). n You can set whether the voice bank and program change numbers...

Owner's Manual
Page 56
...Standard Kit are indicated by pressing another button on the panel. Organ Flutes! No matter what settings you've made from the keyboard. Piano Lock function The convenient Piano Lock function lets you don't inadvertently change the settings by symbols above the voice name. ... Data List (Drum/key Assignment List) for playing the CVP-209/207 as Stereo Sampling, Dynamic Sampling, Sustain Sampling, and Key-off . PIANO PIANO button This reconfigures all of the panel settings for a listing of Yamaha's advanced sampling technology such as a piano. Voices Voice Characteristics...
...Standard Kit are indicated by pressing another button on the panel. Organ Flutes! No matter what settings you've made from the keyboard. Piano Lock function The convenient Piano Lock function lets you don't inadvertently change the settings by symbols above the voice name. ... Data List (Drum/key Assignment List) for playing the CVP-209/207 as Stereo Sampling, Dynamic Sampling, Sustain Sampling, and Key-off . PIANO PIANO button This reconfigures all of the panel settings for a listing of Yamaha's advanced sampling technology such as a piano. Voices Voice Characteristics...


