
Owner's Manual
Page 157
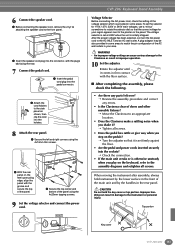
... holders to the side panel as shown, then clip the cord into the holders. 8 Attach the rear panel. 2 Secure the left over? → Review the assembly procedure and correct any parts left and right corners using the 4x20mm tapping screws. 9 Set the voltage selector and connect the power cord...that it comes in some areas to match the pin configuration of the AC wall outlets in improper operation. 10 Set the adjuster. CVP-206: Keyboard Stand Assembly Voltage Selector Before connecting the AC power cord, check the setting of the voltage selector which is initially shipped. To set ...
... holders to the side panel as shown, then clip the cord into the holders. 8 Attach the rear panel. 2 Secure the left over? → Review the assembly procedure and correct any parts left and right corners using the 4x20mm tapping screws. 9 Set the voltage selector and connect the power cord...that it comes in some areas to match the pin configuration of the AC wall outlets in improper operation. 10 Set the adjuster. CVP-206: Keyboard Stand Assembly Voltage Selector Before connecting the AC power cord, check the setting of the voltage selector which is initially shipped. To set ...
Owner's Manual
Page 159
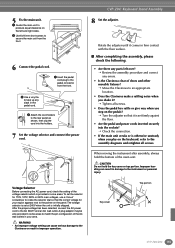
... may be also provided in some areas. Improper handling can cause serious damage to the Clavinova or result in improper operation. Top portion Key cover CVP-206/204 159 Rotate the adjuster until it comes in firm contact with the floor surface. ■ After completing the assembly, please ...unit is initially shipped. 220 127 110 5 Fix the main unit. 1 Center the main unit to produce equal clearance on the left over? → Review the assembly procedure and correct any slack in the pedal cord. 2 Attach the cord holders to the rear panel as shown, then clip the cord...
... may be also provided in some areas. Improper handling can cause serious damage to the Clavinova or result in improper operation. Top portion Key cover CVP-206/204 159 Rotate the adjuster until it comes in firm contact with the floor surface. ■ After completing the assembly, please ...unit is initially shipped. 220 127 110 5 Fix the main unit. 1 Center the main unit to produce equal clearance on the left over? → Review the assembly procedure and correct any slack in the pedal cord. 2 Attach the cord holders to the rear panel as shown, then clip the cord...
