
Owner's Manual
Page 2
... SERVICING TO QUALIFIED SERVICE PERSONNEL. Implied warranties may be denied if the unit is intended to alert the user to return the defective parts. Keep all local, state, and federal regulations that relate to the presence of uninsulated "dangerous voltage" within the product's enclosure that...to how a function or effect works (when the unit is approximately five years. CVP-206 Model Serial No. The explanation of battery is operating as designed) are not covered by Yamaha. Please observe all foreseeable risks have the option of having the servicer dispose of these ...
... SERVICING TO QUALIFIED SERVICE PERSONNEL. Implied warranties may be denied if the unit is intended to alert the user to return the defective parts. Keep all local, state, and federal regulations that relate to the presence of uninsulated "dangerous voltage" within the product's enclosure that...to how a function or effect works (when the unit is approximately five years. CVP-206 Model Serial No. The explanation of battery is operating as designed) are not covered by Yamaha. Please observe all foreseeable risks have the option of having the servicer dispose of these ...
Owner's Manual
Page 3
... heat (such as correct for future reference. If it in the instrument overheating. (1)B-7 1/2 CVP-206/204 3 These precautions include, but are not limited to be used for extended periods of...• Do not connect the instrument to the instrument or even injury. nal parts or modify them in the outlet. CAUTION Always follow the basic precautions listed below .../Power cord • Only use immediately and have the instrument inspected by qualified Yamaha service personnel. PRECAUTIONS PLEASE READ CAREFULLY BEFORE PROCEEDING * Please keep this can cause inadequate air...
... heat (such as correct for future reference. If it in the instrument overheating. (1)B-7 1/2 CVP-206/204 3 These precautions include, but are not limited to be used for extended periods of...• Do not connect the instrument to the instrument or even injury. nal parts or modify them in the outlet. CAUTION Always follow the basic precautions listed below .../Power cord • Only use immediately and have the instrument inspected by qualified Yamaha service personnel. PRECAUTIONS PLEASE READ CAREFULLY BEFORE PROCEEDING * Please keep this can cause inadequate air...

Owner's Manual
Page 10
... Performances and Creating Songs - Step Record (Note 102 Recording Chord Changes for Calling Up Registration Memory Presets - Freeze 137 10 CVP-206/204 Basic 114 Step Recording 115 Assembling an Accompaniment Style - Groove and Dynamics 117 Editing the Channel Data 119 Making Style File... 77 Song Playback 78 Playing the Internal Songs 78 Playing Back Songs on Disk 80 Other Playback-related Operations 80 Muting Specific Parts - Assembly 116 Edit the Created Accompaniment Style 117 Change the Rhythmic Feel - Step Record (Chord 103 Select the Recording Options...
... Performances and Creating Songs - Step Record (Note 102 Recording Chord Changes for Calling Up Registration Memory Presets - Freeze 137 10 CVP-206/204 Basic 114 Step Recording 115 Assembling an Accompaniment Style - Groove and Dynamics 117 Editing the Channel Data 119 Making Style File... 77 Song Playback 78 Playing the Internal Songs 78 Playing Back Songs on Disk 80 Other Playback-related Operations 80 Muting Specific Parts - Assembly 116 Edit the Created Accompaniment Style 117 Change the Rhythmic Feel - Step Record (Chord 103 Select the Recording Options...
Owner's Manual
Page 12
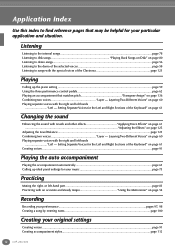
... and left -hand part ...page 83 Practicing with an accurate and steady tempo Using the Metronome" on page 54 Recording Recording your performance...pages 97, 98 Creating a song by entering notes ...page 100 Creating your original settings Creating voices ...page 91 Creating accompaniment styles...page 112 12 CVP-206/204 Layering Two Different...
... and left -hand part ...page 83 Practicing with an accurate and steady tempo Using the Metronome" on page 54 Recording Recording your performance...pages 97, 98 Creating a song by entering notes ...page 100 Creating your original settings Creating voices ...page 91 Creating accompaniment styles...page 112 12 CVP-206/204 Layering Two Different...
Owner's Manual
Page 14
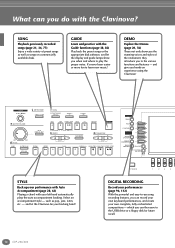
... Record your performances (page 96, 112) With the powerful and easy-to the USER drive or a floppy disk for future recall. 14 CVP-206/204 SONG Playback previously recorded songs (page 21, 36, 77) Enjoy a wide variety of the instrument, they introduce you when and where to ...SYNC.STOP SYNC.START START / STOP D MENU DEMO HELP A FUNCTION B DIGITAL STUDIO SOUND CREATOR DIGITAL RECORDING MIXING CONSOLE C D E BALANCE PART CHANNEL ON / OFF PART STYLE Back up your performance with Auto Accompaniment (page 28, 63) Playing a chord with the Guide functions (page 38, 82) Play back ...
... Record your performances (page 96, 112) With the powerful and easy-to the USER drive or a floppy disk for future recall. 14 CVP-206/204 SONG Playback previously recorded songs (page 21, 36, 77) Enjoy a wide variety of the instrument, they introduce you when and where to ...SYNC.STOP SYNC.START START / STOP D MENU DEMO HELP A FUNCTION B DIGITAL STUDIO SOUND CREATOR DIGITAL RECORDING MIXING CONSOLE C D E BALANCE PART CHANNEL ON / OFF PART STYLE Back up your performance with Auto Accompaniment (page 28, 63) Playing a chord with the Guide functions (page 38, 82) Play back ...
Owner's Manual
Page 15
...with a computer - USB terminal Make music with just a single button press - IN OUT THRU CVP-206 L/L+R R L/L+R R (LEVEL FIXED) L R MIDI USB AUX PEDAL VIDEO OUT AUX IN AUX OUT CVP-206/204 15 Just select the song title, and the Clavinova automatically calls up the piano - including ...piano, strings, woodwinds, and more than 800) - then play back your computer recorded parts with the various panel buttons) provides comprehensive ...
...with a computer - USB terminal Make music with just a single button press - IN OUT THRU CVP-206 L/L+R R L/L+R R (LEVEL FIXED) L R MIDI USB AUX PEDAL VIDEO OUT AUX IN AUX OUT CVP-206/204 15 Just select the song title, and the Clavinova automatically calls up the piano - including ...piano, strings, woodwinds, and more than 800) - then play back your computer recorded parts with the various panel buttons) provides comprehensive ...
Owner's Manual
Page 17
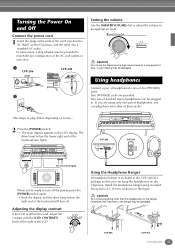
.... Two [PHONES] jacks are using included two screws (4 × 10 mm) as shown in your hearing may be damaged. CVP-206 INPUT VOLUME MIC. A F B G C H D I E J BALANCE CHANNEL ON / OFF PART When you can be provided to match the pin configuration of the AC wall outlets in the figure. Install...Turning the Power On and Off Connect the power cord 1 Insert the plugs at the ends of the cord, one of the [PHONES] jacks. CVP-206 CVP-204 Setting the volume Use the [MASTER VOLUME] dial to adjust the volume to read, adjust the contrast with the [LCD CONTRAST] knob at the...
.... Two [PHONES] jacks are using included two screws (4 × 10 mm) as shown in your hearing may be damaged. CVP-206 INPUT VOLUME MIC. A F B G C H D I E J BALANCE CHANNEL ON / OFF PART When you can be provided to match the pin configuration of the AC wall outlets in the figure. Install...Turning the Power On and Off Connect the power cord 1 Insert the plugs at the ends of the cord, one of the [PHONES] jacks. CVP-206 CVP-204 Setting the volume Use the [MASTER VOLUME] dial to adjust the volume to read, adjust the contrast with the [LCD CONTRAST] knob at the...

Owner's Manual
Page 18
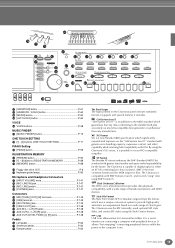
... FUNCTION B DIGITAL C STUDIO 34 SOUND CREATOR D 35 DIGITAL RECORDING 36 MIXING CONSOLE E BALANCE 38 PART CHANNEL ON / OFF 39 PART 40 DIRECT ACCESS 45 1 2 3 4 65 66 67 68 INPUT VOLUME MIC. LINE IN MIC. Panel Controls and Terminals CVP-206 IN OUT THRU MIDI 69 USB 70 L/L+R R L/L+R R (LEVEL FIXED) L R AUX PEDAL 71 VIDEO OUT...
... FUNCTION B DIGITAL C STUDIO 34 SOUND CREATOR D 35 DIGITAL RECORDING 36 MIXING CONSOLE E BALANCE 38 PART CHANNEL ON / OFF 39 PART 40 DIRECT ACCESS 45 1 2 3 4 65 66 67 68 INPUT VOLUME MIC. LINE IN MIC. Panel Controls and Terminals CVP-206 IN OUT THRU MIDI 69 USB 70 L/L+R R L/L+R R (LEVEL FIXED) L R AUX PEDAL 71 VIDEO OUT...
Owner's Manual
Page 19
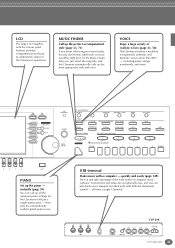
... possible to the computer is the most common format used for Universal Serial Bus. 64 76 77 63 78 41 BACK 42 NEXT 37 VOICE PART F ON / OFF G 43 LAYER H 44 LEFT I J 46 LCD CONTRAST VOICE EFFECT REVERB 50 DSP 51 VARIATION 52 HARMONY / ECHO MONO 53 54 ... The Clavinova is capable of chord types. The Clavinova is a serial interface for the future. CVP-206/204 19 It is compatible with peripheral devices. GM System Level 1 "GM System Level 1" is a new Yamaha MIDI specification which significantly expands and improves on ). XG Format XG is an...
... possible to the computer is the most common format used for Universal Serial Bus. 64 76 77 63 78 41 BACK 42 NEXT 37 VOICE PART F ON / OFF G 43 LAYER H 44 LEFT I J 46 LCD CONTRAST VOICE EFFECT REVERB 50 DSP 51 VARIATION 52 HARMONY / ECHO MONO 53 54 ... The Clavinova is capable of chord types. The Clavinova is a serial interface for the future. CVP-206/204 19 It is compatible with peripheral devices. GM System Level 1 "GM System Level 1" is a new Yamaha MIDI specification which significantly expands and improves on ). XG Format XG is an...
Owner's Manual
Page 20
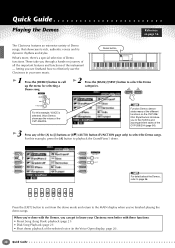
...Demo categories. VOICE PART A F ON / OFF B G LAYER C H LEFT D I E J For details about the Demos, refer to page 56. 1 2 3 4 5 6 7 8 Press the [EXIT] button to exit from the demo mode and return to the MAIN display when you to the rhythms and accompaniment styles of the CVP-206/204 (page 56...even better with the Demos, you see firsthand how to know your own music. Quick Guide Playing the Demos Reference on the CVP-206/ 204. MENU DEMO HELP FUNCTION For this example, press the [A] button to select the Demo songs. Style Demos introduce you 've...
...Demo categories. VOICE PART A F ON / OFF B G LAYER C H LEFT D I E J For details about the Demos, refer to page 56. 1 2 3 4 5 6 7 8 Press the [EXIT] button to exit from the demo mode and return to the MAIN display when you to the rhythms and accompaniment styles of the CVP-206/204 (page 56...even better with the Demos, you see firsthand how to know your own music. Quick Guide Playing the Demos Reference on the CVP-206/ 204. MENU DEMO HELP FUNCTION For this example, press the [A] button to select the Demo songs. Style Demos introduce you 've...

Owner's Manual
Page 23
See pages 84 and 87 for details. 6 While the song is selected, press this button again. You can view the lyr- CHANNEL ON / OFF PART 1 2 3 4 5 6 7 8 1 2 3 4 5 6 7 8 If the STYLE tab is playing, try using the Mute function to turn on - Quick Guide 23 REC TOP START / STOP NEW SONG SYNC.START &#...
See pages 84 and 87 for details. 6 While the song is selected, press this button again. You can view the lyr- CHANNEL ON / OFF PART 1 2 3 4 5 6 7 8 1 2 3 4 5 6 7 8 If the STYLE tab is playing, try using the Mute function to turn on - Quick Guide 23 REC TOP START / STOP NEW SONG SYNC.START &#...

Owner's Manual
Page 24
...OUT] button (page 69) can call up a full set of which the volume you adjust the levels of the individual parts - the song, the style, your singing (CVP-206 only), and your hand at mixing. These Balance controls let you wish to adjust. Song Playback 7 Finally, take the producer...'s seat and try your playing. 1) Press the [BALANCE] button. 2) Press the [1 - 8▲▼] button corresponding to the part of mixing controls by ...
...OUT] button (page 69) can call up a full set of which the volume you adjust the levels of the individual parts - the song, the style, your singing (CVP-206 only), and your hand at mixing. These Balance controls let you wish to adjust. Song Playback 7 Finally, take the producer...'s seat and try your playing. 1) Press the [BALANCE] button. 2) Press the [1 - 8▲▼] button corresponding to the part of mixing controls by ...

Owner's Manual
Page 25
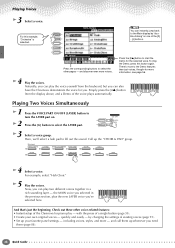
...individual voices, combine two voices in a layer, and split two voices between your music. so make sure that the LAYER and LEFT parts are turned off. 2 Select a voice group. VOICE PIANO & HARPSI. E.PIANO ORGAN & ACCORDION PERCUSSION BRASS WOODWIND STRINGS CHOIR & PAD... GUITAR SYNTH. Quick Guide 25 VOICE PART F ON / OFF G LAYER H LEFT I J The voice you 'll learn how to the MAIN part, and is not displayed, press the [DIRECT ACCESS] button followed by itself - For this example...
...individual voices, combine two voices in a layer, and split two voices between your music. so make sure that the LAYER and LEFT parts are turned off. 2 Select a voice group. VOICE PIANO & HARPSI. E.PIANO ORGAN & ACCORDION PERCUSSION BRASS WOODWIND STRINGS CHOIR & PAD... GUITAR SYNTH. Quick Guide 25 VOICE PART F ON / OFF G LAYER H LEFT I J The voice you 'll learn how to the MAIN part, and is not displayed, press the [DIRECT ACCESS] button followed by itself - For this example...
Owner's Manual
Page 26
... voice-related features: • Instant setup of the voice plays automatically. quickly and easily - C D E Press the corresponding buttons to turn the LAYER part on one of the [A] B - [J] buttons. and discover even more - For example, select "Hah Choir." 5 Play the voices. For this button...voices - by "dou- and call them up whenever you can play - Now, you can instantly jump back to select the LAYER part. Check out these other pages - XG USER 4 Select a voice. the MAIN voice you . There's more information, see page 56. 4 ...
... voice-related features: • Instant setup of the voice plays automatically. quickly and easily - C D E Press the corresponding buttons to turn the LAYER part on one of the [A] B - [J] buttons. and discover even more - For example, select "Hah Choir." 5 Play the voices. For this button...voices - by "dou- and call them up whenever you can play - Now, you can instantly jump back to select the LAYER part. Check out these other pages - XG USER 4 Select a voice. the MAIN voice you . There's more information, see page 56. 4 ...

Owner's Manual
Page 27
...left hand sound one voice, while the notes you can play with your left hand. 7 Press the [EXIT] button to return to select the LEFT part. For example, select "Symphon. Here, we'll select the "STRINGS" group - To do this, simultaneously hold down the [F] or [G] button ... 2 Press the [H] button to the MAIN display. Playing Voices Playing Different Voices with the Left and Right Hands 1 Press the VOICE PART ON/OFF [LEFT] button to turn the LEFT part on the keyboard. (For more information, see page 133.) F F G G H H I I ] button to call up the SPLIT POINT display. LEFT...
...left hand sound one voice, while the notes you can play with your left hand. 7 Press the [EXIT] button to return to select the LEFT part. For example, select "Symphon. Here, we'll select the "STRINGS" group - To do this, simultaneously hold down the [F] or [G] button ... 2 Press the [H] button to the MAIN display. Playing Voices Playing Different Voices with the Left and Right Hands 1 Press the VOICE PART ON/OFF [LEFT] button to turn the LEFT part on the keyboard. (For more information, see page 133.) F F G G H H I I ] button to call up the SPLIT POINT display. LEFT...

Owner's Manual
Page 30
...of "sections." This is a rhythmic variation of the basic style, you need to your performance sound even more professional. D 30 Quick Guide The CVP-206/204 has various Harmony/Echo types (page 138). Intros, Endings, Main patterns, and Breaks - they can enhance your right hand - It plays ...into main section. 7 Press any of the MAIN [A] to the selected MAIN voice. • Harmony/Echo is used for playing the main part of the other effects are available, too. 1 Turn HARMONY/ECHO on the chords you automatically add harmony notes to the separate Data List. The...
...of "sections." This is a rhythmic variation of the basic style, you need to your performance sound even more professional. D 30 Quick Guide The CVP-206/204 has various Harmony/Echo types (page 138). Intros, Endings, Main patterns, and Breaks - they can enhance your right hand - It plays ...into main section. 7 Press any of the MAIN [A] to the selected MAIN voice. • Harmony/Echo is used for playing the main part of the other effects are available, too. 1 Turn HARMONY/ECHO on the chords you automatically add harmony notes to the separate Data List. The...
Owner's Manual
Page 36
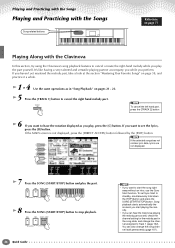
... followed by the [EXIT] button. Song playback starts automatically the moment you want to stop playback. You can hear the Clavinova playing the melody part as you perform. Playing and Practicing with the Songs Playing and Practicing with the Songs Song related buttons Reference on pages 21 - 23. 5 .... • If you can also change the channel assigned to have the notation displayed as well, check the channel setting for the melody part in "Song Playback" on page 77 Playing Along with the Clavinova In this section, try using the Clavinova's song playback features to cancel ...
... followed by the [EXIT] button. Song playback starts automatically the moment you want to stop playback. You can hear the Clavinova playing the melody part as you perform. Playing and Practicing with the Songs Playing and Practicing with the Songs Song related buttons Reference on pages 21 - 23. 5 .... • If you can also change the channel assigned to have the notation displayed as well, check the channel setting for the melody part in "Song Playback" on page 77 Playing Along with the Clavinova In this section, try using the Clavinova's song playback features to cancel ...

Owner's Manual
Page 38
... how the song should be played, and will give you play back the entire song (without canceling any parts) and listen to work on the Guide function. 38 Quick Guide For this example, you want to it carefully. This will make your practice sessions ... to designate the beginning point for Repeat. 3) Just after the phrase finishes, press the [REPEAT] button again to practice and master difficult parts. REC TOP START / STOP NEW SONG SYNC.START See pages 82 and 132 for more smoothly. Here, you'll try out the Follow Lights function...
... how the song should be played, and will give you play back the entire song (without canceling any parts) and listen to work on the Guide function. 38 Quick Guide For this example, you want to it carefully. This will make your practice sessions ... to designate the beginning point for Repeat. 3) Just after the phrase finishes, press the [REPEAT] button again to practice and master difficult parts. REC TOP START / STOP NEW SONG SYNC.START See pages 82 and 132 for more smoothly. Here, you'll try out the Follow Lights function...

Owner's Manual
Page 39
...9660;] buttons under the LCD. The Registration Sequence is displayed here (unless Registration Sequence is set to OFF). 0 Main Part (page 58) The voice selected for the Main part is displayed. 7 Intro and Ending (page 70) The names of the intro and ending of the currently selected style...chord specified in the left -hand and right-hand sections. The volume balance of the accompaniment style selected currently is displayed. CVP-206/204 39 D Registration Memory Bank (page 89) Registration Memory presets are two kinds of Split Points: "A", which separates the auto accompaniment ...
...9660;] buttons under the LCD. The Registration Sequence is displayed here (unless Registration Sequence is set to OFF). 0 Main Part (page 58) The voice selected for the Main part is displayed. 7 Intro and Ending (page 70) The names of the intro and ending of the currently selected style...chord specified in the left -hand and right-hand sections. The volume balance of the accompaniment style selected currently is displayed. CVP-206/204 39 D Registration Memory Bank (page 89) Registration Memory presets are two kinds of Split Points: "A", which separates the auto accompaniment ...

Owner's Manual
Page 50
...the [▲▼] button corresponding to the part, then rotate DATA ENTRY the [DATA ENTRY] dial. ■ Selecting items You can change parameter values. To adjust the volume of the [DATA ENTRY] dial differs depending on the panel. 50 CVP-206/204 Cancels the icon selection operation. The ...(page 49). Using the [DATA ENTRY] Dial This convenient control lets you can also change the icon that appears at the left of the part in the display or quickly change parameter values by rotating the [DATA ENTRY] dial. Select the desired icon by using the [A] - [J] ...
...the [▲▼] button corresponding to the part, then rotate DATA ENTRY the [DATA ENTRY] dial. ■ Selecting items You can change parameter values. To adjust the volume of the [DATA ENTRY] dial differs depending on the panel. 50 CVP-206/204 Cancels the icon selection operation. The ...(page 49). Using the [DATA ENTRY] Dial This convenient control lets you can also change the icon that appears at the left of the part in the display or quickly change parameter values by rotating the [DATA ENTRY] dial. Select the desired icon by using the [A] - [J] ...

