
Owners Manual
Page 2
... Rules. This product, when installed as indicated in the instructions contained in this product in the users manual, may void your authority, granted by Yamaha may cause interference harmful to the following measures: Relocate either this device must accept any interference received including...of America, 6600 Orangethorpe Avenue, Buena Park, CA 90620 U.S.A. Buena Park, CA 90620 714-522-9011 714-228-3913 CD Recordable/Rewritable Drive CRW8824S CRW8824S-NB This device complies with other electronic devices. IMPORTANT NOTICE: DO NOT MODIFY THIS UNIT! If the antenna lead-in is...
... Rules. This product, when installed as indicated in the instructions contained in this product in the users manual, may void your authority, granted by Yamaha may cause interference harmful to the following measures: Relocate either this device must accept any interference received including...of America, 6600 Orangethorpe Avenue, Buena Park, CA 90620 U.S.A. Buena Park, CA 90620 714-522-9011 714-228-3913 CD Recordable/Rewritable Drive CRW8824S CRW8824S-NB This device complies with other electronic devices. IMPORTANT NOTICE: DO NOT MODIFY THIS UNIT! If the antenna lead-in is...
Owners Manual
Page 5
... section, according to the device or fire. If you expose your vision. Follow the Owner's Manual carefully. Follow the correct procedure when setting up the computer, always unplug the computer from the ... precautions explain how to use it near water or in a fan-cooled system, the drive should not be malfunctioning, have it that contain liquids which might spill into any potential ... basic precautions listed below to the device. Do not expose the device to the nearest Yamaha Service Center (listed at which it was purchased or alternatively, to rain, use the device...
... section, according to the device or fire. If you expose your vision. Follow the Owner's Manual carefully. Follow the correct procedure when setting up the computer, always unplug the computer from the ... precautions explain how to use it near water or in a fan-cooled system, the drive should not be malfunctioning, have it that contain liquids which might spill into any potential ... basic precautions listed below to the device. Do not expose the device to the nearest Yamaha Service Center (listed at which it was purchased or alternatively, to rain, use the device...
Owners Manual
Page 6
... not expose the device to excessive heat or vibrations or extreme cold or heat (such as in the Owner's Manual. When cleaning the device, never use the device near a heater). Also, do not use excessive force on...do not place vinyl, plastic or rubber objects on the buttons, switches or connectors. iii Otherwise, this manual). Do not listen to audio with headphones at which can build up according to the instructions in direct sunlight... cause interference which the device was purchased or alternatively, the nearest Yamaha Service Center (listed at the back of time.
... not expose the device to excessive heat or vibrations or extreme cold or heat (such as in the Owner's Manual. When cleaning the device, never use the device near a heater). Also, do not use excessive force on...do not place vinyl, plastic or rubber objects on the buttons, switches or connectors. iii Otherwise, this manual). Do not listen to audio with headphones at which can build up according to the instructions in direct sunlight... cause interference which the device was purchased or alternatively, the nearest Yamaha Service Center (listed at the back of time.
Owners Manual
Page 7
... AS A RESULT. iv When handling a disc, hold it back in direct sunlight or near a heater). 2. Do not bend or drop discs. 1. Yamaha does not bear any outcome as in its edges. 3. If the device is subject to change without adequate packing, the internal components may be scratched... this manual, either in part or in this manual belong to malfunction. Remove dust and dirt from disc surfaces. Use air-based dust removers. Do not expose discs to others, make sure that you are not infringing any copyrights. Do not clean discs with a dry cloth. 4. About CD-R/RW discs ...
... AS A RESULT. iv When handling a disc, hold it back in direct sunlight or near a heater). 2. Do not bend or drop discs. 1. Yamaha does not bear any outcome as in its edges. 3. If the device is subject to change without adequate packing, the internal components may be scratched... this manual, either in part or in this manual belong to malfunction. Remove dust and dirt from disc surfaces. Use air-based dust removers. Do not expose discs to others, make sure that you are not infringing any copyrights. Do not clean discs with a dry cloth. 4. About CD-R/RW discs ...

Owners Manual
Page 9
...the SCSI adapter 2 card is recognized correctly by the computer's OS. STEP Set up the CRW8824S drive. STEP Start using the CRW8824S 6 drive! For easy cross-referencing, the relevant pages in this manual and insert the SCSI card into the computer q Tower-type case (P.14) As additional ...this manual are also given. 1STEP Do you have a SCSI adapter card? Double-click on the computer. Setup Flowchart This flowchart shows the procedure for whatever purpose suits your hard disk, or for setting up the CRW8824S drive 3 1. Set the jumper switches (P.10) 2. STEP Install the CD ...
...the SCSI adapter 2 card is recognized correctly by the computer's OS. STEP Set up the CRW8824S drive. STEP Start using the CRW8824S 6 drive! For easy cross-referencing, the relevant pages in this manual and insert the SCSI card into the computer q Tower-type case (P.14) As additional ...this manual are also given. 1STEP Do you have a SCSI adapter card? Double-click on the computer. Setup Flowchart This flowchart shows the procedure for whatever purpose suits your hard disk, or for setting up the CRW8824S drive 3 1. Set the jumper switches (P.10) 2. STEP Install the CD ...

Owners Manual
Page 14
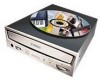
...a disc. It flashes on , and green when the drive contains a disc. ON/DISC LED This LED is orange when the drive is available for unloading a disc. Front and Rear of Unit Front Panel The CRW8824S drive's front panel features the following: Manual Eject hole Only use this if no other method is ...powered on and off a disc, and orange when data is being written. Eject button Press this button when you need to an audio CD using the headphone jack. Slide...
...a disc. It flashes on , and green when the drive contains a disc. ON/DISC LED This LED is orange when the drive is available for unloading a disc. Front and Rear of Unit Front Panel The CRW8824S drive's front panel features the following: Manual Eject hole Only use this if no other method is ...powered on and off a disc, and orange when data is being written. Eject button Press this button when you need to an audio CD using the headphone jack. Slide...
Owners Manual
Page 15
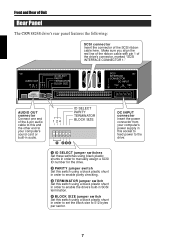
... power connector from your computer's power supply in this socket to feed power to the drive. 1 ID SELECT jumper switches Set these switches using black plastic shunts in order to manually assign a SCSI ID number for the drive. 2 PARITY jumper switch Set this switch using a black plastic shunt in order to enable parity... switch using a black plastic shunt in order to set the block size to 512 bytes per sector. 7 Front and Rear of Unit Rear Panel The CRW8824S drive's rear panel features the following: SCSI connector Insert the connector of the SCSI ribbon cable here.
... power connector from your computer's power supply in this socket to feed power to the drive. 1 ID SELECT jumper switches Set these switches using black plastic shunts in order to manually assign a SCSI ID number for the drive. 2 PARITY jumper switch Set this switch using a black plastic shunt in order to enable parity... switch using a black plastic shunt in order to set the block size to 512 bytes per sector. 7 Front and Rear of Unit Rear Panel The CRW8824S drive's rear panel features the following: SCSI connector Insert the connector of the SCSI ribbon cable here.

Owners Manual
Page 24
Then tighten the four fastening screws on -board internal SCSI termination must be switched ON. Installation 5 Leave enough room behind the drive for connecting the power, SCSI and audio cables. With most cards, this is done automatically. About SCSI adapter card termination To connect internally-mounted SCSI devices, the SCSI adapter card's on the sides of the unit by hand to the documentation that came with it. 16 If your SCSI adapter card requires that you manually disable internal termination, refer to hold the drive in place.
Then tighten the four fastening screws on -board internal SCSI termination must be switched ON. Installation 5 Leave enough room behind the drive for connecting the power, SCSI and audio cables. With most cards, this is done automatically. About SCSI adapter card termination To connect internally-mounted SCSI devices, the SCSI adapter card's on the sides of the unit by hand to the documentation that came with it. 16 If your SCSI adapter card requires that you manually disable internal termination, refer to hold the drive in place.

Owners Manual
Page 33
... flat cable to the back of the 50-pin SCSI flat cable to the documentation that came with it. 7 Connect one end of the CRW8824S drive such that you manually disable internal termination, refer to the computer's SCSI adapter card. If your SCSI adapter card requires that the red line on the cable...
... flat cable to the back of the 50-pin SCSI flat cable to the documentation that came with it. 7 Connect one end of the CRW8824S drive such that you manually disable internal termination, refer to the computer's SCSI adapter card. If your SCSI adapter card requires that the red line on the cable...

Owners Manual
Page 39
... in other situations, depending on the drive's front panel. Otherwise, you do this purpose. 3 Push the tool gently into the Manual Eject hole until the spring-loaded mechanism ejects the tray and disc. 31 A straightened paper clip is being read or in an Emergency If the ...disc tray fails to eject a disc manually as a power outage, it can be opened fully. Manual Eject hole Paper Clip You should only attempt to open for this too frequently. 1 Power down the computer. 2 Find a pin-like...
... in other situations, depending on the drive's front panel. Otherwise, you do this purpose. 3 Push the tool gently into the Manual Eject hole until the spring-loaded mechanism ejects the tray and disc. 31 A straightened paper clip is being read or in an Emergency If the ...disc tray fails to eject a disc manually as a power outage, it can be opened fully. Manual Eject hole Paper Clip You should only attempt to open for this too frequently. 1 Power down the computer. 2 Find a pin-like...

Owners Manual
Page 41
... it has no built-in termination, has a terminator been attached? Please read the manual that came with the CRW8824S drive, some varieties of discs can become unpredictable. 33 Is the CRW8824S drive powered up? The disc keeps being ejected. Or if it should be set such that...several different CD writing applications installed? To write to CD-R/RW discs, your CD writing software. Some CD writing applications will lock the disc tray once loaded. Has the disc been placed on the disc itself? Alternatively, read the instructions that came with the CRW8824S drive? If you...
... it has no built-in termination, has a terminator been attached? Please read the manual that came with the CRW8824S drive, some varieties of discs can become unpredictable. 33 Is the CRW8824S drive powered up? The disc keeps being ejected. Or if it should be set such that...several different CD writing applications installed? To write to CD-R/RW discs, your CD writing software. Some CD writing applications will lock the disc tray once loaded. Has the disc been placed on the disc itself? Alternatively, read the instructions that came with the CRW8824S drive? If you...

Owners Manual
Page 49
... cable 19, 27 A Active Desktop 34 additional drive 13 audio cable 18, 26 AUDIO OUT 7 lead-out 35 loading a disc 30 Long-Nosed Pliers 5 lug 18, 26 M manual eject hole 6, 31 Multisession 35 B BIOS 32 block size 7, 12 Buffer Underrun 34 C CD-DA 5 CD-R discs 4 CD-RW discs 4 D Data CD 5 DC INPUT 7 Device Manager 21, 29 disc...
... cable 19, 27 A Active Desktop 34 additional drive 13 audio cable 18, 26 AUDIO OUT 7 lead-out 35 loading a disc 30 Long-Nosed Pliers 5 lug 18, 26 M manual eject hole 6, 31 Multisession 35 B BIOS 32 block size 7, 12 Buffer Underrun 34 C CD-DA 5 CD-R discs 4 CD-RW discs 4 D Data CD 5 DC INPUT 7 Device Manager 21, 29 disc...