
MCXSP10 Manual
Page 2
IMPORTANT! Please record the serial number of this apparatus during ... get the most importantly, without annoying blaring or distortion - NO USER-SERVICEABLE PARTS INSIDE. We Want You Listening For A Lifetime YAMAHA and the Electronic Industries Association's Consumer Electronics Group want you to rain or ... and maintenance (servicing) instructions in accordance with arrowhead symbol, within an equilateral triangle, is too late, YAMAHA and the Electronic Industries Association's Consumer Electronics Group recommend you to the presence of Graphical Symbols The lightning ...
IMPORTANT! Please record the serial number of this apparatus during ... get the most importantly, without annoying blaring or distortion - NO USER-SERVICEABLE PARTS INSIDE. We Want You Listening For A Lifetime YAMAHA and the Electronic Industries Association's Consumer Electronics Group want you to rain or ... and maintenance (servicing) instructions in accordance with arrowhead symbol, within an equilateral triangle, is too late, YAMAHA and the Electronic Industries Association's Consumer Electronics Group recommend you to the presence of Graphical Symbols The lightning ...
MCXSP10 Manual
Page 3
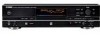
... STATEMENT (DECLARATION OF CONFORMITY PROCEDURE) Responsible Party: Address: Telephone: Fax: Type of Equipment: Model Name: Yamaha Electronics Corporation, U.S.A. 6660 Orangethorpe Avenue Buena Park, CA 90620 714-522-9105 714-670-0108 HDD/CD Recorder CDR-HD1500 This device complies with Part 15 of America or its subsidiaries. This product, when installed as indicated in the instructions contained...
... STATEMENT (DECLARATION OF CONFORMITY PROCEDURE) Responsible Party: Address: Telephone: Fax: Type of Equipment: Model Name: Yamaha Electronics Corporation, U.S.A. 6660 Orangethorpe Avenue Buena Park, CA 90620 714-522-9105 714-670-0108 HDD/CD Recorder CDR-HD1500 This device complies with Part 15 of America or its subsidiaries. This product, when installed as indicated in the instructions contained...
MCXSP10 Manual
Page 7
... Play 22 Playing back only the beginning parts of digital recording 82 Notes on the HDD 40 Copying high quality sounds (Audio Master Quality Recording 41 3 Setting the CDR copy mode 42 Setting the CDR copy menu 43 DUPLICATING A CD 45 Duplicating with high quality sounds 4 (Audio Master Quality Recording 46 FINALIZING A CD-R/CD-RW DISC 47 ERASING DATA ON...
... Play 22 Playing back only the beginning parts of digital recording 82 Notes on the HDD 40 Copying high quality sounds (Audio Master Quality Recording 41 3 Setting the CDR copy mode 42 Setting the CDR copy menu 43 DUPLICATING A CD 45 Duplicating with high quality sounds 4 (Audio Master Quality Recording 46 FINALIZING A CD-R/CD-RW DISC 47 ERASING DATA ON...
MCXSP10 Manual
Page 8
...recording features using this unit. 2. HDD RECORDING This section explains how to copy data from a CD to a CD-R/CD-RW), or finalize a CD-RW disc. 5. For the guideline, please refer to edit data (albums, tracks, and discs) on the HDD. OTHER FEATURES This section explains how to check the HDD information or change in part... "LIST OF EDIT MENU" (P.50). 6. CD-R/CD-RW COPYING This section explains how to copy data from the HDD to a CD-R or CD-RW disc, duplicate a CD (copy from CDs to the HDD or record external playback sources onto the HDD. 4. Design and specifications are subject to change...
...recording features using this unit. 2. HDD RECORDING This section explains how to copy data from a CD to a CD-R/CD-RW), or finalize a CD-RW disc. 5. For the guideline, please refer to edit data (albums, tracks, and discs) on the HDD. OTHER FEATURES This section explains how to check the HDD information or change in part... "LIST OF EDIT MENU" (P.50). 6. CD-R/CD-RW COPYING This section explains how to copy data from the HDD to a CD-R or CD-RW disc, duplicate a CD (copy from CDs to the HDD or record external playback sources onto the HDD. 4. Design and specifications are subject to change...

MCXSP10 Manual
Page 26
... Search L dB -30 -10 -6 -2 0 R 2. D001 1 S 500 L G dB -30 -10 -6 -2 0 R TIME 3. If you can set the play style Only when playing sources recorded on the remote control) to display the playback mode setting. 2. Press MODE to start the play (P.23). 4. The following message appears on the... HDD. Press the MULTI JOG knob (ENTER on the remote control). The play can search the desired part by pressing GROUP SKIP Q or GROUP SKIP W on the remote control. A Random play, full repeat...
... Search L dB -30 -10 -6 -2 0 R 2. D001 1 S 500 L G dB -30 -10 -6 -2 0 R TIME 3. If you can set the play style Only when playing sources recorded on the remote control) to display the playback mode setting. 2. Press MODE to start the play (P.23). 4. The following message appears on the... HDD. Press the MULTI JOG knob (ENTER on the remote control). The play can search the desired part by pressing GROUP SKIP Q or GROUP SKIP W on the remote control. A Random play, full repeat...

MCXSP10 Manual
Page 29
... automatically applies the playback time setting adjusted last time. The unit starts intro play the beginning of each track. ■ Playing back only the beginning parts of tracks (Intro Play) You can listen to the beginnings of the tracks for a set the amount of time to play .
... automatically applies the playback time setting adjusted last time. The unit starts intro play the beginning of each track. ■ Playing back only the beginning parts of tracks (Intro Play) You can listen to the beginnings of the tracks for a set the amount of time to play .

MCXSP10 Manual
Page 36
... REC DIG ALL SYNC L dB -30 -10 -6 -2 0 R TOC CD Adjustment is made . Level 0 . 0 d B REC LEVEL DIG ALL SYNC L dB -30 -10 -6 -2 0 R TOC CD Copy Speed Setting of the copying method. COPYING FROM A CD ONTO THE HDD Copy Method Setting of the copying speed. If digital copying is prohibited by...SCMS standard (P.82). Analog Copy This method always makes analog copies. Memo • Level adjustment is not possible during copying. • If the red part on the "Copy Method" and "Copy Level" settings. • When "Digital Copy" is selected: Max. 10x speed (2x speed when copy level...
... REC DIG ALL SYNC L dB -30 -10 -6 -2 0 R TOC CD Adjustment is made . Level 0 . 0 d B REC LEVEL DIG ALL SYNC L dB -30 -10 -6 -2 0 R TOC CD Copy Speed Setting of the copying method. COPYING FROM A CD ONTO THE HDD Copy Method Setting of the copying speed. If digital copying is prohibited by...SCMS standard (P.82). Analog Copy This method always makes analog copies. Memo • Level adjustment is not possible during copying. • If the red part on the "Copy Method" and "Copy Level" settings. • When "Digital Copy" is selected: Max. 10x speed (2x speed when copy level...

MCXSP10 Manual
Page 38
...parts using the editing operation. • Recording will be turned off before recording is not equipped with the clock function. Following chart indicates the time flow when this unit. • As a characteristic of an HDD recorder, it is 2-minute longer than the set the total recording time over 179 minutes 59 seconds, recording... is normally recorded when recording is 2-minute earlier than the starting time CDR-HD1500 starts recording (30 seconds to 1 minute after the program to be recorded for turning off CDR-HD1500 finishes recording Example: To record the program that...
...parts using the editing operation. • Recording will be turned off before recording is not equipped with the clock function. Following chart indicates the time flow when this unit. • As a characteristic of an HDD recorder, it is 2-minute longer than the set the total recording time over 179 minutes 59 seconds, recording... is normally recorded when recording is 2-minute earlier than the starting time CDR-HD1500 starts recording (30 seconds to 1 minute after the program to be recorded for turning off CDR-HD1500 finishes recording Example: To record the program that...

MCXSP10 Manual
Page 40
... to the previous display. Adjust the recording level so that the red part on the peak level meter does not light at the loudest sound levels. 4. Memo The recording level can be recorded. 2. WRITE HDD CDR ENTER ANALOG REC LEVEL GROUP SKIP When recording a digital input source (OPTICAL, COAXIAL) The digital recording level is set to 0dB by...
... to the previous display. Adjust the recording level so that the red part on the peak level meter does not light at the loudest sound levels. 4. Memo The recording level can be recorded. 2. WRITE HDD CDR ENTER ANALOG REC LEVEL GROUP SKIP When recording a digital input source (OPTICAL, COAXIAL) The digital recording level is set to 0dB by...

MCXSP10 Manual
Page 50
... An image file is not normally necessary. Level 0 . 0 d B REC LEVEL L ALL SYNC ANLG dB R -30 -10 -6 -2 0 CDR Memo • Level adjustment is not possible during copying. • If the red part on the HDD with 1x or 2x speed before starting the disc copy process. • The settings is stored in the...select 2x or 1x speed applied for a CD-RW disc. 4x Copy Copying is always made at 4x speed. Copy Speed REC L ALL SYNC ANLG dB R -30 -10 -6 -2 0 CDR Initial setting: Best Effort Best Effort Copying is made at Max. 8x speed for a CD-R disc and 4x speed for an image ...
... An image file is not normally necessary. Level 0 . 0 d B REC LEVEL L ALL SYNC ANLG dB R -30 -10 -6 -2 0 CDR Memo • Level adjustment is not possible during copying. • If the red part on the HDD with 1x or 2x speed before starting the disc copy process. • The settings is stored in the...select 2x or 1x speed applied for a CD-RW disc. 4x Copy Copying is always made at 4x speed. Copy Speed REC L ALL SYNC ANLG dB R -30 -10 -6 -2 0 CDR Initial setting: Best Effort Best Effort Copying is made at Max. 8x speed for a CD-R disc and 4x speed for an image ...

MCXSP10 Manual
Page 56
... Title Track Shuffle Track Level Tr. LIST OF EDIT MENU In the edit menu, you can edit album, track, and disc data stored in the HDD. A menu with ✕ mark is available in any purpose. ENTER : Confirms items or parameters selected by pressing +/-, H or G. 50 Interval Track ...Rename Track Adjust Track Erase Part Erase Track Combine Track Divide Track Pack Add Fade In Add Fade Out Track Title Disc Rename Disc Erase Disc Combine Disc Divide Disc Pack...
... Title Track Shuffle Track Level Tr. LIST OF EDIT MENU In the edit menu, you can edit album, track, and disc data stored in the HDD. A menu with ✕ mark is available in any purpose. ENTER : Confirms items or parameters selected by pressing +/-, H or G. 50 Interval Track ...Rename Track Adjust Track Erase Part Erase Track Combine Track Divide Track Pack Add Fade In Add Fade Out Track Title Disc Rename Disc Erase Disc Combine Disc Divide Disc Pack...

MCXSP10 Manual
Page 64
...CLEAR to select an item. 2. on the remote control) to be moved. 5. Disc that have been recorded on the remote control). RAL SOUND HDD/CD RECORDER L MAX HDD CDR COPY A.M.Q.R. Press MENU while the HDD is canceled, and then this unit returns to the playback if having started editing during playback. •...that contains the track to be moved If the edit menu is selected (at right) • Track Adjust (P.59) • Track Erase (P.60) • Part Erase (P.60) • Track Combine (P.62) • Track Divide (P.62) • Track Pack* (P.63) • Add Fade In (P.64) •...
...CLEAR to select an item. 2. on the remote control) to be moved. 5. Disc that have been recorded on the remote control). RAL SOUND HDD/CD RECORDER L MAX HDD CDR COPY A.M.Q.R. Press MENU while the HDD is canceled, and then this unit returns to the playback if having started editing during playback. •...that contains the track to be moved If the edit menu is selected (at right) • Track Adjust (P.59) • Track Erase (P.60) • Part Erase (P.60) • Track Combine (P.62) • Track Divide (P.62) • Track Pack* (P.63) • Add Fade In (P.64) •...

MCXSP10 Manual
Page 65
... edit menu is selected during playback, playback restarts.) Before "Track Adjust" 1 2 1 2 After "Track Adjust" (Track 2 is displaced forward) Memo • If the adjusted track includes a part that cannot be copied digitally before the track that has been renumbered will be adjusted takes precedence over the previous track. Press COMPLETE. However, if...
... edit menu is selected during playback, playback restarts.) Before "Track Adjust" 1 2 1 2 After "Track Adjust" (Track 2 is displaced forward) Memo • If the adjusted track includes a part that cannot be copied digitally before the track that has been renumbered will be adjusted takes precedence over the previous track. Press COMPLETE. However, if...

MCXSP10 Manual
Page 66
... The number of the track that has been erased will be erased repeatedly. 6. Press CLEAR to be set by "minute: second: frame". If "Part Erase" is selected (P.58), the following screen appears. In this unit searches for future use. Rotate the MULTI JOG knob (press +/- The passage .... The unit to be set is selected during playback, the unit automatically selects the item to be erased. 3. EDITING TRACKS Track Erase You can erase part of a selected track. 1. If "Track Erase" is erased. Press CLEAR to be edited. Press COMPLETE. L dB -30 -10 -6 -2 0 R GROUP Track ...
... The number of the track that has been erased will be erased repeatedly. 6. Press CLEAR to be set by "minute: second: frame". If "Part Erase" is selected (P.58), the following screen appears. In this unit searches for future use. Rotate the MULTI JOG knob (press +/- The passage .... The unit to be set is selected during playback, the unit automatically selects the item to be erased. 3. EDITING TRACKS Track Erase You can erase part of a selected track. 1. If "Track Erase" is erased. Press CLEAR to be edited. Press COMPLETE. L dB -30 -10 -6 -2 0 R GROUP Track ...

MCXSP10 Manual
Page 67
... ending point is not possible to select the ending point of the partial erase. It is repeatedly played. Track 1 2 English Track 3 : Part to the editing menu item selection. (If the edit menu is four seconds. The passage between the point that is 5 seconds before the beginning... confirmed selection. 8. To change the ending point, press CLEAR once to return to confirm the ending point of the partial erase. The selected part is 5 seconds after the ending point. 9. Press MULTI JOG knob (ENTER on the remote control) to confirm the beginning point of the...
... ending point is not possible to select the ending point of the partial erase. It is repeatedly played. Track 1 2 English Track 3 : Part to the editing menu item selection. (If the edit menu is four seconds. The passage between the point that is 5 seconds before the beginning... confirmed selection. 8. To change the ending point, press CLEAR once to return to confirm the ending point of the partial erase. The selected part is 5 seconds after the ending point. 9. Press MULTI JOG knob (ENTER on the remote control) to confirm the beginning point of the...

MCXSP10 Manual
Page 70
...8226; If "Track Adjust" has been performed, the fade-in length F.In 3 001 L dB -30 -10 -6 -2 0 R TIME Playing time of the track 6. Erasing a certain part of the track 64 The end of the track is selected (P.58), the following screen appears. Rotate the MULTI JOG knob (press +/- Fade-out length... F.Out 3 1001 L dB -30 -10 -6 -2 0 R TIME Playing time of the track (Part Erase). - on the remote control) to be set in above step, with a fade-in of the length set in the 1 to the beginning of the...
...8226; If "Track Adjust" has been performed, the fade-in length F.In 3 001 L dB -30 -10 -6 -2 0 R TIME Playing time of the track 6. Erasing a certain part of the track 64 The end of the track is selected (P.58), the following screen appears. Rotate the MULTI JOG knob (press +/- Fade-out length... F.Out 3 1001 L dB -30 -10 -6 -2 0 R TIME Playing time of the track (Part Erase). - on the remote control) to be set in above step, with a fade-in of the length set in the 1 to the beginning of the...

MCXSP10 Manual
Page 71
...on the remote control) to assign a title. 3. Press TEXT/TIME to cancel the confirmed selection. 4. Rotate MULTI JOG knob (+/- Erasing a certain part of both the adjusted track and the previous track becomes ineffective. Adjusting the beginning of the track (Track Adjust). • If "Track Adjust" has... been performed, the fade-out effect of the track (Part Erase). - Press CLEAR to switch the display information as necessary (P.18). For details on during playback, the unit automatically selects the item to...
...on the remote control) to assign a title. 3. Press TEXT/TIME to cancel the confirmed selection. 4. Rotate MULTI JOG knob (+/- Erasing a certain part of both the adjusted track and the previous track becomes ineffective. Adjusting the beginning of the track (Track Adjust). • If "Track Adjust" has... been performed, the fade-out effect of the track (Part Erase). - Press CLEAR to switch the display information as necessary (P.18). For details on during playback, the unit automatically selects the item to...
MCXSP10 Manual
Page 82
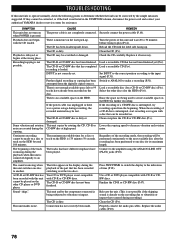
...CD (P.v). Select the other CD player or DVD player. Finalize the CD-R or CD-RW disc (P.47). There is interrupted, try recording again from the digitally copied sources. The maximum recordable time for assistance. The CD is no available space on the HDD is connected digitally to decrease vibration and rotation noise. If the recording of the part...and contact your authorized YAMAHA dealer or service center for a disc or track on the HDD. There is dirty. REMEDY Securely connect the power cable (P.10). Load a recordable CD that has been recorded stretching over again with ...
...CD (P.v). Select the other CD player or DVD player. Finalize the CD-R or CD-RW disc (P.47). There is interrupted, try recording again from the digitally copied sources. The maximum recordable time for assistance. The CD is no available space on the HDD is connected digitally to decrease vibration and rotation noise. If the recording of the part...and contact your authorized YAMAHA dealer or service center for a disc or track on the HDD. There is dirty. REMEDY Securely connect the power cable (P.10). Load a recordable CD that has been recorded stretching over again with ...

MCXSP10 Manual
Page 87
...). Interval Track Rename Track Adjust Edits the tracks on or off the video output. HDD Utility HDD Info. Formats the HDD. Version Displays the firmware version in the synchronized recording mode. LIST OF SYSTEM MENU You can make the following operations on each menu, see "LIST OF EDIT MENU...) or "EDITING TRACKS" (P.58-65). For detailed information on this unit's system menu according to your needs. HDD Format Displays the HDD capacity. Track Erase Part Erase Track Edit* Track Combine Track Divide Track Pack Add Fade In Add Fade Out Track Title Disc Rename Disc ...
...). Interval Track Rename Track Adjust Edits the tracks on or off the video output. HDD Utility HDD Info. Formats the HDD. Version Displays the firmware version in the synchronized recording mode. LIST OF SYSTEM MENU You can make the following operations on each menu, see "LIST OF EDIT MENU...) or "EDITING TRACKS" (P.58-65). For detailed information on this unit's system menu according to your needs. HDD Format Displays the HDD capacity. Track Erase Part Erase Track Edit* Track Combine Track Divide Track Pack Add Fade In Add Fade Out Track Title Disc Rename Disc ...

