
Owner's Manual
Page 5
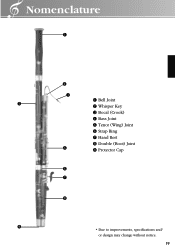
Nomenclature q w e q Bell Joint r w Whisper Key e Bocal (Crook) r Bass Joint t Tenor (Wing) Joint y Strap Ring u Hand Rest i Double (Boot) Joint t o Protector Cap y u i o * Due to improvements, specifications and/ or design may change without notice. 19
Nomenclature q w e q Bell Joint r w Whisper Key e Bocal (Crook) r Bass Joint t Tenor (Wing) Joint y Strap Ring u Hand Rest i Double (Boot) Joint t o Protector Cap y u i o * Due to improvements, specifications and/ or design may change without notice. 19
Owner's Manual
Page 7
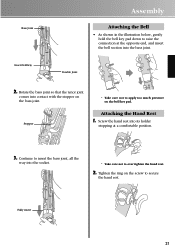
... on the bass joint. * Take care not to apply too much pressure on the screw to secure the hand rest. Tighten the ring on the bell key pad. Stopper Attaching the Hand Rest 1. Screw the hand rest into its holder stopping at the opposite end, and insert the... into the socket. * Take care not to over tighten the hand rest. 2. Bass Joint Insert halfway Assembly Attaching the Bell • As shown in the illustration below, gently hold the bell key pad down to raise the connection at a comfortable position. 3. Double Joint 2. Continue to insert the bass joint, all the way...
... on the bass joint. * Take care not to apply too much pressure on the screw to secure the hand rest. Tighten the ring on the bell key pad. Stopper Attaching the Hand Rest 1. Screw the hand rest into its holder stopping at the opposite end, and insert the... into the socket. * Take care not to over tighten the hand rest. 2. Bass Joint Insert halfway Assembly Attaching the Bell • As shown in the illustration below, gently hold the bell key pad down to raise the connection at a comfortable position. 3. Double Joint 2. Continue to insert the bass joint, all the way...

Owner's Manual
Page 9
...section, then remove the bell from the bass joint (the bell can, however, be removed from the bass joint before removing the bass joint from the double joint's narrower tube. 6. Remove the bocal. 3. Remove the tenor joint. 5. Assembly Take Care When Handling the Bassoon Don't let moisture ... from the instrument). At this time, take care not to properly care for the instrument. 1. ■ Disassembling the Instrument To disassemble the bassoon, follow the steps described below. Clean each of the double joint's tubes while playing the instrument. 23 Also, refer to the "Maintenance" ...
...section, then remove the bell from the bass joint (the bell can, however, be removed from the bass joint before removing the bass joint from the double joint's narrower tube. 6. Remove the bocal. 3. Remove the tenor joint. 5. Assembly Take Care When Handling the Bassoon Don't let moisture ... from the instrument). At this time, take care not to properly care for the instrument. 1. ■ Disassembling the Instrument To disassemble the bassoon, follow the steps described below. Clean each of the double joint's tubes while playing the instrument. 23 Also, refer to the "Maintenance" ...
Owner's Manual
Page 12
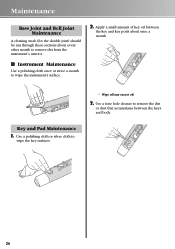
Maintenance Bass Joint and Bell Joint Maintenance A cleaning swab (for the double joint) should be run through these sections about once a month. Use a polishing cloth or silver cloth to wipe ...
Maintenance Bass Joint and Bell Joint Maintenance A cleaning swab (for the double joint) should be run through these sections about once a month. Use a polishing cloth or silver cloth to wipe ...