

Owner's Manual
Page 3
...-20,000 Hz ⅷ Highly Dynamic Power, Low Impedance Drive Capability ⅷ Continuously Variable LOUDNESS Control ⅷ CD/DVD DIRECT AMP Switch Used to Reproduce the Purest CD and DVD Sound ⅷ Remote Control Capability AX-496 only ⅷ REC OUT Selector Independent of Input Source Selection ⅷ PURE DIRECT Switch Used to Reproduce the Purest Source Sound CONTENTS UNPACKING Inside of Front Cover FEATURES ...1 CAUTION ...2 NOTES ABOUT THE REMOTE CONTROL 3 CONNECTIONS ...4 CONTROLS AND THEIR FUNCTIONS 6 OPERATION ...9 TROUBLESHOOTING 13 SPECIFICATIONS 14 E-1
...-20,000 Hz ⅷ Highly Dynamic Power, Low Impedance Drive Capability ⅷ Continuously Variable LOUDNESS Control ⅷ CD/DVD DIRECT AMP Switch Used to Reproduce the Purest CD and DVD Sound ⅷ Remote Control Capability AX-496 only ⅷ REC OUT Selector Independent of Input Source Selection ⅷ PURE DIRECT Switch Used to Reproduce the Purest Source Sound CONTENTS UNPACKING Inside of Front Cover FEATURES ...1 CAUTION ...2 NOTES ABOUT THE REMOTE CONTROL 3 CONNECTIONS ...4 CONTROLS AND THEIR FUNCTIONS 6 OPERATION ...9 TROUBLESHOOTING 13 SPECIFICATIONS 14 E-1
Owner's Manual
Page 4
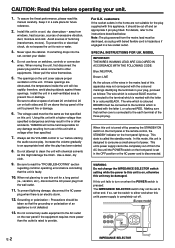
... panel of this apparatus may not correspond with the coloured markings identifying the terminals in your plug, proceed as a plug with a higher voltage than specified. 7. Never open the cabinet. Do not use of power. Never pull the wires themselves. 5. Always set to turn on switches, controls or connection wires. Be sure to "∞" before operating your dealer. 4. IMPEDANCE SELECTOR SET BEFORE POWER ON A OR B : 6ΩMIN. /SPEAKER...
... panel of this apparatus may not correspond with the coloured markings identifying the terminals in your plug, proceed as a plug with a higher voltage than specified. 7. Never open the cabinet. Do not use of power. Never pull the wires themselves. 5. Always set to turn on switches, controls or connection wires. Be sure to "∞" before operating your dealer. 4. IMPEDANCE SELECTOR SET BEFORE POWER ON A OR B : 6ΩMIN. /SPEAKER...
Owner's Manual
Page 5
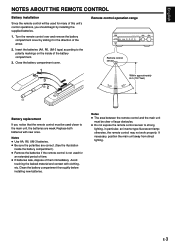
Turn the remote control over and remove the battery compartment cover by installing the supplied batteries. 1. Notes ● Use AA, R6, UM-3 batteries. ● Be sure the polarities are weak. E-3 If necessary, position the main unit away from direct lighting. Close the battery compartment cover. 1 3 2 Remote control operation range REC OUT TAPE CD TUNER MD PHONO AUX Remote control sensor Within approximately 6 m (19.7 feet) 30° 30°...
Turn the remote control over and remove the battery compartment cover by installing the supplied batteries. 1. Notes ● Use AA, R6, UM-3 batteries. ● Be sure the polarities are weak. E-3 If necessary, position the main unit away from direct lighting. Close the battery compartment cover. 1 3 2 Remote control operation range REC OUT TAPE CD TUNER MD PHONO AUX Remote control sensor Within approximately 6 m (19.7 feet) 30° 30°...

Owner's Manual
Page 6
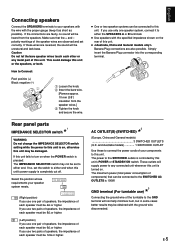
E-4 CONNECTIONS Caution: Plug in this unit. Speakers A GND OUTPUT OUTPUT LINE OUT LINE IN R R L PHONO GND 1 CD/DVD R L R L TUNER 2 IN (PLAY) 3 TAPE OUT (REC) 4 IN (PLAY) 3 MD OUT (REC) 4 AUX L 3 * Right Left (Europe model) SPEAKERS R L A B CAUTION :SEE INSTRUCTION MANUAL FOR CORRECT SETTING. Also refer to "-". on the rear panel must be connected to page 5 for audio/video units except speakers. ● The output (or input) terminals of signals. TOTAL MAINS A OR B : 6ΩMIN. /SPEAKER A B : I2ΩMIN. /SPEAKER A OR...
E-4 CONNECTIONS Caution: Plug in this unit. Speakers A GND OUTPUT OUTPUT LINE OUT LINE IN R R L PHONO GND 1 CD/DVD R L R L TUNER 2 IN (PLAY) 3 TAPE OUT (REC) 4 IN (PLAY) 3 MD OUT (REC) 4 AUX L 3 * Right Left (Europe model) SPEAKERS R L A B CAUTION :SEE INSTRUCTION MANUAL FOR CORRECT SETTING. Also refer to "-". on the rear panel must be connected to page 5 for audio/video units except speakers. ● The output (or input) terminals of signals. TOTAL MAINS A OR B : 6ΩMIN. /SPEAKER A B : I2ΩMIN. /SPEAKER A OR...
Owner's Manual
Page 7
... 100W. 3 * GND terminal (For turntable use one speaker system, connect it as short as possible). Simply insert the Banana Plug connector into the corresponding terminal. Rear panel parts 1 * IMPEDANCE SELECTOR switch WARNING Do not change the IMPEDANCE SELECTOR switch setting while the power to this unit is pressed: The IMPEDANCE SELECTOR switch may be 6Ω or higher. The power to the SWITCHED outlets is completely cut off. If...
... 100W. 3 * GND terminal (For turntable use one speaker system, connect it as short as possible). Simply insert the Banana Plug connector into the corresponding terminal. Rear panel parts 1 * IMPEDANCE SELECTOR switch WARNING Do not change the IMPEDANCE SELECTOR switch setting while the power to this unit is pressed: The IMPEDANCE SELECTOR switch may be 6Ω or higher. The power to the SWITCHED outlets is completely cut off. If...

Owner's Manual
Page 8
CONTROLS AND THEIR FUNCTIONS FRONT PANEL AX-496 1 23 4 5 7 STANDBY POWER ON OFF NATURAL SOUND STEREO AMPLIFIER AX-496 AUX MD TAPE CD/DVD TUNER PHONO STANDBY/ON PHONES SPEAKERS A B ON OFF BASS l 0l 2 2 3 3 4 5 4 5 TREBLE l 0l 2 2 3 3 4 5 4 5 BALANCE l 0l 2 2 3 3 4 L5 4 5R LOUDNESS l FLAT -30dB 2 I0 3 9 4 8 5 7 6 REC OUT TAPE CD/DVD TUNER MD PHONO AUX PURE DIRECT INPUT CD/DVD DIRECT AMP VOLUME l6 20 l2 28 8 40 4 60 2 0 -dB 8 90 A B C DE F G AX-396 1 23 4 6 7 STANDBY POWER ON OFF NATURAL SOUND STEREO AMPLIFIER ...
CONTROLS AND THEIR FUNCTIONS FRONT PANEL AX-496 1 23 4 5 7 STANDBY POWER ON OFF NATURAL SOUND STEREO AMPLIFIER AX-496 AUX MD TAPE CD/DVD TUNER PHONO STANDBY/ON PHONES SPEAKERS A B ON OFF BASS l 0l 2 2 3 3 4 5 4 5 TREBLE l 0l 2 2 3 3 4 5 4 5 BALANCE l 0l 2 2 3 3 4 L5 4 5R LOUDNESS l FLAT -30dB 2 I0 3 9 4 8 5 7 6 REC OUT TAPE CD/DVD TUNER MD PHONO AUX PURE DIRECT INPUT CD/DVD DIRECT AMP VOLUME l6 20 l2 28 8 40 4 60 2 0 -dB 8 90 A B C DE F G AX-396 1 23 4 6 7 STANDBY POWER ON OFF NATURAL SOUND STEREO AMPLIFIER ...

Owner's Manual
Page 9
... to be ready to receive infrared-signals from the remote control. 9 PHONES jack When you can listen to the sound played on the tape deck connected to the OFF position. You can also monitor the sound being recorded. * To listen to the source selected with the INPUT selector, press this switch again to turn off this unit's power supply from the AC line. 2 STANDBY indicator Lights up only while this...
... to be ready to receive infrared-signals from the remote control. 9 PHONES jack When you can listen to the sound played on the tape deck connected to the OFF position. You can also monitor the sound being recorded. * To listen to the source selected with the INPUT selector, press this switch again to turn off this unit's power supply from the AC line. 2 STANDBY indicator Lights up only while this...
Owner's Manual
Page 10
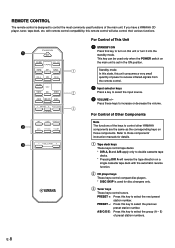
... TAPE CD/DVD AUX PHONO TUNER 3 3 - Refer to those components. Standby mode In this state, this unit consumes a very small quantity of This Unit 1 STANDBY/ON Press this remote control will reverse the tape direction on the main unit is used for details. 1 Tape deck keys These keys control tape decks. * DIR A, B and A/B apply only to select the group (A - REMOTE CONTROL The remote control is designed to select the input source. 3 VOLUME +/- VOLUME + For Control of power to receive infrared-signals from the remote control. 2 Input...
... TAPE CD/DVD AUX PHONO TUNER 3 3 - Refer to those components. Standby mode In this state, this unit consumes a very small quantity of This Unit 1 STANDBY/ON Press this remote control will reverse the tape direction on the main unit is used for details. 1 Tape deck keys These keys control tape decks. * DIR A, B and A/B apply only to select the group (A - REMOTE CONTROL The remote control is designed to select the input source. 3 VOLUME +/- VOLUME + For Control of power to receive infrared-signals from the remote control. 2 Input...
Owner's Manual
Page 11
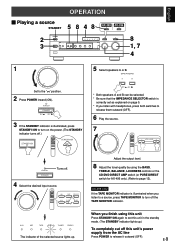
... switches to the "∞" position. 2 Press POWER inward (ON). VOLUME + Adjust the output level. 8 Adjust the tonal quality by using this unit Press STANDBY/ON again to set as explained on the power. (The STANDBY indicator turns off.) STANDBY/ON STANDBY/ON - + STANDBY POWER Turns off. 4 Select the desired input source. - + MD TAPE CD/DVD AUX PHONO TUNER 5 Select speakers A or B. E-9 AX-396 only If the TAPE MONITOR indicator is illuminated, press STANDBY/ON to turn on page 5. * If you listen to a source, press TAPE MONITOR...
... switches to the "∞" position. 2 Press POWER inward (ON). VOLUME + Adjust the output level. 8 Adjust the tonal quality by using this unit Press STANDBY/ON again to set as explained on the power. (The STANDBY indicator turns off.) STANDBY/ON STANDBY/ON - + STANDBY POWER Turns off. 4 Select the desired input source. - + MD TAPE CD/DVD AUX PHONO TUNER 5 Select speakers A or B. E-9 AX-396 only If the TAPE MONITOR indicator is illuminated, press STANDBY/ON to turn on page 5. * If you listen to a source, press TAPE MONITOR...
Owner's Manual
Page 12
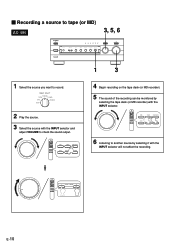
... PHONO AUX 2 Play the source. 3 Select the source with the INPUT selector and adjust VOLUME to check the sound output. - + MD TAPE CD/DVD AUX PHONO TUNER 1 3 4 Begin recording on the tape deck (or MD recorder). 5 The sound of the recording can be monitored by selecting the tape deck (or MD recorder) with the INPUT selector. - + MD TAPE CD/DVD AUX PHONO TUNER 6 Listening to record. l6 20 28 l2 8 40 4 60 2 0 -dB - + - VOLUME + E-10 Ⅵ Recording a source to tape (or MD) AX-496 3, 5, 6 STANDBY POWER...
... PHONO AUX 2 Play the source. 3 Select the source with the INPUT selector and adjust VOLUME to check the sound output. - + MD TAPE CD/DVD AUX PHONO TUNER 1 3 4 Begin recording on the tape deck (or MD recorder). 5 The sound of the recording can be monitored by selecting the tape deck (or MD recorder) with the INPUT selector. - + MD TAPE CD/DVD AUX PHONO TUNER 6 Listening to record. l6 20 28 l2 8 40 4 60 2 0 -dB - + - VOLUME + E-10 Ⅵ Recording a source to tape (or MD) AX-496 3, 5, 6 STANDBY POWER...
Owner's Manual
Page 13
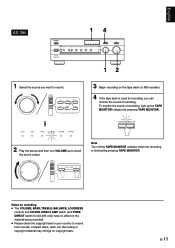
... To monitor the sound of recording, light up to record from records, compact discs, radio, etc. Notes on recording ● The VOLUME, BASS, TREBLE, BALANCE, LOUDNESS controls and CD/DVD DIRECT AMP switch (and PURE DIRECT switch for recording, you want to record. - + MD TAPE CD/DVD AUX PHONO TUNER 3 Begin recording on the tape deck (or MD recorder). 4 If the tape deck is finished by pressing TAPE MONITOR. VOLUME + Note Turn off the TAPE MONITOR indicator when the recording is used for AX-496...
... To monitor the sound of recording, light up to record from records, compact discs, radio, etc. Notes on recording ● The VOLUME, BASS, TREBLE, BALANCE, LOUDNESS controls and CD/DVD DIRECT AMP switch (and PURE DIRECT switch for recording, you want to record. - + MD TAPE CD/DVD AUX PHONO TUNER 3 Begin recording on the tape deck (or MD recorder). 4 If the tape deck is finished by pressing TAPE MONITOR. VOLUME + Note Turn off the TAPE MONITOR indicator when the recording is used for AX-496...
Owner's Manual
Page 14
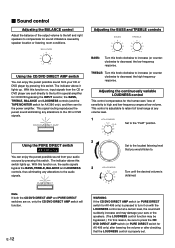
... the LOUDNESS control is pressed to turn it lights up . E-12 WARNING If the CD/DVD DIRECT AMP switch (or PURE DIRECT switch for the human ears' loss of the output volume to the left and right speakers to the power amplifier. The indicator above it on , the audio signals bypass the BASS, TREBLE, BALANCE and LOUDNESS controls, thus eliminating any alterations to high and low-frequency ranges at a certain level, the sound will suddenly...
... the LOUDNESS control is pressed to turn it lights up . E-12 WARNING If the CD/DVD DIRECT AMP switch (or PURE DIRECT switch for the human ears' loss of the output volume to the left and right speakers to the power amplifier. The indicator above it on , the audio signals bypass the BASS, TREBLE, BALANCE and LOUDNESS controls, thus eliminating any alterations to high and low-frequency ranges at a certain level, the sound will suddenly...
Owner's Manual
Page 15
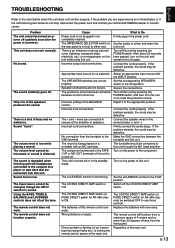
... the POWER switch, and then turn on the power to the GND terminal. Incorrect setting of 6 meters and no ambience. Turn off . Connect the cords properly. Select an appropriate input source with an MC cartridge. Adjust it to either end when this unit on the rear panel is ON. If the problem persists, the cords may be connected to this unit. The CD/DVD DIRECT AMP switch (or PURE DIRECT switch for AX-496 only...
... the POWER switch, and then turn on the power to the GND terminal. Incorrect setting of 6 meters and no ambience. Turn off . Connect the cords properly. Select an appropriate input source with an MC cartridge. Adjust it to either end when this unit on the rear panel is ON. If the problem persists, the cords may be connected to this unit. The CD/DVD DIRECT AMP switch (or PURE DIRECT switch for AX-496 only...
Owner's Manual
Page 16
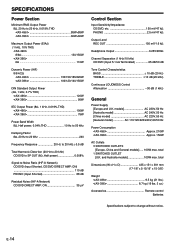
SPECIFICATIONS Power Section Minimum RMS Output Power 8Ω, 20 Hz to 20 kHz, 0.019% THD
SPECIFICATIONS Power Section Minimum RMS Output Power 8Ω, 20 Hz to 20 kHz, 0.019% THD


