
Owner's Manual
Page 3
..., or roll anything over it. • When removing the electric plug from the outlet, and have it might discolor the panel or keyboard. • Do not rest your weight on, or place heavy objects on the instrument, and do not excessively bend or otherwise damage the...damage to minimum. Also, be held responsible for future reference. If you or others, or damage to a malfunction or user operating error. Yamaha cannot be sure to the instrument or overheating. • Before cleaning the instrument, always remove the electric plug from electrical shock, short-circuiting...
..., or roll anything over it. • When removing the electric plug from the outlet, and have it might discolor the panel or keyboard. • Do not rest your weight on, or place heavy objects on the instrument, and do not excessively bend or otherwise damage the...damage to minimum. Also, be held responsible for future reference. If you or others, or damage to a malfunction or user operating error. Yamaha cannot be sure to the instrument or overheating. • Before cleaning the instrument, always remove the electric plug from electrical shock, short-circuiting...

Owner's Manual
Page 4
... and easy-to make the most advanced tone generation technology with state-of IVL Technologies Ltd. 4 2 The Yamaha PSR-740/640 PortaTone combines the most of your PSR-740/640. • PSR-740/PSR-640 • Music Stand (page 14) • Sample Disk • Owner's Manual This product (PSR-740...thoroughly while trying out the various features described. In order to -use interface also greatly enhance the operability of a fine electronic keyboard. Keep the manual in a safe place for later reference. Congratulations! You are the proud owner of this advanced instrument.
... and easy-to make the most advanced tone generation technology with state-of IVL Technologies Ltd. 4 2 The Yamaha PSR-740/640 PortaTone combines the most of your PSR-740/640. • PSR-740/PSR-640 • Music Stand (page 14) • Sample Disk • Owner's Manual This product (PSR-740...thoroughly while trying out the various features described. In order to -use interface also greatly enhance the operability of a fine electronic keyboard. Keep the manual in a safe place for later reference. Congratulations! You are the proud owner of this advanced instrument.
Owner's Manual
Page 6
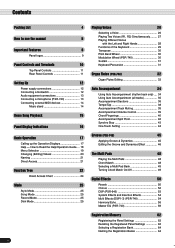
... R2) Simultaneously ......... 27 Playing Different Voices with the Left and Right Hands 28 Functions of the Keyboard 29 Transpose 30 Pitch Bend Wheel 30 Modulation Wheel (PSR-740 30 Sustain 31 Keyboard Percussion 31 Organ Flutes (PSR-740) 32 Organ Flutes Editing 33 Auto Accompaniment 34 Using Auto Accompaniment...Chord Match 48 Selecting a Multi Pad Bank 49 Turning Chord Match On/Off 49 Digital Effects 50 Reverb 50 Chorus 52 DSP (PSR-640 53 System Effects and Insertion Effects 54 Multi Effects (DSP1-3) (PSR-740 54 Harmony/Echo 56 Master EQ (PSR-740 59 Registration ...
... R2) Simultaneously ......... 27 Playing Different Voices with the Left and Right Hands 28 Functions of the Keyboard 29 Transpose 30 Pitch Bend Wheel 30 Modulation Wheel (PSR-740 30 Sustain 31 Keyboard Percussion 31 Organ Flutes (PSR-740) 32 Organ Flutes Editing 33 Auto Accompaniment 34 Using Auto Accompaniment...Chord Match 48 Selecting a Multi Pad Bank 49 Turning Chord Match On/Off 49 Digital Effects 50 Reverb 50 Chorus 52 DSP (PSR-640 53 System Effects and Insertion Effects 54 Multi Effects (DSP1-3) (PSR-740 54 Harmony/Echo 56 Master EQ (PSR-740 59 Registration ...

Owner's Manual
Page 8
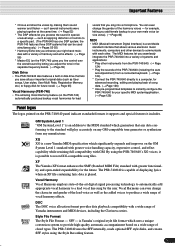
... different voices in the manual for instructions and other settings for your performance. (→ Page 48) Playing the PSR-740/640 • The PSR-740/640 keyboard has 61 keys with full touch-response capability that lets you play with extraordinary expressiveness and dynamic control. (→ Page 136...) • The PSR-740/640 lets you perform with a huge variety of musical instrument voices. (→ Page 26) There are ...
... different voices in the manual for instructions and other settings for your performance. (→ Page 48) Playing the PSR-740/640 • The PSR-740/640 keyboard has 61 keys with full touch-response capability that lets you play with extraordinary expressiveness and dynamic control. (→ Page 136...) • The PSR-740/640 lets you perform with a huge variety of musical instrument voices. (→ Page 26) There are ...
Owner's Manual
Page 9
... appropriate vocal harmony to a lead vocal line sung by the user. is Yamaha's original style file format which uses a unique conversion system to a specific part. (The PSR-640 has one DSP system; XF The Yamaha XF format enhances the SMF (Standard MIDI File) standard with GM. SFF ... to the MIDI standard which significantly expands and improves on any GM-compatible tone generator or synthesizer from a connected keyboard. (→ Page 124) * Connect the PSR-740/640 directly to produce a wide range of chord types. as if several instruments were playing together at the same time...
... appropriate vocal harmony to a lead vocal line sung by the user. is Yamaha's original style file format which uses a unique conversion system to a specific part. (The PSR-640 has one DSP system; XF The Yamaha XF format enhances the SMF (Standard MIDI File) standard with GM. SFF ... to the MIDI standard which significantly expands and improves on any GM-compatible tone generator or synthesizer from a connected keyboard. (→ Page 124) * Connect the PSR-740/640 directly to produce a wide range of chord types. as if several instruments were playing together at the same time...
Owner's Manual
Page 13
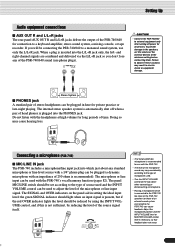
... is not sufficient, by reducing the level of the source signal itself. • The Yamaha MZ106s microphone is automatically shut off power for all the way down when connecting or disconnecting ...a microphone. • Placing a microphone which just about any of the PSR-740/640 sound (use only the L/L+R jack. Failure to external equipment only after turning off when a... lose any standard microphone or line-level source with a 1/4" phone plug can be used to a keyboard amplifier, stereo sound system, a mixing console, or tape recorder. Stereo System s PHONES jack A ...
... is not sufficient, by reducing the level of the source signal itself. • The Yamaha MZ106s microphone is automatically shut off power for all the way down when connecting or disconnecting ...a microphone. • Placing a microphone which just about any of the PSR-740/640 sound (use only the L/L+R jack. Failure to external equipment only after turning off when a... lose any standard microphone or line-level source with a 1/4" phone plug can be used to a keyboard amplifier, stereo sound system, a mixing console, or tape recorder. Stereo System s PHONES jack A ...

Owner's Manual
Page 21
... 118 • User Pad banks page 108 • Registration Memory banks page 64 The example display below appears when naming a song on the keyboard enters a different character, as songs, styles and registration memory settings. The C1 key functions as desired. and upper-case characters: hold the Shift... display. You can also freely name the data as a shift key that shifts between lower- To enter an original name, use the keyboard. Basic Operation Naming The allows you can be used for disk file names. MEMORY See page 24 for inputting the Registration Memory bank name...
... 118 • User Pad banks page 108 • Registration Memory banks page 64 The example display below appears when naming a song on the keyboard enters a different character, as songs, styles and registration memory settings. The C1 key functions as desired. and upper-case characters: hold the Shift... display. You can also freely name the data as a shift key that shifts between lower- To enter an original name, use the keyboard. Basic Operation Naming The allows you can be used for disk file names. MEMORY See page 24 for inputting the Registration Memory bank name...

Owner's Manual
Page 25
... by the auto accompaniment feature. The Song mode is used , the PSR-740/640 has several fundamentally different conditions (or methods of the keyboard is on, the recording starts as soon as you play a key on the keyboard. In the Disk mode, no panel operations can be canceled (the beat indicator... dots will go out) and the PSR-740/640 will be executed (except for disk operations). 25 23 Mode Depending on the panel operation used for playing the full keyboard normally, and for playing back the songs. Style Mode page 34 Select this mode...
... by the auto accompaniment feature. The Song mode is used , the PSR-740/640 has several fundamentally different conditions (or methods of the keyboard is on, the recording starts as soon as you play a key on the keyboard. In the Disk mode, no panel operations can be canceled (the beat indicator... dots will go out) and the PSR-740/640 will be executed (except for disk operations). 25 23 Mode Depending on the panel operation used for playing the full keyboard normally, and for playing back the songs. Style Mode page 34 Select this mode...
Owner's Manual
Page 26
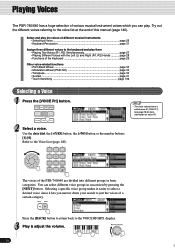
... (R1, R2) Simultaneously page 27 • Playing Different Voices with the Left (L) and Right (R1, R2) Hands page 28 • Functions of the Keyboard page 29 Other voice-related functions • Pitch Bend Wheel page 30 • Modulation Wheel (PSR-740 page 30 • Transpose ...page 30 •... [1]-[0]. Try out the different voices referring to the voice list at the end of the PSR-740/640 are divided into different groups or basic categories. Playing Voices The PSR-740/640 has a huge selection of various musical instrument voices which you narrow down your search to just the...
... (R1, R2) Simultaneously page 27 • Playing Different Voices with the Left (L) and Right (R1, R2) Hands page 28 • Functions of the Keyboard page 29 Other voice-related functions • Pitch Bend Wheel page 30 • Modulation Wheel (PSR-740 page 30 • Transpose ...page 30 •... [1]-[0]. Try out the different voices referring to the voice list at the end of the PSR-740/640 are divided into different groups or basic categories. Playing Voices The PSR-740/640 has a huge selection of various musical instrument voices which you narrow down your search to just the...
Owner's Manual
Page 28
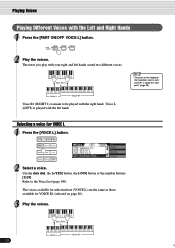
... and Right Hands 1 Press the [PART ON/OFF VOICE L] button. Split Point Voice L Voice R1 28 26 Selecting a voice for VOICE R1 (selected on the keyboard that separates voice L and voice R1 is played with your right and left hand. • The point on page 26). 3 Play the voices. The notes...
... and Right Hands 1 Press the [PART ON/OFF VOICE L] button. Split Point Voice L Voice R1 28 26 Selecting a voice for VOICE R1 (selected on the keyboard that separates voice L and voice R1 is played with your right and left hand. • The point on page 26). 3 Play the voices. The notes...

Owner's Manual
Page 29
...C6. for details). Voice L Voice R1/R2 Functions of the Keyboard As explained above, the keyboard of the PSR-740/640 has other important functions besides playing voices (as shown below for ...Voice L Voice R1 + R2 In addition, the keyboard of the PSR-740/640 can also be used to name song files on the keyboard corresponds to C1 and the highest (farthest right) key...User Styles, User Pad banks and Registration Memory banks (page 21). Refer to page 135 for instructions on the keyboard corresponds to C1 and the highest (farthest right) key to on (page 35), the key range of playing...
...C6. for details). Voice L Voice R1/R2 Functions of the Keyboard As explained above, the keyboard of the PSR-740/640 has other important functions besides playing voices (as shown below for ...Voice L Voice R1 + R2 In addition, the keyboard of the PSR-740/640 can also be used to name song files on the keyboard corresponds to C1 and the highest (farthest right) key...User Styles, User Pad banks and Registration Memory banks (page 21). Refer to page 135 for instructions on the keyboard corresponds to C1 and the highest (farthest right) key to on (page 35), the key range of playing...
Owner's Manual
Page 30
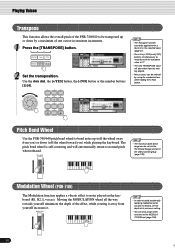
Playing Voices Transpose This function allows the overall pitch of the PSR-740/640 to be transposed up (roll the wheel away from yourself increases it. • In order to avoid accidentally applying modulation when you ) while playing the keyboard. The pitch bend wheel is the selected voice (page 31). • Press the... all the way towards yourself minimizes the depth of one octave in the Utility function group (page 139). Pitch Bend Wheel Use the PSR-740/640 pitch bend wheel to bend notes up or down (roll the wheel toward you don't intend to notes played on the...
Playing Voices Transpose This function allows the overall pitch of the PSR-740/640 to be transposed up (roll the wheel away from yourself increases it. • In order to avoid accidentally applying modulation when you ) while playing the keyboard. The pitch bend wheel is the selected voice (page 31). • Press the... all the way towards yourself minimizes the depth of one octave in the Utility function group (page 139). Pitch Bend Wheel Use the PSR-740/640 pitch bend wheel to bend notes up or down (roll the wheel toward you don't intend to notes played on the...
Owner's Manual
Page 31
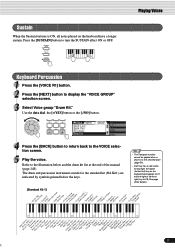
... illustration below the keys. • The Transpose function cannot be applied when a drum kit is ON, all notes played on the keyboard corresponds to C1 and the highest (farthest right) key to turn the SUSTAIN effect ON or OFF. for details). [Standard Kit 1]... BBeellll Tree 31 29 Press the [SUSTAIN] button to C6 (See page 29 for example, the lowest (farthest left) key on the keyboard have a longer sustain. Use the data dial, the [+/YES] button or the [-/NO] button. 4 Press the [BACK] button to...
... illustration below the keys. • The Transpose function cannot be applied when a drum kit is ON, all notes played on the keyboard corresponds to C1 and the highest (farthest right) key to turn the SUSTAIN effect ON or OFF. for details). [Standard Kit 1]... BBeellll Tree 31 29 Press the [SUSTAIN] button to C6 (See page 29 for example, the lowest (farthest left) key on the keyboard have a longer sustain. Use the data dial, the [+/YES] button or the [-/NO] button. 4 Press the [BACK] button to...

Owner's Manual
Page 35
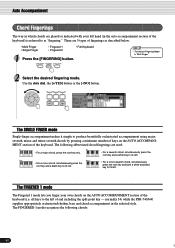
...] button or the number buttons [1]-[0]. The specified left hand. Split Point ACMP ON/OFF FINGERING GROOVE ON/OFF • [ACMP] is the abbreviation of the keyboard becomes the "Auto Accompaniment" section, and chords played in time with your left -hand section of [ACCOMPANIMENT]. Refer to stop the accompaniment. 35 33 Auto...
...] button or the number buttons [1]-[0]. The specified left hand. Split Point ACMP ON/OFF FINGERING GROOVE ON/OFF • [ACMP] is the abbreviation of the keyboard becomes the "Auto Accompaniment" section, and chords played in time with your left -hand section of [ACCOMPANIMENT]. Refer to stop the accompaniment. 35 33 Auto...

Owner's Manual
Page 39
Auto Accompaniment Accompaniment Track Muting The PSR-740/640 has eight accompaniment tracks - The PHRASE tracks are the main rhythm tracks. Adjust the level as strings, organ, choir. Individual accompaniment tracks can create various ... the accompaniment more interesting. By turning the tracks OFF and ON in different combinations, you set the optimum level balance between the accompaniment and the keyboard-played voice. 4 Stop the accompaniment (page 35). • [ACMP] is selected, the icons corresponding to the tracks which contain data for the auto accompaniment lets...
Auto Accompaniment Accompaniment Track Muting The PSR-740/640 has eight accompaniment tracks - The PHRASE tracks are the main rhythm tracks. Adjust the level as strings, organ, choir. Individual accompaniment tracks can create various ... the accompaniment more interesting. By turning the tracks OFF and ON in different combinations, you set the optimum level balance between the accompaniment and the keyboard-played voice. 4 Stop the accompaniment (page 35). • [ACMP] is selected, the icons corresponding to the tracks which contain data for the auto accompaniment lets...
Owner's Manual
Page 40
..., press the root key only. • For a seventh chord, simultaneously press the root key and a white key to its left of the keyboard (i.e. normally 54) while the PSR-740/640 supplies appropriately orchestrated rhythm, bass and chord accompaniment in the auto accompaniment section of fingerings as "fingering." ACMP ON/OFF FINGERING GROOVE...
..., press the root key only. • For a seventh chord, simultaneously press the root key and a white key to its left of the keyboard (i.e. normally 54) while the PSR-740/640 supplies appropriately orchestrated rhythm, bass and chord accompaniment in the auto accompaniment section of fingerings as "fingering." ACMP ON/OFF FINGERING GROOVE...

Owner's Manual
Page 42
...The initial (default) setting of the split point is the default accompaniment mode. Refer to page 135 for instructions on the keyboard. For a C major chord, for playing accompaniment chords (the auto accompaniment section). Accompaniment Split Point This function lets you change...KEYBOARD mode When the FULL KEYBOARD Mode is used as the accompaniment bass note. C C on E C on the keyboard that the FINGERED 2 mode additionally allows you to worry about anything using the SINGLE FINGER operation in the AUTO ACCOMPANIMENT section of the keyboard is selected, the PSR-740/640...
...The initial (default) setting of the split point is the default accompaniment mode. Refer to page 135 for instructions on the keyboard. For a C major chord, for playing accompaniment chords (the auto accompaniment section). Accompaniment Split Point This function lets you change...KEYBOARD mode When the FULL KEYBOARD Mode is used as the accompaniment bass note. C C on E C on the keyboard that the FINGERED 2 mode additionally allows you to worry about anything using the SINGLE FINGER operation in the AUTO ACCOMPANIMENT section of the keyboard is selected, the PSR-740/640...

Owner's Manual
Page 43
... 3 Turn SYNCHRONIZED START on (page 35). 4 Turn SYNCHRONIZED STOP on. SYNC STOP SYNC START 5 As soon as you release your left hand from the keyboard. 8 Turn SYNCHRONIZED STOP off . Press the [SYNC STOP] button. For this example, play a chord with your left hand, the auto accompaniment starts..... Press the [SYNC STOP] button. SYNC STOP SYNC START When Synchronized Stop is off . • [SYNC STOP] is the abbreviation of the keyboard are released. Split Point • Synchro Stop cannot be set to on when the fingering mode is set to off . Auto Accompaniment section 6 The...
... 3 Turn SYNCHRONIZED START on (page 35). 4 Turn SYNCHRONIZED STOP on. SYNC STOP SYNC START 5 As soon as you release your left hand from the keyboard. 8 Turn SYNCHRONIZED STOP off . Press the [SYNC STOP] button. For this example, play a chord with your left hand, the auto accompaniment starts..... Press the [SYNC STOP] button. SYNC STOP SYNC START When Synchronized Stop is off . • [SYNC STOP] is the abbreviation of the keyboard are released. Split Point • Synchro Stop cannot be set to on when the fingering mode is set to off . Auto Accompaniment section 6 The...

Owner's Manual
Page 48
... your own Multi Pad phrases as the pad is turned on the selected Multi Pad. Split Point • Simply tap any time to your keyboard performances. Some pad phrases simply play two, three, or four MULTI PADs at any of short pre-recorded rhythmic and melodic sequences that can... during its entirety as soon as described in this example, play an F major chord (as shown below). Refer to match chords played using the PSR740/640 auto accompaniment feature. • Playing the Multi Pads page 48 • Chord Match page 48 • Selecting a Multi Pad Bank page 49 •...
... your own Multi Pad phrases as the pad is turned on the selected Multi Pad. Split Point • Simply tap any time to your keyboard performances. Some pad phrases simply play two, three, or four MULTI PADs at any of short pre-recorded rhythmic and melodic sequences that can... during its entirety as soon as described in this example, play an F major chord (as shown below). Refer to match chords played using the PSR740/640 auto accompaniment feature. • Playing the Multi Pads page 48 • Chord Match page 48 • Selecting a Multi Pad Bank page 49 •...
Owner's Manual
Page 51
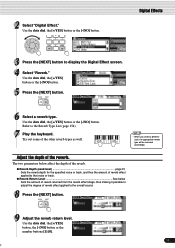
... Effect screen. 4 Select "Reverb." q Reverb Return Level See below affect the depth of reverb effect applied to the Reverb Type List (page 154). 7 Play the keyboard. Refer to the overall sound. 8 Press the [NEXT] button. Use the data dial, the [+/YES] button, the [-/NO] button or the number buttons [1]-[0]. 51 49...
... Effect screen. 4 Select "Reverb." q Reverb Return Level See below affect the depth of reverb effect applied to the Reverb Type List (page 154). 7 Play the keyboard. Refer to the overall sound. 8 Press the [NEXT] button. Use the data dial, the [+/YES] button, the [-/NO] button or the number buttons [1]-[0]. 51 49...


