
Owner's Manual
Page 40
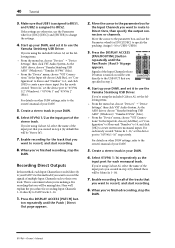
...driver, choose "Yamaha Steinberg USB ASIO" (Windows) / "Yamaha 01V96i" (Mac). • From the "Device" menu, choose "VST Connections." Create a stereo track in step 4 (by default these will be Mono In 1-16). 7. If you're using Cubase AI, select the name of multiple Input Channels each Input Channel is convenient ...'ve finished recording, stop the DAW. 01V96i-Owner's Manual Make sure that you created in step 2. 4. If you're using the included Cubase AI, set it to the owner's manual of the input ports you will be mixing later. ton repeatedly until the Pan/Route...
...driver, choose "Yamaha Steinberg USB ASIO" (Windows) / "Yamaha 01V96i" (Mac). • From the "Device" menu, choose "VST Connections." Create a stereo track in step 4 (by default these will be Mono In 1-16). 7. If you're using Cubase AI, select the name of multiple Input Channels each Input Channel is convenient ...'ve finished recording, stop the DAW. 01V96i-Owner's Manual Make sure that you created in step 2. 4. If you're using the included Cubase AI, set it to the owner's manual of the input ports you will be mixing later. ton repeatedly until the Pan/Route...
Owner's Manual
Page 41
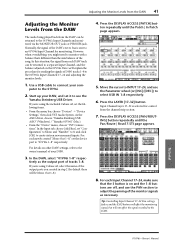
...-24, and use the Yamaha Steinberg USB Driver. ING] button repeatedly until the Patch | In Patch page appears. 5. Tutorial 01V96i-Owner's Manual In this situation, the signal from each Input Channel 17-24, make sure that 's different than the mix balance of the output ports you 're using the included Cubase AI, set it to...
...-24, and use the Yamaha Steinberg USB Driver. ING] button repeatedly until the Patch | In Patch page appears. 5. Tutorial 01V96i-Owner's Manual In this situation, the signal from each Input Channel 17-24, make sure that 's different than the mix balance of the output ports you 're using the included Cubase AI, set it to...
Reference Manual
Page 117
...& Headphones section 7 MONITOR OUT connectors ...... 10, 13 Monitor Source selector 7 Monitoring 49 Digital input channel status .........14 LAST SOLO 50 MIX SOLO 50 MIXDOWN 49 MONO 50 RECORDING 49 Solo function 51 Solo safe function 50 Solo setup 49 ...MONO 50 MONO DELAY 132 MULTI FILTER 141 Mute groups 59 Muting 89 N Naming 28, 35 Nominal Pan preference 109 Nuendo 83 Nuendo/Cubase... Target parameter 85 TRACK ARMING section 98 TRANSPORT section 99 01V96i-Reference Manual
...& Headphones section 7 MONITOR OUT connectors ...... 10, 13 Monitor Source selector 7 Monitoring 49 Digital input channel status .........14 LAST SOLO 50 MIX SOLO 50 MIXDOWN 49 MONO 50 RECORDING 49 Solo function 51 Solo safe function 50 Solo setup 49 ...MONO 50 MONO DELAY 132 MULTI FILTER 141 Mute groups 59 Muting 89 N Naming 28, 35 Nominal Pan preference 109 Nuendo 83 Nuendo/Cubase... Target parameter 85 TRACK ARMING section 98 TRANSPORT section 99 01V96i-Reference Manual
Reference Manual
Page 118
...Layer Nuendo/Cubase 93 Pro...Routing ST Pair Link preference ..... 110 S Sampling rates 14 DOUBLE CHANNEL 16 DOUBLE SPEED 16 Setting the higher sampling rates 16 SINGLE 16... Scene numbers 68 Scene up/down buttons 9 SEL buttons 7, 8 SELECTED CHANNEL section ...........9 Setting levels 38 Shadow memory 70 SIGNAL indicators 7, 12 SINGLE 16... 49 LAST SOLO 50 LISTEN 50 MIX SOLO 50 MIXDOWN 49 RECORDING 49 SOLO 49 Solo function 51 SOLO SAFE CHANNEL 50 Solo safe function 50 SOLO .........53 Channel Pairing 27 Copy operation 42 WORD CLOCK IN connector 10 WORD CLOCK OUT connector ..........
...Layer Nuendo/Cubase 93 Pro...Routing ST Pair Link preference ..... 110 S Sampling rates 14 DOUBLE CHANNEL 16 DOUBLE SPEED 16 Setting the higher sampling rates 16 SINGLE 16... Scene numbers 68 Scene up/down buttons 9 SEL buttons 7, 8 SELECTED CHANNEL section ...........9 Setting levels 38 Shadow memory 70 SIGNAL indicators 7, 12 SINGLE 16... 49 LAST SOLO 50 LISTEN 50 MIX SOLO 50 MIXDOWN 49 RECORDING 49 SOLO 49 Solo function 51 SOLO SAFE CHANNEL 50 Solo safe function 50 SOLO .........53 Channel Pairing 27 Copy operation 42 WORD CLOCK IN connector 10 WORD CLOCK OUT connector ..........


