User Guide
Page 3
...-Right View 1-2 Rear-Left View 1-3 Internal Components 1-4 Options 1-5 Printer Configurations 1-6 Standard Features 1-6 Available Configurations 1-6 Options 1-7 Control Panel 1-8 Control Panel Features 1-8 Control Panel Layout 1-9 Menu Map 1-10 Information Pages 1-10 Sample Pages 1-10 More Information 1-12 Resources 1-12 Xerox Support Centre 1-13 2 Network Basics Overview of Network Setup and Configuration 2-2 Setting Up the Network 2-3 Choosing a Connection Method 2-3 Connecting via...
...-Right View 1-2 Rear-Left View 1-3 Internal Components 1-4 Options 1-5 Printer Configurations 1-6 Standard Features 1-6 Available Configurations 1-6 Options 1-7 Control Panel 1-8 Control Panel Features 1-8 Control Panel Layout 1-9 Menu Map 1-10 Information Pages 1-10 Sample Pages 1-10 More Information 1-12 Resources 1-12 Xerox Support Centre 1-13 2 Network Basics Overview of Network Setup and Configuration 2-2 Setting Up the Network 2-3 Choosing a Connection Method 2-3 Connecting via...

User Guide
Page 5
...4-15 Color Misregistration 4-16 Printed Area Does Not Fit on the Paper or Margins Are Incorrect 4-20 5 Maintenance Cleaning the Printer 5-2 Cleaning the Outside of the Printer 5-2 Cleaning the LEDs 5-3 ...Printer 5-14 Moving the Printer Within the Office 5-14 Preparing the Printer for Shipment 5-14 6 Troubleshooting Clearing Paper Jams 6-2 Preventing Jams 6-2 Jams in the Printer 6-3 Jams in the Finisher 6-36 Getting Help 6-63 Control Panel Messages 6-63 PhaserSMART Technical Support 6-64 PrintingScout Alerts 6-64 Web Links 6-65 A User Safety Index Phaser® 7400 Color Printer...
...4-15 Color Misregistration 4-16 Printed Area Does Not Fit on the Paper or Margins Are Incorrect 4-20 5 Maintenance Cleaning the Printer 5-2 Cleaning the Outside of the Printer 5-2 Cleaning the LEDs 5-3 ...Printer 5-14 Moving the Printer Within the Office 5-14 Preparing the Printer for Shipment 5-14 6 Troubleshooting Clearing Paper Jams 6-2 Preventing Jams 6-2 Jams in the Printer 6-3 Jams in the Finisher 6-36 Getting Help 6-63 Control Panel Messages 6-63 PhaserSMART Technical Support 6-64 PrintingScout Alerts 6-64 Web Links 6-65 A User Safety Index Phaser® 7400 Color Printer...

User Guide
Page 6
Printer Features This chapter includes: ■ Parts of the Printer on page 1-2 ■ Printer Configurations on page 1-6 ■ Control Panel on page 1-8 ■ More Information on page 1-12 Phaser® 7400 Color Printer 1-1
Printer Features This chapter includes: ■ Parts of the Printer on page 1-2 ■ Printer Configurations on page 1-6 ■ Control Panel on page 1-8 ■ More Information on page 1-12 Phaser® 7400 Color Printer 1-1

User Guide
Page 7
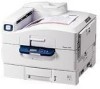
Top output tray (output delivered facedown) 8. Door B 9 10 7400-001 Phaser® 7400 Color Printer 1-2 Front door 5. Door A 9. Parts of the Printer This section includes: ■ Front-Right View on page 1-2 ■ Rear-Left View on page 1-3 ■ Internal Components on page 1-4 ■ Options on page 1-5 Front-Right View Parts of the Printer 6 7 8 1 2 3 4 5 1. Top cover handle 2. Tray 2 paper level gauge 6. Paper catcher 7. Tray 2 4. Control panel 3. Tray 1 (Multi-Purpose Tray) 10.
Top output tray (output delivered facedown) 8. Door B 9 10 7400-001 Phaser® 7400 Color Printer 1-2 Front door 5. Door A 9. Parts of the Printer This section includes: ■ Front-Right View on page 1-2 ■ Rear-Left View on page 1-3 ■ Internal Components on page 1-4 ■ Options on page 1-5 Front-Right View Parts of the Printer 6 7 8 1 2 3 4 5 1. Top cover handle 2. Tray 2 paper level gauge 6. Paper catcher 7. Tray 2 4. Control panel 3. Tray 1 (Multi-Purpose Tray) 10.

User Guide
Page 13
... Information Pages on page 1-10 ■ Sample Pages on page 1-10 Control Panel Features The control panel: ■ Displays the printer's operating status (for example, Printing, Ready to Print), printer errors, and warnings. ■ Prompts you to load paper, order and... replace supplies, and clear jams. ■ Enables you to access tools and information pages to help resolve problems. ■ Enables you to change printer and network settings. ■ Enables you to access supply status. Phaser® 7400 Color Printer...
... Information Pages on page 1-10 ■ Sample Pages on page 1-10 Control Panel Features The control panel: ■ Displays the printer's operating status (for example, Printing, Ready to Print), printer errors, and warnings. ■ Prompts you to load paper, order and... replace supplies, and clear jams. ■ Enables you to access tools and information pages to help resolve problems. ■ Enables you to change printer and network settings. ■ Enables you to access supply status. Phaser® 7400 Color Printer...

User Guide
Page 14
Control Panel Layout Control Panel 7400-006 3 5 78 1 2 46 7400-007 1. Yellow: Warning condition, printer continues to the previous menu item. Red: Startup sequence or error condition. 6. Graphic display indicates status messages and menus. 3. OK button Accepts the setting selected. 8. Phaser® 7400 Color Printer 1-9 Status Indicator LED: 4. Up Arrow button print. Scrolls downward through the menus. Returns to 5. Back...
Control Panel Layout Control Panel 7400-006 3 5 78 1 2 46 7400-007 1. Yellow: Warning condition, printer continues to the previous menu item. Red: Startup sequence or error condition. 6. Graphic display indicates status messages and menus. 3. OK button Accepts the setting selected. 8. Phaser® 7400 Color Printer 1-9 Status Indicator LED: 4. Up Arrow button print. Scrolls downward through the menus. Returns to 5. Back...

User Guide
Page 15
...Usage Page, and then press the OK button to print. To print sample pages: 1. Phaser® 7400 Color Printer 1-10 On the control panel, select Information, and then press the OK button. 2. On the control panel, select Information, and then press the OK button. 2. Note: You can be printed.... available for printing. Print the Menu Map to see where these pages from the control panel. On the control panel, select Information, and then press the OK button. 2. Information Pages Your printer comes with a set of information pages that can also print information pages from CentreWare...
...Usage Page, and then press the OK button to print. To print sample pages: 1. Phaser® 7400 Color Printer 1-10 On the control panel, select Information, and then press the OK button. 2. On the control panel, select Information, and then press the OK button. 2. Note: You can be printed.... available for printing. Print the Menu Map to see where these pages from the control panel. On the control panel, select Information, and then press the OK button. 2. Information Pages Your printer comes with a set of information pages that can also print information pages from CentreWare...
User Guide
Page 16
... print. Select Sample Pages, and then press the OK button. 3. See also: Advanced Features Guide at www.xerox.com/office/7400support. On the control panel, select Information, and then press the OK button. 2. Phaser® 7400 Color Printer 1-11 Each sampler page lists either CMYK Sampler Pages or RGB Sampler Pages, and then press the OK...
... print. Select Sample Pages, and then press the OK button. 3. See also: Advanced Features Guide at www.xerox.com/office/7400support. On the control panel, select Information, and then press the OK button. 2. Phaser® 7400 Color Printer 1-11 Each sampler page lists either CMYK Sampler Pages or RGB Sampler Pages, and then press the OK...

User Guide
Page 17
... the Support website. Source Packaged with printer Packaged with printer Software and Documentation CD-ROM www.xerox.com/office/7400support www.xerox.com/office/7400support www.xerox.com/office/7400support www.xerox.com/office/7400support www.xerox.com/office/pmtools www.xerox.com/office/7400support www.phaserSMART.com www.xerox.com/office/7400support Control panel Help (?) button Control panel menu Phaser® 7400 Color Printer 1-12
... the Support website. Source Packaged with printer Packaged with printer Software and Documentation CD-ROM www.xerox.com/office/7400support www.xerox.com/office/7400support www.xerox.com/office/7400support www.xerox.com/office/7400support www.xerox.com/office/pmtools www.xerox.com/office/7400support www.phaserSMART.com www.xerox.com/office/7400support Control panel Help (?) button Control panel menu Phaser® 7400 Color Printer 1-12

User Guide
Page 20
... CD-ROM is not available, you can also manually set the printer's IP address on the control panel. ■ Macintosh systems: Manually set the printer's network address (for TCP/IP) on driver installation, see the...printer and the computer. 2. Turn on the computer from www.xerox.com/office/drivers. Configure the printer's network address, which is required to identify the printer on the network. ■ Windows operating systems: Run the Installer on the Software and Documentation CD-ROM to automatically set up and configure the network: 1. Phaser® 7400 Color Printer...
... CD-ROM is not available, you can also manually set the printer's IP address on the control panel. ■ Macintosh systems: Manually set the printer's network address (for TCP/IP) on driver installation, see the...printer and the computer. 2. Turn on the computer from www.xerox.com/office/drivers. Configure the printer's network address, which is required to identify the printer on the network. ■ Windows operating systems: Run the Installer on the Software and Documentation CD-ROM to automatically set up and configure the network: 1. Phaser® 7400 Color Printer...

User Guide
Page 24
...control panel or by default on page 1-8 Changing or Modifying the IP Address Using CentreWare IS CentreWare IS provides a simple interface that the printer DHCP protocol is enabled by using an embedded web server. Enter the printer's IP address in CentreWare IS to go to the CentreWare IS Online Help. Phaser® 7400 Color Printer...0-255. See also: Control Panel Features on all Phaser printers. ■ DHCP ■ CentreWare IS ■ AutoIP Information Required for Manual IP Addressing Information Internet Protocol (IP) address of the printer Network Mask Default Router/...
...control panel or by default on page 1-8 Changing or Modifying the IP Address Using CentreWare IS CentreWare IS provides a simple interface that the printer DHCP protocol is enabled by using an embedded web server. Enter the printer's IP address in CentreWare IS to go to the CentreWare IS Online Help. Phaser® 7400 Color Printer...0-255. See also: Control Panel Features on all Phaser printers. ■ DHCP ■ CentreWare IS ■ AutoIP Information Required for Manual IP Addressing Information Internet Protocol (IP) address of the printer Network Mask Default Router/...

User Guide
Page 26
... for your computer has a properly configured IP address for more information. Select TCP/IP Setup, and then press the OK button. 5. Phaser® 7400 Color Printer 2-8 Select Network Setup, and then press the OK button. 4. Select DHCP/BOOTP, and then press the OK button to manually set ...server, or in a small office with a single PC and use a dialup modem connection, you can manually set the IP address. On the control panel, select Printer Setup, and then press the OK button. 2. Select TCP/IP Address, and then press the OK button. 7. Manually setting the IP address ...
... for your computer has a properly configured IP address for more information. Select TCP/IP Setup, and then press the OK button. 5. Phaser® 7400 Color Printer 2-8 Select Network Setup, and then press the OK button. 4. Select DHCP/BOOTP, and then press the OK button to manually set ...server, or in a small office with a single PC and use a dialup modem connection, you can manually set the IP address. On the control panel, select Printer Setup, and then press the OK button. 2. Select TCP/IP Address, and then press the OK button. 7. Manually setting the IP address ...

User Guide
Page 28
... your desired language from the Software and Documentation CD-ROM: 1. Use the Desktop Printer Utility to install the printer driver: 1. Verify that is created during the software installation. Phaser® 7400 Color Printer 2-10 Insert the CD-ROM into the CD-ROM drive. 2. Click Start,...www.xerox.com/office/7400support Macintosh OS 9.x USB A USB-connected printer does not display in the PhaserTools folder that the Ethernet port is located in the Chooser. Open the AppleTalk Control Panel. 2. In the Run window, type: :\INSTALL.EXE. 2. To create a desktop USB printer: 1....
... your desired language from the Software and Documentation CD-ROM: 1. Use the Desktop Printer Utility to install the printer driver: 1. Verify that is created during the software installation. Phaser® 7400 Color Printer 2-10 Insert the CD-ROM into the CD-ROM drive. 2. Click Start,...www.xerox.com/office/7400support Macintosh OS 9.x USB A USB-connected printer does not display in the PhaserTools folder that the Ethernet port is located in the Chooser. Open the AppleTalk Control Panel. 2. In the Run window, type: :\INSTALL.EXE. 2. To create a desktop USB printer: 1....

User Guide
Page 31
Caution: Setting the appropriate paper type improves print quality and avoids damage to the printer. For more information, see Selecting Printing Options on page 3-8 Phaser® 7400 Color Printer 3-2 See also: Loading Paper on page 3-24. 4. From the application, access the Print dialog box, and select printing options in the tray. 2. Send the job to the printer. 3. Load paper in the printer driver. At the control panel, either confirm the paper type and size or change them as required. Overview of Basic Steps Overview of Basic Steps Follow these steps to print jobs: 1.
Caution: Setting the appropriate paper type improves print quality and avoids damage to the printer. For more information, see Selecting Printing Options on page 3-8 Phaser® 7400 Color Printer 3-2 See also: Loading Paper on page 3-24. 4. From the application, access the Print dialog box, and select printing options in the tray. 2. Send the job to the printer. 3. Load paper in the printer driver. At the control panel, either confirm the paper type and size or change them as required. Overview of Basic Steps Overview of Basic Steps Follow these steps to print jobs: 1.

User Guide
Page 34
On the control panel, select Information, and then press the OK button. 2. Select Paper Tips, and then press the OK button to print. See also: Recommended Media List at www.xerox.com/office/7400support Phaser® 7400 Color Printer 3-5 For more detailed information about paper sizes and weights supported in the printer trays. Supported Paper and Media Supported Paper Sizes and Weights The following sections provide information about supported paper and other media, print the Paper Tips page: 1. Select Information Pages, and then press the OK button. 3.
On the control panel, select Information, and then press the OK button. 2. Select Paper Tips, and then press the OK button to print. See also: Recommended Media List at www.xerox.com/office/7400support Phaser® 7400 Color Printer 3-5 For more detailed information about paper sizes and weights supported in the printer trays. Supported Paper and Media Supported Paper Sizes and Weights The following sections provide information about supported paper and other media, print the Paper Tips page: 1. Select Information Pages, and then press the OK button. 3.

User Guide
Page 40
.... If you are using Letter or A4 size paper, select the paper size without the letters SEF. c. Phaser® 7400 Color Printer 3-11 b. Select the appropriate paper type, and then press the OK button. When the control panel prompts you loaded a new size or type of paper in the tray, do the following: a. Select Change...
.... If you are using Letter or A4 size paper, select the paper size without the letters SEF. c. Phaser® 7400 Color Printer 3-11 b. Select the appropriate paper type, and then press the OK button. When the control panel prompts you loaded a new size or type of paper in the tray, do the following: a. Select Change...

User Guide
Page 43
.... See also: Printing on Specialty Media on page 3-32 Printing Custom Size Paper on page 3-45 Phaser® 7400 Color Printer 3-14 If you loaded paper or media with the letters SEF. c. Loading Paper 4. When the control panel prompts you are using Letter or A4 size paper, select the paper size with a height less than...
.... See also: Printing on Specialty Media on page 3-32 Printing Custom Size Paper on page 3-45 Phaser® 7400 Color Printer 3-14 If you loaded paper or media with the letters SEF. c. Loading Paper 4. When the control panel prompts you are using Letter or A4 size paper, select the paper size with a height less than...

User Guide
Page 44
...printer driver, click the Paper/Quality tab. 2. Selecting Manual Feed Using Macintosh To select this option using Macintosh: 1. When prompted by the control panel, remove the paper from Tray 1 (MPT). 6. Select Manual Feed, and then click OK to load the paper for your print job. When prompted by the control panel... the tray. Load the appropriate paper for your print job. 4. Select Manual Feed in Tray 1 (MPT) on page 3-8 Phaser® 7400 Color Printer 3-15 Selecting Manual Feed Using Windows To select this option using Windows: 1. Loading Paper Using Manual Feed in Tray 1 (MPT...
...printer driver, click the Paper/Quality tab. 2. Selecting Manual Feed Using Macintosh To select this option using Macintosh: 1. When prompted by the control panel, remove the paper from Tray 1 (MPT). 6. Select Manual Feed, and then click OK to load the paper for your print job. When prompted by the control panel... the tray. Load the appropriate paper for your print job. 4. Select Manual Feed in Tray 1 (MPT) on page 3-8 Phaser® 7400 Color Printer 3-15 Selecting Manual Feed Using Windows To select this option using Windows: 1. Loading Paper Using Manual Feed in Tray 1 (MPT...

User Guide
Page 48
c. Select the appropriate paper type, and then press the OK button. At the control panel, select Paper Tray Setup, and then press the OK button. d. e. For Tray 2, select the appropriate paper size, and then press the OK button. If you ... you changed the type of paper in the tray, do not select the paper size with the letters SEF. Push the tray completely into the printer. Phaser® 7400 Color Printer 3-19 Loading Paper 7400-023 6. Caution: Setting the appropriate paper type improves print quality and avoids damage to the...
c. Select the appropriate paper type, and then press the OK button. At the control panel, select Paper Tray Setup, and then press the OK button. d. e. For Tray 2, select the appropriate paper size, and then press the OK button. If you ... you changed the type of paper in the tray, do not select the paper size with the letters SEF. Push the tray completely into the printer. Phaser® 7400 Color Printer 3-19 Loading Paper 7400-023 6. Caution: Setting the appropriate paper type improves print quality and avoids damage to the...

User Guide
Page 52
...and then press the OK button. See also: Printing on Specialty Media on page 3-32 Printing Custom Size Paper on page 3-45 Phaser® 7400 Color Printer 3-23 If you changed the type of paper in the tray, do the following: a. Select Tray N Paper, and then ...press the OK button. c. Caution: Setting the appropriate paper type improves print quality and avoids damage to the printer. Loading Paper 6. Select Change setup, and then press the OK button. At the control panel...
...and then press the OK button. See also: Printing on Specialty Media on page 3-32 Printing Custom Size Paper on page 3-45 Phaser® 7400 Color Printer 3-23 If you changed the type of paper in the tray, do the following: a. Select Tray N Paper, and then ...press the OK button. c. Caution: Setting the appropriate paper type improves print quality and avoids damage to the printer. Loading Paper 6. Select Change setup, and then press the OK button. At the control panel...