User Guide
Page 4
... Scanning 49 Scanning Setup Overview 49 Setting Up Scanning to a Shared Folder on Your Computer 49 Setting Up Scanning to an FTP Server 51 Setting Up Scanning to an Email Address 52 Setting Up Scanning with USB 53 4 Printing Supported Paper and Media 56 Paper Usage Guidelines 56 Paper That Can Damage Your Printer 57 Paper Storage Guidelines 57 Supported Paper 58 Loading Paper 61 Loading Paper in Tray 1 61 Loading Paper in the Manual Feed Slot 63 Loading Paper in the 250-Sheet Feeder (Tray 2 65 4 WorkCentre 6505 Color Laser Multifunction Printer User Guide
... Scanning 49 Scanning Setup Overview 49 Setting Up Scanning to a Shared Folder on Your Computer 49 Setting Up Scanning to an FTP Server 51 Setting Up Scanning to an Email Address 52 Setting Up Scanning with USB 53 4 Printing Supported Paper and Media 56 Paper Usage Guidelines 56 Paper That Can Damage Your Printer 57 Paper Storage Guidelines 57 Supported Paper 58 Loading Paper 61 Loading Paper in Tray 1 61 Loading Paper in the Manual Feed Slot 63 Loading Paper in the 250-Sheet Feeder (Tray 2 65 4 WorkCentre 6505 Color Laser Multifunction Printer User Guide

User Guide
Page 6
... 119 Adjusting Scanning Options 120 Adjusting Scan Settings 120 Changing the Default Scan Settings 123 Limiting Access to Scan Operations 125 7 Faxing Loading Documents for Faxing 128 Basic Faxing 129 Sending a Fax from the Printer 129 Sending a Fax from Your Computer 130 Using the Fax Address Book 132 Faxing to an Individual 132 Faxing to a Group 133 Selecting Fax Options for Single Jobs 137 Setting the Fax Resolution 137 Making the Image Lighter or Darker 137 Turning On Hook On or Off 137 Sending a Delayed Fax 138 Including a Fax Cover Page 138 Setting...
... 119 Adjusting Scanning Options 120 Adjusting Scan Settings 120 Changing the Default Scan Settings 123 Limiting Access to Scan Operations 125 7 Faxing Loading Documents for Faxing 128 Basic Faxing 129 Sending a Fax from the Printer 129 Sending a Fax from Your Computer 130 Using the Fax Address Book 132 Faxing to an Individual 132 Faxing to a Group 133 Selecting Fax Options for Single Jobs 137 Setting the Fax Resolution 137 Making the Image Lighter or Darker 137 Turning On Hook On or Off 137 Sending a Delayed Fax 138 Including a Fax Cover Page 138 Setting...
User Guide
Page 20
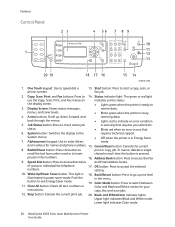
...enter letters mode. Alphanumeric keypad: Use to 3. Speed Dial button: Press to accept the selected setting. 10. OK button: Press to access directories and Email address books. Stop button: Cancels the current print job. 20. Lower light indicates Color mode. 20 WorkCentre 6505 Color Laser Multifunction Printer User Guide menus, and toner levels. • Blinks green when the printer is illuminated in Energy Saver 7. status. • Blinks red when an error occurs that requires your copy, fax, and scan jobs. 12. System button: Switches the display to check...
...enter letters mode. Alphanumeric keypad: Use to 3. Speed Dial button: Press to accept the selected setting. 10. OK button: Press to access directories and Email address books. Stop button: Cancels the current print job. 20. Lower light indicates Color mode. 20 WorkCentre 6505 Color Laser Multifunction Printer User Guide menus, and toner levels. • Blinks green when the printer is illuminated in Energy Saver 7. status. • Blinks red when an error occurs that requires your copy, fax, and scan jobs. 12. System button: Switches the display to check...
User Guide
Page 31
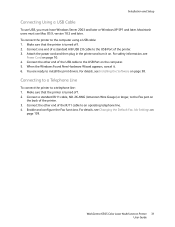
.... 4. Enable and configure the Fax functions. WorkCentre 6505 Color Laser Multifunction Printer 31 User Guide Attach the power cord and then plug in the printer and turn it . 6. Connect a standard RJ11 cable, NO. 26 AWG (American Wire Gauge) or larger, to an operating telephone line. 4. You are ready to the USB Port of the printer. 3. Connect one end of a standard A/B USB 2.0 cable to install the print drivers. For details, see Changing the Default Fax Job Settings on the computer. 5. Installation and Setup Connecting Using a USB Cable To use USB...
.... 4. Enable and configure the Fax functions. WorkCentre 6505 Color Laser Multifunction Printer 31 User Guide Attach the power cord and then plug in the printer and turn it . 6. Connect a standard RJ11 cable, NO. 26 AWG (American Wire Gauge) or larger, to an operating telephone line. 4. You are ready to the USB Port of the printer. 3. Connect one end of a standard A/B USB 2.0 cable to install the print drivers. For details, see Changing the Default Fax Job Settings on the computer. 5. Installation and Setup Connecting Using a USB Cable To use USB...
User Guide
Page 35
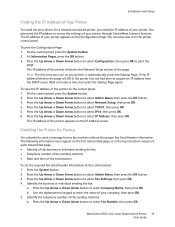
... Fax Number, then press OK. Enabling the Printer for a network-connected printer, you turn on your printer, it on the page is unlawful to send a message from the DHCP server. Press the Up Arrow or Down Arrow button to select TCP/IP, then press OK. 5. b. Note: The first time you need the IP address to select Fax Settings, then press OK. 4. The IP address of your printer. WorkCentre 6505 Color Laser Multifunction Printer 35 User Guide...
... Fax Number, then press OK. Enabling the Printer for a network-connected printer, you turn on your printer, it on the page is unlawful to send a message from the DHCP server. Press the Up Arrow or Down Arrow button to select TCP/IP, then press OK. 5. b. Note: The first time you need the IP address to select Fax Settings, then press OK. 4. The IP address of your printer. WorkCentre 6505 Color Laser Multifunction Printer 35 User Guide...
User Guide
Page 36
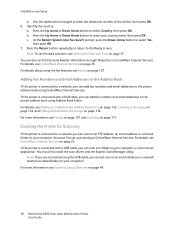
... in CentreWare Internet Services. Adding Fax Numbers and Email Addresses to the Address Book If the printer is connected to a network you can add fax numbers and email addresses to an email address or a network location (a shared folder on page 111. Installation and Setup b. Note: If you cannot scan to the printer address book using the USB cable, you are connected using CentreWare Internet Services. Use the alphanumeric keypad to select Yes, then press OK. 7. For more information see Setting the Date and Time on your country...
... in CentreWare Internet Services. Adding Fax Numbers and Email Addresses to the Address Book If the printer is connected to a network you can add fax numbers and email addresses to an email address or a network location (a shared folder on page 111. Installation and Setup b. Note: If you cannot scan to the printer address book using the USB cable, you are connected using CentreWare Internet Services. Use the alphanumeric keypad to select Yes, then press OK. 7. For more information see Setting the Date and Time on your country...
User Guide
Page 39
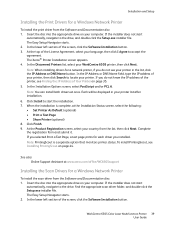
... a Windows Network Printer To install the print driver from the Software and Documentation disc: 1. WorkCentre 6505 Color Laser Multifunction Printer 39 User Guide Insert the disc into the appropriate drive on page 44. In the IP Address or DNS Name field, type the IP address of the printer, see your printer in your printer, then click Search to the drive, and double-click the Setup.exe installer file. When the installation is a separate option that monitors printer status. Installation and Setup Installing the Print Drivers for a Windows Network Printer...
... a Windows Network Printer To install the print driver from the Software and Documentation disc: 1. WorkCentre 6505 Color Laser Multifunction Printer 39 User Guide Insert the disc into the appropriate drive on page 44. In the IP Address or DNS Name field, type the IP address of the printer, see your printer in your printer, then click Search to the drive, and double-click the Setup.exe installer file. When the installation is a separate option that monitors printer status. Installation and Setup Installing the Print Drivers for a Windows Network Printer...
User Guide
Page 40
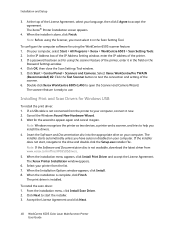
...Programs > Xerox > WorkCentre 6505 > Scan Setting Tools. 2. Accept the License Agreement and click Next. 40 WorkCentre 6505 Color Laser Multifunction Printer User Guide Installation and Setup 3. To configure the computer software for Windows USB To install the print driver: 1. When the Installation Options window appears, click Install. 8. Click Start > Control Panel > Scanners and Cameras. Double-click Xerox WorkCentre 6505 (LAN) to the drive and double-click the Setup.exe installer file. Note: Windows recognizes the printer as two devices, a printer and a scanner, and tries to use...
...Programs > Xerox > WorkCentre 6505 > Scan Setting Tools. 2. Accept the License Agreement and click Next. 40 WorkCentre 6505 Color Laser Multifunction Printer User Guide Installation and Setup 3. To configure the computer software for Windows USB To install the print driver: 1. When the Installation Options window appears, click Install. 8. Click Start > Control Panel > Scanners and Cameras. Double-click Xerox WorkCentre 6505 (LAN) to the drive and double-click the Setup.exe installer file. Note: Windows recognizes the printer as two devices, a printer and a scanner, and tries to use...

User Guide
Page 42
... WorkCentre 6505 Color Laser Multifunction Printer User Guide When the driver is finished installing, your password, then click OK. 9. Complete the online registration, then close the browser. 9. Click Print & Fax. At the Introduction installer window, click Continue. 6. Installation and Setup 8. Click Install. Adding the Printer For networking, set up your printer using Bonjour (Rendezvous), or connect using Bonjour: 1. Next, add the printer to an online registration form. 8. Click the plus (+) button under the list of the window. 3. If prompted, enter your...
... WorkCentre 6505 Color Laser Multifunction Printer User Guide When the driver is finished installing, your password, then click OK. 9. Complete the online registration, then close the browser. 9. Click Print & Fax. At the Introduction installer window, click Continue. 6. Installation and Setup 8. Click Install. Adding the Printer For networking, set up your printer using Bonjour (Rendezvous), or connect using Bonjour: 1. Next, add the printer to an online registration form. 8. Click the plus (+) button under the list of the window. 3. If prompted, enter your...
User Guide
Page 49
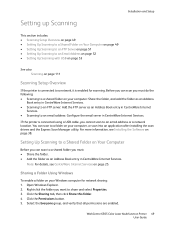
...; Setting Up Scanning with USB on page 53 See also: Scanning on page 111 Scanning Setup Overview If the printer is connected to a folder on your computer, or scan into an application after installing the scan drivers and the Express Scan Manager utility. You can scan to a network, it is connected using a USB cable, you must : • Share the folder. • Add the folder as an Address Book entry in CentreWare Internet Services. • Scanning to an email address or a network location. Setting Up Scanning...
...; Setting Up Scanning with USB on page 53 See also: Scanning on page 111 Scanning Setup Overview If the printer is connected to a folder on your computer, or scan into an application after installing the scan drivers and the Express Scan Manager utility. You can scan to a network, it is connected using a USB cable, you must : • Share the folder. • Add the folder as an Address Book entry in CentreWare Internet Services. • Scanning to an email address or a network location. Setting Up Scanning...
User Guide
Page 53
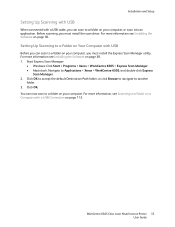
... Applications > Xerox > WorkCentre 6505, and double-click Express Scan Manager. 2. Click OK. You can now scan to a folder on page 38. WorkCentre 6505 Color Laser Multifunction Printer 53 User Guide Before scanning, you must install the Express Scan Manager utility. Setting Up Scanning to a Folder on Your Computer with USB Before you can scan to a folder on your computer, or scan into an application. Installation and Setup Setting Up Scanning with USB When connected with a USB cable, you can scan to a folder on...
... Applications > Xerox > WorkCentre 6505, and double-click Express Scan Manager. 2. Click OK. You can now scan to a folder on page 38. WorkCentre 6505 Color Laser Multifunction Printer 53 User Guide Before scanning, you must install the Express Scan Manager utility. Setting Up Scanning to a Folder on Your Computer with USB Before you can scan to a folder on your computer, or scan into an application. Installation and Setup Setting Up Scanning with USB When connected with a USB cable, you can scan to a folder on...

User Guide
Page 68
... paper loaded in a tray: 1. Setting the Paper Size To set the paper type for paper in the tray or print-quality problems can select an option to display a message prompting you to select the tray you are setting, then press OK. 68 WorkCentre 6505 Color Laser Multifunction Printer User Guide Setting the Paper Type CAUTION: Paper type settings must match the type of paper that is selected in the Paper Type menu in the print driver, the printer uses the control panel settings. The printer prints only when the settings for the paper size and type configured in the tray...
... paper loaded in a tray: 1. Setting the Paper Size To set the paper type for paper in the tray or print-quality problems can select an option to display a message prompting you to select the tray you are setting, then press OK. 68 WorkCentre 6505 Color Laser Multifunction Printer User Guide Setting the Paper Type CAUTION: Paper type settings must match the type of paper that is selected in the Paper Type menu in the print driver, the printer uses the control panel settings. The printer prints only when the settings for the paper size and type configured in the tray...
User Guide
Page 72
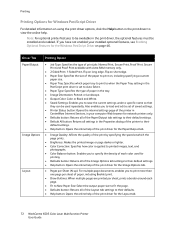
...; Job Type: Specifies the type of print job: Normal Print, Secure Print, Proof Print. Also enables you to load and edit a set to Auto Select. • Paper Type: Specifies the type of paper in the tray. • Image Orientation: Portrait or Landscape. • Output Color: Color or Black and White. • Saved Settings: Enables you to save the current settings under a specific name so that they can be installed and enabled. If you have not enabled your computer Web browser for network printers only. • Defaults button...
...; Job Type: Specifies the type of print job: Normal Print, Secure Print, Proof Print. Also enables you to load and edit a set to Auto Select. • Paper Type: Specifies the type of paper in the tray. • Image Orientation: Portrait or Landscape. • Output Color: Color or Black and White. • Saved Settings: Enables you to save the current settings under a specific name so that they can be installed and enabled. If you have not enabled your computer Web browser for network printers only. • Defaults button...

User Guide
Page 73
...Color: Color or Black and White. • Paper Type: Specifies the type of the printer in CentreWare Internet Services in the print driver to view the online help. WorkCentre 6505 Color Laser Multifunction Printer 73 User Guide If you have not enabled your computer Web browser for the Windows PCL Driver on using the print driver options, click the Help button in your installed optional features, see Enabling Optional Features for network printers only. • Defaults button: Returns the Paper/Output tab settings to their defaults. Driver Tab Paper/Output Printing Option • Job...
...Color: Color or Black and White. • Paper Type: Specifies the type of the printer in CentreWare Internet Services in the print driver to view the online help. WorkCentre 6505 Color Laser Multifunction Printer 73 User Guide If you have not enabled your computer Web browser for the Windows PCL Driver on using the print driver options, click the Help button in your installed optional features, see Enabling Optional Features for network printers only. • Defaults button: Returns the Paper/Output tab settings to their defaults. Driver Tab Paper/Output Printing Option • Job...

User Guide
Page 95
... field, type your printer configuration and available optional features, see Enabling Optional Features on page 46. In the Password field, enter a numeric password. Note: If you to use a specific document name to eight characters. WorkCentre 6505 Color Laser Multifunction Printer 95 User Guide Storing a Print Job in the printer, then print them when you can use this option, see Configurations and Options on page 21. Store frequently used documents in Memory Set up to access the document from the computer each time. Click the Paper/Output tab...
... field, type your printer configuration and available optional features, see Enabling Optional Features on page 46. In the Password field, enter a numeric password. Note: If you to use a specific document name to eight characters. WorkCentre 6505 Color Laser Multifunction Printer 95 User Guide Storing a Print Job in the printer, then print them when you can use this option, see Configurations and Options on page 21. Store frequently used documents in Memory Set up to access the document from the computer each time. Click the Paper/Output tab...

User Guide
Page 127
Faxing This chapter includes: • Loading Documents for Faxing on page 128 • Basic Faxing on page 129 • Using the Fax Address Book on page 132 • Selecting Fax Options for Single Jobs on page 137 • Changing the Default Fax Job Settings on page 139 • Managing Fax Functions on page 140 See also: Installation and Setup Overview on page 28 7 WorkCentre 6505 Color Laser Multifunction Printer 127 User Guide
Faxing This chapter includes: • Loading Documents for Faxing on page 128 • Basic Faxing on page 129 • Using the Fax Address Book on page 132 • Selecting Fax Options for Single Jobs on page 137 • Changing the Default Fax Job Settings on page 139 • Managing Fax Functions on page 140 See also: Installation and Setup Overview on page 28 7 WorkCentre 6505 Color Laser Multifunction Printer 127 User Guide

User Guide
Page 146
.... Clear All Redial/Pause Cancels the current print, copy, scan, or fax job. Prints from Energy Saver Mode. Recalls the last fax number used or inserts pauses in menu selections or moves the cursor to access directories of group or individual fax telephone numbers. 146 WorkCentre 6505 Color Laser Multifunction Printer User Guide Power Saver Stop Controls entry and exit from USB memory. Speed Dial Used to the right when setting a value. Displays the previous menu or item. Displays active jobs. Address Book Allows you to access the printer address book...
.... Clear All Redial/Pause Cancels the current print, copy, scan, or fax job. Prints from Energy Saver Mode. Recalls the last fax number used or inserts pauses in menu selections or moves the cursor to access directories of group or individual fax telephone numbers. 146 WorkCentre 6505 Color Laser Multifunction Printer User Guide Power Saver Stop Controls entry and exit from USB memory. Speed Dial Used to the right when setting a value. Displays the previous menu or item. Displays active jobs. Address Book Allows you to access the printer address book...
User Guide
Page 148
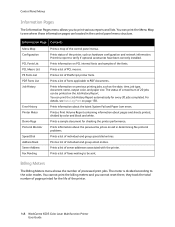
... Monitor Speed Dial Address Book Server Address Fax Pending Prints a map of PostScript printer fonts. Prints status of the fonts. Print this report to the color modes. Prints a list of the control panel menus. The status of a maximum of 20 jobs can print the Menu Map to PDF documents. Prints a Print Volume Report containing information about the latest System Fail and Paper Jam errors. Prints a list of the printer. 148 WorkCentre 6505 Color Laser Multifunction Printer User Guide they track the total number of pages printed for the life of individual and group email...
... Monitor Speed Dial Address Book Server Address Fax Pending Prints a map of PostScript printer fonts. Prints status of the fonts. Print this report to the color modes. Prints a list of the control panel menus. The status of a maximum of 20 jobs can print the Menu Map to PDF documents. Prints a Print Volume Report containing information about the latest System Fail and Paper Jam errors. Prints a list of the printer. 148 WorkCentre 6505 Color Laser Multifunction Printer User Guide they track the total number of pages printed for the life of individual and group email...

User Guide
Page 194
... type. Turn on the printer and leave it on for assistance see Loading Paper on page 196. If the problems still occur, for at least one hour to too much light; Check the condition of the condensation. Reset the paper tray guides. Reinstall the transfer belt unit or the fuser. Vertical blanks. For details, see the instruction sheets in the trays are not Xerox® toner cartridges. Replace the imaging unit. 194 WorkCentre 6505 Color Laser Multifunction Printer User Guide The paper...
... type. Turn on the printer and leave it on for assistance see Loading Paper on page 196. If the problems still occur, for at least one hour to too much light; Check the condition of the condensation. Reset the paper tray guides. Reinstall the transfer belt unit or the fuser. Vertical blanks. For details, see the instruction sheets in the trays are not Xerox® toner cartridges. Replace the imaging unit. 194 WorkCentre 6505 Color Laser Multifunction Printer User Guide The paper...

Evaluator Guide
Page 12
Scan to USB memory device A standard USB port on as an important communication tool. Fax forward Allows you manage documents and convert scanned images into editable files. Fax resolution The fax resolution for each multifunction printer is received by the multifunction printer, it stays in memory until the intended recipient enters a password at the device and allows the document to print. 12 Xerox Phaser and WorkCentre Small-Business-Class Color Printers and Multifunction Printers Evaluator Guide Color fax send/receive The multifunction...
Scan to USB memory device A standard USB port on as an important communication tool. Fax forward Allows you manage documents and convert scanned images into editable files. Fax resolution The fax resolution for each multifunction printer is received by the multifunction printer, it stays in memory until the intended recipient enters a password at the device and allows the document to print. 12 Xerox Phaser and WorkCentre Small-Business-Class Color Printers and Multifunction Printers Evaluator Guide Color fax send/receive The multifunction...


