

User Guide
Page 9
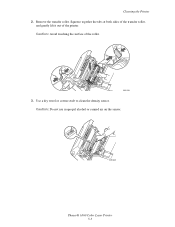
Front Door A 2. Toner cartridges (high capacity) 3. Imaging unit 4. Top cover 2. Power cord connection Inside View Doors A and C Open 23 4 5 6360-041 Door B Open 12 1 1. Door C 5. Fuser 6360-043 Phaser® 6360 Color Laser Printer 1-3 Transfer roller 3. Front Door B 2. USB connection 4. Ethernet 10/100 Base-Tx connection 5. Door C latch 6360-042 1. Rear-Left View Parts of the Printer 1 2 3 4 5 1.
Front Door A 2. Toner cartridges (high capacity) 3. Imaging unit 4. Top cover 2. Power cord connection Inside View Doors A and C Open 23 4 5 6360-041 Door B Open 12 1 1. Door C 5. Fuser 6360-043 Phaser® 6360 Color Laser Printer 1-3 Transfer roller 3. Front Door B 2. USB connection 4. Ethernet 10/100 Base-Tx connection 5. Door C latch 6360-042 1. Rear-Left View Parts of the Printer 1 2 3 4 5 1.
User Guide
Page 94
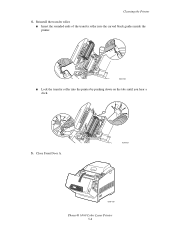
Use a dry towel or cotton swab to clean the density sensor. Caution: Do not use isopropyl alcohol or canned air on the sensor. 6360-038 Phaser® 6360 Color Laser Printer 5-3 Squeeze together the tabs at both sides of the transfer roller, and gently lift it out of the roller. 6360-035 3. Caution: Avoid touching the surface of the printer. Remove the transfer roller. Cleaning the Printer 2.
Use a dry towel or cotton swab to clean the density sensor. Caution: Do not use isopropyl alcohol or canned air on the sensor. 6360-038 Phaser® 6360 Color Laser Printer 5-3 Squeeze together the tabs at both sides of the transfer roller, and gently lift it out of the roller. 6360-035 3. Caution: Avoid touching the surface of the printer. Remove the transfer roller. Cleaning the Printer 2.
User Guide
Page 95
Close Front Door A. 6360-037 6360-059 Phaser® 6360 Color Laser Printer 5-4 Cleaning the Printer 4. Reinstall the transfer roller. ■ Insert the rounded ends of the transfer roller into the curved black guides inside the printer. 6360-036 ■ Lock the transfer roller into the printer by pushing down on the tabs until you hear a click. 5.
Close Front Door A. 6360-037 6360-059 Phaser® 6360 Color Laser Printer 5-4 Cleaning the Printer 4. Reinstall the transfer roller. ■ Insert the rounded ends of the transfer roller into the curved black guides inside the printer. 6360-036 ■ Lock the transfer roller into the printer by pushing down on the tabs until you hear a click. 5.
User Guide
Page 96
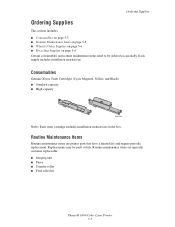
Consumables Genuine Xerox Toner Cartridges (Cyan, Magenta, Yellow, and Black): ■ Standard capacity ■ High capacity 6360-066 Note: Each toner cartridge includes installation instructions on ...ordered occasionally. Each supply includes installation instructions. Routine Maintenance Items Routine maintenance items are typically customer replaceable. ■ Imaging unit ■ Fuser ■ Transfer roller ■ Feed roller kit Phaser® 6360 Color Laser Printer 5-5 Routine maintenance items are printer parts that have a limited life and require periodic replacement.
Consumables Genuine Xerox Toner Cartridges (Cyan, Magenta, Yellow, and Black): ■ Standard capacity ■ High capacity 6360-066 Note: Each toner cartridge includes installation instructions on ...ordered occasionally. Each supply includes installation instructions. Routine Maintenance Items Routine maintenance items are typically customer replaceable. ■ Imaging unit ■ Fuser ■ Transfer roller ■ Feed roller kit Phaser® 6360 Color Laser Printer 5-5 Routine maintenance items are printer parts that have a limited life and require periodic replacement.
Quick Use Guide
Page 2
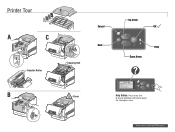
Paper Tray Setup Use these tools to setup Help Button: Press at any time to display additional information about the printer. Printer Tour A C Transfer Roller B Imaging Unit Cancel Back Up Arrow OK Help Down Arrow Fuser Help Information Provides information about the message or menu. www.xerox.com/office/6360support
Paper Tray Setup Use these tools to setup Help Button: Press at any time to display additional information about the printer. Printer Tour A C Transfer Roller B Imaging Unit Cancel Back Up Arrow OK Help Down Arrow Fuser Help Information Provides information about the message or menu. www.xerox.com/office/6360support


