User Guide
Page 14
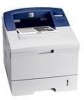
See page 9.7. 4 Menu: Enters Menu mode and arrows through the available menus. 5 LCD: Displays the printer status, error messages and menus in progress. 6 Up Arrow button: The option available in the selected menu increase values. 7 OK: Confirms the selection ... printing. 2 Back: Sends you back to the upper menu level. 3 Status: Shows the status of your printer. Rear view Control panel overview / * The figure above shows an Phaser 3600/DN with all available options. 1 rear cover 2 duplex unit 3 network port 4 USB port 5 parallel port 6 power receptacle 7 power switch 1 Start/Stop: Cancel an...
See page 9.7. 4 Menu: Enters Menu mode and arrows through the available menus. 5 LCD: Displays the printer status, error messages and menus in progress. 6 Up Arrow button: The option available in the selected menu increase values. 7 OK: Confirms the selection ... printing. 2 Back: Sends you back to the upper menu level. 3 Status: Shows the status of your printer. Rear view Control panel overview / * The figure above shows an Phaser 3600/DN with all available options. 1 rear cover 2 duplex unit 3 network port 4 USB port 5 parallel port 6 power receptacle 7 power switch 1 Start/Stop: Cancel an...
User Guide
Page 15
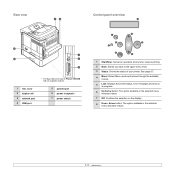
... have Internet access, you with adequate space for air circulation. The area should be well-ventilated and away from the Xerox website, www.xerox.com/office/support. Online User's Guide Printer Driver Help Provides you can access the user's guides in the guide to get help screen, click Help from the ...enough space to allow opening of the rear cover or the duplex unit) Right: 100 mm (enough space for ventilation) Left: 100 mm (enough space to allow opening covers and trays. Do not set the printer close to the edge of your printer or cleaning jam and, therefore, be sure to follow the ...
... have Internet access, you with adequate space for air circulation. The area should be well-ventilated and away from the Xerox website, www.xerox.com/office/support. Online User's Guide Printer Driver Help Provides you can access the user's guides in the guide to get help screen, click Help from the ...enough space to allow opening of the rear cover or the duplex unit) Right: 100 mm (enough space for ventilation) Left: 100 mm (enough space to allow opening covers and trays. Do not set the printer close to the edge of your printer or cleaning jam and, therefore, be sure to follow the ...
User Guide
Page 16
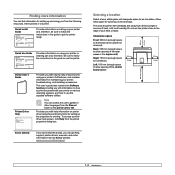
... is now the default. 6 Press Start/Stop to return to Standby mode. You can also set the control panel menus while the printer is installed. Available when duplex unit is in the display depending on the control panel. The control panel provides access to your... printer. Accessing control panel menus You can select are used to save your printer from the printer driver on a connected computer override the settings on options or models. Auto CR ...
... is now the default. 6 Press Start/Stop to return to Standby mode. You can also set the control panel menus while the printer is installed. Available when duplex unit is in the display depending on the control panel. The control panel provides access to your... printer. Accessing control panel menus You can select are used to save your printer from the printer driver on a connected computer override the settings on options or models. Auto CR ...
User Guide
Page 21
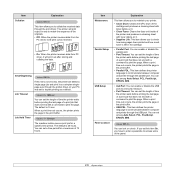
... • USB PDL: This item defines the printer language to communicate between computer and printer through the print driver. Item Maintenance Parallel Setup USB Setup Panel Lockout Explanation This item allows you to maintain your PC was set to duplex printing as a security measure. • Port ...and print it as a simplex-singlepage even though the printer driver on your printer. • Clean Drum: Cleans the OPC drum of the cartridge and produces a cleaning sheet with toner debris on it. • Clean Fuser: Cleans the fuser unit inside of the panel. 2.6 Job Held Timer Values:...
... • USB PDL: This item defines the printer language to communicate between computer and printer through the print driver. Item Maintenance Parallel Setup USB Setup Panel Lockout Explanation This item allows you to maintain your PC was set to duplex printing as a security measure. • Port ...and print it as a simplex-singlepage even though the printer driver on your printer. • Clean Drum: Cleans the OPC drum of the cartridge and produces a cleaning sheet with toner debris on it. • Clean Fuser: Cleans the fuser unit inside of the panel. 2.6 Job Held Timer Values:...
User Guide
Page 41
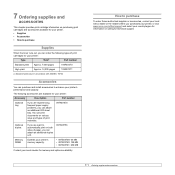
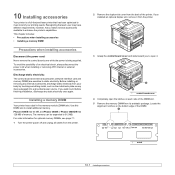
...purchase and install accessories to enhance your printer's performance and capacity. How to purchase To order Xerox-authorized supplies or accessories, contact your local Xerox dealer or the retailer where you purchased your printer, or visit www.xerox.com/office/support and select your ...order the following accessories are available for your printer: Accessory Description Part number Optional tray If you are want to automatically print on both sides of paper, you can attach an additional duplex unit. 097S03756 Memory DIMM Extends your printer's memory capacity. • 097S03759: 64 ...
...purchase and install accessories to enhance your printer's performance and capacity. How to purchase To order Xerox-authorized supplies or accessories, contact your local Xerox dealer or the retailer where you purchased your printer, or visit www.xerox.com/office/support and select your ...order the following accessories are available for your printer: Accessory Description Part number Optional tray If you are want to automatically print on both sides of paper, you can attach an additional duplex unit. 097S03756 Memory DIMM Extends your printer's memory capacity. • 097S03759: 64 ...
User Guide
Page 51
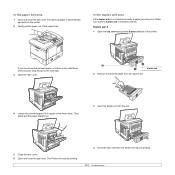
...and close the top cover. Duplex jam 0 1 Open the top cover and pull the duplex unit out of the output tray. The Printer will resume printing. 4 Close the top cover then the printer will resume printing. 9.4 The jammed paper is automatically ejected from the duplex unit. 4 Loosen the jammed ...Insert the duplex unit into the slot. 5 Close the rear cover. 6 Open and close the top cover. In the duplex unit area If the duplex unit is inserted correctly. If you pull, stop and go to the next step. 3 Open the rear cover. 1 1 duplex unit 2 Remove the jammed paper from the printer. 2 ...
...and close the top cover. Duplex jam 0 1 Open the top cover and pull the duplex unit out of the output tray. The Printer will resume printing. 4 Close the top cover then the printer will resume printing. 9.4 The jammed paper is automatically ejected from the duplex unit. 4 Loosen the jammed ...Insert the duplex unit into the slot. 5 Close the rear cover. 6 Open and close the top cover. In the duplex unit area If the duplex unit is inserted correctly. If you pull, stop and go to the next step. 3 Open the rear cover. 1 1 duplex unit 2 Remove the jammed paper from the printer. 2 ...
User Guide
Page 52
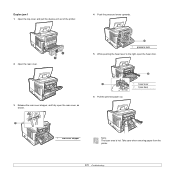
Take care when removing paper from the printer. 9.5 Duplex jam 1 1 Open the top cover and pull the duplex unit out of the printer. 4 Push the pressure levers upwards. 2 Open the rear cover. 3 Release the rear cover stopper, and fully open the rear cover, as shown. 1 1 pressure lever 5 While pushing the fuser lever to the right, open the fuser door. 1 6 Pull the jammed paper out. 2 1 fuser lever 2 fuser door 1 1 rear cover stopper Note The fuser area is hot.
Take care when removing paper from the printer. 9.5 Duplex jam 1 1 Open the top cover and pull the duplex unit out of the printer. 4 Push the pressure levers upwards. 2 Open the rear cover. 3 Release the rear cover stopper, and fully open the rear cover, as shown. 1 1 pressure lever 5 While pushing the fuser lever to the right, open the fuser door. 1 6 Pull the jammed paper out. 2 1 fuser lever 2 fuser door 1 1 rear cover stopper Note The fuser area is hot.
User Guide
Page 53
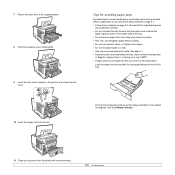
...; Do not use creased, damp, or highly curled paper. • Do not mix paper types in a tray. • Use only recommended print media. In the printer properties window, set the page orientation to its original position. 8 Push the pressure levers downwards. 9 Insert the rear cover stopper in tray 1(MPT). • If... you print on A5-sized paper: Load the paper into the tray with the long edge facing the front of the tray. 10 Insert the duplex unit into the slot. Ensure that the paper level is below the paper capacity mark on page 5.5. Tips for avoiding paper jams By selecting the correct...
...; Do not use creased, damp, or highly curled paper. • Do not mix paper types in a tray. • Use only recommended print media. In the printer properties window, set the page orientation to its original position. 8 Push the pressure levers downwards. 9 Insert the rear cover stopper in tray 1(MPT). • If... you print on A5-sized paper: Load the paper into the tray with the long edge facing the front of the tray. 10 Insert the duplex unit into the slot. Ensure that the paper level is below the paper capacity mark on page 5.5. Tips for avoiding paper jams By selecting the correct...
User Guide
Page 55
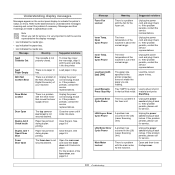
...Start/Stop. If the problem persists, please call for service. Refer to the tables below to indicate the printer's status or errors. Note When you are listed in . Paper has jammed during duplex printing. If the problem persists, contact the service representatives. If the problem persists, contact the service representatives.... securely latched. Unplug the power cord and plug it back inches. LSU Hsync Error Cycle Power A problem has occurred in the LSU (Laser Scanning Unit). Unplug the power cord and plug it back in . LSU Motor Error Cycle Power A problem has occurred in the LSU...
...Start/Stop. If the problem persists, please call for service. Refer to the tables below to indicate the printer's status or errors. Note When you are listed in . Paper has jammed during duplex printing. If the problem persists, contact the service representatives. If the problem persists, contact the service representatives.... securely latched. Unplug the power cord and plug it back inches. LSU Hsync Error Cycle Power A problem has occurred in the LSU (Laser Scanning Unit). Unplug the power cord and plug it back in . LSU Motor Error Cycle Power A problem has occurred in the LSU...
User Guide
Page 65
... DIMMs, see page 7.1. 1 Turn the printer power off and unplug all cables from the printer. 2 Remove the duplex-slot cover from your printing needs. If you installed an optional duplex unit, remove it from its antistatic package. To avoid the possibility of the printer. Phaser 3600/B has 64 MB, and Phaser 3600N or Phaser 3600/DN has 128 MB...
... DIMMs, see page 7.1. 1 Turn the printer power off and unplug all cables from the printer. 2 Remove the duplex-slot cover from your printing needs. If you installed an optional duplex unit, remove it from its antistatic package. To avoid the possibility of the printer. Phaser 3600/B has 64 MB, and Phaser 3600N or Phaser 3600/DN has 128 MB...

User Guide
Page 66
... 2 1 groove 2 notch 7 Push the DIMM straight into place. For Windows XP/2003, select Printers and Faxes. For Windows Vista, select Control Panel > Hardware and Sound > Printers. 4 Select the Xerox Phaser 3600 PS printer. 5 Click the right mouse button on page 10.2. 10.2 Pull out the DIMM. 3 Place ... 8 Replace the control board cover. 9 Reinstall the duplex-slot cover or the optional duplex unit. 10 Reconnect the power cord and printer cable, and turn the printer on page 10.1 to select it in the printer properties of the PostScript printer driver so that you can use it snaps into the...
... 2 1 groove 2 notch 7 Push the DIMM straight into place. For Windows XP/2003, select Printers and Faxes. For Windows Vista, select Control Panel > Hardware and Sound > Printers. 4 Select the Xerox Phaser 3600 PS printer. 5 Click the right mouse button on page 10.2. 10.2 Pull out the DIMM. 3 Place ... 8 Replace the control board cover. 9 Reinstall the duplex-slot cover or the optional duplex unit. 10 Reconnect the power cord and printer cable, and turn the printer on page 10.1 to select it in the printer properties of the PostScript printer driver so that you can use it snaps into the...
User Guide
Page 67
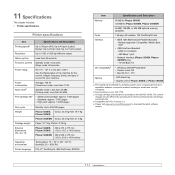
...Printer language Monthly: Up to download the latest software version. 11.1 USB 2.0 compliant - 480 Mbps 1 port • Network Interface (Phaser 3600/N, Phaser 3600/DN only) - 10/100 Base TX OS compatibilitye • Windows 2000/XP/Vista/2003 • Various Linux OS • Mac OS 10.2 ~ 10.5 Options • 500-sheet tray • Duplex unit... Bidirectional Parallel Standard - Sound pressure Level, ISO 7779. Please visit www.xerox.com/office/support to 200,000 pages Phaser 3600/B, Gross: 23.5 Kg/ Net: 19.7 Kg Phaser 3600/N Phaser 3600/DN Gross: 25.4 Kg/ Net: 21.0 Kg Paper: 2.71...
...Printer language Monthly: Up to download the latest software version. 11.1 USB 2.0 compliant - 480 Mbps 1 port • Network Interface (Phaser 3600/N, Phaser 3600/DN only) - 10/100 Base TX OS compatibilitye • Windows 2000/XP/Vista/2003 • Various Linux OS • Mac OS 10.2 ~ 10.5 Options • 500-sheet tray • Duplex unit... Bidirectional Parallel Standard - Sound pressure Level, ISO 7779. Please visit www.xerox.com/office/support to 200,000 pages Phaser 3600/B, Gross: 23.5 Kg/ Net: 19.7 Kg Phaser 3600/N Phaser 3600/DN Gross: 25.4 Kg/ Net: 21.0 Kg Paper: 2.71...
User Guide
Page 91
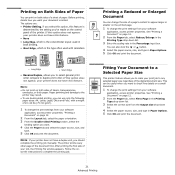
... Folio, with calendars. 2 2 2 3 5 3 5 s Long Edge 3 2 5 3 5 s Short Edge • Reverse Duplex, allows you want your software application, access printer properties. If this option does not appear, your printer does not have this feature is determined by the setting you want to a Selected Paper Size This...size regardless of the digital document size. If this option does not appear, your print job to scale your printer does not have a duplex unit, you can use double-sided printing, you should complete the printing job manually. Printing a Reduced or Enlarged Document...
... Folio, with calendars. 2 2 2 3 5 3 5 s Long Edge 3 2 5 3 5 s Short Edge • Reverse Duplex, allows you want your software application, access printer properties. If this option does not appear, your printer does not have this feature is determined by the setting you want to a Selected Paper Size This...size regardless of the digital document size. If this option does not appear, your print job to scale your printer does not have a duplex unit, you can use double-sided printing, you should complete the printing job manually. Printing a Reduced or Enlarged Document...

User Guide
Page 104
... the machine have optional tray n, you have to check the tray name. •Duplex Unit: If the machine has duplex unit, you have to configure the size of copies you want and indicate which pages you want to check the printer software setting in each application you need to print. 2 Open the File menu and...
... the machine have optional tray n, you have to check the tray name. •Duplex Unit: If the machine has duplex unit, you have to configure the size of copies you want and indicate which pages you want to check the printer software setting in each application you need to print. 2 Open the File menu and...


