
IPv6 Supplement
Page 3
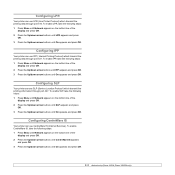
... tree. 7. Click on the [Connectivity] link. 5. this option is used for the Protocol click the [Enabled]checkbox. At your Xerox device (under the Reports menu) and check the version of automatic and manual configuration. 8. Click on the [Properties] tab. 4. ...Address will be obtained and displayed on the local IPv6 subnet. this option is automatically populated. Click on some Xerox WorkCentre/Phaser mono printers and Xerox WorkCentre/Phaser mono MFP products via CentreWare Internet Services (CWIS). Configure IP Settings and IP Filtering 1 Default DHCPv6 (Dynamic ...
... tree. 7. Click on the [Connectivity] link. 5. this option is used for the Protocol click the [Enabled]checkbox. At your Xerox device (under the Reports menu) and check the version of automatic and manual configuration. 8. Click on the [Properties] tab. 4. ...Address will be obtained and displayed on the local IPv6 subnet. this option is automatically populated. Click on some Xerox WorkCentre/Phaser mono printers and Xerox WorkCentre/Phaser mono MFP products via CentreWare Internet Services (CWIS). Configure IP Settings and IP Filtering 1 Default DHCPv6 (Dynamic ...

Statement of Volatility - Phaser 3600
Page 1
... in the mechanical systems of the printer; Xerox Company Confidential This document and its contents are the property of Fonts, Forms and Macros. the image may not be removed by cycling power or printing a page. Phaser 3600 series printers do not retain any latent image ...in the mechanical system of the printer during normal operation. Xerox Phaser 3600 Printers Letter of Volatility May 20, 2008 Phaser 3600 series printers do not retain any latent user image in the...
... in the mechanical systems of the printer; Xerox Company Confidential This document and its contents are the property of Fonts, Forms and Macros. the image may not be removed by cycling power or printing a page. Phaser 3600 series printers do not retain any latent image ...in the mechanical system of the printer during normal operation. Xerox Phaser 3600 Printers Letter of Volatility May 20, 2008 Phaser 3600 series printers do not retain any latent user image in the...

Phaser 3600 Machine Firmware Installation Instructions Network connected devices
Page 1
... 7. Within the "File Download" screen, select "Browse" to access the location on a Phaser 3600 printer: 1. Type in a .zip format, unzip the file. Once the file has been downloaded to the printer, the screen will be installed on the printed configuration page. 10. Please refer to the... begin the file download to close the CentreWare Internet Services window. To do this report. CentreWare Internet Services (CWIS) Procedure for the Phaser 3600 printer to be upgraded. The firmware file will show "End of screen). 5. This can now close the message window. 8. Select the ...
... 7. Within the "File Download" screen, select "Browse" to access the location on a Phaser 3600 printer: 1. Type in a .zip format, unzip the file. Once the file has been downloaded to the printer, the screen will be installed on the printed configuration page. 10. Please refer to the... begin the file download to close the CentreWare Internet Services window. To do this report. CentreWare Internet Services (CWIS) Procedure for the Phaser 3600 printer to be upgraded. The firmware file will show "End of screen). 5. This can now close the message window. 8. Select the ...

User Guide
Page 3
Introduction Special features ...1.1 Printer overview ...1.2 Finding more information ...1.4 2. Network setup (Phaser 3600/N, Phaser 3600/DN only) Introduction ...4.1 Supported operating systems ...4.1 Configuring TCP/IP ...4.2 Configuring EtherTalk ...4.2 Configuring IPX frame types ...4.2 ... Using control panel menus ...2.1 Menu overview ...2.1 Printing a demo page ...2.9 Changing the display language ...2.9 3. Software overview Supplied software ...3.1 Printer driver features ...3.2 System requirements ...3.2 4. Basic printing Printing a document ...6.1 Canceling a print job ...6.1
Introduction Special features ...1.1 Printer overview ...1.2 Finding more information ...1.4 2. Network setup (Phaser 3600/N, Phaser 3600/DN only) Introduction ...4.1 Supported operating systems ...4.1 Configuring TCP/IP ...4.2 Configuring EtherTalk ...4.2 Configuring IPX frame types ...4.2 ... Using control panel menus ...2.1 Menu overview ...2.1 Printing a demo page ...2.9 Changing the display language ...2.9 3. Software overview Supplied software ...3.1 Printer driver features ...3.2 System requirements ...3.2 4. Basic printing Printing a document ...6.1 Canceling a print job ...6.1
User Guide
Page 12
... network printing. • A PostScript 3 Emulation* (PS) enables PS printing. * Zoran IPS Emulation compatible with plain paper. The Phaser 3600/N or Phaser 3600/DN comes with a built-in use. 1 Introduction Congratulations on the purchase of your documents with words, such as "Confidential". ...PostScript 3 • © Copyright 1995-2005, Zoran Corporation. See the Software section. • Print Posters. Expand the printer capacity • The Phaser 3600 series have to save paper (Double-sided printing). 3 4 • You can use a network interface. For duplex printing...
... network printing. • A PostScript 3 Emulation* (PS) enables PS printing. * Zoran IPS Emulation compatible with plain paper. The Phaser 3600/N or Phaser 3600/DN comes with a built-in use. 1 Introduction Congratulations on the purchase of your documents with words, such as "Confidential". ...PostScript 3 • © Copyright 1995-2005, Zoran Corporation. See the Software section. • Print Posters. Expand the printer capacity • The Phaser 3600 series have to save paper (Double-sided printing). 3 4 • You can use a network interface. For duplex printing...
User Guide
Page 13
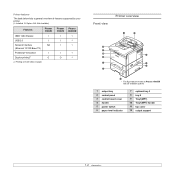
... table below lists a general overview of paper. Front view Printer overview * The figure above shows an Phaser 3600/DN with all available options. 1 output tray 2 control panel 3 control board cover 4 handle 5 power switch 6 paper level indicator 7 ... 2 9 Tray1(MPT) 10 Tray1(MPT) handle 11 top cover 12 output support 1.2 Printing on both sides of features supported by your printer. (I: Installed, O: Option, NA: Not Available) Features Phaser 3600/B Phaser Phaser 3600/N 3600/DN IEEE 1284 Parallel I I I USB 2.0 I I I Network Interface NA I I (Ethernet 10/100 Base TX)...
... table below lists a general overview of paper. Front view Printer overview * The figure above shows an Phaser 3600/DN with all available options. 1 output tray 2 control panel 3 control board cover 4 handle 5 power switch 6 paper level indicator 7 ... 2 9 Tray1(MPT) 10 Tray1(MPT) handle 11 top cover 12 output support 1.2 Printing on both sides of features supported by your printer. (I: Installed, O: Option, NA: Not Available) Features Phaser 3600/B Phaser Phaser 3600/N 3600/DN IEEE 1284 Parallel I I I USB 2.0 I I I Network Interface NA I I (Ethernet 10/100 Base TX)...
User Guide
Page 14
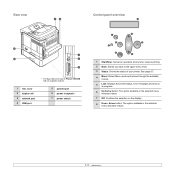
... figure above shows an Phaser 3600/DN with all available options. 1 rear cover 2 duplex unit 3 network port 4 USB port 5 parallel port 6 power receptacle 7 power switch 1 Start/Stop: Cancel an operation at any time; See page 9.7. 4 Menu: Enters Menu mode and arrows through the available menus. 5 LCD: Displays the printer status, error messages... option available in the selected menu decrease values. 1.3 resume printing. 2 Back: Sends you back to the upper menu level. 3 Status: Shows the status of your printer.
... figure above shows an Phaser 3600/DN with all available options. 1 rear cover 2 duplex unit 3 network port 4 USB port 5 parallel port 6 power receptacle 7 power switch 1 Start/Stop: Cancel an operation at any time; See page 9.7. 4 Menu: Enters Menu mode and arrows through the available menus. 5 LCD: Displays the printer status, error messages... option available in the selected menu decrease values. 1.3 resume printing. 2 Back: Sends you back to the upper menu level. 3 Status: Shows the status of your printer.

User Guide
Page 23
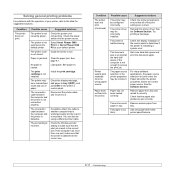
...: 6, 8 You can reset the network interface and print a configuration page. Values: Off, On This item determines whether or not the printer automatically performs line feed when the data overflows the printable area of the print material. Values: Auto, 802.2, 802.3, Ethernet II, SNAP,...8226; BOOTP: The BOOTP server assigns the IP address to you automatically. • Static: You can enable the EtherTalk protocol. Network menu (Phaser 3600/N, Phaser 3600/DN only) This menu lets you configure the network interface installed in one horizontal inch of type. Item Lines Explanation Values: 5 ~ ...
...: 6, 8 You can reset the network interface and print a configuration page. Values: Off, On This item determines whether or not the printer automatically performs line feed when the data overflows the printable area of the print material. Values: Auto, 802.2, 802.3, Ethernet II, SNAP,...8226; BOOTP: The BOOTP server assigns the IP address to you automatically. • Static: You can enable the EtherTalk protocol. Network menu (Phaser 3600/N, Phaser 3600/DN only) This menu lets you configure the network interface installed in one horizontal inch of type. Item Lines Explanation Values: 5 ~ ...
User Guide
Page 25
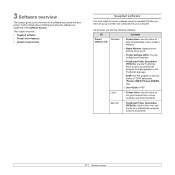
...System requirements Supplied software You must install the printer software using the software are explained in PDF. Further details about installing and using the supplied CD after you have set your printer's TCP/IP addresses. (Phaser 3600/N, Phaser 3600/DN only) • User Guide in... the Software Section. 3 Software overview This chapter gives you an overview of your printer's features. • Status Monitor: Appears when printing errors occur. • Printer Settings Utility: ...
...System requirements Supplied software You must install the printer software using the software are explained in PDF. Further details about installing and using the supplied CD after you have set your printer's TCP/IP addresses. (Phaser 3600/N, Phaser 3600/DN only) • User Guide in... the Software Section. 3 Software overview This chapter gives you an overview of your printer's features. • Status Monitor: Appears when printing errors occur. • Printer Settings Utility: ...
User Guide
Page 27
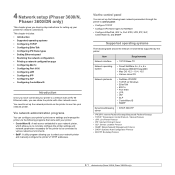
... IPX/SPX: Internet Packet eXchange/Sequenced Packet eXchange • TCP/IP: Transmission Control Protocol / Internet Protocol • LPR: Line Printer Protocol • IPP: Internet Printing Protocol • SLP: Service Location Protocol • SNMP: Simple Network Management Protocol •... DHCP: Dynamic Host Configuration Protocol • BOOTP: Bootstrap Protocol 4.1 4 Network setup (Phaser 3600/N, Phaser 3600/DN only) This chapter gives you step-by the printer: Item Network interface Requirements • 10/100 Base-TX Network operating system • Novell NetWare ...
... IPX/SPX: Internet Packet eXchange/Sequenced Packet eXchange • TCP/IP: Transmission Control Protocol / Internet Protocol • LPR: Line Printer Protocol • IPP: Internet Printing Protocol • SLP: Service Location Protocol • SNMP: Simple Network Management Protocol •... DHCP: Dynamic Host Configuration Protocol • BOOTP: Bootstrap Protocol 4.1 4 Network setup (Phaser 3600/N, Phaser 3600/DN only) This chapter gives you step-by the printer: Item Network interface Requirements • 10/100 Base-TX Network operating system • Novell NetWare ...
User Guide
Page 28
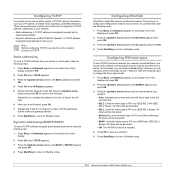
...to Standby mode. All others will be discarded. • Ethernet II: Limits the frame type to Standby mode. 4.2 Configuring TCP/IP Your printer can be set the network protocol to TCP/IP. This protocol is AppleTalk used in Macintosh network environments. All others will be discarded. •...; 802.3: Limits the frame type to IPX over Ethernet Frames. Repeat this to complete the address from your printer's control panel, take the following step: 1 Press Menu until Network appears on the bottom line of the display. 2 Press OK when TCP/IP...
...to Standby mode. All others will be discarded. • Ethernet II: Limits the frame type to Standby mode. 4.2 Configuring TCP/IP Your printer can be set the network protocol to TCP/IP. This protocol is AppleTalk used in Macintosh network environments. All others will be discarded. •...; 802.3: Limits the frame type to IPX over Ethernet Frames. Repeat this to complete the address from your printer's control panel, take the following step: 1 Press Menu until Network appears on the bottom line of the display. 2 Press OK when TCP/IP...
User Guide
Page 29
... and passcode using Up/down arrow button. 6 Press OK to save the selection. 7 Press Start/Stop to return to Standby mode. Configuring Port 9100 Your printer can use 802.1x, take the following steps: 1 Press Menu until Network appears on the bottom line of the display and press OK. 2 Press the... the Up/down arrow buttons until the speed you want appears and press OK. 4 Press Start/Stop to return to Standby mode. It secures your printer is configured. 1 Press Menu until Network appears on the bottom line of the display and press OK. 2 Press the Up/down arrow buttons until Port...
... and passcode using Up/down arrow button. 6 Press OK to save the selection. 7 Press Start/Stop to return to Standby mode. Configuring Port 9100 Your printer can use 802.1x, take the following steps: 1 Press Menu until Network appears on the bottom line of the display and press OK. 2 Press the... the Up/down arrow buttons until the speed you want appears and press OK. 4 Press Start/Stop to return to Standby mode. It secures your printer is configured. 1 Press Menu until Network appears on the bottom line of the display and press OK. 2 Press the Up/down arrow buttons until Port...
User Guide
Page 30
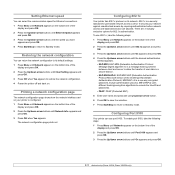
Configuring CentreWare IS Your printer can use SLP (Service Location Protocol) which transmit the printing information through port 427. To...3 Press the Up/down arrow buttons until On appears and press OK. Configuring SLP Your printer can use CentreWare IS (Internet Services). Configuring LPR Your printer can use IPP ( Internet Printing Protocol) which transmit the printing data through port 631. To... the Up/down arrow buttons until On appears and press OK. 4.4 Configuring IPP Your printer can use LPR (Line Printer Protocol) which transmit the printing data through port 510.
Configuring CentreWare IS Your printer can use SLP (Service Location Protocol) which transmit the printing information through port 427. To...3 Press the Up/down arrow buttons until On appears and press OK. Configuring SLP Your printer can use CentreWare IS (Internet Services). Configuring LPR Your printer can use IPP ( Internet Printing Protocol) which transmit the printing data through port 631. To... the Up/down arrow buttons until On appears and press OK. 4.4 Configuring IPP Your printer can use LPR (Line Printer Protocol) which transmit the printing data through port 510.

User Guide
Page 40
...printing This chapter explains common printing tasks. Note You can also cancel the current job by double-clicking the printer icon at the bottom right corner of your printer. 6.1 The exact steps for printing a document may vary depending on the control panel of the Windows ... spooler, such as the printer group in Windows, delete the job as follows: 1 Click the Windows Start button. 2 For Windows 2000, select Settings and then Printers. For Windows Vista, select Control Panel > Hardware and Sound > Printers. 3 Double-click the Xerox Phaser 3600 PCL 6 or Xerox Phaser 3600 PS icon. 4 ...
...printing This chapter explains common printing tasks. Note You can also cancel the current job by double-clicking the printer icon at the bottom right corner of your printer. 6.1 The exact steps for printing a document may vary depending on the control panel of the Windows ... spooler, such as the printer group in Windows, delete the job as follows: 1 Click the Windows Start button. 2 For Windows 2000, select Settings and then Printers. For Windows Vista, select Control Panel > Hardware and Sound > Printers. 3 Double-click the Xerox Phaser 3600 PCL 6 or Xerox Phaser 3600 PS icon. 4 ...
User Guide
Page 58
... indicating a system error. See the Software Section. Remove excess paper from the wrong paper source. Select Xerox Phaser 3600 PCL 6 or Xerox Phaser 3600 PS as the default printer. See page 9.1. Load paper. See page 5.4. Check the display message, add paper to another computer that the hard disk space of the computer is not ...
... indicating a system error. See the Software Section. Remove excess paper from the wrong paper source. Select Xerox Phaser 3600 PCL 6 or Xerox Phaser 3600 PS as the default printer. See page 9.1. Load paper. See page 5.4. Check the display message, add paper to another computer that the hard disk space of the computer is not ...
User Guide
Page 65
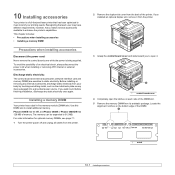
...(network interface card and memory DIMM) are sensitive to enhance the printer's capabilities. Recognizing that has been optimized to install additional memory. Locate the alignment notches on each user may have different requirements, however, Xerox makes several accessories available to static electricity. If you to 512 MB... power cord: Never remove the control board cover while the power is a full-featured laser printer that each side of the DIMM slot. 5 Remove the memory DIMM from the back of memory. Phaser 3600/B has 64 MB, and Phaser 3600N or Phaser 3600/DN has 128 MB of the...
...(network interface card and memory DIMM) are sensitive to enhance the printer's capabilities. Recognizing that has been optimized to install additional memory. Locate the alignment notches on each user may have different requirements, however, Xerox makes several accessories available to static electricity. If you to 512 MB... power cord: Never remove the control board cover while the power is a full-featured laser printer that each side of the DIMM slot. 5 Remove the memory DIMM from the back of memory. Phaser 3600/B has 64 MB, and Phaser 3600N or Phaser 3600/DN has 128 MB of the...

User Guide
Page 66
... installing the memory DIMM, you can use it in your computer. For Windows Vista, select Control Panel > Hardware and Sound > Printers. 4 Select the Xerox Phaser 3600 PS printer. 5 Click the right mouse button on the printer icon and select Properties. 6 For Windows 2000/XP//Vista/2003, select Device Settings tab. 7 Select the amount of memory...
... installing the memory DIMM, you can use it in your computer. For Windows Vista, select Control Panel > Hardware and Sound > Printers. 4 Select the Xerox Phaser 3600 PS printer. 5 Click the right mouse button on the printer icon and select Properties. 6 For Windows 2000/XP//Vista/2003, select Device Settings tab. 7 Select the amount of memory...
User Guide
Page 67
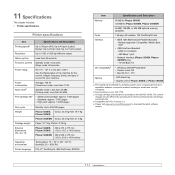
.... Average cartridge yield declared in accordance with PCL 6 Version 2.1. Please visit www.xerox.com/office/support to 38 ppm (A4); Up to 40 ppm (Letter) Duplex: Up to 200,000 pages Phaser 3600/B, Gross: 23.5 Kg/ Net: 19.7 Kg Phaser 3600/N Phaser 3600/DN Gross: 25.4 Kg/ Net: 21.0 Kg Paper: 2.71 Kg, Plastic... cartridge: Approx. 7,000 pages • Standard: Approx. 7,000 pages • High yield: Approx. 14,000 pages Duty cycle Weight Package weight External dimensions (W x D x H) Operating environment Printer language Monthly: Up to 26 ipm (A4); c.
.... Average cartridge yield declared in accordance with PCL 6 Version 2.1. Please visit www.xerox.com/office/support to 38 ppm (A4); Up to 40 ppm (Letter) Duplex: Up to 200,000 pages Phaser 3600/B, Gross: 23.5 Kg/ Net: 19.7 Kg Phaser 3600/N Phaser 3600/DN Gross: 25.4 Kg/ Net: 21.0 Kg Paper: 2.71 Kg, Plastic... cartridge: Approx. 7,000 pages • Standard: Approx. 7,000 pages • High yield: Approx. 14,000 pages Duty cycle Weight Package weight External dimensions (W x D x H) Operating environment Printer language Monthly: Up to 26 ipm (A4); c.
User Guide
Page 71
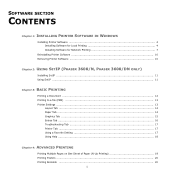
... Software for Local Printing 4 Installing Software for Network Printing 7 Reinstalling Printer Software 10 Removing Printer Software ...10 Chapter 2: USING SETIP (PHASER 3600/N, PHASER 3600/DN ONLY) Installing SetIP ...11 Using SetIP ...11 Chapter 3: BASIC PRINTING Printing a Document ...12 Printing to a file (PRN) ...13 Printer Settings ...13 Layout Tab ...14 Paper Tab ...14 Graphics Tab ...15...
... Software for Local Printing 4 Installing Software for Network Printing 7 Reinstalling Printer Software 10 Removing Printer Software ...10 Chapter 2: USING SETIP (PHASER 3600/N, PHASER 3600/DN ONLY) Installing SetIP ...11 Using SetIP ...11 Chapter 3: BASIC PRINTING Printing a Document ...12 Printing to a file (PRN) ...13 Printer Settings ...13 Layout Tab ...14 Paper Tab ...14 Graphics Tab ...15...
User Guide
Page 73
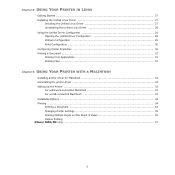
... YOUR PRINTER WITH A MACINTOSH Installing printer driver for Macintosh 32 Uninstalling the printer driver 32 Setting Up the Printer ...33 For a Network-connected Macintosh 33 For a USB-connected Macintosh 33 Installable Options ...34 Printing ...34 Printing a Document ...34 Changing Printer Settings 35 Printing Multiple Pages on One Sheet of Paper 36 Duplex Printing (Phaser 3600/DN...
... YOUR PRINTER WITH A MACINTOSH Installing printer driver for Macintosh 32 Uninstalling the printer driver 32 Setting Up the Printer ...33 For a Network-connected Macintosh 33 For a USB-connected Macintosh 33 Installable Options ...34 Printing ...34 Printing a Document ...34 Changing Printer Settings 35 Printing Multiple Pages on One Sheet of Paper 36 Duplex Printing (Phaser 3600/DN...


