
IPv6 Supplement
Page 4
...:xxxx:xxxx:xxxx:xxxx:xxxx:xxxx:xxxx] Note: If you have changed the port number from the default port number "80", append the number to populate the prefix for manual entry address. 11. In the following examples, the port number is derived from the list supplied in square brackets. Domain name: http://myhost.example...
...:xxxx:xxxx:xxxx:xxxx:xxxx:xxxx:xxxx] Note: If you have changed the port number from the default port number "80", append the number to populate the prefix for manual entry address. 11. In the following examples, the port number is derived from the list supplied in square brackets. Domain name: http://myhost.example...

IPv6 Supplement
Page 5
... feature that allows you to control access to Internet Services. IP Filtering Overview The IP Filtering is now completed. Enable IP Filtering 1. Prefix indicates the number of "http://". Note: If the Accounting feature is enabled, you may be released when the machine is encrypted, enter "https://" followed by the Internet address...
... feature that allows you to control access to Internet Services. IP Filtering Overview The IP Filtering is now completed. Enable IP Filtering 1. Prefix indicates the number of "http://". Note: If the Accounting feature is enabled, you may be released when the machine is encrypted, enter "https://" followed by the Internet address...
User Guide
Page 3
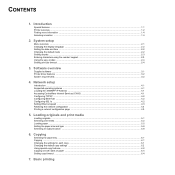
... display language ...2.2 Setting the date and time ...2.2 Changing the default mode ...2.2 Setting sounds ...2.3 Entering characters using the number keypad ...2.3 Using the save modes ...2.4 Setting print job timeout ...2.4 3. Network setup Introduction ...4.1 Supported operating systems ...4.1 Locating the 3300MFP IP Address ...4.1 Accessing CentreWare Internet Services (CWIS 4.1 Configuring TCP/IP ...4.2 Configuring EtherTalk ...4.2 Configuring 802.1x ...4.2 Setting...
... display language ...2.2 Setting the date and time ...2.2 Changing the default mode ...2.2 Setting sounds ...2.3 Entering characters using the number keypad ...2.3 Using the save modes ...2.4 Setting print job timeout ...2.4 3. Network setup Introduction ...4.1 Supported operating systems ...4.1 Locating the 3300MFP IP Address ...4.1 Accessing CentreWare Internet Services (CWIS 4.1 Configuring TCP/IP ...4.2 Configuring EtherTalk ...4.2 Configuring 802.1x ...4.2 Setting...

User Guide
Page 4
... ...7.1 Canceling a print job ...7.1 8. Faxing Setting the fax header ...9.1 Adjusting the document settings ...9.1 Sending a fax automatically ...9.2 Sending a fax manually ...9.2 Confirming a transmission ...9.3 Automatic redialing ...9.3 Redialing the last number ...9.3 Selecting the paper tray ...9.3 Changing receiving modes ...9.3 Receiving automatically in Fax mode ...9.4 Receiving manually in Tel mode ...9.4 Receiving manually using an extension telephone 9.4 Receiving automatically...
... ...7.1 Canceling a print job ...7.1 8. Faxing Setting the fax header ...9.1 Adjusting the document settings ...9.1 Sending a fax automatically ...9.2 Sending a fax manually ...9.2 Confirming a transmission ...9.3 Automatic redialing ...9.3 Redialing the last number ...9.3 Selecting the paper tray ...9.3 Changing receiving modes ...9.3 Receiving automatically in Fax mode ...9.4 Receiving manually in Tel mode ...9.4 Receiving manually using an extension telephone 9.4 Receiving automatically...

User Guide
Page 5
... memory ...13.2 Cleaning your machine ...13.2 Maintaining the print cartridge ...13.3 Maintenance Parts ...13.6 Managing your machine from the website ...13.7 Checking the machine's serial number ...13.8 14. Installing accessories Precautions when installing accessories ...15.1 Installing a memory DIMM ...15.1 16.
... memory ...13.2 Cleaning your machine ...13.2 Maintaining the print cartridge ...13.3 Maintenance Parts ...13.6 Managing your machine from the website ...13.7 Checking the machine's serial number ...13.8 14. Installing accessories Precautions when installing accessories ...15.1 Installing a memory DIMM ...15.1 16.

User Guide
Page 8
... the following number: EUROPE: +44 (0) 1707 353434 USA/CANADA: 1 800 928 6571 Safety Standards EUROPE: This XEROX product is certified by calling 1-800-828-6571 in hazardous light exposure. This can cause irritation and inflammation. iii If you may result in the United States and Canada. Do not attempt to laser safety, the...
... the following number: EUROPE: +44 (0) 1707 353434 USA/CANADA: 1 800 928 6571 Safety Standards EUROPE: This XEROX product is certified by calling 1-800-828-6571 in hazardous light exposure. This can cause irritation and inflammation. iii If you may result in the United States and Canada. Do not attempt to laser safety, the...

User Guide
Page 11
... US:AAAEQ##TXXXX. Data Coupler Information: This equipment complies with this equipment is part of 0.3). On the rear of this Xerox equipment, for repair or warranty information, please contact the appropriate service center; See installation instructions for details. Excessive RENs on party... products, the REN is a REN of the product identifier that contains, among other individual sending the message and the telephone number of the equipment. If this equipment, or equipment malfunctions, may make necessary modifications to the telephone network, the Telephone Company ...
... US:AAAEQ##TXXXX. Data Coupler Information: This equipment complies with this equipment is part of 0.3). On the rear of this Xerox equipment, for repair or warranty information, please contact the appropriate service center; See installation instructions for details. Excessive RENs on party... products, the REN is a REN of the product identifier that contains, among other individual sending the message and the telephone number of the equipment. If this equipment, or equipment malfunctions, may make necessary modifications to the telephone network, the Telephone Company ...

User Guide
Page 18
...: Starts a job. 12 Enter: Confirms the selection on toner by using less toner in printing. 8 Scan: Activates Scan mode. 20 Number keypad: dials a number or enters alphanumeric characters. 9 Display: Shows the current status and prompts during an operation. 21 Manual Dial: Engages the telephone line. 10... 4 Resolution: Adjusts the document resolution for the current through 30. Control panel overview 1 Speed buttons: Allows you to store frequently-dialed fax numbers and email addresses and enter them with the touch of a few buttons. 13 Exit: Sends you back to the upper menu level. 2...
...: Starts a job. 12 Enter: Confirms the selection on toner by using less toner in printing. 8 Scan: Activates Scan mode. 20 Number keypad: dials a number or enters alphanumeric characters. 9 Display: Shows the current status and prompts during an operation. 21 Manual Dial: Engages the telephone line. 10... 4 Resolution: Adjusts the document resolution for the current through 30. Control panel overview 1 Speed buttons: Allows you to store frequently-dialed fax numbers and email addresses and enter them with the touch of a few buttons. 13 Exit: Sends you back to the upper menu level. 2...
User Guide
Page 20
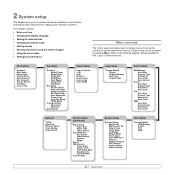
...Changing the display language • Setting the date and time • Changing the default mode • Setting sounds • Entering characters using the number keypad • Using the save modes • Setting print job timeout Menu overview The control panel provides access to various menus to set up ...the machine or use the machine's functions. Supplies Life Serial Number Clear Setting System Setup Machine Setup Machine ID Machine Fax No. 2 System setup This chapter gives you an overview of menus available on...
...Changing the display language • Setting the date and time • Changing the default mode • Setting sounds • Entering characters using the number keypad • Using the save modes • Setting print job timeout Menu overview The control panel provides access to various menus to set up ...the machine or use the machine's functions. Supplies Life Serial Number Clear Setting System Setup Machine Setup Machine ID Machine Fax No. 2 System setup This chapter gives you an overview of menus available on...

User Guide
Page 21
For the Phaser 3300MFP, all of your faxes will have the date and time printed on the bottom line of... immediately moves the cursor to the indicator. Changing the default mode Your machine is not under the digit you enter a wrong number, Out of the display and press Enter. 2 Press Enter when Machine Setup appears. 3 Press the Scroll buttons until Default ...press Enter. 5 Press Stop/Clear to return to Standby mode. 2.2 You can switch this happens, simply reenter the correct number. 7 Press Stop/Clear to return to Standby mode. Note If power to the machine is on the bottom line of ...
For the Phaser 3300MFP, all of your faxes will have the date and time printed on the bottom line of... immediately moves the cursor to the indicator. Changing the default mode Your machine is not under the digit you enter a wrong number, Out of the display and press Enter. 2 Press Enter when Machine Setup appears. 3 Press the Scroll buttons until Default ...press Enter. 5 Press Stop/Clear to return to Standby mode. 2.2 You can switch this happens, simply reenter the correct number. 7 Press Stop/Clear to return to Standby mode. Note If power to the machine is on the bottom line of ...

User Guide
Page 22
... letter appears on or off the sounds from the speaker. 2 Press the Scroll buttons until you hear the volume you want. Keypad letters and numbers Key Assigned numbers, letters, or characters 1 1 Space 2 ABCabc2 3 DEFdef3 4 GHIghi4 5 JKLjkl5 6 MNOmno6 7 PQRSpqrs7 8 TUVtuv8 9 WXYZwxyz9 0 + -,.'/*#&@0 2.3 which means "...alarm tone sounds when an error occurs or fax communication ends. • Speaker: Turns on the display. When you store fax numbers or email addresses in memory, you may need to enter a letter, locate the button labeled with the character you want. ...
... letter appears on or off the sounds from the speaker. 2 Press the Scroll buttons until you hear the volume you want. Keypad letters and numbers Key Assigned numbers, letters, or characters 1 1 Space 2 ABCabc2 3 DEFdef3 4 GHIghi4 5 JKLjkl5 6 MNOmno6 7 PQRSpqrs7 8 TUVtuv8 9 WXYZwxyz9 0 + -,.'/*#&@0 2.3 which means "...alarm tone sounds when an error occurs or fax communication ends. • Speaker: Turns on the display. When you store fax numbers or email addresses in memory, you may need to enter a letter, locate the button labeled with the character you want. ...

User Guide
Page 23
...and then cancels printing if data flow does not resume. 1 Press Menu until System Setup appears on or off Toner Save mode in the telephone number. To insert a pause, press Redial/Pause at the corresponding location. Using the save modes Toner Save mode Toner Save mode allows your machine ... systems, you must insert a pause in the printer properties. Scan Power Save mode Scan Power Save mode allows you make a mistake while entering a number or name, press the left Scroll button to delete the last digit or character. To turn this mode extends the life of the lamp. You...
...and then cancels printing if data flow does not resume. 1 Press Menu until System Setup appears on or off Toner Save mode in the telephone number. To insert a pause, press Redial/Pause at the corresponding location. Using the save modes Toner Save mode Toner Save mode allows your machine ... systems, you must insert a pause in the printer properties. Scan Power Save mode Scan Power Save mode allows you make a mistake while entering a number or name, press the left Scroll button to delete the last digit or character. To turn this mode extends the life of the lamp. You...
User Guide
Page 25
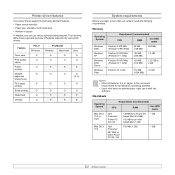
... a general overview of features supported by your system meets the following standard features: • Paper source selection • Paper size, orientation and media type • Number of copies In addition, you begin, ensure that your printer drivers: Feature PCL 6 Windows Toner save O Print quality O option Poster O printing Multiple O pages per sheet...
... a general overview of features supported by your system meets the following standard features: • Paper source selection • Paper size, orientation and media type • Number of copies In addition, you begin, ensure that your printer drivers: Feature PCL 6 Windows Toner save O Print quality O option Poster O printing Multiple O pages per sheet...

User Guide
Page 28
... IP Address appears. 5 Enter a byte between bytes. Configuring TCP/IP Your machine can be set the network protocol to move between 0 and 255 using the number keypad and press the Scroll buttons to TCP/IP. This protocol is widely used in which your machine can be assigned a TCP/ IP address, depending...
... IP Address appears. 5 Enter a byte between bytes. Configuring TCP/IP Your machine can be set the network protocol to move between 0 and 255 using the number keypad and press the Scroll buttons to TCP/IP. This protocol is widely used in which your machine can be assigned a TCP/ IP address, depending...

User Guide
Page 39
...or 4-up into the ADF, or place a single original face down on both sides of copies using the control panel buttons, see page 5.1. 3 Enter the number of paper • Setting copy timeout Selecting the paper tray After loading the print media for copy output, you must select the paper tray you... faint markings and dark images, you can cancel the copy job during an operation. Copying 1 Press Copy. Note If you step-by using the number keypad, if necessary. 4 If you want to improve the copy quality by selecting the document type for originals with light print or faint pencil markings...
...or 4-up into the ADF, or place a single original face down on both sides of copies using the control panel buttons, see page 5.1. 3 Enter the number of paper • Setting copy timeout Selecting the paper tray After loading the print media for copy output, you must select the paper tray you... faint markings and dark images, you can cancel the copy job during an operation. Copying 1 Press Copy. Note If you step-by using the number keypad, if necessary. 4 If you want to improve the copy quality by selecting the document type for originals with light print or faint pencil markings...

User Guide
Page 40
Changing the default copy settings The copy options, including darkness, original type, copy size, and number of copies, can print 2 or 4 original images reduced to fit onto one complete 3 page document will print followed by using the Reduce/Enlarge .... 6 Repeat steps 4 through 5, as needed. 7 Press Stop/Clear to return to Standby mode. For details about loading an original, see page 5.1. 3 Enter the number of copies using the number keypad. 4 Press Menu until Copy Feature appears on the bottom line of paper. 1 Press Copy. 2 2 1 2-up copying 3 1 2 Load originals face up ...
Changing the default copy settings The copy options, including darkness, original type, copy size, and number of copies, can print 2 or 4 original images reduced to fit onto one complete 3 page document will print followed by using the Reduce/Enlarge .... 6 Repeat steps 4 through 5, as needed. 7 Press Stop/Clear to return to Standby mode. For details about loading an original, see page 5.1. 3 Enter the number of copies using the number keypad. 4 Press Menu until Copy Feature appears on the bottom line of paper. 1 Press Copy. 2 2 1 2-up copying 3 1 2 Load originals face up ...

User Guide
Page 42
... and press Enter. 5 Press the Scroll buttons to select On and press Enter. 6 Press Stop/Clear to return to Standby mode. 7 Enter the number of the display and press Enter. 4 Press the Scroll buttons until System Setup appears on the bottom line of copies using the Reduce/Enlarge button... while making a clone copy. Note You cannot adjust the copy size using the number keypad. 8 Press Start to begin copying. This copy feature removes the background color and can set the time the machine waits before it restores...
... and press Enter. 5 Press the Scroll buttons to select On and press Enter. 6 Press Stop/Clear to return to Standby mode. 7 Enter the number of the display and press Enter. 4 Press the Scroll buttons until System Setup appears on the bottom line of copies using the Reduce/Enlarge button... while making a clone copy. Note You cannot adjust the copy size using the number keypad. 8 Press Start to begin copying. This copy feature removes the background color and can set the time the machine waits before it restores...

User Guide
Page 45
...Password from 4-10 digits that can change the scanner properties of credentials was entered the Phaser MFP will return Scan. Click Properties and set of your machine and the scan settings ...SMTP Requires Authentication to require authentication. 7 Enter the SMTP server login name and password. 8.2 The Xerox Network Scan Manager window opens. 2 Click the Add Device button or double-click the Add Device ... model name of up to 8 characters. To scan images from 1 to 65535. The default port number is automatically entered, but can be 4 digits. 7 Click Next. 8 Click Finish. You can scan...
...Password from 4-10 digits that can change the scanner properties of credentials was entered the Phaser MFP will return Scan. Click Properties and set of your machine and the scan settings ...SMTP Requires Authentication to require authentication. 7 Enter the SMTP server login name and password. 8.2 The Xerox Network Scan Manager window opens. 2 Click the Add Device button or double-click the Add Device ... model name of up to 8 characters. To scan images from 1 to 65535. The default port number is automatically entered, but can be 4 digits. 7 Click Next. 8 Click Finish. You can scan...

User Guide
Page 46
...on your machine. 7 Select IP Address or Host Name. 8 Enter the server address in dotted decimal notation or as a host name. 9 Enter the server port number, from 1 to set in Anonymous if you want appears and press Enter. This is running on the computer. 2 Load originals face up parameters for access.... 4 Press the Scroll buttons until NetScan appears on the scanner glass. The default port number is 139. 10 Enter the share name of the display and press Enter. 5 Enter the ID you have set in the Xerox Network Scan Manager window and press Enter. 6 Enter the PIN you need to 65535. ...
...on your machine. 7 Select IP Address or Host Name. 8 Enter the server address in dotted decimal notation or as a host name. 9 Enter the server port number, from 1 to set in Anonymous if you want appears and press Enter. This is running on the computer. 2 Load originals face up parameters for access.... 4 Press the Scroll buttons until NetScan appears on the scanner glass. The default port number is 139. 10 Enter the share name of the display and press Enter. 5 Enter the ID you have set in the Xerox Network Scan Manager window and press Enter. 6 Enter the PIN you need to 65535. ...

User Guide
Page 47
.... If you want appears and press Enter or Start. Scanning to an FTP server You can use a speed button or a speed email or group email number to set up parameters for access to a network. 2 Load originals face up Address Book, you can scan an image and then upload it to FTP...
.... If you want appears and press Enter or Start. Scanning to an FTP server You can use a speed button or a speed email or group email number to set up parameters for access to a network. 2 Load originals face up Address Book, you can scan an image and then upload it to FTP...


