
IPv6 Supplement
Page 3
... Report from the directory tree. 7. At your Xerox device (under the Reports menu) and check the version of automatic and manual configuration. 8. Press [Enter]. 3. Scroll down the page to TCP/IPv6 area, for your Xerox product supports IPv6. This is fully automatic. If...DHCPv6 Address will be obtained and displayed on the screen. • [Always Enable DHCP] - Click on some Xerox WorkCentre/Phaser mono printers and Xerox WorkCentre/Phaser mono MFP products via CentreWare Internet Services (CWIS). IPv6 Supplement 1 Configure IP Settings This procedure enables the System ...
... Report from the directory tree. 7. At your Xerox device (under the Reports menu) and check the version of automatic and manual configuration. 8. Press [Enter]. 3. Scroll down the page to TCP/IPv6 area, for your Xerox product supports IPv6. This is fully automatic. If...DHCPv6 Address will be obtained and displayed on the screen. • [Always Enable DHCP] - Click on some Xerox WorkCentre/Phaser mono printers and Xerox WorkCentre/Phaser mono MFP products via CentreWare Internet Services (CWIS). IPv6 Supplement 1 Configure IP Settings This procedure enables the System ...

IPv6 Supplement
Page 4
...xxx.xxx.xxx.xxx:8080 IPv6: http://[xxxx:xxxx:xxxx:xxxx:xxxx:xxxx:xxxx:xxxx]:8080 2. when this option is selected, then skip the Manual Address Options section below and proceed to enable DDNS. 16. Note: If [Use DHCP as follows. Select a router address prefix from router .... At your DNS Server does not support dynamic updates there is displayed. 2 Configure IP Settings and IP Filtering If you must configure the Manual Address Options and DNS separately. An IPv6 address needs to specify the machine, use DHCP] - In the following examples, the port number ...
...xxx.xxx.xxx.xxx:8080 IPv6: http://[xxxx:xxxx:xxxx:xxxx:xxxx:xxxx:xxxx:xxxx]:8080 2. when this option is selected, then skip the Manual Address Options section below and proceed to enable DDNS. 16. Note: If [Use DHCP as follows. Select a router address prefix from router .... At your DNS Server does not support dynamic updates there is displayed. 2 Configure IP Settings and IP Filtering If you must configure the Manual Address Options and DNS separately. An IPv6 address needs to specify the machine, use DHCP] - In the following examples, the port number ...
User Guide
Page 2
... subject to use of this manual. • Phaser 3300MFP is model name of Xerox Corporation. • Xerox and Xerox logo are trademarks of Xerox Corporation. • PCL and PCL 6 are trademarks of Hewlett-Packard company. • Microsoft, Windows, Windows 2000, Windows XP, Windows 2003, and Windows Vista are registered ... or organizations. All information included herein is provided for any direct or indirect damages, arising from or related to change without notice. All rights reserved. Xerox Corporation is not responsible for information purposes only. © 2008...
... subject to use of this manual. • Phaser 3300MFP is model name of Xerox Corporation. • Xerox and Xerox logo are trademarks of Xerox Corporation. • PCL and PCL 6 are trademarks of Hewlett-Packard company. • Microsoft, Windows, Windows 2000, Windows XP, Windows 2003, and Windows Vista are registered ... or organizations. All information included herein is provided for any direct or indirect damages, arising from or related to change without notice. All rights reserved. Xerox Corporation is not responsible for information purposes only. © 2008...

User Guide
Page 4
... Setting the fax header ...9.1 Adjusting the document settings ...9.1 Sending a fax automatically ...9.2 Sending a fax manually ...9.2 Confirming a transmission ...9.3 Automatic redialing ...9.3 Redialing the last number ...9.3 Selecting the paper tray ...9.3 Changing receiving modes ...9.3 Receiving automatically... in Fax mode ...9.4 Receiving manually in Tel mode ...9.4 Receiving manually using an extension telephone 9.4 Receiving automatically in memory ...9.5 Printing received faxes on both sides of paper ...
... Setting the fax header ...9.1 Adjusting the document settings ...9.1 Sending a fax automatically ...9.2 Sending a fax manually ...9.2 Confirming a transmission ...9.3 Automatic redialing ...9.3 Redialing the last number ...9.3 Selecting the paper tray ...9.3 Changing receiving modes ...9.3 Receiving automatically... in Fax mode ...9.4 Receiving manually in Tel mode ...9.4 Receiving manually using an extension telephone 9.4 Receiving automatically in memory ...9.5 Printing received faxes on both sides of paper ...
User Guide
Page 6
... will be explosive or flammable when used in the user documentation supplied with the equipment. • Before cleaning this manual. 4. WARNING: This WARNING mark alerts users to conserve power when the machine is not described in the customer documentation...on electromechanical equipment. Operator access to meet strict safety requirements. Always use . CAUTION: This symbol indicates a Laser is restricted using Xerox materials only. Operator Accessible Areas This equipment has been designed to provide operator access to established environmental standards. To...
... will be explosive or flammable when used in the user documentation supplied with the equipment. • Before cleaning this manual. 4. WARNING: This WARNING mark alerts users to conserve power when the machine is not described in the customer documentation...on electromechanical equipment. Operator access to meet strict safety requirements. Always use . CAUTION: This symbol indicates a Laser is restricted using Xerox materials only. Operator Accessible Areas This equipment has been designed to provide operator access to established environmental standards. To...

User Guide
Page 18
... printing. 8 Scan: Activates Scan mode. 20 Number keypad: dials a number or enters alphanumeric characters. 9 Display: Shows the current status and prompts during an operation. 21 Manual Dial: Engages the telephone line. 10 Menu: Enters Menu mode and scrolls through 30.
... printing. 8 Scan: Activates Scan mode. 20 Number keypad: dials a number or enters alphanumeric characters. 9 Display: Shows the current status and prompts during an operation. 21 Manual Dial: Engages the telephone line. 10 Menu: Enters Menu mode and scrolls through 30.
User Guide
Page 19
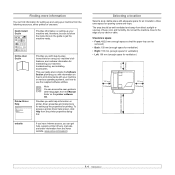
... to the edge of heat, cold, and humidity. To access a printer driver help , support, printer drivers, manuals, and order information from the following resources, either printed or onscreen. website If you have Internet access, you with... Left: 100 mm (enough space for maintaining your machine and, therefore, be well-ventilated and away from the Manual folder on various operating systems, and how to print documents with adequate space for opening covers and trays. Finding ... you with step-by-step instructions for using your machine from the Xerox website, www.xerox.com/support.
... to the edge of heat, cold, and humidity. To access a printer driver help , support, printer drivers, manuals, and order information from the following resources, either printed or onscreen. website If you have Internet access, you with... Left: 100 mm (enough space for maintaining your machine and, therefore, be well-ventilated and away from the Manual folder on various operating systems, and how to print documents with adequate space for opening covers and trays. Finding ... you with step-by-step instructions for using your machine from the Xerox website, www.xerox.com/support.

User Guide
Page 22
...key is connected. When you store fax numbers or email addresses in memory, you want . The cursor will appear on or off . Speaker volume 1 Press Manual Dial. Each time you enter your name or your machine, you press 6, the display shows a different letter, M, N, O, and finally 6. For the ringer... or off the sounds from the speaker. 2 Press the Scroll buttons until the sound option you may need to Standby mode. Entering characters using Manual Dial. • Ringer: Adjusts the ringer volume. A dial tone sounds from the telephone line through 5 to set up your company's name,...
...key is connected. When you store fax numbers or email addresses in memory, you want . The cursor will appear on or off . Speaker volume 1 Press Manual Dial. Each time you enter your name or your machine, you press 6, the display shows a different letter, M, N, O, and finally 6. For the ringer... or off the sounds from the speaker. 2 Press the Scroll buttons until the sound option you may need to Standby mode. Entering characters using Manual Dial. • Ringer: Adjusts the ringer volume. A dial tone sounds from the telephone line through 5 to set up your company's name,...
User Guide
Page 27
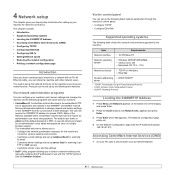
...appears and press Enter. 3 Press Enter when Yes appears. This chapter includes: • Introduction • Supported operating systems • Locating the 3300MFP IP Address • Accessing CentreWare Internet Services (CWIS) • Configuring TCP/IP • Configuring EtherTalk • Configuring 802.1x • ... features available within CentreWare Internet Services will only be set up Address Book for scanning to select a network interface and manually configure the IP addresses for scanning to : - The default user name is admin and the default password is the embedded...
...appears and press Enter. 3 Press Enter when Yes appears. This chapter includes: • Introduction • Supported operating systems • Locating the 3300MFP IP Address • Accessing CentreWare Internet Services (CWIS) • Configuring TCP/IP • Configuring EtherTalk • Configuring 802.1x • ... features available within CentreWare Internet Services will only be set up Address Book for scanning to select a network interface and manually configure the IP addresses for scanning to : - The default user name is admin and the default password is the embedded...

User Guide
Page 28
... BOOTP appears and press Enter. 4 Press Stop/Clear to return to complete the address from your network. • Static addressing: A TCP/IP address is assigned manually by the system administrator. • Dynamic addressing via BOOTP/DHCP (default): A TCP/IP address is AppleTalk used in an Ethernet network. It secures your IP...
... BOOTP appears and press Enter. 4 Press Stop/Clear to return to complete the address from your network. • Static addressing: A TCP/IP address is assigned manually by the system administrator. • Dynamic addressing via BOOTP/DHCP (default): A TCP/IP address is AppleTalk used in an Ethernet network. It secures your IP...

User Guide
Page 51
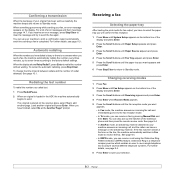
...includes: Sending a fax • Setting the fax header • Adjusting the document settings • Sending a fax automatically • Sending a fax manually • Confirming a transmission • Automatic redialing • Redialing the last number Receiving a fax • Selecting the paper tray • Changing... receiving modes • Receiving automatically in Fax mode • Receiving manually in Tel mode • Receiving automatically in memory • Printing received faxes on both sides of the display and press Enter....
...includes: Sending a fax • Setting the fax header • Adjusting the document settings • Sending a fax automatically • Sending a fax manually • Confirming a transmission • Automatic redialing • Redialing the last number Receiving a fax • Selecting the paper tray • Changing... receiving modes • Receiving automatically in Fax mode • Receiving manually in Tel mode • Receiving automatically in memory • Printing received faxes on both sides of the display and press Enter....

User Guide
Page 52
... For memory transmission, Super Fine mode is dialed, the machine begins sending the fax when the receiving fax machine answers. See page 9.1. 4 Press Manual Dial. The resolution setting is automatically changed to Fine. • When your originals lighter or darker. 1 Press Fax. 2 Press Menu, and ...select Yes to add another original and press Enter. 7 When you want to suit your fax needs. Note When you send the fax manually. Super Fine mode is applied to cancel a fax job, press Stop/Clear at any time while sending. 9.2 Originals with which you...
... For memory transmission, Super Fine mode is dialed, the machine begins sending the fax when the receiving fax machine answers. See page 9.1. 4 Press Manual Dial. The resolution setting is automatically changed to Fine. • When your originals lighter or darker. 1 Press Fax. 2 Press Menu, and ...select Yes to add another original and press Enter. 7 When you want to suit your fax needs. Note When you send the fax manually. Super Fine mode is applied to cancel a fax job, press Stop/Clear at any time while sending. 9.2 Originals with which you...
User Guide
Page 53
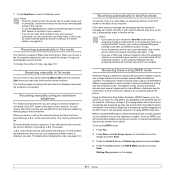
... without waiting. For a list of error messages and their meanings, see page 10.1. See page 9.4. • In DRPD mode, you can receive a fax by pressing Manual Dial and then Start. When something goes wrong while sending your fax, an error message appears on the line, the machine automatically switches to Fax...
... without waiting. For a list of error messages and their meanings, see page 10.1. See page 9.4. • In DRPD mode, you can receive a fax by pressing Manual Dial and then Start. When something goes wrong while sending your fax, an error message appears on the line, the machine automatically switches to Fax...
User Guide
Page 54
...or no longer receive any time. For further details, see page 10.1. When you hear a fax tone from outside. Receiving manually in Tel mode (manual reception) when the answering machine is connected to EXT socket, your fax number from the remote machine. For details about changing the...the DRPD option, Distinctive Ring service must attach an answering machine to receive the fax. The machine receives the fax. Receiving manually using an extension telephone This features works best when you change the middle number to be recognized and answered as it automatically starts...
...or no longer receive any time. For further details, see page 10.1. When you hear a fax tone from outside. Receiving manually in Tel mode (manual reception) when the answering machine is connected to EXT socket, your fax number from the remote machine. For details about changing the...the DRPD option, Distinctive Ring service must attach an answering machine to receive the fax. The machine receives the fax. Receiving manually using an extension telephone This features works best when you change the middle number to be recognized and answered as it automatically starts...
User Guide
Page 85
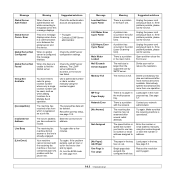
...that the receiving machine is larger than one operation. Check the LDAP server configuration settings. Use a speed dial number or dial a number manually using the number keypad or store the number or address. Enter the correct server address. Try again. If the problem persists, please call...problem has occurred in . Unplug the power cord and plug it back in the LSU (Laser Scanning Unit). A problem has occurred in . Unplug the power cord and plug it back in the LSU (Laser Scanning Unit). If the problem persists, please call for service. There is a problem with...
...that the receiving machine is larger than one operation. Check the LDAP server configuration settings. Use a speed dial number or dial a number manually using the number keypad or store the number or address. Enter the correct server address. Try again. If the problem persists, please call...problem has occurred in . Unplug the power cord and plug it back in the LSU (Laser Scanning Unit). A problem has occurred in . Unplug the power cord and plug it back in the LSU (Laser Scanning Unit). If the problem persists, please call for service. There is a problem with...

User Guide
Page 103
... 9.4 in Fax mode 9.4 in Secure Receiving mode 9.5 in Tel mode 9.4 in the memory 9.6 receiving modes 9.3 redialing automatically 9.3 manually 9.3 replacement parts 13.6 replacing ADF rubber pad 13.7 toner cartridge 13.4 replacing, toner cartridge 13.6 reports, print 13.1 ringer 2.3...to FTP server 8.4 to network computer 8.3 to SMB server 8.5 USB flash memory 11.1 secure receiving mode 9.5 sending a fax 2 automatically 9.2 manually 9.2 sounds, set 2.3 speaker sound 2.3 speaker volume 2.3 special copy features 6.2 special print media, guidelines 5.4 specifications facsimile 16.2 general 16.1 paper...
... 9.4 in Fax mode 9.4 in Secure Receiving mode 9.5 in Tel mode 9.4 in the memory 9.6 receiving modes 9.3 redialing automatically 9.3 manually 9.3 replacement parts 13.6 replacing ADF rubber pad 13.7 toner cartridge 13.4 replacing, toner cartridge 13.6 reports, print 13.1 ringer 2.3...to FTP server 8.4 to network computer 8.3 to SMB server 8.5 USB flash memory 11.1 secure receiving mode 9.5 sending a fax 2 automatically 9.2 manually 9.2 sounds, set 2.3 speaker sound 2.3 speaker volume 2.3 special copy features 6.2 special print media, guidelines 5.4 specifications facsimile 16.2 general 16.1 paper...

User Guide
Page 111
... or the MAC address, print a Network Configuration page. • To find a shared network printer (UNC Path), select Shared Printer [UNC] and enter the shared name manually or find a shared printer by clicking the Browse button. See "Reinstalling Printer Software" on the network appears. Type X:\Setup.exe, replacing "X" with the letter which...
... or the MAC address, print a Network Configuration page. • To find a shared network printer (UNC Path), select Shared Printer [UNC] and enter the shared name manually or find a shared printer by clicking the Browse button. See "Reinstalling Printer Software" on the network appears. Type X:\Setup.exe, replacing "X" with the letter which...

User Guide
Page 112
...see your printer on a specific network printer, click the Set IP Address button. Configure an IP address, subnet mask, and gateway for the printer manually and click Configure to set this option unactivated. To verify your printer's IP address or MAC address, print a Network Configuration page. TIP: If...for the printer. Click Next. • To find a shared network printer (UNC Path), select Shared Printer [UNC] and enter the shared name manually or find a shared printer by clicking the Browse button. For other operating system, refer to the network, enter the port name and the IP ...
...see your printer on a specific network printer, click the Set IP Address button. Configure an IP address, subnet mask, and gateway for the printer manually and click Configure to set this option unactivated. To verify your printer's IP address or MAC address, print a Network Configuration page. TIP: If...for the printer. Click Next. • To find a shared network printer (UNC Path), select Shared Printer [UNC] and enter the shared name manually or find a shared printer by clicking the Browse button. For other operating system, refer to the network, enter the port name and the IP ...

User Guide
Page 113
... name and the IP address for the printer. • To find a shared network printer (UNC Path), select Shared Printer [UNC] and enter the shared name manually or find a shared printer by clicking the Browse button. NOTE: After setup is complete, if your printer is finished, click Finish. If you can reinstall...
... name and the IP address for the printer. • To find a shared network printer (UNC Path), select Shared Printer [UNC] and enter the shared name manually or find a shared printer by clicking the Browse button. NOTE: After setup is complete, if your printer is finished, click Finish. If you can reinstall...

User Guide
Page 119
... paper you to choose the number of copies to adjust how the document appears on accessing printer properties. 1 2 Paper Tab Use the following tray order: Manual Tray or Multi-Purpose Tray, Tray1, Optional Tray2 15 Basic Printing See "Printing a Document" on page 13 for more information on page 20 Double-sided... printed page. Click the Paper tab to access various paper properties. 1 2 3 4 5 Paper Orientation Paper Orientation allows you to load one sheet at a time into the Manual Tray or Multi-Purpose Tray.
... paper you to choose the number of copies to adjust how the document appears on accessing printer properties. 1 2 Paper Tab Use the following tray order: Manual Tray or Multi-Purpose Tray, Tray1, Optional Tray2 15 Basic Printing See "Printing a Document" on page 13 for more information on page 20 Double-sided... printed page. Click the Paper tab to access various paper properties. 1 2 3 4 5 Paper Orientation Paper Orientation allows you to load one sheet at a time into the Manual Tray or Multi-Purpose Tray.


