
Installation Instructions
Page 1
...dans ce document. Table of Contents / Table des matières MICROWAVE HOOD COMBINATION SAFETY 1 INSTALLATION REQUIREMENTS 2 Tools and Parts 2 Remove Cardboard Template 2 Location Requirements 2 Product Dimensions 3 Electrical Requirements 3 INSTALLATION INSTRUCTIONS 4 Remove Mounting Plate 4 Rotate ...Install Damper Assembly 9 Install the Microwave Oven 9 Complete Installation 10 VENTING DESIGN SPECIFICATIONS 11 ASSISTANCE 12 Replacement Parts 12 Accessories 12 SÉCURITÉ DE L'ENSEMBLE FOUR À MICRO-ONDES/HOTTE......... 13 EXIGENCES D'INSTALLATION...
...dans ce document. Table of Contents / Table des matières MICROWAVE HOOD COMBINATION SAFETY 1 INSTALLATION REQUIREMENTS 2 Tools and Parts 2 Remove Cardboard Template 2 Location Requirements 2 Product Dimensions 3 Electrical Requirements 3 INSTALLATION INSTRUCTIONS 4 Remove Mounting Plate 4 Rotate ...Install Damper Assembly 9 Install the Microwave Oven 9 Complete Installation 10 VENTING DESIGN SPECIFICATIONS 11 ASSISTANCE 12 Replacement Parts 12 Accessories 12 SÉCURITÉ DE L'ENSEMBLE FOUR À MICRO-ONDES/HOTTE......... 13 EXIGENCES D'INSTALLATION...
Installation Instructions
Page 2
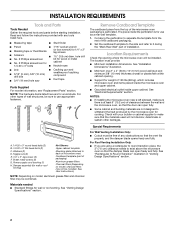
... that the door can open fully. ■ Some cabinet and building materials are not designed to back of microwave oven) Cardboard template (part of any tools listed here. ■ Measuring tape ■ Stud finder ■ Pencil ■ 7/16" socket wrench ■ ...mm) drill bits ■ 3/4" (19 mm) hole saw ■ Caulking gun and weatherproof caulking compound ■ Duct tape Parts Supplied For reorder information, see "Replacement Parts" section. For other damages. See User Instructions.) NOTE: Depending on model, charcoal filters may be sure to make sure there is...
... that the door can open fully. ■ Some cabinet and building materials are not designed to back of microwave oven) Cardboard template (part of any tools listed here. ■ Measuring tape ■ Stud finder ■ Pencil ■ 7/16" socket wrench ■ ...mm) drill bits ■ 3/4" (19 mm) hole saw ■ Caulking gun and weatherproof caulking compound ■ Duct tape Parts Supplied For reorder information, see "Replacement Parts" section. For other damages. See User Instructions.) NOTE: Depending on model, charcoal filters may be sure to make sure there is...
Installation Instructions
Page 8
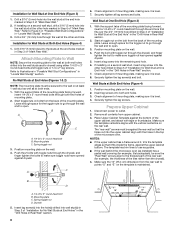
.... 5. Wall Studs at One End Hole (Figure 3) 1. Position mounting plate on the rear wall. Check alignment of the microwave oven. Disconnect power to the thickest part of the rear wall (for Wall Stud at both end holes. 3. Remove all lag screws and bolts. The "rear wall" arrows must be sure the...
.... 5. Wall Studs at One End Hole (Figure 3) 1. Position mounting plate on the rear wall. Check alignment of the microwave oven. Disconnect power to the thickest part of the rear wall (for Wall Stud at both end holes. 3. Remove all lag screws and bolts. The "rear wall" arrows must be sure the...
Installation Instructions
Page 12
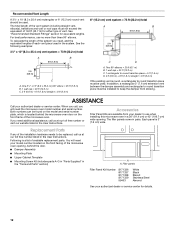
...Call your dealer to round transition piece must not exceed the equivalent of 140 ft (42.7 m) for either type of available replacement parts. Accessories Filler Panel Kits are available from sticking. Each panel is located behind the door. ■ Damper Assembly ■ Mounting ...Plate ■ Upper Cabinet Template ■ Mounting Screw Kit (includes parts A-G in "Parts Supplied" in the User Instructions. Replacement Parts If any of the installation hardware needs to be installed to keep the damper from your authorized dealer or service...
...Call your dealer to round transition piece must not exceed the equivalent of 140 ft (42.7 m) for either type of available replacement parts. Accessories Filler Panel Kits are available from sticking. Each panel is located behind the door. ■ Damper Assembly ■ Mounting ...Plate ■ Upper Cabinet Template ■ Mounting Screw Kit (includes parts A-G in "Parts Supplied" in the User Instructions. Replacement Parts If any of the installation hardware needs to be installed to keep the damper from your authorized dealer or service...


