
Installation Instructions
Page 1
These installation instructions cover different models. Table of Contents / Table des matières MICROWAVE HOOD COMBINATION SAFETY 1 INSTALLATION REQUIREMENTS 2 Tools and Parts 2 Remove Cardboard Template 2 Location Requirements 2 Product Dimensions 3 Electrical Requirements 3 INSTALLATION INSTRUCTIONS 4 Remove ... you to Wall 8 Prepare Upper Cabinet 8 Install Damper Assembly 9 Install the Microwave Oven 9 Complete Installation 10 VENTING DESIGN SPECIFICATIONS 11 ASSISTANCE 12 Replacement Parts 12 Accessories 12 SÉCURITÉ DE L'ENSEMBLE FOUR À MICRO-ONDES...
These installation instructions cover different models. Table of Contents / Table des matières MICROWAVE HOOD COMBINATION SAFETY 1 INSTALLATION REQUIREMENTS 2 Tools and Parts 2 Remove Cardboard Template 2 Location Requirements 2 Product Dimensions 3 Electrical Requirements 3 INSTALLATION INSTRUCTIONS 4 Remove ... you to Wall 8 Prepare Upper Cabinet 8 Install Damper Assembly 9 Install the Microwave Oven 9 Complete Installation 10 VENTING DESIGN SPECIFICATIONS 11 ASSISTANCE 12 Replacement Parts 12 Accessories 12 SÉCURITÉ DE L'ENSEMBLE FOUR À MICRO-ONDES...
Installation Instructions
Page 2
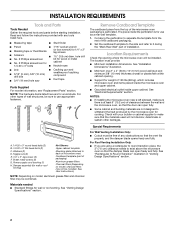
...may be sure to it during the "Mark Rear Wall" part of clearance between the wall and the microwave oven, so that the door can open freely and fully. NOTES: ■ If installing the microwave oven near a left sidewall, make sure that the vent fits... Only: ■ Cutout must provide: ■ Minimum installation dimensions. Sheet metal screws (2) G. See "Rectangular to back of microwave oven) Cardboard template (part of packaging) Aluminum grease filters Charcoal filters (Depending on model, aluminum grease filter and charcoal filter may not be installed. Damper ...
...may be sure to it during the "Mark Rear Wall" part of clearance between the wall and the microwave oven, so that the door can open freely and fully. NOTES: ■ If installing the microwave oven near a left sidewall, make sure that the vent fits... Only: ■ Cutout must provide: ■ Minimum installation dimensions. Sheet metal screws (2) G. See "Rectangular to back of microwave oven) Cardboard template (part of packaging) Aluminum grease filters Charcoal filters (Depending on model, aluminum grease filter and charcoal filter may not be installed. Damper ...
Installation Instructions
Page 8
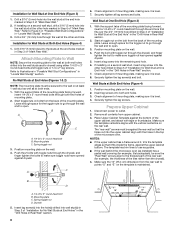
...." The "rear wall" arrows must be secured to use as guides. ■ If the wall behind the microwave oven (as at least 1 wall stud as well as installed) has a partial wall covering (for example, tile...), be against the rear wall so that fits over the 3/4" (19 mm) hole drilled in Step 3 of the microwave oven. Mounting plate C. Drill a 3/16" (5 mm) hole into both end holes of "Installation for No Wall ...for the toggle nuts to go through the drywall, and finger tighten the bolt to the thickest part of the rear wall (for Wall Studs at One End Hole" in the "Drill Holes in "Locate Wall...
...." The "rear wall" arrows must be secured to use as guides. ■ If the wall behind the microwave oven (as at least 1 wall stud as well as installed) has a partial wall covering (for example, tile...), be against the rear wall so that fits over the 3/4" (19 mm) hole drilled in Step 3 of the microwave oven. Mounting plate C. Drill a 3/16" (5 mm) hole into both end holes of "Installation for No Wall ...for the toggle nuts to go through the drywall, and finger tighten the bolt to the thickest part of the rear wall (for Wall Studs at One End Hole" in the "Drill Holes in "Locate Wall...
Installation Instructions
Page 12
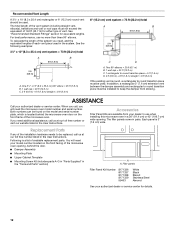
... vent system = 73 ft (22.2 m) total A B 6 ft (1.8 m) 2 ft (0.6 m) C A. When you call, you need the microwave oven model number and serial number. The filler panels come in the "Tools and Parts" section) A A. ASSISTANCE Call your authorized dealer or service center for details. 12 If you will need , add the... damper assembly and rectangular to round transition piece must be installed to round transition piece must not exceed the equivalent of the microwave oven. Each panel is round, a rectangular to keep the damper from your model number located on the front frame of ...
... vent system = 73 ft (22.2 m) total A B 6 ft (1.8 m) 2 ft (0.6 m) C A. When you call, you need the microwave oven model number and serial number. The filler panels come in the "Tools and Parts" section) A A. ASSISTANCE Call your authorized dealer or service center for details. 12 If you will need , add the... damper assembly and rectangular to round transition piece must be installed to round transition piece must not exceed the equivalent of the microwave oven. Each panel is round, a rectangular to keep the damper from your model number located on the front frame of ...


