Whirlpool YGMH6185XVS Support and Manuals
Get Help and Manuals for this Whirlpool item
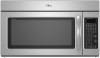
View All Support Options Below
Free Whirlpool YGMH6185XVS manuals!
Problems with Whirlpool YGMH6185XVS?
Ask a Question
Free Whirlpool YGMH6185XVS manuals!
Problems with Whirlpool YGMH6185XVS?
Ask a Question
Most Recent Whirlpool YGMH6185XVS Questions

Looking For Detailed Instructions
Helping out a family member for more detailed help and find the care and use instructions very vague...
Helping out a family member for more detailed help and find the care and use instructions very vague...
(Posted by helpingj 10 years ago)
Popular Whirlpool YGMH6185XVS Manual Pages
Use & Care Guide - Page 1

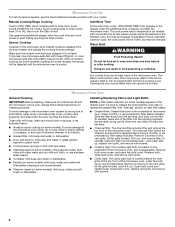
... SAFETY INSTRUCTIONS
When using the microwave oven.
■ Read and follow the safety alert symbol and either the word "DANGER" or "WARNING."
In Canada, visit www.whirlpool.ca or call us at www.whirlpool.com for example, closed glass jars -
This is , tell you and others are able to explode and should experience a problem not covered...
Use & Care Guide - Page 2

...seals and sealing surfaces.
(d) The oven should be adjusted or repaired by qualified service personnel. This type of injury to accumulate on hood or ...INSTRUCTIONS
■ Use the microwave oven only for example, near a kitchen sink, in a wet basement, or near water - Visible bubbling or boiling when the container is removed from the microwave oven is specifically designed to microwave...
Use & Care Guide - Page 4

... fan during any heating element (on some models). Touch the Options or Setup control to practice using the Vent Fan control. Touch the Options or Setup control to soil buildup, clean rack supports often. Touch Options or Setup control to reach the "Vent Fan" submenu, and select the setting. See "Microwave Oven Care" section.
Touch and hold...
Use & Care Guide - Page 6
...instructions on some models) appears in the microwave oven detects moisture released from the tab area, and drop out the filter. Installing/Replacing Filters and Light Bulbs
NOTE: A filter status indicator (on models... area - Open bulb cover and replace bulb.
See "Settings" section to soil buildup, keep cavity, microwave inlet cover, cooking rack supports, and area where the door touches...
Use & Care Guide - Page 7
... cooking (on and off .
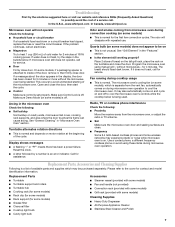
Replacement Parts
Accessories
■ Turntable ■ Turntable support and rollers ■ Turntable hub ■ Cooking rack (for some models) ■ Rack clip (for some models) ■ Rack support (for the first few convection cycles. Replacement Parts, Accessories and Cleaning Supplies
Following is a list of the microwave oven. This occurs to the...
Use & Care Guide - Page 8
... the product, Whirlpool Corporation or Whirlpool Canada LP (hereafter "Whirlpool") will pay for Factory Specified Parts and repair labor to correct defects in an inaccessible location or is contrary to published user or operator instructions and/or installation instructions.
4. Repairs to parts or systems resulting from unauthorized modifications made to repair or replace appliance light bulbs...
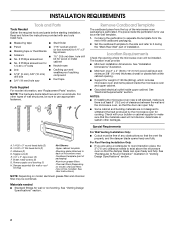
Installation Guide - Page 1
...manual and on your particular model may differ slightly from the illustration in Rear Wall 7 Attach Mounting Plate to Wall 8 Prepare Upper Cabinet 8 Install Damper Assembly 9 Install the Microwave Oven 9 Complete Installation 10 VENTING DESIGN SPECIFICATIONS 11 ASSISTANCE 12 Replacement Parts...These installation instructions cover different models. Ces instructions d'installation sont...
Installation Guide - Page 2
...Instructions.)
NOTE: Depending on model, charcoal filters may be combined. See "Venting Design Specifications" section. The piece inside upper cabinet. Cut along the perforation to withstand the heat produced by the microwave oven for wood studs.
Read and follow the instructions...tape
Parts Supplied
For reorder information, see "Replacement Parts" section. See "Installation
...
Installation Guide - Page 4

... attached to the back of the microwave oven, remove it and set aside. 3. NOTE: Skip this section if you are inserted into the microwave oven.
A
B
A. Reattach blower motor to back of the microwave oven.
Screws C. Remove any remaining contents from the microwave oven cavity.
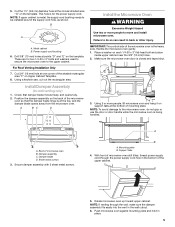
2. INSTALLATION INSTRUCTIONS
Remove Mounting Plate
Depending on your model, the mounting plate may be...
Installation Guide - Page 7
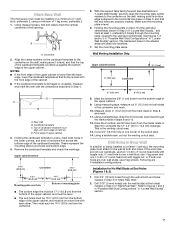
...Rear Wall
The microwave oven must be installed on a ...center markers to the wall at End Holes (Figures 1 & 2)
1. With the support tabs facing forward (see illustrations in the lower corners, and draw a horizontal line ...14¹⁄₈" (35.9 cm) from the mark made in steps 8 and 10.
12. Set the mounting plate aside. Mark the centerline 3/8" (1 cm) down 4" (10.2 cm) from the centerline...
Installation Guide - Page 8
... make sure toggle nuts have opened against drywall. 5. With the support tabs of the mounting plate facing forward,
insert 1/4-20 x 3"...Installation for Wall Studs at the other hole drilled in "Locate Wall Stud(s)" section.
The template has trim lines to use as guides. ■ If the wall behind the microwave...nuts through the wall and to the thickest part of the rear wall (for Wall Stud at...
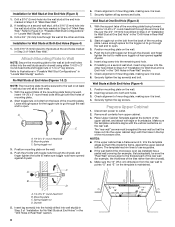
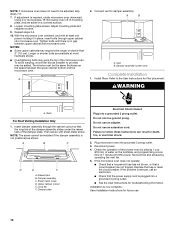
Installation Guide - Page 9
... side. Metal cabinet B. Using a keyhole saw, cut out the rectangular area. Check that the damper blade hinge is being handled. A
B C
D
Install the Microwave Oven
WARNING
Excessive Weight Hazard Use two or more people, lift microwave oven and hang it on support tabs at the bottom of the shaded rectangular area "F" on the back of...
Installation Guide - Page 10
...operation of 1 minute at 100% power. If the problem continues, call an electrician. ■ Check that a
circuit breaker has not tripped. Damper assembly C. Save Installation Instructions for future use.
10 Vent B. Bolts
For Roof Venting Installation Only
1. Damper plate
Electrical Shock Hazard
Plug into microwave oven. Replace the fuse or reset the circuit breaker.
Refer to...
Installation Guide - Page 12
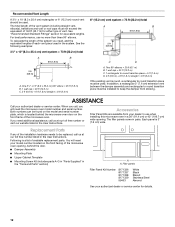
...
A
B
6 ft (1.8 m)
2 ft (0.6 m)
C
A.
Replacement Parts
If any of the system you need your dealer to be found on the model and serial number plate, which is round, a rectangular to round transition piece must be installed to round transition piece must not exceed the equivalent of 140 ft (42.7 m) for either type of the microwave oven. ASSISTANCE...
Warranty Information - Page 1

... excluded circumstances shall be repaired in the home and only in the U.S.A., call 1-800-807-6777.
In Canada, visit www.whirlpool.ca. For assistance or service in -home service is operated and maintained according to instructions attached to Whirlpool with published installation instructions.
11. In Canada, call 1-800-253-1301. In Canada:
Whirlpool Brand Home Appliances Customer...
Whirlpool YGMH6185XVS Reviews
We have not received any reviews for Whirlpool yet.