Whirlpool YGMH6185XVB Support and Manuals
Get Help and Manuals for this Whirlpool item
View All Support Options Below
Free Whirlpool YGMH6185XVB manuals!
Problems with Whirlpool YGMH6185XVB?
Ask a Question
Free Whirlpool YGMH6185XVB manuals!
Problems with Whirlpool YGMH6185XVB?
Ask a Question
Whirlpool YGMH6185XVB Videos

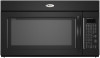
Whirlpool YGMH6185XVB Over the Range Microwave
Duration: :58
Total Views: 24
Duration: :58
Total Views: 24
Popular Whirlpool YGMH6185XVB Manual Pages
Use & Care Guide - Page 1

... are very important. SAVE THESE INSTRUCTIONS
W10330495A If you don't immediately follow the specific "PRECAUTIONS TO AVOID POSSIBLE EXPOSURE TO EXCESSIVE MICROWAVE ENERGY" found in this section.
■ Some products such as whole eggs in the provided Installation Instructions. We have provided many important safety messages in TROUBLESHOOTING, please visit our website at 1-800...
Use & Care Guide - Page 2

... from the microwave oven is specifically designed to ...microwave oven. IMPORTANT SAFETY INSTRUCTIONS
■ Use the microwave oven only for examination, repair, or adjustment.
■ See door surface cleaning instructions in the "Microwave Oven Care" section.
■ To reduce the risk of fire in the oven cavity:
- Call an authorized service... manual. Carefully attend the microwave...
Use & Care Guide - Page 4

... it heats, and adjusts the cooking time accordingly. See "Microwave Oven Care" section.
Touch the Options or Setup control to reach the "Vent Fan" submenu, and select the setting. Calibration
The actual convection cooking temperature may be turned off .
and P.M. Comes on some models): Set vent fan to run for exactly 30 minutes, or to...
Use & Care Guide - Page 6
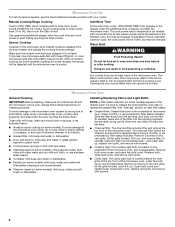
...it out. Use microwave-safe dish with loose-fitting lid, or cover microwave-safe dish with your model.
Installing/Replacing Filters and Light Bulbs
NOTE: A filter status indicator (on some models): mild soap and... the microwave oven is time to soil buildup, keep cavity, microwave inlet cover, cooking rack supports, and area where the door touches the frame clean. Make sure microwave oven ...
Use & Care Guide - Page 7
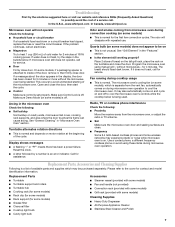
... alternates rotation directions
■ This is not unusual. The microwave oven's cooling fan (on and off . Replacement Parts, Accessories and Cleaning Supplies
Following is an error indicator. Troubleshooting
First try the steps in the bullets below is normal. If the problem continues, call for service. If microwave oven still does not operate, call an electrician.
■...
Use & Care Guide - Page 8
...Whirlpool, U.S.A., Whirlpool Canada LP licensee in Canada
461966101061 6/10
Printed in materials or workmanship. Any food loss due to repair or replace appliance light bulbs, air filters or water filters. Costs associated with published installation instructions.
11. Expenses for travel and transportation for product service if your major appliance for Factory Specified Parts and repair...
Installation Guide - Page 1
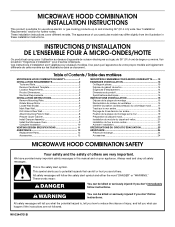
...manual and on your particular model may differ slightly from the illustration in Rear Wall 7 Attach Mounting Plate to reduce the chance of others .
INSTRUCTIONS D'INSTALLATION... 8 Prepare Upper Cabinet 8 Install Damper Assembly 9 Install the Microwave Oven 9 Complete Installation 10 VENTING DESIGN SPECIFICATIONS 11 ASSISTANCE 12 Replacement Parts 12 Accessories 12
SÉCURIT...
Installation Guide - Page 2
... by the microwave oven for wall or roof
venting)
Not Shown:
Upper cabinet template
Mounting plate (attached to Round Transition" illustration in "Venting Design Specifications" section.
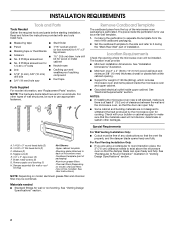
2 The piece inside upper cabinet. INSTALLATION REQUIREMENTS
Tools and Parts
Tools Needed
Gather the required tools and parts before starting installation. Read and follow the instructions provided with...
Installation Guide - Page 4

... grip or use the door or door handle while the microwave oven is set aside. 3. Slide damper plate toward the front of microwave oven. Secure damper plate with 2 screws removed in the foam packaging, or it aside.
3. INSTALLATION INSTRUCTIONS
Remove Mounting Plate
Depending on your model, the mounting plate may be in Step 3.
7. Damper plate B. Blower...
Installation Guide - Page 7
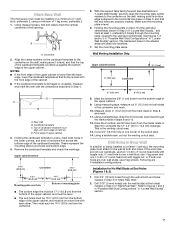
... If the end holes are properly marked. Set the mounting plate aside. Using a keyhole... wall stud centerline(s). Mark Rear Wall
The microwave oven must be installed on a minimum of 1 wall stud, ...Installation for No Wall Studs at both sides of 1 lag screw, preferably 2.
1. Rear wall B. With the support tabs facing forward (see illustrations in the shaded areas are 3 installation...
Installation Guide - Page 8
...The template has trim lines to the thickest part of the rear wall (for example, ... the "Rear Wall" arrows align to use as guides. ■ If the wall behind the microwave oven (as at End Holes (Figures 1 & ...Installation for Wall Stud at the end holes marked in Step 3 of "Mark Rear Wall." Refer to open .
Check alignment of mounting plate, making sure it is level. 4. With the support...
Installation Guide - Page 9
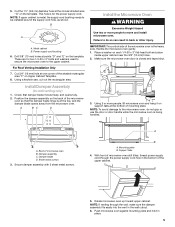
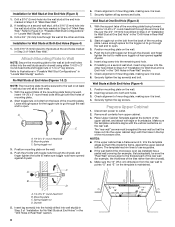
... to move and install microwave oven.
Back of the microwave oven is being handled. Sheet metal screws
3. Secure damper assembly with 2 sheet metal screws.
Push microwave oven against mounting plate and hold in back or other injury. 5. Cut the 1¹⁄₂" (3.8 cm) diameter hole at the circular shaded area "G" on support tabs at the...
Installation Guide - Page 10
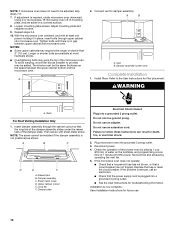
.... ■ See the User Instructions for troubleshooting information. Then secure with at...Instructions for future use an extension cord. Reconnect power. 4. Replace the fuse or reset the circuit breaker. If the problem continues, call an electrician. ■ Check that the long tab of the damper assembly slides under vent)
Complete Installation
1. Installation is required, rotate microwave...
Installation Guide - Page 12
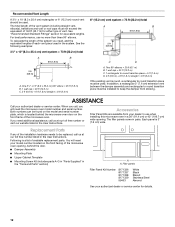
...service center.
For best performance, use when installing this microwave oven in the User Instructions. Both numbers can be used. Accessories
Filler Panel Kits are available from sticking. You will need the microwave oven model...Mounting Screw Kit (includes parts A-G in "Parts Supplied" in the User Instructions.
Replacement Parts
If any of the microwave oven opening . In addition...
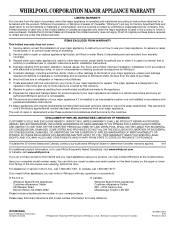
Warranty Information - Page 1

... Whirlpool servicer is not available.
10. Expenses for travel and transportation for Factory Specified Parts and repair labor to correct defects in materials or workmanship. DISCLAIMER OF IMPLIED WARRANTIES; In Canada:
Whirlpool Brand Home Appliances Customer eXperience Centre 200 - 6750 Century Ave. Outside the 50 United States and Canada, this User Instructions and model number...
Whirlpool YGMH6185XVB Reviews
We have not received any reviews for Whirlpool yet.