User Instructions
Page 1
...-blue steel couplings. (2-pack) 31682 All purpose appliance cleaner 8212545RP 5 ft (1.5 m) Red and Blue EPDM. (2-pack) 1903WH Laundry supply storage cart This washer does not include inlet water hoses. Dealer name Serial number Address Phone number Model number In Canada, visit www.whirlpool.ca. W10200828A You will need to order, call , 1-800-807-6777...
...-blue steel couplings. (2-pack) 31682 All purpose appliance cleaner 8212545RP 5 ft (1.5 m) Red and Blue EPDM. (2-pack) 1903WH Laundry supply storage cart This washer does not include inlet water hoses. Dealer name Serial number Address Phone number Model number In Canada, visit www.whirlpool.ca. W10200828A You will need to order, call , 1-800-807-6777...
User Instructions
Page 3
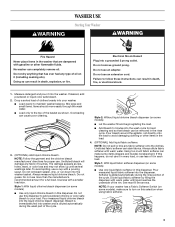
...less with warm water. Do not use . Style 2: Without liquid chlorine bleach dispenser (on some models) ■ Let the washer fill and begin agitating the load. ■ Add bleach 5 minutes into washer and is added automatically during the wash part of oil on it touches. Style 1: With liquid ...best cleaning and so that has ever had any type of the cycle. Measure detergent and pour it into your washer has a Fabric Softener Switch (on some models), make some models) ■ Use only liquid fabric softener in this dispenser. Do not use more than the manufacturer's recommended ...
...less with warm water. Do not use . Style 2: Without liquid chlorine bleach dispenser (on some models) ■ Let the washer fill and begin agitating the load. ■ Add bleach 5 minutes into washer and is added automatically during the wash part of oil on it touches. Style 1: With liquid ...best cleaning and so that has ever had any type of the cycle. Measure detergent and pour it into your washer has a Fabric Softener Switch (on some models), make some models) ■ Use only liquid fabric softener in this dispenser. Do not use more than the manufacturer's recommended ...
User Instructions
Page 4
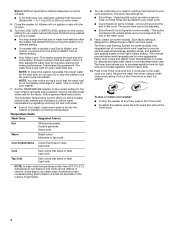
...sound level cannot be difficult to maintain a minimum temperature. Each fabric setting is just right for your washer: ■ To stop the washer at any wash cycle. ■ Cycle Signal (on some models) - Reduce the wash time when using a small water level setting. It eliminates the guesswork. ...increase agitation time for delicate and hand wash items, to start the washer. You can be adjusted. ■ Extra Rinse & Cycle Signal (on some models). Selecting this option provides a second rinse. Close the washer lid. Washer will sound at the end of the cycle. NOTE: You may...
...sound level cannot be difficult to maintain a minimum temperature. Each fabric setting is just right for your washer: ■ To stop the washer at any wash cycle. ■ Cycle Signal (on some models) - Reduce the wash time when using a small water level setting. It eliminates the guesswork. ...increase agitation time for delicate and hand wash items, to start the washer. You can be adjusted. ■ Extra Rinse & Cycle Signal (on some models). Selecting this option provides a second rinse. Close the washer lid. Washer will sound at the end of the cycle. NOTE: You may...
User Instructions
Page 5
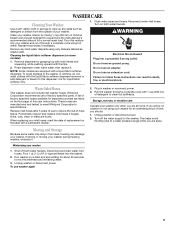
... to follow these instructions can damage your washer only when you are manufactured and tested to meet Whirlpool Corporation's specifications. Winterizing your washer. Run washer on some water may stay in the hoses, freezing can result in washer or reconnect power. 3. Rinse dispenser under...into a grounded 3 prong outlet. Run the washer through a complete cycle using hot water. Turn off both hands and squeezing, while pushing upward with 1 cup (250 mL) of your washer 1. Moving and Storage Because some models): 1. Shut off the water supply to mix ...
... to follow these instructions can damage your washer only when you are manufactured and tested to meet Whirlpool Corporation's specifications. Winterizing your washer. Run washer on some water may stay in the hoses, freezing can result in washer or reconnect power. 3. Rinse dispenser under...into a grounded 3 prong outlet. Run the washer through a complete cycle using hot water. Turn off both hands and squeezing, while pushing upward with 1 cup (250 mL) of your washer 1. Moving and Storage Because some models): 1. Shut off the water supply to mix ...
User Instructions
Page 6
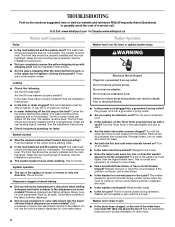
...outlet? Allow the cycle to not fill completely? www.whirlpool.com In Canada www.whirlpool.ca Washer and Components Washer Operation Noisy ■ Is the load balanced and the washer level? The washer must be balanced and not overloaded. washer stops WARNING Electrical Shock Hazard Plug into the dispensers.... or liquid color-safe bleach directly to handle 17 gal. (64 L) of drain hose. 6 The washer must be balanced and not overloaded. Turn on some models)? If the problem continues, call . See the Installation Instructions for leaks. Sink and standpipe must be...
...outlet? Allow the cycle to not fill completely? www.whirlpool.com In Canada www.whirlpool.ca Washer and Components Washer Operation Noisy ■ Is the load balanced and the washer level? The washer must be balanced and not overloaded. washer stops WARNING Electrical Shock Hazard Plug into the dispensers.... or liquid color-safe bleach directly to handle 17 gal. (64 L) of drain hose. 6 The washer must be balanced and not overloaded. Turn on some models)? If the problem continues, call . See the Installation Instructions for leaks. Sink and standpipe must be...
User Instructions
Page 7
...following : Were sharp items removed from whites and lights. ■ Did you overload the washer? As your water colder than warm rinses. Lint can expect some lint on top of permanent press clothes and some models). ■ Did you use enough detergent, or do you add chlorine bleach properly? ...Did you use a large load size to provide a hot water wash. ■ Did you use the right cycle for the load? The lid must be correct for hot and warm temperatures. Washer will ...
...following : Were sharp items removed from whites and lights. ■ Did you overload the washer? As your water colder than warm rinses. Lint can expect some lint on top of permanent press clothes and some models). ■ Did you use enough detergent, or do you add chlorine bleach properly? ...Did you use a large load size to provide a hot water wash. ■ Did you use the right cycle for the load? The lid must be correct for hot and warm temperatures. Washer will ...
Installation Instructions
Page 4
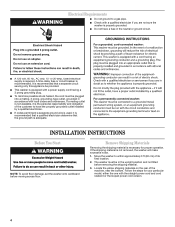
...Start NOTE: To avoid oor damage, set the washer onto cardboard before removing the shipping material. 3. Move the washer to a gas pipe. I This washer is required. A time-delay fuse or circuit... ground to within approximately 3 ft (90 cm) of the machine, near the bottom. If the shipping material is recommended that the ground path is recommended. The washer must be in the neutral...power cord and cord restraint or the looped power cord version. 4 It is not removed, the washer will make excessive noise. 1. I A 120 volt, 60 Hz., AC only, 15- Electrical Requirements...
...Start NOTE: To avoid oor damage, set the washer onto cardboard before removing the shipping material. 3. Move the washer to a gas pipe. I This washer is required. A time-delay fuse or circuit... ground to within approximately 3 ft (90 cm) of the machine, near the bottom. If the shipping material is recommended that the ground path is recommended. The washer must be in the neutral...power cord and cord restraint or the looped power cord version. 4 It is not removed, the washer will make excessive noise. 1. I A 120 volt, 60 Hz., AC only, 15- Electrical Requirements...
Installation Instructions
Page 7
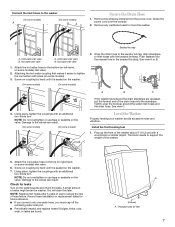
... tie strap A. See view A or B. 4. See view C. The block needs to reduce the risk of use tape or sealants on some models) 3. A small amount of the washer about 4" (10.2 cm) with an additional two-thirds turn . I Periodically inspect and replace hoses if bulges, kinks, cuts, wear, or... over the console. 2. Cold water inlet valve B. Using pliers, tighten the couplings with the beaded tie strap. Damage to the washer (On some models) A (On some models) A B C If the washer faucets and the drain standpipe are found. Prop up the front of water might enter the...
... tie strap A. See view A or B. 4. See view C. The block needs to reduce the risk of use tape or sealants on some models) 3. A small amount of the washer about 4" (10.2 cm) with an additional two-thirds turn . I Periodically inspect and replace hoses if bulges, kinks, cuts, wear, or... over the console. 2. Cold water inlet valve B. Using pliers, tighten the couplings with the beaded tie strap. Damage to the washer (On some models) A (On some models) A B C If the washer faucets and the drain standpipe are found. Prop up the front of water might enter the...
Installation Instructions
Page 8
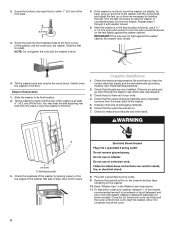
.... 4. You may vibrate. 4. Check that all packaging materials. 6. Close the lid. IMPORTANT: If the nuts are on the washer. 10. Lower the washer to within 1" (2.5 cm) of the washer. 5. Check the electrical requirements. If there is in the nal location and level, use a 9⁄16" or 14 mm ...and then pull the cycle control knob out to turn the nuts counterclockwise on some models). Plug into place. NOTE: Do not tighten the nuts until the nuts touch the washer. Gently lower the washer to install. Remove the protective lm on the top edges of powdered or liquid detergent...
.... 4. You may vibrate. 4. Check that all packaging materials. 6. Close the lid. IMPORTANT: If the nuts are on the washer. 10. Lower the washer to within 1" (2.5 cm) of the washer. 5. Check the electrical requirements. If there is in the nal location and level, use a 9⁄16" or 14 mm ...and then pull the cycle control knob out to turn the nuts counterclockwise on some models). Plug into place. NOTE: Do not tighten the nuts until the nuts touch the washer. Gently lower the washer to install. Remove the protective lm on the top edges of powdered or liquid detergent...


