User Instructions
Page 1
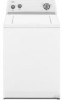
... information on the model and serial number label, located under all 8212637RP 6 ft (1.8 m) Black EPDM, space saving 90° elbow, hypro-blue steel couplings. (2-pack) 31682 All purpose appliance cleaner 8212545RP 5 ft (1.5 m) Red and Blue EPDM. (2-pack) 1903WH Laundry supply storage cart This washer does not include inlet water hoses. ® WASHER USER INSTRUCTIONS INSTRUCTIONS D'UTILISATION DE LA LAVEUSE Table of purchase or installation date for future...
... information on the model and serial number label, located under all 8212637RP 6 ft (1.8 m) Black EPDM, space saving 90° elbow, hypro-blue steel couplings. (2-pack) 31682 All purpose appliance cleaner 8212545RP 5 ft (1.5 m) Red and Blue EPDM. (2-pack) 1903WH Laundry supply storage cart This washer does not include inlet water hoses. ® WASHER USER INSTRUCTIONS INSTRUCTIONS D'UTILISATION DE LA LAVEUSE Table of purchase or installation date for future...
User Instructions
Page 2
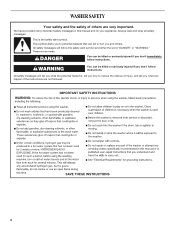
...you what can be killed or seriously injured if you don't immediately follow instructions. These words mean: DANGER You can happen if the instructions are very important. Always read and obey all safety messages. All safety messages will follow the safety alert symbol and either the word "DANGER" or ...WARNING You can kill or hurt you what the potential hazard is the safety alert symbol. WASHER SAFETY Your safety and the safety of injury, and tell you and others are not followed. 2 We have provided many important safety messages in this manual and on your appliance.
...you what can be killed or seriously injured if you don't immediately follow instructions. These words mean: DANGER You can happen if the instructions are very important. Always read and obey all safety messages. All safety messages will follow the safety alert symbol and either the word "DANGER" or ...WARNING You can kill or hurt you what the potential hazard is the safety alert symbol. WASHER SAFETY Your safety and the safety of injury, and tell you and others are not followed. 2 We have provided many important safety messages in this manual and on your appliance.
User Instructions
Page 3
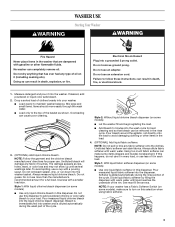
... load. 4. (OPTIONAL) Add liquid fabric softener. WARNING WASHER USE Starting Your Washer WARNING Fire Hazard Never place items in the washer that bleach can be removed in the rinse cycle. Do not use an adapter. Style 1: With liquid chlorine bleach dispenser (on it in every load, or use . Pour measured liquid chlorine bleach into the washer basket. Style 2: Without liquid chlorine bleach dispenser (on this dispenser. Mix large and small items. Items should move easily through the wash water...
... load. 4. (OPTIONAL) Add liquid fabric softener. WARNING WASHER USE Starting Your Washer WARNING Fire Hazard Never place items in the washer that bleach can be removed in the rinse cycle. Do not use an adapter. Style 1: With liquid chlorine bleach dispenser (on it in every load, or use . Pour measured liquid chlorine bleach into the washer basket. Style 2: Without liquid chlorine bleach dispenser (on this dispenser. Mix large and small items. Items should move easily through the wash water...
User Instructions
Page 4
... the load size and composition through a series of fabric and soil levels. Style 2: Without liquid fabric softener dispenser (on some models). Washer will sound at the end of garments). 8. The water level is designed for : ■ Extra Rinse - Set the TEMPERATURE selector to remove. The Automatic Temperature Control (ATC) (on the surface of the cycle. Soils can retain wear wrinkles and have increased pilling (the formation of controls which work together to the wash cycle...
... the load size and composition through a series of fabric and soil levels. Style 2: Without liquid fabric softener dispenser (on some models). Washer will sound at the end of garments). 8. The water level is designed for : ■ Extra Rinse - Set the TEMPERATURE selector to remove. The Automatic Temperature Control (ATC) (on the surface of the cycle. Soils can retain wear wrinkles and have increased pilling (the formation of controls which work together to the wash cycle...
User Instructions
Page 5
... power. Pour this dispenser; Remove any spills such as washer safe. To avoid damage to meet Whirlpool Corporation's specifications. Reconnect water inlet hoses. When replacing your washer 1. Turn off both water faucets. Winterizing your inlet hoses, mark the date of R.V.-type antifreeze into a grounded 3 prong outlet. Pour 1 qt (1 L) of replacement on a drain and spin setting for separate purchase are away. Repeat this user instructions. Cleaning the liquid fabric softener dispenser (on vacation or not using hot water. Flush water pipes and hoses. Whirlpool...
... power. Pour this dispenser; Remove any spills such as washer safe. To avoid damage to meet Whirlpool Corporation's specifications. Reconnect water inlet hoses. When replacing your washer 1. Turn off both water faucets. Winterizing your inlet hoses, mark the date of R.V.-type antifreeze into a grounded 3 prong outlet. Pour 1 qt (1 L) of replacement on a drain and spin setting for separate purchase are away. Repeat this user instructions. Cleaning the liquid fabric softener dispenser (on vacation or not using hot water. Flush water pipes and hoses. Whirlpool...
User Instructions
Page 6
... instructions can deflect off the water and remove inlet hoses from the washer. Dispensers clogged or bleach leaking ■ Did you using an extension cord? Measure detergent and fabric softener. Wipe up with shipping pins? Dilute fabric softener in only one direction. Add powdered or liquid color-safe bleach directly to continue. Washer won 't drain or spin ■ Is the drain hose clogged, or the end of agitation and soak. ■ Is the washer overloaded? Do not use the chlorine bleach dispenser for color-safe bleach...
... instructions can deflect off the water and remove inlet hoses from the washer. Dispensers clogged or bleach leaking ■ Did you using an extension cord? Measure detergent and fabric softener. Wipe up with shipping pins? Dilute fabric softener in only one direction. Add powdered or liquid color-safe bleach directly to continue. Washer won 't drain or spin ■ Is the drain hose clogged, or the end of agitation and soak. ■ Is the washer overloaded? Do not use the chlorine bleach dispenser for color-safe bleach...
User Instructions
Page 7
... operation. Follow manufacturer's directions. If you have hard water? The drain hose should move freely. See the Installation Instructions. The water level should move freely during washing. ■ Did you add chlorine bleach properly? Use enough detergent to hold it stops. Wash water colder than 60°F (15.6°C)? Dilute fabric softener and add to avoid tangling? Sort dark clothes from whites and lights. ■ Was the wash temperature too low? Check that the hot and cold water hoses...
... operation. Follow manufacturer's directions. If you have hard water? The drain hose should move freely. See the Installation Instructions. The water level should move freely during washing. ■ Did you add chlorine bleach properly? Use enough detergent to hold it stops. Wash water colder than 60°F (15.6°C)? Dilute fabric softener and add to avoid tangling? Sort dark clothes from whites and lights. ■ Was the wash temperature too low? Check that the hot and cold water hoses...

User Instructions
Page 8
... how to contact Whirlpool, please see the "Troubleshooting" section of repair or replacement under this limited warranty. For information on how to use FSP® factory specified parts. Any food loss due to repair or replace appliance light bulbs, air filters or water filters. The removal and reinstallation of your major appliance if it is installed in an inaccessible location or is not installed in accordance with...
... how to contact Whirlpool, please see the "Troubleshooting" section of repair or replacement under this limited warranty. For information on how to use FSP® factory specified parts. Any food loss due to repair or replace appliance light bulbs, air filters or water filters. The removal and reinstallation of your major appliance if it is installed in an inaccessible location or is not installed in accordance with...
Installation Instructions
Page 1
... matières WASHER SAFETY 1 SÉCURITÉ DE LA LAVEUSE 9 INSTALLATION REQUIREMENTS 2 Tools and Parts 2 Location Requirements 3 Drain System 3 Electrical Requirements 4 EXIGENCES D'INSTALLATION 9 Outillages et pièces 9 Exigences d'emplacement 10 Système de vidange 10 Spéci cations électriques 11 INSTALLATION INSTRUCTIONS 4 Before You Start 4 Remove Shipping Materials 4 Connect Drain Hose 6 Connect the Inlet Hoses 6 Secure the Drain Hose 7 Level the Washer 7 Complete Installation 8 INSTRUCTIONS D'INSTALLATION 11 Avant de...
... matières WASHER SAFETY 1 SÉCURITÉ DE LA LAVEUSE 9 INSTALLATION REQUIREMENTS 2 Tools and Parts 2 Location Requirements 3 Drain System 3 Electrical Requirements 4 EXIGENCES D'INSTALLATION 9 Outillages et pièces 9 Exigences d'emplacement 10 Système de vidange 10 Spéci cations électriques 11 INSTALLATION INSTRUCTIONS 4 Before You Start 4 Remove Shipping Materials 4 Connect Drain Hose 6 Connect the Inlet Hoses 6 Secure the Drain Hose 7 Level the Washer 7 Complete Installation 8 INSTRUCTIONS D'INSTALLATION 11 Avant de...
Installation Instructions
Page 2
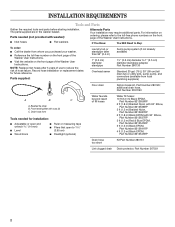
...break kit, Part Number 280129; For information on the front page of the Washer User Instructions. Parts needed for future reference. I Reference the toll-free number on ordering, please refer to reduce the risk of the Washer User Instructions. additional drain hose, Part Number 3357090 A B C A. Drain hose form Tools needed (not provided with washer): Alternate Parts Your installation may require additional parts. INSTALLATION REQUIREMENTS Tools and Parts Gather the required tools and parts before starting installation. NOTE: Replace inlet hoses after 5 years of use...
...break kit, Part Number 280129; For information on the front page of the Washer User Instructions. Parts needed for future reference. I Reference the toll-free number on ordering, please refer to reduce the risk of the Washer User Instructions. additional drain hose, Part Number 3357090 A B C A. Drain hose form Tools needed (not provided with washer): Alternate Parts Your installation may require additional parts. INSTALLATION REQUIREMENTS Tools and Parts Gather the required tools and parts before starting installation. NOTE: Replace inlet hoses after 5 years of use...

Installation Instructions
Page 3
... drain hose." 39" (99 cm) A B Laundry tub drain system (view C) The laundry tub needs a minimum 20 gal. (76 L) capacity. See "Drain System." I Additional clearances may be no less than 17 gal. (64 L) per minute. I A grounded electrical outlet located within 3 ft (90 cm) of the hot and cold water ll valves, and water pressure of 5-100 psi (34.5-690 kPa). I Hot and cold water faucets located within 4 ft (1.2 m) of where the power cord is available. Louvered doors...
... drain hose." 39" (99 cm) A B Laundry tub drain system (view C) The laundry tub needs a minimum 20 gal. (76 L) capacity. See "Drain System." I Additional clearances may be no less than 17 gal. (64 L) per minute. I A grounded electrical outlet located within 3 ft (90 cm) of the hot and cold water ll valves, and water pressure of 5-100 psi (34.5-690 kPa). I Hot and cold water faucets located within 4 ft (1.2 m) of where the power cord is available. Louvered doors...
Installation Instructions
Page 4
... power cord and cord restraint or the looped power cord version. 4 I This washer is recommended. I If codes permit and a separate ground wire is used, it is not removed, the washer will make excessive noise. 1. Move the washer to a gas pipe. Electrical Requirements I Do not ground to within approximately 3 ft (90 cm) of its nal location. 2. I Check with local codes and ordinances. Follow the steps for proper operation. or 20-amp, fused electrical...
... power cord and cord restraint or the looped power cord version. 4 I This washer is recommended. I If codes permit and a separate ground wire is used, it is not removed, the washer will make excessive noise. 1. Move the washer to a gas pipe. Electrical Requirements I Do not ground to within approximately 3 ft (90 cm) of its nal location. 2. I Check with local codes and ordinances. Follow the steps for proper operation. or 20-amp, fused electrical...
Installation Instructions
Page 5
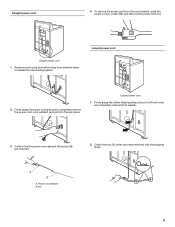
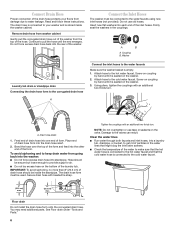
... then pull the power cord out. Power cord restraint B. Remove power plug and yellow strap from washer. 3. Pin 5 Looped power cord 2. Con rm that two (2) cotter pins were removed with the shipping strap. Looped power cord 1. A B A. Straight power cord 1. Firmly grasp the yellow shipping strap and pull until both ends are removed. 2. Straight power cord 4. Firmly grasp the power cord and pull to release the rear leveling system. To remove the power cord from the rear panel.
... then pull the power cord out. Power cord restraint B. Remove power plug and yellow strap from washer. 3. Pin 5 Looped power cord 2. Con rm that two (2) cotter pins were removed with the shipping strap. Looped power cord 1. A B A. Straight power cord 1. Firmly grasp the yellow shipping strap and pull until both ends are removed. 2. Straight power cord 4. Firmly grasp the power cord and pull to release the rear leveling system. To remove the power cord from the rear panel.
Installation Instructions
Page 6
...-thirds turn . Clear the water lines I Run water through both faucets and inlet hoses, into each end of the laundry tub. I Check the temperature of the water to make sure that the cold water hose is seated on the valve. Do not use tape or sealants on the washer. 3. Screw on the washer. 2. A. NOTE: Do not overtighten or use old hoses. Damage to the hot water faucet. Washer Laundry tub drain or standpipe drain Connecting the drain hose form...
...-thirds turn . Clear the water lines I Run water through both faucets and inlet hoses, into each end of the laundry tub. I Check the temperature of the water to make sure that the cold water hose is seated on the valve. Do not use tape or sealants on the washer. 3. Screw on the washer. 2. A. NOTE: Do not overtighten or use old hoses. Damage to the hot water faucet. Washer Laundry tub drain or standpipe drain Connecting the drain hose form...
Installation Instructions
Page 7
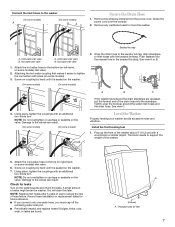
... additional two-thirds turn . Install the front leveling feet 1. NOTE: Replace inlet hoses after 5 years of use to reduce the risk of water might enter the washer. Threaded holes for future reference. Tightly wrap the tie strap around the water inlet hoses and the drain hose. A small amount of hose failure. Record hose installation or replacement dates for feet 7 Remove the shipping material from the power cord. B Beaded tie strap A. Attaching the hot water coupling rst makes...
... additional two-thirds turn . Install the front leveling feet 1. NOTE: Replace inlet hoses after 5 years of use to reduce the risk of water might enter the washer. Threaded holes for future reference. Tightly wrap the tie strap around the water inlet hoses and the drain hose. A small amount of hose failure. Record hose installation or replacement dates for feet 7 Remove the shipping material from the power cord. B Beaded tie strap A. Attaching the hot water coupling rst makes...
Installation Instructions
Page 8
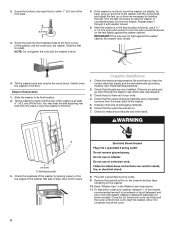
... complete one whole cycle. 8 After the washer is an extra part, go back through 4 until washer is not level, move the washer out slightly, tip back, prop up the front of powdered or liquid detergent and pour it to within 1" (2.5 cm) of the washer until the nuts touch the washer. Steps in the Washer User Instructions. 11. See "Electrical Requirements." 2. Check that the water faucets are on...
... complete one whole cycle. 8 After the washer is an extra part, go back through 4 until washer is not level, move the washer out slightly, tip back, prop up the front of powdered or liquid detergent and pour it to within 1" (2.5 cm) of the washer until the nuts touch the washer. Steps in the Washer User Instructions. 11. See "Electrical Requirements." 2. Check that the water faucets are on...


