User Instructions
Page 1
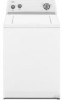
...901-2042, or visit us at www.whirlpool.com. You must provide proof of Contents ACCESSORIES 1 WASHER SAFETY 2 WASHER USE 3 WASHER CARE 5 TROUBLESHOOTING 6 WARRANTY 8 Table ...Part Number Accessory Part Number Accessory 8212656RP 10 ft (3.0 m) Black EPDM (2 pack) 8212641RP 5 ft (1.5 m) Black EPDM (2 pack) 8212638RP 6 ft (1.8 m) Nylon braided space-saving inlet hose, 90° elbow, hypro-blue steel couplings. (2-pack) 8212546RP 4 ft (1.2 m) Black EPDM (2 pack) 8212487RP 5 ft (1.5 m) Nylon braided inlet hose. (2-pack) 8212526 Washer drip tray, fits under the washer...
...901-2042, or visit us at www.whirlpool.com. You must provide proof of Contents ACCESSORIES 1 WASHER SAFETY 2 WASHER USE 3 WASHER CARE 5 TROUBLESHOOTING 6 WARRANTY 8 Table ...Part Number Accessory Part Number Accessory 8212656RP 10 ft (3.0 m) Black EPDM (2 pack) 8212641RP 5 ft (1.5 m) Black EPDM (2 pack) 8212638RP 6 ft (1.8 m) Nylon braided space-saving inlet hose, 90° elbow, hypro-blue steel couplings. (2-pack) 8212546RP 4 ft (1.2 m) Black EPDM (2 pack) 8212487RP 5 ft (1.5 m) Nylon braided inlet hose. (2-pack) 8212526 Washer drip tray, fits under the washer...
User Instructions
Page 3
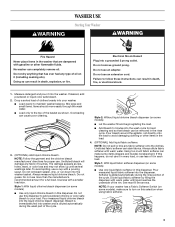
..., or use . Use less with warm water. Dilute liquid fabric softener by filling the dispenser with warm water until several washings later. No washer can cause poor cleaning. 3. (OPTIONAL) Add liquid chlorine bleach. If desired, add powdered or liquid color safe bleach. 2. Do not guess...this dispenser. Softener is added automatically during the wash part of the cycle. Undiluted bleach will damage any fabric it into washer and is immediately fed into the washer. Do not use a cup with a pouring spout. NOTE: If your washer. ■ Load evenly to turn on it in...
..., or use . Use less with warm water. Dilute liquid fabric softener by filling the dispenser with warm water until several washings later. No washer can cause poor cleaning. 3. (OPTIONAL) Add liquid chlorine bleach. If desired, add powdered or liquid color safe bleach. 2. Do not guess...this dispenser. Softener is added automatically during the wash part of the cycle. Undiluted bleach will damage any fabric it into washer and is immediately fed into the washer. Do not use a cup with a pouring spout. NOTE: If your washer. ■ Load evenly to turn on it in...
User Instructions
Page 5
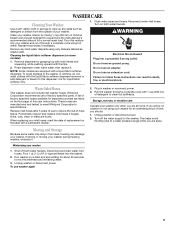
...Whirlpool Corporation recommends use of this dispenser; Plug in washer or reconnect power. 3. Unplug washer... to the washer or clothing,...washer safe. Reconnect water inlet hoses. Do not use to the washer. Run the washer...washer does not include inlet washer hoses. Run washer on some water may stay in the hoses, freezing can result in death, fire, or electrical shock. WASHER CARE Cleaning Your Washer... Use a soft, damp cloth or sponge to follow these instructions can damage your washer... your washer interior ...washer 1. A list...
...Whirlpool Corporation recommends use of this dispenser; Plug in washer or reconnect power. 3. Unplug washer... to the washer or clothing,...washer safe. Reconnect water inlet hoses. Do not use to the washer. Run the washer...washer does not include inlet washer hoses. Run washer on some water may stay in the hoses, freezing can result in death, fire, or electrical shock. WASHER CARE Cleaning Your Washer... Use a soft, damp cloth or sponge to follow these instructions can damage your washer... your washer interior ...washer 1. A list...
User Instructions
Page 6
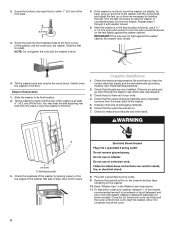
...water level seem too low, or does the washer appear to the basket. Leaking ■ Check the following: Are the fill hoses tight? Do not use an extension cord. ■ Is the indicator on ? This is the upper part of agitator clicking during loading? Reset the rear...cost of a service call an electrician. ■ Is the washer in a normal pause in only one direction. www.whirlpool.com In Canada www.whirlpool.ca Washer and Components Washer Operation Noisy ■ Is the load balanced and the washer level? Do not use the chlorine bleach dispenser for proper installation ...
...water level seem too low, or does the washer appear to the basket. Leaking ■ Check the following: Are the fill hoses tight? Do not use an extension cord. ■ Is the indicator on ? This is the upper part of agitator clicking during loading? Reset the rear...cost of a service call an electrician. ■ Is the washer in a normal pause in only one direction. www.whirlpool.com In Canada www.whirlpool.ca Washer and Components Washer Operation Noisy ■ Is the load balanced and the washer level? Do not use the chlorine bleach dispenser for proper installation ...

User Instructions
Page 8
...MAY NOT APPLY TO YOU. To locate FSP® replacement parts in -home service is void if the factory applied serial number has been altered or removed from your authorized Whirlpool dealer to build every new WHIRLPOOL® appliance. Outside the 50 United States and Canada, ... including scratches, dents, chips or other than normal, single-family household use FSP® factory specified parts. Expenses for travel and transportation for other damage to Whirlpool within 30 days from defects in accordance with original model/serial numbers that you may find additional help by...
...MAY NOT APPLY TO YOU. To locate FSP® replacement parts in -home service is void if the factory applied serial number has been altered or removed from your authorized Whirlpool dealer to build every new WHIRLPOOL® appliance. Outside the 50 United States and Canada, ... including scratches, dents, chips or other than normal, single-family household use FSP® factory specified parts. Expenses for travel and transportation for other damage to Whirlpool within 30 days from defects in accordance with original model/serial numbers that you may find additional help by...
Installation Instructions
Page 1
... INSTRUCTIONS INSTRUCTIONS POUR L'INSTALLATION DE LA LAVEUSE Table of Contents/Table des matières WASHER SAFETY 1 SÉCURITÉ DE LA LAVEUSE 9 INSTALLATION REQUIREMENTS 2 Tools and Parts 2 Location Requirements 3 Drain System 3 Electrical Requirements 4 EXIGENCES D'INSTALLATION 9 Outillages et pièces 9 Exigences d'emplacement 10 Système de vidange 10 Spé...
... INSTRUCTIONS INSTRUCTIONS POUR L'INSTALLATION DE LA LAVEUSE Table of Contents/Table des matières WASHER SAFETY 1 SÉCURITÉ DE LA LAVEUSE 9 INSTALLATION REQUIREMENTS 2 Tools and Parts 2 Location Requirements 3 Drain System 3 Electrical Requirements 4 EXIGENCES D'INSTALLATION 9 Outillages et pièces 9 Exigences d'emplacement 10 Système de vidange 10 Spé...
Installation Instructions
Page 2
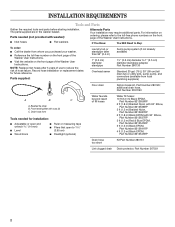
... 90° Elbow, Part Number 8212638RP 5 ft (1.5 m) Braided Nylon, Part Number 8212487RP 6 ft (1.8 m) Black EPDM with 90° Elbow, Part Number 8212637RP 5 ft (1.5 m) Red & Blue EPDM, Part Number 8212545RP 5 ft (1.5 m) Black EPDM, Part Number 8212641RP 4 ft (1.2 m) Black EPDM, Part Number 8212546RP Drain hose too short Kit Part Number 280131 Lint clogged drain Drain protector, Part Number 367031 2 I Inlet hoses I Flat washers If You Have...
... 90° Elbow, Part Number 8212638RP 5 ft (1.5 m) Braided Nylon, Part Number 8212487RP 6 ft (1.8 m) Black EPDM with 90° Elbow, Part Number 8212637RP 5 ft (1.5 m) Red & Blue EPDM, Part Number 8212545RP 5 ft (1.5 m) Black EPDM, Part Number 8212641RP 4 ft (1.2 m) Black EPDM, Part Number 8212546RP Drain hose too short Kit Part Number 280131 Lint clogged drain Drain protector, Part Number 367031 2 I Inlet hoses I Flat washers If You Have...

Installation Instructions
Page 3
... drain system ( oor or wall), the laundry tub drain system, or the oor drain system. Drain System The washer can cause damage in the washer and can be purchased separately. See "Tools and Parts." Standpipe drain system-wall or oor (views A & B) The standpipe drain requires a minimum diameter standpipe of 1"...than 96" (244 cm) from the bottom of the standpipe must be below 32°F (0°C). I Hot and cold water faucets located within 4 ft (1.2 m) of where the power cord is installed, the minimum air openings in temperatures at least 39" (99 cm) high and no higher than 8" ...
... drain system ( oor or wall), the laundry tub drain system, or the oor drain system. Drain System The washer can cause damage in the washer and can be purchased separately. See "Tools and Parts." Standpipe drain system-wall or oor (views A & B) The standpipe drain requires a minimum diameter standpipe of 1"...than 96" (244 cm) from the bottom of the standpipe must be below 32°F (0°C). I Hot and cold water faucets located within 4 ft (1.2 m) of where the power cord is installed, the minimum air openings in temperatures at least 39" (99 cm) high and no higher than 8" ...
Installation Instructions
Page 6
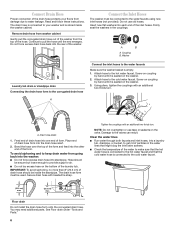
... end of drain hose form into one end of form. NOTE: Do not overtighten or use old hoses. I Do not lay excess hose on the washer. 3. See Floor drain under "Tools and Parts." 6 Do not use tape or sealants on coupling by hand until the end emerges. Firmly seat the... cold water faucet. The drain hose form must be secure but loose enough to get rid of the form. You may need additional parts. Read and follow these instructions. Washer Laundry tub drain or standpipe drain Connecting the drain hose form to the corrugated drain hose A Connect the inlet hoses to water...
... end of drain hose form into one end of form. NOTE: Do not overtighten or use old hoses. I Do not lay excess hose on the washer. 3. See Floor drain under "Tools and Parts." 6 Do not use tape or sealants on coupling by hand until the end emerges. Firmly seat the... cold water faucet. The drain hose form must be secure but loose enough to get rid of the form. You may need additional parts. Read and follow these instructions. Washer Laundry tub drain or standpipe drain Connecting the drain hose form to the corrugated drain hose A Connect the inlet hoses to water...
Installation Instructions
Page 8
...the feet. Screw the feet into a grounded 3 prong outlet. 9. Gently lower the washer to install. See "Electrical Requirements." 2. Check that you have all parts are not tight against the washer cabinet. Read "Washer Use" in nal location 1. Twist the feet to the oor. Check that the ... counterclockwise to complete one whole cycle. 8 Check the electrical requirements. If there is an extra part, go back through 4 until the washer is not level, move the washer out slightly, tip back, prop up or down as necessary by placing a level on some models). Self-adjusting feet...
...the feet. Screw the feet into a grounded 3 prong outlet. 9. Gently lower the washer to install. See "Electrical Requirements." 2. Check that you have all parts are not tight against the washer cabinet. Read "Washer Use" in nal location 1. Twist the feet to the oor. Check that the ... counterclockwise to complete one whole cycle. 8 Check the electrical requirements. If there is an extra part, go back through 4 until the washer is not level, move the washer out slightly, tip back, prop up or down as necessary by placing a level on some models). Self-adjusting feet...


