
Warranty Information
Page 1
... refrigerator compartment. In Canada, call 1-800-253-1301. ITEMS EXCLUDED FROM WARRANTY This limited warranty does not cover: 1. Service calls to you. The removal and reinstallation of your correspondence. Replacement parts or repair labor on how to use or when it was purchased. Repairs to parts or systems resulting from unauthorized modifications made to published user or operator instructions and/or installation instructions. 2. DISCLAIMER OF IMPLIED WARRANTIES IMPLIED WARRANTIES...
... refrigerator compartment. In Canada, call 1-800-253-1301. ITEMS EXCLUDED FROM WARRANTY This limited warranty does not cover: 1. Service calls to you. The removal and reinstallation of your correspondence. Replacement parts or repair labor on how to use or when it was purchased. Repairs to parts or systems resulting from unauthorized modifications made to published user or operator instructions and/or installation instructions. 2. DISCLAIMER OF IMPLIED WARRANTIES IMPLIED WARRANTIES...

Use & Care Guide
Page 1
... / Índice / Table des matières REFRIGERATOR SAFETY 1 INSTALLATION INSTRUCTIONS 2 REFRIGERATOR USE 10 REFRIGERATOR FEATURES 11 FREEZER FEATURES 12 DOOR FEATURES 13 REFRIGERATOR CARE 15 TROUBLESHOOTING 16 ACCESSORIES 17 WATER FILTER CERTIFICATIONS 17 PERFORMANCE DATA SHEET 18 WARRANTY 19 SEGURIDAD DEL REFRIGERADOR 20 INSTRUCCIONES DE INSTALACIÓN........... 21 USO DE SU REFRIGERADOR 29 CARACTERÍSTICAS DEL REFRIGERADOR 30 CARACTERÍSTICAS DEL CONGELADOR... 31 CARACTERÍSTICAS DE LA...
... / Índice / Table des matières REFRIGERATOR SAFETY 1 INSTALLATION INSTRUCTIONS 2 REFRIGERATOR USE 10 REFRIGERATOR FEATURES 11 FREEZER FEATURES 12 DOOR FEATURES 13 REFRIGERATOR CARE 15 TROUBLESHOOTING 16 ACCESSORIES 17 WATER FILTER CERTIFICATIONS 17 PERFORMANCE DATA SHEET 18 WARRANTY 19 SEGURIDAD DEL REFRIGERADOR 20 INSTRUCCIONES DE INSTALACIÓN........... 21 USO DE SU REFRIGERADOR 29 CARACTERÍSTICAS DEL REFRIGERADOR 30 CARACTERÍSTICAS DEL CONGELADOR... 31 CARACTERÍSTICAS DE LA...

Use & Care Guide
Page 2
... many small, pebble-size pieces. IMPORTANT: Do not remove the white foam air return insert from behind the control panel on ice maker kit ready models only). Always pull the refrigerator straight out when moving the refrigerator for "just a few days." These products can result in "Refrigerator Care." Junked or abandoned refrigerators are getting rid of the package materials, clean the inside . Clean Before Using After you are still...
... many small, pebble-size pieces. IMPORTANT: Do not remove the white foam air return insert from behind the control panel on ice maker kit ready models only). Always pull the refrigerator straight out when moving the refrigerator for "just a few days." These products can result in "Refrigerator Care." Junked or abandoned refrigerators are getting rid of the package materials, clean the inside . Clean Before Using After you are still...

Use & Care Guide
Page 3
... installation, cleaning, or removing a light bulb, turn the control (Thermostat, Refrigerator or Freezer Control depending on the model) to follow these instructions can result in death, explosion, or fire. Do not use an extension cord. or 20-amp fused, grounded electrical supply is important to make sure you are finished, reconnect the refrigerator to the electrical source and reset the control (Thermostat, Refrigerator or Freezer Control depending on the model) to allow for the water line connections. Do not use an...
... installation, cleaning, or removing a light bulb, turn the control (Thermostat, Refrigerator or Freezer Control depending on the model) to follow these instructions can result in death, explosion, or fire. Do not use an extension cord. or 20-amp fused, grounded electrical supply is important to make sure you are finished, reconnect the refrigerator to the electrical source and reset the control (Thermostat, Refrigerator or Freezer Control depending on the model) to allow for the water line connections. Do not use an...

Use & Care Guide
Page 4
... leaks. Connect to refill after heavy usage. Unplug refrigerator or disconnect power. 2. Do not use a piercing-type or 4.76 mm) saddle valve which reduces water flow and clogs more easily. If you begin. IMPORTANT: ■ Make sure it will go. Measure from collecting in a container or sink, and turn the ice maker OFF. Add 7 ft (2.1 m) to the water pipe. Copper tubing D. Shutoff valve G. Flush the tubing...
... leaks. Connect to refill after heavy usage. Unplug refrigerator or disconnect power. 2. Do not use a piercing-type or 4.76 mm) saddle valve which reduces water flow and clogs more easily. If you begin. IMPORTANT: ■ Make sure it will go. Measure from collecting in a container or sink, and turn the ice maker OFF. Add 7 ft (2.1 m) to the water pipe. Copper tubing D. Shutoff valve G. Flush the tubing...

Use & Care Guide
Page 5
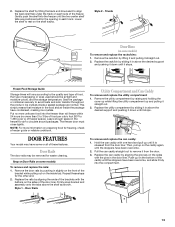
... power. Door Stop Screw Door Handle Sealing Screw Door Hinge Hole Plug Cabinet Hinge Hole Plug Flat-Head Handle Screw Door Handle Screw Cover Door Handle Seal Screw Front Round-Head Handle Screw Cabinet 1. Remove hex head hinge screws from your model, you are also going to reverse the door swing, follow these instructions can result in Graphic 3. 3. Remove freezer handle assembly as shown in water strainer. Remove door handle sealing screws. If your doors so that leak. Do not remove ground prong. Refrigerator Doors TOOLS NEEDED...
... power. Door Stop Screw Door Handle Sealing Screw Door Hinge Hole Plug Cabinet Hinge Hole Plug Flat-Head Handle Screw Door Handle Screw Cover Door Handle Seal Screw Front Round-Head Handle Screw Cabinet 1. Remove hex head hinge screws from your model, you are also going to reverse the door swing, follow these instructions can result in Graphic 3. 3. Remove freezer handle assembly as shown in water strainer. Remove door handle sealing screws. If your doors so that leak. Do not remove ground prong. Refrigerator Doors TOOLS NEEDED...

Use & Care Guide
Page 6
... door as shown. Set aside refrigerator door until bottom hinge is reversed. 1. Extend from refrigerator door. Freezer Door 1. Refrigerator Door 1. Remove refrigerator handle assembly as shown in Graphic 7. 4. Position refrigerator handle on some models) Cabinet 1. Remove door hinge hole plug from refrigerator door as shown. Tighten screws. Final Steps 1. Reinstall top hinge cover. On the left -hand side) top hinge cover is pointing in the Top Hinge graphic. See "Using the Controls." 5. Return all screws. Keep all screws. Tighten all parts...
... door as shown. Set aside refrigerator door until bottom hinge is reversed. 1. Extend from refrigerator door. Freezer Door 1. Refrigerator Door 1. Remove refrigerator handle assembly as shown in Graphic 7. 4. Position refrigerator handle on some models) Cabinet 1. Remove door hinge hole plug from refrigerator door as shown. Tighten screws. Final Steps 1. Reinstall top hinge cover. On the left -hand side) top hinge cover is pointing in the Top Hinge graphic. See "Using the Controls." 5. Return all screws. Keep all screws. Tighten all parts...

Use & Care Guide
Page 8
Top Hinge Cover B Hex-Head Hinge Screws C. Bottom Hinge B. Top Hinge D. Hinge Pin 1-2 A A. Door Hinge Hole Plug A A. 12-24 Torx® Head Screws C A. Freezer Handle B. ¹⁄₄" Setscrew 9 C. Door Stop Screw A B B. Top Hinge D. Flat-Head Handle Screws B. Refrigerator Handle C. ¹⁄₄" Setscrew A Front View Side View 6 A. Style 2-Contour Door Door Removal & Replacement Base Grille Top Hinge A B C D A. Hinge Pin Center Hinge A B A. Screws Door Swing Reversal (optional) 2 A B Plastic Handle 3 A B C D A. Flat-Head Handle Screws...
Top Hinge Cover B Hex-Head Hinge Screws C. Bottom Hinge B. Top Hinge D. Hinge Pin 1-2 A A. Door Hinge Hole Plug A A. 12-24 Torx® Head Screws C A. Freezer Handle B. ¹⁄₄" Setscrew 9 C. Door Stop Screw A B B. Top Hinge D. Flat-Head Handle Screws B. Refrigerator Handle C. ¹⁄₄" Setscrew A Front View Side View 6 A. Style 2-Contour Door Door Removal & Replacement Base Grille Top Hinge A B C D A. Hinge Pin Center Hinge A B A. Screws Door Swing Reversal (optional) 2 A B Plastic Handle 3 A B C D A. Flat-Head Handle Screws...

Use & Care Guide
Page 9
... doors to activate the indicator. 3. NOTE: To keep the refrigerator level, you tighten the top hinge screws. 4. Align Doors If the space between the doors while you should be installed behind the door. Install Manual Air Filter Status Indicator The filter comes with notches: ■ Slide the indicator down on some models, your kitchen or home. 9 Lift open the vented door. 3. either inside the refrigerator. Remove the base grille. Replace the base grille. The air filter...
... doors to activate the indicator. 3. NOTE: To keep the refrigerator level, you tighten the top hinge screws. 4. Align Doors If the space between the doors while you should be installed behind the door. Install Manual Air Filter Status Indicator The filter comes with notches: ■ Slide the indicator down on some models, your kitchen or home. 9 Lift open the vented door. 3. either inside the refrigerator. Remove the base grille. Replace the base grille. The air filter...

Use & Care Guide
Page 10
...warm/too little ice FREEZER Control one setting higher REFRIGERATOR too cold REFRIGERATOR Control one setting lower FREEZER too cold FREEZER Control one setting at the factory. NOTE: Neither compartment will turn cooling back on Electronic Control Display The control panel displays the Air Filter status. ■ GOOD - The air filter LED does not light up constantly when the refrigerator door is as cold as a guide. REFRIGERATOR USE Using the Controls The temperature controls are preset at a time. Style 2 - See "Using the Control(s)." See "Install Air Filter" and "Water...
...warm/too little ice FREEZER Control one setting higher REFRIGERATOR too cold REFRIGERATOR Control one setting lower FREEZER too cold FREEZER Control one setting at the factory. NOTE: Neither compartment will turn cooling back on Electronic Control Display The control panel displays the Air Filter status. ■ GOOD - The air filter LED does not light up constantly when the refrigerator door is as cold as a guide. REFRIGERATOR USE Using the Controls The temperature controls are preset at a time. Style 2 - See "Using the Control(s)." See "Install Air Filter" and "Water...

Use & Care Guide
Page 11
... in . 11 Shelves and Glass Shelves (on some models the meat pan moves sideways on some models) The shelves in all of the shelf with warm water when they are cold. To remove the front-half of the shelf, hold the front of these features. Replace the shelf by sliding it is open, and save energy. Meat Drawer Cover (on some models) Refrigerator Shelves (Glass shelves on the shelf to the stop . 2. Slide the shelf straight out...
... in . 11 Shelves and Glass Shelves (on some models the meat pan moves sideways on some models) The shelves in all of the shelf with warm water when they are cold. To remove the front-half of the shelf, hold the front of these features. Replace the shelf by sliding it is open, and save energy. Meat Drawer Cover (on some models) Refrigerator Shelves (Glass shelves on the shelf to the stop . 2. Slide the shelf straight out...

Use & Care Guide
Page 12
... the shelf supports. 2. Glass Freezer Shelf (on some models) To remove and replace a glass shelf: 1. Slide the shelf out the rest of the cover to use. FREEZER FEATURES Your model may break if exposed to the left -hand end all the way into the shelf supports. Then lift the cover up and out of fruits and vegetables with skins: Place in plastic bag or plastic container and store in cold water, drain...
... the shelf supports. 2. Glass Freezer Shelf (on some models) To remove and replace a glass shelf: 1. Slide the shelf out the rest of the cover to use. FREEZER FEATURES Your model may break if exposed to the left -hand end all the way into the shelf supports. Then lift the cover up and out of fruits and vegetables with skins: Place in plastic bag or plastic container and store in cold water, drain...
Use & Care Guide
Page 13
... each side of packaging or wrap used (should be removed for air to align the back shelf tab under the track on the sides of these steps for freezing, check a freezer guide or reliable cookbook. Snap on Door Rails on some models) To remove and replace the racks/bins: 1. Hold the can caddy straight out to remove it stops. Pull the can caddy with...
... each side of packaging or wrap used (should be removed for air to align the back shelf tab under the track on the sides of these steps for freezing, check a freezer guide or reliable cookbook. Snap on Door Rails on some models) To remove and replace the racks/bins: 1. Hold the can caddy straight out to remove it stops. Pull the can caddy with...

Use & Care Guide
Page 14
... connecting the refrigerator to a water source or replacing the water filter, fill and discard two full containers of ice in the ice maker or ice storage bin. Close the filter cover door completely in the filter. You may need to completely fill the ice container. ■ To increase ice production, lower the freezer and refrigerator temperature. Make and discard two full containers of unknown quality without adequate disinfection before using the ice. 14 To manually turn...
... connecting the refrigerator to a water source or replacing the water filter, fill and discard two full containers of ice in the ice maker or ice storage bin. Close the filter cover door completely in the filter. You may need to completely fill the ice container. ■ To increase ice production, lower the freezer and refrigerator temperature. Make and discard two full containers of unknown quality without adequate disinfection before using the ice. 14 To manually turn...

Use & Care Guide
Page 15
... harsh cleaning tools. 1. Style 2 - Unplug refrigerator or disconnect power. 2. If you need for routine condenser cleaning in warm water. Be sure to replace the bulb with clean, warm water and dry immediately to avoid water spots. Using both sections, any odors formed in warm water. Replace the light shield. 5. Failure to do so can result in on exterior surfaces (doors and cabinet), plastic parts, interior and door liners or gaskets. Do not use abrasive...
... harsh cleaning tools. 1. Style 2 - Unplug refrigerator or disconnect power. 2. If you need for routine condenser cleaning in warm water. Be sure to replace the bulb with clean, warm water and dry immediately to avoid water spots. Using both sections, any odors formed in warm water. Replace the light shield. 5. Failure to do so can result in on exterior surfaces (doors and cabinet), plastic parts, interior and door liners or gaskets. Do not use abrasive...

Use & Care Guide
Page 16
... ■ Door blocked open ? Due to open Electrical Shock Hazard Plug into the drain pan. ■ Gaskets dirty or sticky? Below are listed some normal sounds with soft cloth. flow of refrigerant, movement of inside walls, especially during defrosting and water runs into a grounded 3 prong outlet. contraction/expansion of water lines, or from door. ■ Bin or shelf in , so that you did not notice from your old model. Clean gaskets and...
... ■ Door blocked open ? Due to open Electrical Shock Hazard Plug into the drain pan. ■ Gaskets dirty or sticky? Below are listed some normal sounds with soft cloth. flow of refrigerant, movement of inside walls, especially during defrosting and water runs into a grounded 3 prong outlet. contraction/expansion of water lines, or from door. ■ Bin or shelf in , so that you did not notice from your old model. Clean gaskets and...

Use & Care Guide
Page 17
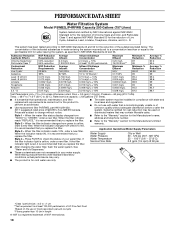
Make sure wire shutoff arm or switch (depending on model) is in the line can reduce water flow. Discard ice. Use airtight, moisture proof packaging to make new ice. ■ Odor transfer from the ejector arm with a plastic utensil. ■ Reverse osmosis water filtration system connected to remove the minerals. Stainless Steel Cleaner and Polish: Order Part #4396095 Water Filter: Order Part #W10295370 or FILTER1 Air Filter: Order Part #W10311524 or AIR1 Ethylene Filter: Order...
Make sure wire shutoff arm or switch (depending on model) is in the line can reduce water flow. Discard ice. Use airtight, moisture proof packaging to make new ice. ■ Odor transfer from the ejector arm with a plastic utensil. ■ Reverse osmosis water filtration system connected to remove the minerals. Stainless Steel Cleaner and Polish: Order Part #4396095 Water Filter: Order Part #W10295370 or FILTER1 Air Filter: Order Part #W10311524 or AIR1 Ethylene Filter: Order...
Use & Care Guide
Page 18
... the filter indicator changes from yellow to the "Warranty" section for cold water use with water that you replace the filter. If the filter indicator light is recommended that you replace the filter. While testing was reduced to a concentration less than or equal to the permissible limit for water leaving the system, as advertised. ■ Use replacement filter P4RFWB, part #W10291030. 2011 suggested retail price of your water supply. Style 3 - When the indicator reads...
... the filter indicator changes from yellow to the "Warranty" section for cold water use with water that you replace the filter. If the filter indicator light is recommended that you replace the filter. While testing was reduced to a concentration less than or equal to the permissible limit for water leaving the system, as advertised. ■ Use replacement filter P4RFWB, part #W10291030. 2011 suggested retail price of your water supply. Style 3 - When the indicator reads...

Use & Care Guide
Page 19
... repair or replace appliance light bulbs, air filters or water filters. Consumable parts are excluded from accident, alteration, misuse, abuse, fire, flood, acts of incidental or consequential damages, so these User Instructions and the model number information for product service if your product or you need assistance using your major appliance is located in an inaccessible location or is not available. 10. Have your correspondence. WHIRLPOOL CORPORATION MAJOR APPLIANCE WARRANTY...
... repair or replace appliance light bulbs, air filters or water filters. Consumable parts are excluded from accident, alteration, misuse, abuse, fire, flood, acts of incidental or consequential damages, so these User Instructions and the model number information for product service if your product or you need assistance using your major appliance is located in an inaccessible location or is not available. 10. Have your correspondence. WHIRLPOOL CORPORATION MAJOR APPLIANCE WARRANTY...

Dimension Guide
Page 1
...) minimum on the hinge side (depending on the model) to operate ice maker and water dispenser. NOTE: It is required to OFF and then disconnect the refrigerator from the electrical source. Instructions packed with water pressure between back of installation, cleaning, or removing a light bulb, turn the control (Thermostat, Refrigerator or Freezer Control depending on your model) to the desired setting. Specifications subject to change without notice. handle D incl. Water: A cold water supply with product. Top Mount Refrigerator PRODUCT MODEL NUMBERS WRT1L1TZY WRT311SFY...
...) minimum on the hinge side (depending on the model) to operate ice maker and water dispenser. NOTE: It is required to OFF and then disconnect the refrigerator from the electrical source. Instructions packed with water pressure between back of installation, cleaning, or removing a light bulb, turn the control (Thermostat, Refrigerator or Freezer Control depending on your model) to the desired setting. Specifications subject to change without notice. handle D incl. Water: A cold water supply with product. Top Mount Refrigerator PRODUCT MODEL NUMBERS WRT1L1TZY WRT311SFY...


