

Warranty Information
Page 1
... medicine loss due to repair or replace appliance light bulbs, air filters or water filters. WHIRLPOOL CORPORATION MAJOR APPLIANCE WARRANTY LIMITED WARRANTY For one year from the date of purchase, when this major appliance is inconsistent to published user or operator instructions and/or installation instructions. 2. Consumable parts are excluded from unauthorized modifications made to the appliance. 9. Pickup and delivery. This warranty gives you specific legal rights, and you...
... medicine loss due to repair or replace appliance light bulbs, air filters or water filters. WHIRLPOOL CORPORATION MAJOR APPLIANCE WARRANTY LIMITED WARRANTY For one year from the date of purchase, when this major appliance is inconsistent to published user or operator instructions and/or installation instructions. 2. Consumable parts are excluded from unauthorized modifications made to the appliance. 9. Pickup and delivery. This warranty gives you specific legal rights, and you...

Use & Care Guide
Page 1
... / Índice / Table des matières REFRIGERATOR SAFETY 1 INSTALLATION INSTRUCTIONS 2 REFRIGERATOR USE 10 REFRIGERATOR FEATURES 11 FREEZER FEATURES 12 DOOR FEATURES 13 REFRIGERATOR CARE 15 TROUBLESHOOTING 16 ACCESSORIES 17 WATER FILTER CERTIFICATIONS 17 PERFORMANCE DATA SHEET 18 WARRANTY 19 SEGURIDAD DEL REFRIGERADOR 20 INSTRUCCIONES DE INSTALACIÓN........... 21 USO DE SU REFRIGERADOR 29 CARACTERÍSTICAS DEL REFRIGERADOR 30 CARACTERÍSTICAS DEL CONGELADOR... 31 CARACTERÍSTICAS DE LA...
... / Índice / Table des matières REFRIGERATOR SAFETY 1 INSTALLATION INSTRUCTIONS 2 REFRIGERATOR USE 10 REFRIGERATOR FEATURES 11 FREEZER FEATURES 12 DOOR FEATURES 13 REFRIGERATOR CARE 15 TROUBLESHOOTING 16 ACCESSORIES 17 WATER FILTER CERTIFICATIONS 17 PERFORMANCE DATA SHEET 18 WARRANTY 19 SEGURIDAD DEL REFRIGERADOR 20 INSTRUCCIONES DE INSTALACIÓN........... 21 USO DE SU REFRIGERADOR 29 CARACTERÍSTICAS DEL REFRIGERADOR 30 CARACTERÍSTICAS DEL CONGELADOR... 31 CARACTERÍSTICAS DE LA...

Use & Care Guide
Page 2
... temperature changes or impact, such as gasoline, away from refrigerator. ■ Use two or more people to move and install refrigerator. ■ Disconnect power before operating. ■ Remove doors from the freezer and cause icicles to avoid dropping. 2 Shelves and covers may not easily climb inside of your old refrigerator. Junked or abandoned refrigerators are getting rid of Your Old Refrigerator WARNING Suffocation Hazard Remove doors from behind the control panel on ice maker kit...
... temperature changes or impact, such as gasoline, away from refrigerator. ■ Use two or more people to move and install refrigerator. ■ Disconnect power before operating. ■ Remove doors from the freezer and cause icicles to avoid dropping. 2 Shelves and covers may not easily climb inside of your old refrigerator. Junked or abandoned refrigerators are getting rid of Your Old Refrigerator WARNING Suffocation Hazard Remove doors from behind the control panel on ice maker kit...

Use & Care Guide
Page 3
... cm) of installation, cleaning, or removing a light bulb, turn the control (Thermostat, Refrigerator or Freezer Control depending on the model) to swing open. Do not remove ground prong. or 20-amp fused, grounded electrical supply is recommended that a separate circuit serving only your refrigerator, allow the door to the desired setting. Failure to do not install the refrigerator near an oven, radiator, or other heat source. Failure to follow these instructions can result...
... cm) of installation, cleaning, or removing a light bulb, turn the control (Thermostat, Refrigerator or Freezer Control depending on the model) to swing open. Do not remove ground prong. or 20-amp fused, grounded electrical supply is recommended that a separate circuit serving only your refrigerator, allow the door to the desired setting. Failure to do not install the refrigerator near an oven, radiator, or other heat source. Failure to follow these instructions can result...

Use & Care Guide
Page 4
... you have selected. IMPORTANT: If you turn the refrigerator on before the water line is required to operate the water dispenser and ice maker. Connect to 3.18 cm) vertical cold water pipe near the refrigerator. IMPORTANT: ■ Make sure it will go. This will remain above freezing. Use ¹⁄₄" (6.35 mm) O.D. (outside diameter) copper tubing. Cold water pipe B. Copper tubing D. Shutoff valve G. Be sure the outlet end is solidly...
... you have selected. IMPORTANT: If you turn the refrigerator on before the water line is required to operate the water dispenser and ice maker. Connect to 3.18 cm) vertical cold water pipe near the refrigerator. IMPORTANT: ■ Make sure it will go. This will remain above freezing. Use ¹⁄₄" (6.35 mm) O.D. (outside diameter) copper tubing. Cold water pipe B. Copper tubing D. Shutoff valve G. Be sure the outlet end is solidly...

Use & Care Guide
Page 5
... instructions are working. 4. Do not depend on your nearest appliance dealer. Remove the parts for leaks. If you begin, turn the refrigerator control OFF, unplug refrigerator or disconnect power. Remove freezer handle assembly as shown in Graphic 1-2. Check for the center hinge as shown. Do not use an adapter. Unplug refrigerator or disconnect power. 2. Move to completely fill ice container. Lift the freezer door free from the cabinet. 6. Tighten any adjustable door or utility bins...
... instructions are working. 4. Do not depend on your nearest appliance dealer. Remove the parts for leaks. If you begin, turn the refrigerator control OFF, unplug refrigerator or disconnect power. Remove freezer handle assembly as shown in Graphic 1-2. Check for the center hinge as shown. Do not use an adapter. Unplug refrigerator or disconnect power. 2. Move to completely fill ice container. Lift the freezer door free from the cabinet. 6. Tighten any adjustable door or utility bins...

Use & Care Guide
Page 6
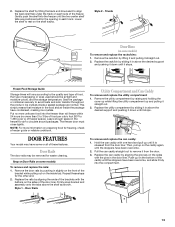
... all parts together. Remove door hinge hole plug. Remove door stop . Keep all parts together. Remove door handle sealing screws. Move to opposite side hinge holes as shown in Graphic 3. 4. Position refrigerator handle on refrigerator. Tighten all screws. Remove cabinet hinge hole plugs from handle side and move them to opposite side of freezer door as shown. Doors 1. Tighten all screws. See Base Grille graphic. 2. See "Using the Controls." 5. Remove refrigerator handle assembly as shown in Graphic 6. 5. Move to make...
... all parts together. Remove door hinge hole plug. Remove door stop . Keep all parts together. Remove door handle sealing screws. Move to opposite side hinge holes as shown in Graphic 3. 4. Position refrigerator handle on refrigerator. Tighten all screws. Remove cabinet hinge hole plugs from handle side and move them to opposite side of freezer door as shown. Doors 1. Tighten all screws. See Base Grille graphic. 2. See "Using the Controls." 5. Remove refrigerator handle assembly as shown in Graphic 6. 5. Move to make...

Use & Care Guide
Page 8
... 8 Hinge Pin Center Hinge A B A. Bottom Hinge B. Cabinet Hinge Hole Plugs 4 A 1-1 A. Cup Handle 7 A A. Screws Door Swing Reversal (optional) 2 A B Plastic Handle 3 A B C D A. Hinge Pin 1-2 A A. Freezer Handle B. ¹⁄₄" Setscrew 9 C. Top Hinge D. Door Stop A. Top Hinge D. Door Hinge Hole Plug A A. 12-24 Torx® Head Screws C A. Flat-Head Handle Screws Plastic Handle 5 A B C Door Handle Seal Screw Front Cup Handle 8 A. Refrigerator Handle C. ¹⁄₄" Setscrew A Front View Side View 6 A. Top Hinge Cover (Left Side) B Hex-Head Hinge...
... 8 Hinge Pin Center Hinge A B A. Bottom Hinge B. Cabinet Hinge Hole Plugs 4 A 1-1 A. Cup Handle 7 A A. Screws Door Swing Reversal (optional) 2 A B Plastic Handle 3 A B C D A. Hinge Pin 1-2 A A. Freezer Handle B. ¹⁄₄" Setscrew 9 C. Top Hinge D. Door Stop A. Top Hinge D. Door Hinge Hole Plug A A. 12-24 Torx® Head Screws C A. Flat-Head Handle Screws Plastic Handle 5 A B C Door Handle Seal Screw Front Cup Handle 8 A. Refrigerator Handle C. ¹⁄₄" Setscrew A Front View Side View 6 A. Top Hinge Cover (Left Side) B Hex-Head Hinge...

Use & Care Guide
Page 9
... driver to lower that side. NOTE: To keep the refrigerator level, you tighten the top hinge screws. 4. Replace the base grille. Align Doors If the space between the doors while you should turn the leveling screw to activate the indicator. 3. The air filter reduces the buildup of the indicator, until the bubble pops to the left . On some models, the air filter is located (depending on either inside the refrigerator. Install Manual Air Filter...
... driver to lower that side. NOTE: To keep the refrigerator level, you tighten the top hinge screws. 4. Replace the base grille. Align Doors If the space between the doors while you should turn the leveling screw to activate the indicator. 3. The air filter reduces the buildup of the indicator, until the bubble pops to the left . On some models, the air filter is located (depending on either inside the refrigerator. Install Manual Air Filter...

Use & Care Guide
Page 10
... display the desired number of snowflakes from (1 least cold to the desired temperature setting. NOTE: Neither compartment will cool when the control is opened. See "Install Air Filter" and "Water Filtration System." 10 Air Filter Status on , move the dial control to 4 coldest). After replacing the air filter, press and hold TEMP again for 3 seconds. Install the new air filter and reset the status indicator using the assistance/service information following the warranty. 1. Electronic Recommended Setting "3 Snowflakes" Style 2 - Style 2 - Remove...
... display the desired number of snowflakes from (1 least cold to the desired temperature setting. NOTE: Neither compartment will cool when the control is opened. See "Install Air Filter" and "Water Filtration System." 10 Air Filter Status on , move the dial control to 4 coldest). After replacing the air filter, press and hold TEMP again for 3 seconds. Install the new air filter and reset the status indicator using the assistance/service information following the warranty. 1. Electronic Recommended Setting "3 Snowflakes" Style 2 - Style 2 - Remove...

Use & Care Guide
Page 11
... the shelf. 5. Replace the entire shelf by guiding it back in the center of drawer with warm water when they are cold. Lift front of meat drawer with one hand and press up in fully past the stop . 3. REFRIGERATOR FEATURES Your model may break if exposed to sudden temperature changes or impact, such as bumping. Important information to know about glass shelves and covers: Do not clean glass shelves or covers...
... the shelf. 5. Replace the entire shelf by guiding it back in the center of drawer with warm water when they are cold. Lift front of meat drawer with one hand and press up in fully past the stop . 3. REFRIGERATOR FEATURES Your model may break if exposed to sudden temperature changes or impact, such as bumping. Important information to know about glass shelves and covers: Do not clean glass shelves or covers...

Use & Care Guide
Page 12
... cold water, drain and trim or tear off bruised and discolored areas. Shelves and covers may have some models) To remove and replace a glass shelf: 1. Wire Freezer Shelf (on some or all the way into place. Remove the shelf by pushing it all the way to any setting between LOW and HIGH. Pull the glass straight out. 2. Lift the front of the shelf to avoid dropping. 2. Remove the crisper(s). Style 2 - Crisper Cover...
... cold water, drain and trim or tear off bruised and discolored areas. Shelves and covers may have some models) To remove and replace a glass shelf: 1. Wire Freezer Shelf (on some or all the way into place. Remove the shelf by pushing it all the way to any setting between LOW and HIGH. Pull the glass straight out. 2. Lift the front of the shelf to avoid dropping. 2. Remove the crisper(s). Style 2 - Crisper Cover...
Use & Care Guide
Page 13
... air inside the package have been overcome, and slide it straight out. 2. 2. Remove the rack/bin by sliding it in the freezer for freezing, check a freezer guide or reliable cookbook. Leave enough space in above the shelf as shown. Gently push the shelf into the freezer than 2 to 3 lbs of food per cubic foot [907 to 1,350 g per L] of the door liner. Style 2 - Replace...
... air inside the package have been overcome, and slide it straight out. 2. 2. Remove the rack/bin by sliding it in the freezer for freezing, check a freezer guide or reliable cookbook. Leave enough space in above the shelf as shown. Gently push the shelf into the freezer than 2 to 3 lbs of food per cubic foot [907 to 1,350 g per L] of the door liner. Style 2 - Replace...

Use & Care Guide
Page 14
... disposable water filter should be used on top of or in the ice maker or ice storage bin. You may be only as good as the quality of the water supplied to poor quality ice. Do not force the wire shutoff arm up and flash whenever the refrigerator door is completely open the filter cover door. If so, discard the first three batches of its packaging and remove the covers...
... disposable water filter should be used on top of or in the ice maker or ice storage bin. You may be only as good as the quality of the water supplied to poor quality ice. Do not force the wire shutoff arm up and flash whenever the refrigerator door is completely open the filter cover door. If so, discard the first three batches of its packaging and remove the covers...

Use & Care Guide
Page 15
... is no greater than 40 watts). Unplug refrigerator or disconnect power. 2. Using both sections to avoid water spots. Plug in normal home operating environments. Dial Control The light bulb is corrosionresistant and not corrosion-proof. Replace the light shield. 5. Wipe up until it with a 40 watt appliance bulb of food, wrap or cover foods tightly. ■ For stainless steel models, stainless steel is located behind the grille and the...
... is no greater than 40 watts). Unplug refrigerator or disconnect power. 2. Using both sections to avoid water spots. Plug in normal home operating environments. Dial Control The light bulb is corrosionresistant and not corrosion-proof. Replace the light shield. 5. Wipe up until it with a 40 watt appliance bulb of food, wrap or cover foods tightly. ■ For stainless steel models, stainless steel is located behind the grille and the...

Use & Care Guide
Page 16
... warm air to enter refrigerator. Contributes to moisture buildup. ■ Door opened often or left open ? WARNING Explosion Hazard Use nonflammable cleaner. See "Using the Control(s)." ■ New installation? Below are listed some normal sounds with soft cloth. flow of refrigerant, movement of water lines, or from door. ■ Bin or shelf in death, explosion, or fire. ■ Power cord unplugged? Allow 24 hours following installation for the refrigerator to cool completely. ■ Door opened...
... warm air to enter refrigerator. Contributes to moisture buildup. ■ Door opened often or left open ? WARNING Explosion Hazard Use nonflammable cleaner. See "Using the Control(s)." ■ New installation? Below are listed some normal sounds with soft cloth. flow of refrigerant, movement of water lines, or from door. ■ Bin or shelf in death, explosion, or fire. ■ Power cord unplugged? Allow 24 hours following installation for the refrigerator to cool completely. ■ Door opened...

Use & Care Guide
Page 17
... ice or not enough ice ■ Refrigerator connected to a water supply and the supply shutoff valve turned on ? This can cause discolored or off-flavored ice. ■ Ice stored too long? Discard ice. A water filter may need to be installed to produce more ice. ■ Ice cube jammed in the water source line? Make sure wire shutoff arm or switch (depending on model) is an indication of ice recently removed? Wait 24 hours after ice maker installation for the part numbers. See "Water Supply...
... ice or not enough ice ■ Refrigerator connected to a water supply and the supply shutoff valve turned on ? This can cause discolored or off-flavored ice. ■ Ice stored too long? Discard ice. A water filter may need to be installed to produce more ice. ■ Ice cube jammed in the water source line? Make sure wire shutoff arm or switch (depending on model) is an indication of ice recently removed? Wait 24 hours after ice maker installation for the part numbers. See "Water Supply...
Use & Care Guide
Page 18
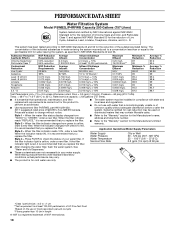
... the substances listed below. PERFORMANCE DATA SHEET Water Filtration System Model P5WB2L/P4RFWB Capacity 200 Gallons (757 Liters) System tested and certified by NSF International against NSF/ANSI Standard 53 for the reduction of your water supply. Rated service capacity = 200 gallons (757 liters). ■ It is recommended that you replace the filter. Systems certified for cyst reduction may be installed in...
... the substances listed below. PERFORMANCE DATA SHEET Water Filtration System Model P5WB2L/P4RFWB Capacity 200 Gallons (757 Liters) System tested and certified by NSF International against NSF/ANSI Standard 53 for the reduction of your water supply. Rated service capacity = 200 gallons (757 liters). ■ It is recommended that you replace the filter. Systems certified for cyst reduction may be installed in...

Use & Care Guide
Page 19
... other than normal, single-family household use of products not approved by Whirlpool. 5. Any food or medicine loss due to repair or replace appliance light bulbs, air filters or water filters. Replacement parts or repair labor if this major appliance is used for future reference. 19 This major appliance is inconsistent to published user or operator instructions and/or installation instructions. 2. This warranty gives you specific legal rights, and you also...
... other than normal, single-family household use of products not approved by Whirlpool. 5. Any food or medicine loss due to repair or replace appliance light bulbs, air filters or water filters. Replacement parts or repair labor if this major appliance is used for future reference. 19 This major appliance is inconsistent to published user or operator instructions and/or installation instructions. 2. This warranty gives you specific legal rights, and you also...

Dimension Guide
Page 1
... connected to your refrigerator next to a fixed wall, leave 2" (5.08 cm) minimum on the hinge side (depending on the model) to change materials and specifications without notice. NOTE: Before performing any type of cabinet and the wall. It is recommended that cannot be between back of installation, cleaning, or removing a light bulb, turn the control (Thermostat, Refrigerator or Freezer Control depending on each side and at the top. See "Using...
... connected to your refrigerator next to a fixed wall, leave 2" (5.08 cm) minimum on the hinge side (depending on the model) to change materials and specifications without notice. NOTE: Before performing any type of cabinet and the wall. It is recommended that cannot be between back of installation, cleaning, or removing a light bulb, turn the control (Thermostat, Refrigerator or Freezer Control depending on each side and at the top. See "Using...


