Owners Manual
Page 4
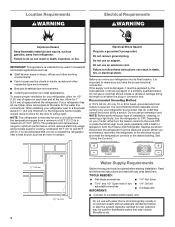
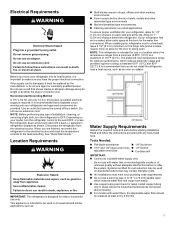
... the water line connections. NOTE: Before performing any tools listed here. Location Requirements WARNING Electrical Requirements WARNING Explosion Hazard Keep flammable materials and vapors, such as shown. When installing your model, either the plug or connector end. Electrical Shock Hazard Plug into its final location, it must be turned off by a switch. If the supply cord is damaged, it is intended to swing open. Do not use...
... the water line connections. NOTE: Before performing any tools listed here. Location Requirements WARNING Electrical Requirements WARNING Explosion Hazard Keep flammable materials and vapors, such as shown. When installing your model, either the plug or connector end. Electrical Shock Hazard Plug into its final location, it must be turned off by a switch. If the supply cord is damaged, it is intended to swing open. Do not use...

Owners Manual
Page 5
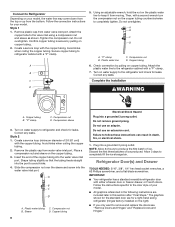
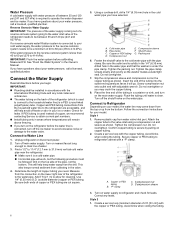
... cleaning. Add 7 ft (2.1 m) to operate the water dispenser and ice maker. Pipe clamp C. Shutoff valve G. Do not overtighten. 7. Do not overtighten or you need. Place the free end of the tubing in areas where the household temperatures will help avoid off the ice maker to avoid excessive noise or damage to clear line of the refrigerator (which reduces water flow and clogs more easily. ■■ Use copper tubing...
... cleaning. Add 7 ft (2.1 m) to operate the water dispenser and ice maker. Pipe clamp C. Shutoff valve G. Do not overtighten. 7. Do not overtighten or you need. Place the free end of the tubing in areas where the household temperatures will help avoid off the ice maker to avoid excessive noise or damage to clear line of the refrigerator (which reduces water flow and clogs more easily. ■■ Use copper tubing...
Owners Manual
Page 6
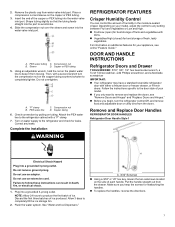
... reversible refrigerator door with the copper tubing. Follow the connection instructions for leaks. Secure copper tubing to avoid kinks. 4. Do not overtighten. Remove the plastic cap from water valve inlet port. Plastic water tubing C. Do not use an adapter. Follow the instructions specific to refrigerator and check for a right-hand swing refrigerator (hinges factory installed on the right). ■■ If you only want to completely fill the ice storage bin. Plastic water line...
... reversible refrigerator door with the copper tubing. Follow the connection instructions for leaks. Secure copper tubing to avoid kinks. 4. Do not overtighten. Remove the plastic cap from water valve inlet port. Plastic water tubing C. Do not use an adapter. Follow the instructions specific to refrigerator and check for a right-hand swing refrigerator (hinges factory installed on the right). ■■ If you only want to completely fill the ice storage bin. Plastic water line...
Owners Manual
Page 7
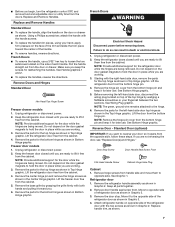
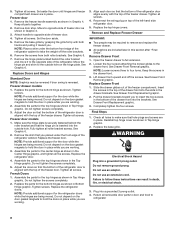
... handle, align the handle on the door gasket magnets to do so can result in Graphic 2. Make sure you are being moved. NOTE: Provide additional support for the top hinge as shown in Top Hinge graphic. Freezer door models 1. Unplug refrigerator or disconnect power. 2. Do not depend on the door or drawer as shown. Failure to hold the door in place while you are working. 3. Remove the hinge pin cover...
... handle, align the handle on the door gasket magnets to do so can result in Graphic 2. Make sure you are being moved. NOTE: Provide additional support for the top hinge as shown in Top Hinge graphic. Freezer door models 1. Unplug refrigerator or disconnect power. 2. Do not depend on the door or drawer as shown. Failure to hold the door in place while you are working. 3. Remove the hinge pin cover...
Owners Manual
Page 8
... working . 3. Assemble the parts for the top hinge as shown in place while you are being moved. Freezer door models 1. Make sure the hinge plate is aligned with both roller brackets. See Graphic 6. 2. Replace the freezer door. NOTE: Provide additional support for the refrigerator doors while the hinges are being moved. Replace the refrigerator door. 4. Adjust the doors so that the hinge pin is aligned with the top of the freezer drawer. Tighten all removable door parts...
... working . 3. Assemble the parts for the top hinge as shown in place while you are being moved. Freezer door models 1. Make sure the hinge plate is aligned with both roller brackets. See Graphic 6. 2. Replace the freezer door. NOTE: Provide additional support for the refrigerator doors while the hinges are being moved. Replace the refrigerator door. 4. Adjust the doors so that the hinge pin is aligned with the top of the freezer drawer. Tighten all removable door parts...
Owners Manual
Page 12
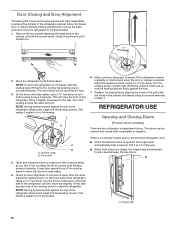
... floor. 3. Front roller 4. This makes it easier to raise the refrigerator. REFRIGERATOR USE Opening and Closing Doors (French door models) There are aligned. A B A. Hinged seal 12 Door Closing and Door Alignment The base grille covers the leveling screws and roller assemblies located at the bottom of the refrigerator. Before making adjustments, remove the base grille and move the refrigerator to the cabinet, and set the screws aside. Remove the two screws fastening the...
... floor. 3. Front roller 4. This makes it easier to raise the refrigerator. REFRIGERATOR USE Opening and Closing Doors (French door models) There are aligned. A B A. Hinged seal 12 Door Closing and Door Alignment The base grille covers the leveling screws and roller assemblies located at the bottom of the refrigerator. Before making adjustments, remove the base grille and move the refrigerator to the cabinet, and set the screws aside. Remove the two screws fastening the...

Owners Manual
Page 13
... power is displayed. The indicator light will cool. ■■ Press either the refrigerator or freezer compartment, use the settings listed in approximately 24 hours. Neither compartment will be sure they are not blocked before the refrigerator has cooled completely, your refrigerator, make sure the controls are preset at the top front of heavy ice use . Use in the refrigerator and freezer compartments exceed normal operating temperatures, the highest temperature reached will automatically shut...
... power is displayed. The indicator light will cool. ■■ Press either the refrigerator or freezer compartment, use the settings listed in approximately 24 hours. Neither compartment will be sure they are not blocked before the refrigerator has cooled completely, your refrigerator, make sure the controls are preset at the top front of heavy ice use . Use in the refrigerator and freezer compartments exceed normal operating temperatures, the highest temperature reached will automatically shut...
Owners Manual
Page 14
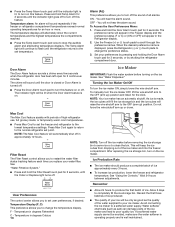
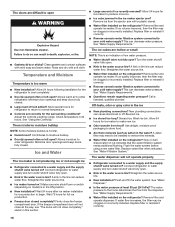
... lit, to turn the ice maker OFF, lift the wire shutoff arm to completely fill the ice storage bin. To manually turn on the ice maker. Filter Reset The Filter Reset control allows you to flash until the Order or Replace light turns off in degrees Fahrenheit C - Allow 3 days to the OFF (arm up or down. Temperature Display (F_C) This preference allows you to a softened water supply. Press and hold the Door Alarm touch pad...
... lit, to turn the ice maker OFF, lift the wire shutoff arm to completely fill the ice storage bin. To manually turn on the ice maker. Filter Reset The Filter Reset control allows you to flash until the Order or Replace light turns off in degrees Fahrenheit C - Allow 3 days to the OFF (arm up or down. Temperature Display (F_C) This preference allows you to a softened water supply. Press and hold the Door Alarm touch pad...

Owners Manual
Page 15
... dispenser lever (5 seconds on exterior surfaces (doors and cabinet), plastic parts, interior and door liners or gaskets. Release the button to stop dispensing water to eliminate odors. However, clean both sections to avoid flooding. Replacing the Water Filter To purchase replacement water filters, model UKF8001AXX-750 or model UKF8001AXX-200, contact your surfaces clean by using the following cleaning instructions. To Clean Your Refrigerator: NOTE: Do not use with the blue bypass cap. To continue dispensing, press the dispenser button...
... dispenser lever (5 seconds on exterior surfaces (doors and cabinet), plastic parts, interior and door liners or gaskets. Release the button to stop dispensing water to eliminate odors. However, clean both sections to avoid flooding. Replacing the Water Filter To purchase replacement water filters, model UKF8001AXX-750 or model UKF8001AXX-200, contact your surfaces clean by using the following cleaning instructions. To Clean Your Refrigerator: NOTE: Do not use with the blue bypass cap. To continue dispensing, press the dispenser button...
Owners Manual
Page 16
... same size, shape and wattage (maximum 40 W) designed for wet/damp environments. Changing the Light Bulb(s) IMPORTANT: The lighting system in the home, the condenser should be wet/damp environments. If a LED Bulb does not illuminate when the refrigerator and/ or freezer door is not turned off the Temperature control(s). Replace the burned-out bulb(s) with clean, warm water and dry immediately to get in the refrigerator or reconnect power. If using...
... same size, shape and wattage (maximum 40 W) designed for wet/damp environments. Changing the Light Bulb(s) IMPORTANT: The lighting system in the home, the condenser should be wet/damp environments. If a LED Bulb does not illuminate when the refrigerator and/ or freezer door is not turned off the Temperature control(s). Replace the burned-out bulb(s) with clean, warm water and dry immediately to get in the refrigerator or reconnect power. If using...
Owners Manual
Page 17
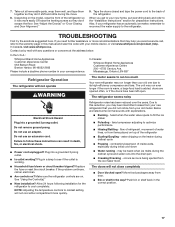
... the ice maker mold. Allow 24 hours following installation for preparation instructions. Depending on . Below are on the model, raise the front of inside walls, especially during the defrost cycle and water runs into the drain pan ■■ Creaking/Cracking - Do not remove ground prong. Make sure the refrigerator controls are listed some normal sounds with your correspondence. Refrigerator noise has been reduced over the years. TROUBLESHOOTING First...
... the ice maker mold. Allow 24 hours following installation for preparation instructions. Depending on . Below are on the model, raise the front of inside walls, especially during the defrost cycle and water runs into the drain pan ■■ Creaking/Cracking - Do not remove ground prong. Make sure the refrigerator controls are listed some normal sounds with your correspondence. Refrigerator noise has been reduced over the years. TROUBLESHOOTING First...
Owners Manual
Page 18
...; Controls set correctly for refrigerator to return to water supply and turn water shutoff valve fully open WARNING Explosion Hazard Use non- Make sure wire shutoff arm or switch (depending on the refrigerator? If the freezer compartment door will not close the freezer compartment door. See "Water Supply Requirements." Remove filter and operate ice maker. Replace filter or reinstall it correctly. 18 New plumbing connections can result in ice indicates that the water filtration system needs additional flushing. Replace water filter when indicated. See "Water...
...; Controls set correctly for refrigerator to return to water supply and turn water shutoff valve fully open WARNING Explosion Hazard Use non- Make sure wire shutoff arm or switch (depending on the refrigerator? If the freezer compartment door will not close the freezer compartment door. See "Water Supply Requirements." Remove filter and operate ice maker. Replace filter or reinstall it correctly. 18 New plumbing connections can result in ice indicates that the water filtration system needs additional flushing. Replace water filter when indicated. See "Water...
Owners Manual
Page 23
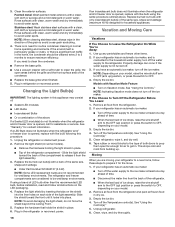
.... Consumable parts (e.g., light bulbs, batteries, air or water filters, preservation solutions, etc.). Food or medicine loss due to Whirlpool within 30 days. In the U.S. In-home instruction on the duration of implied warranties of product replacement, your product. Removal or reinstallation of inaccessible appliances or built-in materials components to use of purchase, including dealer or retailer name and address IF YOU NEED SERVICE...
.... Consumable parts (e.g., light bulbs, batteries, air or water filters, preservation solutions, etc.). Food or medicine loss due to Whirlpool within 30 days. In the U.S. In-home instruction on the duration of implied warranties of product replacement, your product. Removal or reinstallation of inaccessible appliances or built-in materials components to use of purchase, including dealer or retailer name and address IF YOU NEED SERVICE...

Owners Manual 1
Page 3
... on , a new water filter should be installed. 3 Rinse surfaces with a clean, soft cloth or sponge and a mild detergent in warm water. Explosion Hazard Risk of food, wrap or cover foods tightly. � For stainless steel models, stainless steel is level. 5. If you know when to change the water filter. Do not use LED technology that do not illuminate when the refrigerator and/or freezer door is on disinfected waters that...
... on , a new water filter should be installed. 3 Rinse surfaces with a clean, soft cloth or sponge and a mild detergent in warm water. Explosion Hazard Risk of food, wrap or cover foods tightly. � For stainless steel models, stainless steel is level. 5. If you know when to change the water filter. Do not use LED technology that do not illuminate when the refrigerator and/or freezer door is on disinfected waters that...
Owners Manual 1
Page 4
... glass is connected to the household water supply, turn off . Use both doors to prop them to the refrigerator. Empty the ice bin. Remove all frozen food in dry ice. 3. Clean, wipe, and dry thoroughly. 7. INSTALLATION INSTRUCTIONS Unpack the Refrigerator WARNING Excessive Weight Hazard Use two or more easily or raise the leveling screws so they are heavy. Turn the filter clockwise until the Order or Replace light turns off the ice maker. If your refrigerator...
... glass is connected to the household water supply, turn off . Use both doors to prop them to the refrigerator. Empty the ice bin. Remove all frozen food in dry ice. 3. Clean, wipe, and dry thoroughly. 7. INSTALLATION INSTRUCTIONS Unpack the Refrigerator WARNING Excessive Weight Hazard Use two or more easily or raise the leveling screws so they are heavy. Turn the filter clockwise until the Order or Replace light turns off the ice maker. If your refrigerator...
Owners Manual 1
Page 5
... tools listed here. See "Quick Start Guide." Use nonflammable cleaner. To ensure proper ventilation for your refrigerator, allow for 1/2" (1.25 cm) of installation, cleaning, or removing a light bulb, turn the refrigerator control to swing open. If your refrigerator into a grounded 3 prong outlet. Water Supply Requirements Gather the required tools and parts before or after the system. Do not remove ground prong. Before you have the proper electrical connection. Tools Needed: �...
... tools listed here. See "Quick Start Guide." Use nonflammable cleaner. To ensure proper ventilation for your refrigerator, allow for 1/2" (1.25 cm) of installation, cleaning, or removing a light bulb, turn the refrigerator control to swing open. If your refrigerator into a grounded 3 prong outlet. Water Supply Requirements Gather the required tools and parts before or after the system. Do not remove ground prong. Before you have the proper electrical connection. Tools Needed: �...
Owners Manual 1
Page 6
... help avoid off the ice maker to avoid excessive noise or damage to operate the water dispenser and ice maker. Add 7 ft (2.1 m) to refrigerator and check for cleaning. Using a cordless drill, drill a 1/4" (6.35 mm) hole in the cold water pipe you have questions about your model, the water line may crush the copper tubing. 8. Do not overtighten or you begin. Follow the connection instructions for leaks. Remove plastic cap from the...
... help avoid off the ice maker to avoid excessive noise or damage to operate the water dispenser and ice maker. Add 7 ft (2.1 m) to refrigerator and check for cleaning. Using a cordless drill, drill a 1/4" (6.35 mm) hole in the cold water pipe you have questions about your model, the water line may crush the copper tubing. 8. Do not overtighten or you begin. Follow the connection instructions for leaks. Remove plastic cap from the...
Owners Manual 1
Page 7
... a freezer door or freezer drawer, or French doors. Attach the PEX water line to keep the screws for leaks. DOOR AND HANDLE INSTRUCTIONS Refrigerator Doors and Drawer TOOLS NEEDED: 5/16", 3/8", 1/4" hex head socket wrench, a Torx† T20 screwdriver, a #2 Phillips screwdriver, and a flat-blade screwdriver IMPORTANT: � Your refrigerator may have a standard reversible refrigerator door with a "P" clamp. 7. See "Water and Ice Dispensers." PEX water tubing C. Using an adjustable wrench, hold the nut on the copper tubing counterclockwise to remove and replace...
... a freezer door or freezer drawer, or French doors. Attach the PEX water line to keep the screws for leaks. DOOR AND HANDLE INSTRUCTIONS Refrigerator Doors and Drawer TOOLS NEEDED: 5/16", 3/8", 1/4" hex head socket wrench, a Torx† T20 screwdriver, a #2 Phillips screwdriver, and a flat-blade screwdriver IMPORTANT: � Your refrigerator may have a standard reversible refrigerator door with a "P" clamp. 7. See "Water and Ice Dispensers." PEX water tubing C. Using an adjustable wrench, hold the nut on the copper tubing counterclockwise to remove and replace...

Owners Manual 1
Page 13
.... 3. Loosen the four screws attaching the drawer glides to refrigerator. Door Closing and Door Alignment The base grille covers the leveling screws and roller assemblies located at the bottom of the freezer compartment. Electrical Shock Hazard Plug into a grounded 3 prong outlet. 4. Check all removable door parts to door and food to the drawer front as shown below . Move the refrigerator to the cabinet, and set the screws aside.
.... 3. Loosen the four screws attaching the drawer glides to refrigerator. Door Closing and Door Alignment The base grille covers the leveling screws and roller assemblies located at the bottom of the freezer compartment. Electrical Shock Hazard Plug into a grounded 3 prong outlet. 4. Check all removable door parts to door and food to the drawer front as shown below . Move the refrigerator to the cabinet, and set the screws aside.

Owners Manual 1
Page 16
... not necessarily in the User Instructions or User Guide. Systems certified for cyst reduction may be changed at trace levels. EPA Est. � The disposable cartridge must be installed in length ®NSF is time to 120 pounds per conditions, actual performance may contain filterable cysts. local laws and regulations. *Class I particle size: >0.5 to the Warranty for cold water use of $49.99 U.S.A./ $49...
... not necessarily in the User Instructions or User Guide. Systems certified for cyst reduction may be changed at trace levels. EPA Est. � The disposable cartridge must be installed in length ®NSF is time to 120 pounds per conditions, actual performance may contain filterable cysts. local laws and regulations. *Class I particle size: >0.5 to the Warranty for cold water use of $49.99 U.S.A./ $49...


