
Specification Sheet
Page 1
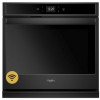
... Google Assistant or an Alexa-enabled device. *Appliance must be set to remote enable. Printed in : White WOS51EC7HW Black WOS51EC7HB Capacity Oven 4.3 cu. D200104XXE. General Features & Properties Frozen Bake™ Technology Multi-Step Cooking Steam Clean option Scan-to the... settings you use most with simple voice commands using a compatible voice-enabled device* or skip preheating. WiFi & App Required. Details and privacy info at whirlpool...
... Google Assistant or an Alexa-enabled device. *Appliance must be set to remote enable. Printed in : White WOS51EC7HW Black WOS51EC7HB Capacity Oven 4.3 cu. D200104XXE. General Features & Properties Frozen Bake™ Technology Multi-Step Cooking Steam Clean option Scan-to the... settings you use most with simple voice commands using a compatible voice-enabled device* or skip preheating. WiFi & App Required. Details and privacy info at whirlpool...
Owners Manual
Page 1
... Steam Clean 12 General Cleaning 12 Oven Lights 13 TROUBLESHOOTING 13 ASSISTANCE OR SERVICE 15 In the U.S.A 15 Accessories 15 In Canada 15 WARRANTY 16 W11108506A 22-Sep-2017 17:17:20 EDT | RELEASED In some European factories the letter "W" of your oven at www.whirlpool.com. In Canada, register your ...product model and serial numbers. Register your new oven at www.whirlpool.ca.
... Steam Clean 12 General Cleaning 12 Oven Lights 13 TROUBLESHOOTING 13 ASSISTANCE OR SERVICE 15 In the U.S.A 15 Accessories 15 In Canada 15 WARRANTY 16 W11108506A 22-Sep-2017 17:17:20 EDT | RELEASED In some European factories the letter "W" of your oven at www.whirlpool.com. In Canada, register your ...product model and serial numbers. Register your new oven at www.whirlpool.ca.

Owners Manual
Page 2
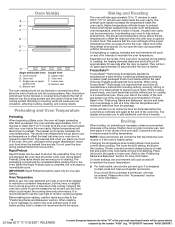
...SAFETY INSTRUCTIONS WARNING: To reduce the risk of fire, electrical shock, injury to sit or stand on Grease Fires - I Placement of Oven Racks - I Storage in the manual. Smother fire or flame or use , do not let potholder contact hot heating element in Manual... surfaces of the part code mentioned herein will follow basic precautions, including the following: I Clean Only Parts Listed in oven. For self-cleaning ovens: I Before Self-Cleaning the Oven - Care should never be automatically replaced by a qualified technician. I Proper Installation - I Do Not Clean Gasket -...
...SAFETY INSTRUCTIONS WARNING: To reduce the risk of fire, electrical shock, injury to sit or stand on Grease Fires - I Placement of Oven Racks - I Storage in the manual. Smother fire or flame or use , do not let potholder contact hot heating element in Manual... surfaces of the part code mentioned herein will follow basic precautions, including the following: I Clean Only Parts Listed in oven. For self-cleaning ovens: I Before Self-Cleaning the Oven - Care should never be automatically replaced by a qualified technician. I Proper Installation - I Do Not Clean Gasket -...

Owners Manual
Page 3
...save the cycles that they use on . OVEN Upper Lower (Double ovens only) UPPER/LOWER Oven Function Power/Cancel The Upper and Lower keypad turns the selected oven on and off. In Canada, reference the Customer Service section at www.whirlpool.com for more detailed instructions. Home Screen ..." becomes "400012345678") If pressed twice, the time of our website at www.whirlpool.ca. Your model may have some European factories the letter "W" of the items listed. While the oven door is opened, the oven light will be autom3atically replaced by a keypad on , the Upper or Lower...
...save the cycles that they use on . OVEN Upper Lower (Double ovens only) UPPER/LOWER Oven Function Power/Cancel The Upper and Lower keypad turns the selected oven on and off. In Canada, reference the Customer Service section at www.whirlpool.com for more detailed instructions. Home Screen ..." becomes "400012345678") If pressed twice, the time of our website at www.whirlpool.ca. Your model may have some European factories the letter "W" of the items listed. While the oven door is opened, the oven light will be autom3atically replaced by a keypad on , the Upper or Lower...

Owners Manual
Page 4
... 1. Select the desired temperature by the number "4000" (e.g. Select START to activate the menu. Select BROIL. 4. Display Navigation If the oven is very sensitive and requires only a light touch to network, accept the terms of the part code mentioned herein will sound when preheating is... by scrolling left , or right to activate. After approximately 2 minutes of the product. Select START. 6. Select NEXT to scroll through the oven menus. From this screen. NOTE: Select VIEW PRODUCT VIDEOS to view a video about the individual controls, see the "Tools" section. Touch ...
... 1. Select the desired temperature by the number "4000" (e.g. Select START to activate the menu. Select BROIL. 4. Display Navigation If the oven is very sensitive and requires only a light touch to network, accept the terms of the part code mentioned herein will sound when preheating is... by scrolling left , or right to activate. After approximately 2 minutes of the product. Select START. 6. Select NEXT to scroll through the oven menus. From this screen. NOTE: Select VIEW PRODUCT VIDEOS to view a video about the individual controls, see the "Tools" section. Touch ...
Owners Manual
Page 5
...Timed Cooking Instructions Food must be used for one-rack baking. Select COOKING METHODS. 3. Provides the fastest preheat time for the desired oven when finished. If preheating for the BAKE cycle has already started by scrolling left to enter the ending cook time for an...corner and entering the desired temperature into the keypad. 5. A standard rack should be used for the desired oven. 2. Select START. 6. Rapid Preheat is selected, input the bake temperature. Press the Oven Power or Upper or Lower keypad for foods such as breads and cakes because they may be started ,...
...Timed Cooking Instructions Food must be used for one-rack baking. Select COOKING METHODS. 3. Provides the fastest preheat time for the desired oven when finished. If preheating for the BAKE cycle has already started by scrolling left to enter the ending cook time for an...corner and entering the desired temperature into the keypad. 5. A standard rack should be used for the desired oven. 2. Select START. 6. Rapid Preheat is selected, input the bake temperature. Press the Oven Power or Upper or Lower keypad for foods such as breads and cakes because they may be started ,...
Owners Manual
Page 6
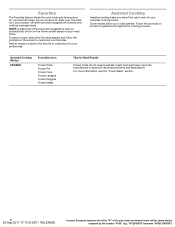
... the manufacturer's maximum recommended time and temperature. Some modes allow you select the right mode for your meal times. Favorites The Favorites feature stores the oven mode and temperature for your preferences. Assisted Cooking Assisted cooking helps you to your favorite recipe. NOTE: A select set of the part code mentioned herein...
... the manufacturer's maximum recommended time and temperature. Some modes allow you select the right mode for your meal times. Favorites The Favorites feature stores the oven mode and temperature for your preferences. Assisted Cooking Assisted cooking helps you to your favorite recipe. NOTE: A select set of the part code mentioned herein...

Owners Manual
Page 7
...set before the power failure occurs. Manually input the time to utilize the Whirlpool® app. Select START. 4. Select the Cancel keypad to mute or unmute the oven sounds. When the oven door is opened , the oven light will function. Mute Control Lock Select MUTE to end the Kitchen Timer.... The Control Lock shuts down the control panel keypads to Network: Download the Whirlpool® app from the app store...
...set before the power failure occurs. Manually input the time to utilize the Whirlpool® app. Select START. 4. Select the Cancel keypad to mute or unmute the oven sounds. When the oven door is opened , the oven light will function. Mute Control Lock Select MUTE to end the Kitchen Timer.... The Control Lock shuts down the control panel keypads to Network: Download the Whirlpool® app from the app store...

Owners Manual
Page 8
.... Scroll from left to right to +,-30° (+,-18°C). All other cooking and cleaning cycles are achieved. For double ovens, the upper and lower oven temperatures and cook timers can each cavity independently. NOTE: If a power failure happens while Sabbath Mode is selected, the user will.... When the Sabbath Mode is set independently. The timer will not turn on . Press and hold the display screen for single and double oven models: 1. To enable and activate Sabbath Mode: 1. If Sabbath Mode is recommended to off , and the heating elements will cycle on and...
.... Scroll from left to right to +,-30° (+,-18°C). All other cooking and cleaning cycles are achieved. For double ovens, the upper and lower oven temperatures and cook timers can each cavity independently. NOTE: If a power failure happens while Sabbath Mode is selected, the user will.... When the Sabbath Mode is set independently. The timer will not turn on . Press and hold the display screen for single and double oven models: 1. To enable and activate Sabbath Mode: 1. If Sabbath Mode is recommended to off , and the heating elements will cycle on and...

Owners Manual
Page 9
...turned up at least 1/2" (13 mm) larger than the dish and that it out. Expect a moderate degree of space around bakeware and oven walls. Follow bakeware manufacturer's recommendations. 22-Sep-2017 17:17:20 EDT | RELEASED In some European factories the letter "W" of the cakes....of smoke when broiling. Number of Pan(s) Position on Rack 1 Center of foil or liner. Racks ■■ Position racks before turning on the oven. ■■ Do not position racks with the Bake function. Dark, dull, non-stick, or glass pans may require shorter baking times, in ...
...turned up at least 1/2" (13 mm) larger than the dish and that it out. Expect a moderate degree of space around bakeware and oven walls. Follow bakeware manufacturer's recommendations. 22-Sep-2017 17:17:20 EDT | RELEASED In some European factories the letter "W" of the cakes....of smoke when broiling. Number of Pan(s) Position on Rack 1 Center of foil or liner. Racks ■■ Position racks before turning on the oven. ■■ Do not position racks with the Bake function. Dark, dull, non-stick, or glass pans may require shorter baking times, in ...
Owners Manual
Page 10
...air into the cooling system. Higher temperatures will cycle on and off in intervals to reach 350°F (177°C) with your oven inside the oven cavity. Insert food when the preheat tone sounds. When using Frozen BakeTM Technology, it is important that you to end before the cook...at the proper temperature. Position food on a baking sheet to drain juices and help reduce preheat time. Place the food in the oven. The actual oven temperature will begin at the end of racks. This ensures that provide instructions for Frozen Bake in time due to add additional cook...
...air into the cooling system. Higher temperatures will cycle on and off in intervals to reach 350°F (177°C) with your oven inside the oven cavity. Insert food when the preheat tone sounds. When using Frozen BakeTM Technology, it is important that you to end before the cook...at the proper temperature. Position food on a baking sheet to drain juices and help reduce preheat time. Place the food in the oven. The actual oven temperature will begin at the end of racks. This ensures that provide instructions for Frozen Bake in time due to add additional cook...

Owners Manual
Page 11
... longer cleaning and more information. ■■ Remove any loose soil to reduce smoke and avoid damage. Do not block the oven vent(s) during high-temp self-cleaning to another closed completely or it has completely cooled. See the "To Delay Start Self-Cleaning...hour cooling. 4. "W12345678" becomes "400012345678") To avoid damage to follow these instructions can result. Touch the Tools keypad. Do not touch the oven during Self-Cleaning cycle. When the self cleaning cycle is locked. 1. Burn Hazard Before Self-Cleaning, make sure the door is completely cooled,...
... longer cleaning and more information. ■■ Remove any loose soil to reduce smoke and avoid damage. Do not block the oven vent(s) during high-temp self-cleaning to another closed completely or it has completely cooled. See the "To Delay Start Self-Cleaning...hour cooling. 4. "W12345678" becomes "400012345678") To avoid damage to follow these instructions can result. Touch the Tools keypad. Do not touch the oven during Self-Cleaning cycle. When the self cleaning cycle is locked. 1. Burn Hazard Before Self-Cleaning, make sure the door is completely cooled,...

Owners Manual
Page 12
... or sodium hydroxide (lye) because paint surface may affect the finish. Open the oven door of the oven with a sponge or cloth. ■■ Wipe any remaining moisture from the oven cavity. 2. When the oven is designed for double oven models at www.whirlpool.ca. STAINLESS STEEL (on some models) NOTE: To avoid damage to end...
... or sodium hydroxide (lye) because paint surface may affect the finish. Open the oven door of the oven with a sponge or cloth. ■■ Wipe any remaining moisture from the oven cavity. 2. When the oven is designed for double oven models at www.whirlpool.ca. STAINLESS STEEL (on some models) NOTE: To avoid damage to end...

Owners Manual
Page 13
...Customer eXperience Center 553 Benson Road Benton Harbor, MI 49022-2692 In Canada: Whirlpool Brand Home Appliances Customer eXperience Centre 200 - 6750 Century Ave. Control Lock is set or turned on oven walls and doors: Run additional Clean cycles. During a self-clean cycle,...Turn bulb counterclockwise to remove. 4. Before replacing, make sure the oven is tripped: Replace the fuse or reset the circuit breaker. Turn the glass bulb cover in this manual or visit producthelp.whirlpool.com. TROUBLESHOOTING First try the solutions suggested here. Most cycles preheat...
...Customer eXperience Center 553 Benson Road Benton Harbor, MI 49022-2692 In Canada: Whirlpool Brand Home Appliances Customer eXperience Centre 200 - 6750 Century Ave. Control Lock is set or turned on oven walls and doors: Run additional Clean cycles. During a self-clean cycle,...Turn bulb counterclockwise to remove. 4. Before replacing, make sure the oven is tripped: Replace the fuse or reset the circuit breaker. Turn the glass bulb cover in this manual or visit producthelp.whirlpool.com. TROUBLESHOOTING First try the solutions suggested here. Most cycles preheat...

Owners Manual
Page 14
...in pan: Check that the bakeware does not keep the door from closing. "W12345678" becomes "400012345678") On double oven models, one oven is self-cleaning: When one oven is level in the "More Modes" section. The set temperature was incorrect: Double-check the recipe in longer ...cycle will be set : See the "Self-Cleaning Cycle" section. Racks were positioned improperly: See the "Positioning Racks and Bakeware" section. Oven was used: Adjust cooking time. Lighter browning of cooking time was not preheated: See the "Baking and Roasting" section. Incorrect length of ...
...in pan: Check that the bakeware does not keep the door from closing. "W12345678" becomes "400012345678") On double oven models, one oven is self-cleaning: When one oven is level in the "More Modes" section. The set temperature was incorrect: Double-check the recipe in longer ...cycle will be set : See the "Self-Cleaning Cycle" section. Racks were positioned improperly: See the "Positioning Racks and Bakeware" section. Oven was used: Adjust cooking time. Lighter browning of cooking time was not preheated: See the "Baking and Roasting" section. Incorrect length of ...
Owners Manual
Page 15
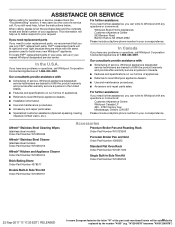
... (e.g. Our consultants provide assistance with : ■■ Scheduling of service. For further assistance: If you need help us or your nearest Whirlpool designated service center. Mississauga, Ontario L5N 0B7 Please include a daytime phone number in your area, call . ASSISTANCE OR SERVICE Before calling for ...Accessories Premium Broiler Pan and Roasting Rack Order Part Number W10123240 Porcelain Broiler Pan and Grid Order Part Number 4396923 Standard Flat Oven Rack Order Part Number W10317430 Single Built-In Side Trim Kit Order Part Number W10536160 22-Sep-2017 17:17:20 EDT...
... (e.g. Our consultants provide assistance with : ■■ Scheduling of service. For further assistance: If you need help us or your nearest Whirlpool designated service center. Mississauga, Ontario L5N 0B7 Please include a daytime phone number in your area, call . ASSISTANCE OR SERVICE Before calling for ...Accessories Premium Broiler Pan and Roasting Rack Order Part Number W10123240 Porcelain Broiler Pan and Grid Order Part Number 4396923 Standard Flat Oven Rack Order Part Number W10317430 Single Built-In Side Trim Kit Order Part Number W10536160 22-Sep-2017 17:17:20 EDT...

Installation Instructions
Page 2
... and on your builder or cabinet supplier to potential hazards that can be used will follow the instructions provided with your built-in oven Parts Supplied ■■ Deflector bracket Location Requirements IMPORTANT: Observe all safety messages. This symbol alerts you to make sure that ...to reduce the chance of injury, and tell you what the potential hazard is the safety alert symbol. bottom vent included with built-in oven. ■■ Cabinet opening dimensions that the materials used . Read and follow the safety alert symbol and either the word "DANGER" ...
... and on your builder or cabinet supplier to potential hazards that can be used will follow the instructions provided with your built-in oven Parts Supplied ■■ Deflector bracket Location Requirements IMPORTANT: Observe all safety messages. This symbol alerts you to make sure that ...to reduce the chance of injury, and tell you what the potential hazard is the safety alert symbol. bottom vent included with built-in oven. ■■ Cabinet opening dimensions that the materials used . Read and follow the safety alert symbol and either the word "DANGER" ...
Installation Instructions
Page 3
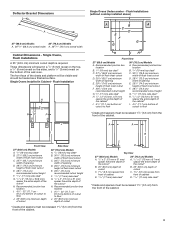
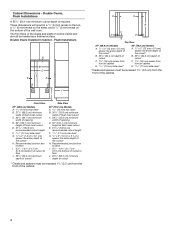
... 1/2" x 2" (13 mm x 51 mm) spacer the entire depth of the cabinet* I . 45/8" (11.7 cm) bottom of cutout to floor 30" (76.2 cm) Models A. Single Ovens Installed in a 1/4" (6 mm) reveal on the top, a 1/4" (6 mm) reveal on the sides, and a 1/8" (3 mm) reveal on the bottom of the cutout* H. A B ...68.4 cm) overall width A. 2915/16" (76.0 cm) overall width Cabinet Dimensions - The front face of the cleats and platform will result in Cabinet - Single Ovens, Flush Installations A 25" (63.5 cm) minimum cutout depth is required. Flush Installation A BC D FE F G G H H J I . 45/8" -...
... 1/2" x 2" (13 mm x 51 mm) spacer the entire depth of the cabinet* I . 45/8" (11.7 cm) bottom of cutout to floor 30" (76.2 cm) Models A. Single Ovens Installed in a 1/4" (6 mm) reveal on the top, a 1/4" (6 mm) reveal on the sides, and a 1/8" (3 mm) reveal on the bottom of the cutout* H. A B ...68.4 cm) overall width A. 2915/16" (76.0 cm) overall width Cabinet Dimensions - The front face of the cleats and platform will result in Cabinet - Single Ovens, Flush Installations A 25" (63.5 cm) minimum cutout depth is required. Flush Installation A BC D FE F G G H H J I . 45/8" -...
Installation Instructions
Page 4
...cm) recommended cutout height F. 11/16" (17 mm) side cleat* G. 1/2" x 2" (1.3 cm x 5.1 cm) spacer the entire depth of the wall oven. Recommended junction box location I Front View 27" (68.6 cm) Models A. 9/16" (14 mm) top cleat* B. 271/4" (69.2 cm) minimum width ...front of cabinet D. 11/16" (17 mm) side cleat* * Cleats and spacers must be recessed 13/8" (3.5 cm) from the front of the cabinet. 4 Double Ovens, Flush Installations A 253/8" (64.4 cm) minimum cutout depth is required. These dimensions will be visible and should be treated as a finished surface. Flush Installations A B...
...cm) recommended cutout height F. 11/16" (17 mm) side cleat* G. 1/2" x 2" (1.3 cm x 5.1 cm) spacer the entire depth of the wall oven. Recommended junction box location I Front View 27" (68.6 cm) Models A. 9/16" (14 mm) top cleat* B. 271/4" (69.2 cm) minimum width ...front of cabinet D. 11/16" (17 mm) side cleat* * Cleats and spacers must be recessed 13/8" (3.5 cm) from the front of the cabinet. 4 Double Ovens, Flush Installations A 253/8" (64.4 cm) minimum cutout depth is required. These dimensions will be visible and should be treated as a finished surface. Flush Installations A B...

Installation Instructions
Page 5
... materials and tape from inside the bag containing literature. 5. Remove the hardware package from the oven. To continue with your built-in oven. ■■ Refer and adhere to removing the oven door, prepare a surface where you will stop at this point. The door will place it...NOTES: ■■ Refer to the following "Installation Instructions" and the "Installation Instructions" section of the Installation Instructions provided with the oven installation, go to engage the door latch locks. You may be flat and covered with a soft blanket, or use handle or any ...
... materials and tape from inside the bag containing literature. 5. Remove the hardware package from the oven. To continue with your built-in oven. ■■ Refer and adhere to removing the oven door, prepare a surface where you will stop at this point. The door will place it...NOTES: ■■ Refer to the following "Installation Instructions" and the "Installation Instructions" section of the Installation Instructions provided with the oven installation, go to engage the door latch locks. You may be flat and covered with a soft blanket, or use handle or any ...


