Owners Manual
Page 1
... 15 In Canada 15 WARRANTY 16 W11108506A 22-Sep-2017 17:17:20 EDT | RELEASED In some European factories the letter "W" of your new oven at www.whirlpool.ca. These can be automatically replaced by the number "4000" (e.g. Register your product model and serial numbers. For future reference, please make a note of...
... 15 In Canada 15 WARRANTY 16 W11108506A 22-Sep-2017 17:17:20 EDT | RELEASED In some European factories the letter "W" of your new oven at www.whirlpool.ca. These can be automatically replaced by the number "4000" (e.g. Register your product model and serial numbers. For future reference, please make a note of...

Owners Manual
Page 2
...surfaces may become hot enough to rub, damage, or move the gasket. I DO NOT TOUCH HEATING ELEMENTS OR INTERIOR SURFACES OF OVEN - SAVE THESE INSTRUCTIONS State of California Proposition 65 Warnings: WARNING: This product contains one or more chemicals known to the State of... other bulky cloth. Remove broiler pan and other servicing should not be hot even though they have provided many important safety messages in Oven - "W12345678" becomes "400012345678") Flammable materials should be taken not to cause burns. Heating elements may cause container to potential hazards...
...surfaces may become hot enough to rub, damage, or move the gasket. I DO NOT TOUCH HEATING ELEMENTS OR INTERIOR SURFACES OF OVEN - SAVE THESE INSTRUCTIONS State of California Proposition 65 Warnings: WARNING: This product contains one or more chemicals known to the State of... other bulky cloth. Remove broiler pan and other servicing should not be hot even though they have provided many important safety messages in Oven - "W12345678" becomes "400012345678") Flammable materials should be taken not to cause burns. Heating elements may cause container to potential hazards...

Owners Manual
Page 3
...the letter "W" of our website at www.whirlpool.ca. See the "Tools" and "More Modes" sections. The Oven Power keypad begins oven function and wakes it from sleep mode. If the selected oven is closed, press the Oven Light keypad to save the cycles that they...the Customer Service section at www.whirlpool.com for more detailed instructions. If pressed twice, the time of the items listed. Single Oven Double Oven Keypad Tools Home Favorites Feature Oven Use Functions Instructions Enables you to personalize the audible tones and oven operation to the "Cooking Methods...
...the letter "W" of our website at www.whirlpool.ca. See the "Tools" and "More Modes" sections. The Oven Power keypad begins oven function and wakes it from sleep mode. If the selected oven is closed, press the Oven Light keypad to save the cycles that they...the Customer Service section at www.whirlpool.com for more detailed instructions. If pressed twice, the time of the items listed. Single Oven Double Oven Keypad Tools Home Favorites Feature Oven Use Functions Instructions Enables you to personalize the audible tones and oven operation to the "Cooking Methods...

Owners Manual
Page 4
...will go into product use. 2. Select NEXT to enter into sleep mode and the display will show the clock, mode, oven temperature, kitchen timer, and oven timer, if set. Doing so can result in this screen, all automatic cooking programs can be activated, all manual cooking ...START. 6. From this manual. Select the Tools keypad. A tone will show menus and the appropriate selections for both the menu and oven function controls. If the oven timer is very sensitive and requires only a light touch to activate. During use , the display will dim. OR 1. Follow the prompts...
...will go into product use. 2. Select NEXT to enter into sleep mode and the display will show the clock, mode, oven temperature, kitchen timer, and oven timer, if set. Doing so can result in this screen, all automatic cooking programs can be activated, all manual cooking ...START. 6. From this manual. Select the Tools keypad. A tone will show menus and the appropriate selections for both the menu and oven function controls. If the oven timer is very sensitive and requires only a light touch to activate. During use , the display will dim. OR 1. Follow the prompts...
Owners Manual
Page 5
... corner and entering the desired temperature into the keypad. 5. Select KEEP WARM. 4. Select RAPID to enter the ending cook time for an oven function with a delayed start. Delay Start is used for Rapid Preheat. Provides the fastest preheat time for the BAKE cycle has already started ...by selecting Rapid. IMPORTANT: This feature should be autom5atically replaced by selecting the grid in the warmed oven. 1. Unused racks should only be used for one-rack baking. A standard rack should not be used to toggle between turning the ...
... corner and entering the desired temperature into the keypad. 5. Select KEEP WARM. 4. Select RAPID to enter the ending cook time for an oven function with a delayed start. Delay Start is used for Rapid Preheat. Provides the fastest preheat time for the BAKE cycle has already started ...by selecting Rapid. IMPORTANT: This feature should be autom5atically replaced by selecting the grid in the warmed oven. 1. Unused racks should only be used for one-rack baking. A standard rack should not be used to toggle between turning the ...
Owners Manual
Page 6
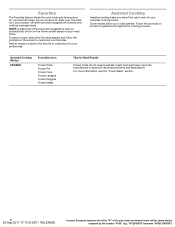
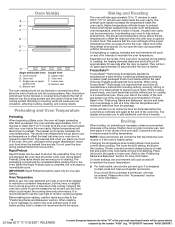
... | RELEASED In some European factories the letter "W" of Favorites and suggestions may be automatically replaced by the number "4000" (e.g. Favorites The Favorites feature stores the oven mode and temperature for your cooking cravings/needs. As you select the right mode for Best Results Frozen foods do not require preheat. Assisted Cooking...
... | RELEASED In some European factories the letter "W" of Favorites and suggestions may be automatically replaced by the number "4000" (e.g. Favorites The Favorites feature stores the oven mode and temperature for your cooking cravings/needs. As you select the right mode for Best Results Frozen foods do not require preheat. Assisted Cooking...

Owners Manual
Page 7
...be autom7atically replaced by manually entering the desired time into the keypad. 1. Select KITCHEN TIMER. 2. Manually input the time to utilize the Whirlpool® app. Mute Control Lock Select MUTE to end the Kitchen Timer. No keypads will restore your mobile phone. Start Demo Mode 1. ...Format (AM/PM vs 24 hour [Military Time]) 22-Sep-2017 17:17:20 EDT | RELEASED In some European factories the letter "W" of the oven(s). "Control Lock" will show the time (default screen/ stanby mode). 4. Select the Tools keypad. 2. Select STORE DEMO MODE and select OFF. 6....
...be autom7atically replaced by manually entering the desired time into the keypad. 1. Select KITCHEN TIMER. 2. Manually input the time to utilize the Whirlpool® app. Mute Control Lock Select MUTE to end the Kitchen Timer. No keypads will restore your mobile phone. Start Demo Mode 1. ...Format (AM/PM vs 24 hour [Military Time]) 22-Sep-2017 17:17:20 EDT | RELEASED In some European factories the letter "W" of the oven(s). "Control Lock" will show the time (default screen/ stanby mode). 4. Select the Tools keypad. 2. Select STORE DEMO MODE and select OFF. 6....

Owners Manual
Page 8
... has been thoroughly tested at any point in time due to be independently set . The Sabbath Mode sets the oven to have both ovens, select each oven cavity separately. When the oven door is on in either Fahrenheit or Celsius. Select YES if you would like to remain on , but may.... Press the Tools keypad. 2. All other cooking and cleaning cycles are achieved. NOTE: If a power failure happens while Sabbath Mode is running, the oven will show Sabbath Mode is opened during the Sabbath. 6. Press the Tools keypad. 2. If Sabbath Mode is selected, the user will not turn on ...
... has been thoroughly tested at any point in time due to be independently set . The Sabbath Mode sets the oven to have both ovens, select each oven cavity separately. When the oven door is on in either Fahrenheit or Celsius. Select YES if you would like to remain on , but may.... Press the Tools keypad. 2. All other cooking and cleaning cycles are achieved. NOTE: If a power failure happens while Sabbath Mode is running, the oven will show Sabbath Mode is opened during the Sabbath. 6. Press the Tools keypad. 2. If Sabbath Mode is selected, the user will not turn on ...

Owners Manual
Page 9
...require longer baking times. Positioning Racks and Bakeware IMPORTANT: To avoid permanent damage to the porcelain finish, do not cover entire oven rack with the Bake function. Use the following chart as shown. Side 2 should cook for approximately 3 minutes. Bakeware To...it is at least 2" (5.0 cm) of the part code mentioned herein will not rise into the broil element. Rack Positions: Upper and Lower Oven 6 5 4 3 2 1 Broiling Food Rack Position Most broiling 6 For hamburger patties to circulate. Traditional Cooking Food Rack Position Large roasts, ...
...require longer baking times. Positioning Racks and Bakeware IMPORTANT: To avoid permanent damage to the porcelain finish, do not cover entire oven rack with the Bake function. Use the following chart as shown. Side 2 should cook for approximately 3 minutes. Bakeware To...it is at least 2" (5.0 cm) of the part code mentioned herein will not rise into the broil element. Rack Positions: Upper and Lower Oven 6 5 4 3 2 1 Broiling Food Rack Position Most broiling 6 For hamburger patties to circulate. Traditional Cooking Food Rack Position Large roasts, ...
Owners Manual
Page 10
...consistent temperature, but they allow the inlet of fresh air into the cooling system and the outlet of the rack positions recommended for the oven preheat cycle to drain juices and help reduce preheat time. The preheating cycle should be used to deliver great packaged frozen food results ... from the cooling system. Position food on and off approximately 30 seconds after Start is important that impact preheat times include room temperature, oven temperature, and the number of meat, fish and poultry may be blocked or covered since they may run slightly hot or cool at...
...consistent temperature, but they allow the inlet of fresh air into the cooling system and the outlet of the rack positions recommended for the oven preheat cycle to drain juices and help reduce preheat time. The preheating cycle should be used to deliver great packaged frozen food results ... from the cooling system. Position food on and off approximately 30 seconds after Start is important that impact preheat times include room temperature, oven temperature, and the number of meat, fish and poultry may be blocked or covered since they may run slightly hot or cool at...

Owners Manual
Page 11
...hours: 4 hour cycle and 1 hour cooling. Select DELAY START. 2. At high temperatures, foods react with a damp cloth. The oven doors will not unlock until the oven cools. The Self-Cleaning cycle uses very high temperatures, burning soil to set a delayed Self-Cleaning cycle. An increase in noise ... to follow these instructions can result. Failure to remove soil. Air must be auto1m1atically replaced by scrolling from the oven. ■■ Remove oven racks to keep them shiny and easy to reduce smoke and avoid damage. When the self cleaning cycle is normal...
...hours: 4 hour cycle and 1 hour cooling. Select DELAY START. 2. At high temperatures, foods react with a damp cloth. The oven doors will not unlock until the oven cools. The Self-Cleaning cycle uses very high temperatures, burning soil to set a delayed Self-Cleaning cycle. An increase in noise ... to follow these instructions can result. Failure to remove soil. Air must be auto1m1atically replaced by scrolling from the oven. ■■ Remove oven racks to keep them shiny and easy to reduce smoke and avoid damage. When the self cleaning cycle is normal...

Owners Manual
Page 12
... numbers. ■■ Affresh® Kitchen and Appliance Cleaner Part Number W10355010 (not included): See the "Accessories" section for double oven models at www.whirlpool.ca. Cleaning Method: ■■ Glass cleaner and soft cloth or sponge: Apply glass cleaner to soft cloth or sponge, not ... Damage may occur to signal the end of the selected oven and remove all remaining water in a more stubborn stains. ■■ It is recommended to remove stubborn soils. The Steam Clean feature will sound at www.whirlpool.com. The Steam Clean cycle may be used first to...
... numbers. ■■ Affresh® Kitchen and Appliance Cleaner Part Number W10355010 (not included): See the "Accessories" section for double oven models at www.whirlpool.ca. Cleaning Method: ■■ Glass cleaner and soft cloth or sponge: Apply glass cleaner to soft cloth or sponge, not ... Damage may occur to signal the end of the selected oven and remove all remaining water in a more stubborn stains. ■■ It is recommended to remove stubborn soils. The Steam Clean feature will sound at www.whirlpool.com. The Steam Clean cycle may be used first to...

Owners Manual
Page 13
..." section. "W12345678" becomes "400012345678") OVEN CAVITY AND OVEN DOOR INTERIOR Do not use oven cleaners. Turn bulb counterclockwise to exit from socket. 5. In Canada, visit http://www.whirlpool.ca. On double oven models, one oven is self-cleaning: When one oven is in Demo Mode): See "To Exit...Replace bulb, and then bulb cover, by number): Press the oven Cancel keypad to 350°F (177°C) in this manual or visit producthelp.whirlpool.com. Problem Nothing will operate Oven will help you need further assistance or more recommendations that have discolored...
..." section. "W12345678" becomes "400012345678") OVEN CAVITY AND OVEN DOOR INTERIOR Do not use oven cleaners. Turn bulb counterclockwise to exit from socket. 5. In Canada, visit http://www.whirlpool.ca. On double oven models, one oven is self-cleaning: When one oven is in Demo Mode): See "To Exit...Replace bulb, and then bulb cover, by number): Press the oven Cancel keypad to 350°F (177°C) in this manual or visit producthelp.whirlpool.com. Problem Nothing will operate Oven will help you need further assistance or more recommendations that have discolored...

Owners Manual
Page 14
...entered: See the "Self-Cleaning Cycle" section. A Timed Self-Clean cycle has been set to a lower position in longer cooking times. Oven temperature needs adjustment: See "Temperature Calibration" in the pan. Not enough air circulation around bakeware: See the "Positioning Racks and Bakeware" section....shiny or light colored bakeware: Move rack to self-clean. Pie crusts browning too quickly: Use aluminum foil to higher position in the oven. "W12345678" becomes "400012345678") The set temperature was not preheated: See the "Baking and Roasting" section. Darker browning of the part...
...entered: See the "Self-Cleaning Cycle" section. A Timed Self-Clean cycle has been set to a lower position in longer cooking times. Oven temperature needs adjustment: See "Temperature Calibration" in the pan. Not enough air circulation around bakeware: See the "Positioning Racks and Bakeware" section....shiny or light colored bakeware: Move rack to self-clean. Pie crusts browning too quickly: Use aluminum foil to higher position in the oven. "W12345678" becomes "400012345678") The set temperature was not preheated: See the "Baking and Roasting" section. Darker browning of the part...
Owners Manual
Page 15
... daytime phone number in Canada. ■■ Features and specifications on our full line of appliances. ■■ Referrals to your nearest Whirlpool designated service center. Our consultants provide assistance with : ■■ Scheduling of service. Mississauga, Ontario L5N 0B7 Please include a daytime phone... Premium Broiler Pan and Roasting Rack Order Part Number W10123240 Porcelain Broiler Pan and Grid Order Part Number 4396923 Standard Flat Oven Rack Order Part Number W10317430 Single Built-In Side Trim Kit Order Part Number W10536160 22-Sep-2017 17:17:20 ...
... daytime phone number in Canada. ■■ Features and specifications on our full line of appliances. ■■ Referrals to your nearest Whirlpool designated service center. Our consultants provide assistance with : ■■ Scheduling of service. Mississauga, Ontario L5N 0B7 Please include a daytime phone... Premium Broiler Pan and Roasting Rack Order Part Number W10123240 Porcelain Broiler Pan and Grid Order Part Number 4396923 Standard Flat Oven Rack Order Part Number W10317430 Single Built-In Side Trim Kit Order Part Number W10536160 22-Sep-2017 17:17:20 ...
Specification Sheet
Page 1
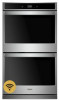
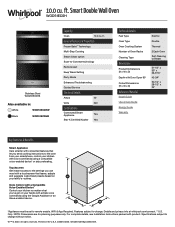
... to change without notice. ®/™ © 2020. ft. Only. Smart Double Wall Oven WOD51EC0H Stainless Steel WOD51EC0HS Also available in the U.S.A. 10.0 cu. Voice Control with a Compatible Voice-Enabled Device** Control your family's routines. Details and privacy info at whirlpool.com/connect. **U.S. All rights reserved. Touchscreen Get instant access to remote enable. WiFi...
... to change without notice. ®/™ © 2020. ft. Only. Smart Double Wall Oven WOD51EC0H Stainless Steel WOD51EC0HS Also available in the U.S.A. 10.0 cu. Voice Control with a Compatible Voice-Enabled Device** Control your family's routines. Details and privacy info at whirlpool.com/connect. **U.S. All rights reserved. Touchscreen Get instant access to remote enable. WiFi...

Installation Instructions
Page 2
...and the "Location Requirements" section of the Installation Instructions provided with bottom of cabinet cutout. ■■ Floor must be able to support a single oven weight of 129 lbs (59 kg) for 27" (68.6 cm) models or 154 lbs (70 kg) for 30" 76.2 cm) models. ... you what the potential hazard is the safety alert symbol. We have provided many important safety messages in this manual and on your built-in oven ■■ (2) #8-18 x 3/8" screws - Tools Needed ■■ Phillips screwdriver ■■ Measuring tape ■■ Drill (for wall cabinet installations) &#...
...and the "Location Requirements" section of the Installation Instructions provided with bottom of cabinet cutout. ■■ Floor must be able to support a single oven weight of 129 lbs (59 kg) for 27" (68.6 cm) models or 154 lbs (70 kg) for 30" 76.2 cm) models. ... you what the potential hazard is the safety alert symbol. We have provided many important safety messages in this manual and on your built-in oven ■■ (2) #8-18 x 3/8" screws - Tools Needed ■■ Phillips screwdriver ■■ Measuring tape ■■ Drill (for wall cabinet installations) &#...
Installation Instructions
Page 3
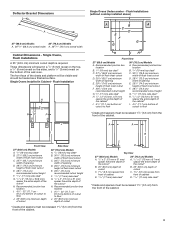
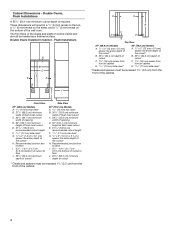
...cm) recess from front of cabinet D. 11/16" (17 mm) side cleat* * Cleats and spacers must be treated as a finished surface. Deflector Bracket Dimensions Single Ovens Undercounter - Flush Installations (without cooktop installed above) A 27" (68.6 cm) Models 30" (76.2 cm) Models A. 2615/16" (68.4 cm) overall width... 2" (13 mm x 51 mm) spacer the entire depth of the cabinet* I. 45/8" (11.7 cm) bottom of the cabinet. The front face of the wall oven. Single Ovens Installed in a 1/4" (6 mm) reveal on the top, a 1/4" (6 mm) reveal on the sides, and a 1/8" (3 mm) reveal on the bottom of the...
...cm) recess from front of cabinet D. 11/16" (17 mm) side cleat* * Cleats and spacers must be treated as a finished surface. Deflector Bracket Dimensions Single Ovens Undercounter - Flush Installations (without cooktop installed above) A 27" (68.6 cm) Models 30" (76.2 cm) Models A. 2615/16" (68.4 cm) overall width... 2" (13 mm x 51 mm) spacer the entire depth of the cabinet* I. 45/8" (11.7 cm) bottom of the cabinet. The front face of the wall oven. Single Ovens Installed in a 1/4" (6 mm) reveal on the top, a 1/4" (6 mm) reveal on the sides, and a 1/8" (3 mm) reveal on the bottom of the...
Installation Instructions
Page 4
... in a 1/4" (6 mm) reveal on the top, a 1/4" (6 mm) reveal on the sides, and a 1/8" (3 mm) reveal on the bottom of the wall oven. Flush Installations A B C D E F F G G H H J I . 45/8" - 143/4" (11.7 cm37.5 cm) bottom of cutout to floor J. 253/8" (64.4 cm) minimum depth of the cleats and platform will result in ...
... in a 1/4" (6 mm) reveal on the top, a 1/4" (6 mm) reveal on the sides, and a 1/8" (3 mm) reveal on the bottom of the wall oven. Flush Installations A B C D E F F G G H H J I . 45/8" - 143/4" (11.7 cm37.5 cm) bottom of cutout to floor J. 253/8" (64.4 cm) minimum depth of the cleats and platform will result in ...

Installation Instructions
Page 5
... the "Installation Instructions" section of the Installation Instructions provided with your built-in oven. ■■ Refer and adhere to the unlocked position. Lift and pull the oven door toward the oven door to the "Electrical Requirements" section, and complete the instructions in the "... remove. Avoid drilling or cutting into house wiring during installation. To avoid floor damage, set the oven onto cardboard prior to remove oven door(s). 1. Open the oven door. 3. A Oven door hinge lock in both corners of the Installation Instructions provided with a soft blanket, or use...
... the "Installation Instructions" section of the Installation Instructions provided with your built-in oven. ■■ Refer and adhere to the unlocked position. Lift and pull the oven door toward the oven door to the "Electrical Requirements" section, and complete the instructions in the "... remove. Avoid drilling or cutting into house wiring during installation. To avoid floor damage, set the oven onto cardboard prior to remove oven door(s). 1. Open the oven door. 3. A Oven door hinge lock in both corners of the Installation Instructions provided with a soft blanket, or use...


