Whirlpool WMMF5930PB Support and Manuals
Get Help and Manuals for this Whirlpool item
View All Support Options Below
Free Whirlpool WMMF5930PB manuals!
Problems with Whirlpool WMMF5930PB?
Ask a Question
Free Whirlpool WMMF5930PB manuals!
Problems with Whirlpool WMMF5930PB?
Ask a Question
Popular Whirlpool WMMF5930PB Manual Pages
Quick Start Guide - Page 1

... Reset" on specific functions, see the online Control Guide.
NOTE: Order the Charcoal or Grease Filter, see the Owner's Manual included with dishwasher.
5. W11595047A Setting Clock When First... installation instruction and maintenance information, please see the "Online ordering information" section.
Select food classes. Close the door. To clean the Grease Filter:
1. Replace...
Control Guide - Page 1

.... Doing so can result in oven more detailed instructions.
Microwave Hood Combination Control Guide
Feature Guide
WARNING: To reduce the risk of fire, electric shock, or injury to persons, read the IMPORTANT SAFETY INSTRUCTIONS, located in your appliance's Owner's Manual, before or after cooking. This manual covers several models. In Canada, refer our website www.whirlpool.ca...
Control Guide - Page 2

...be operated independent.
Pressing Setting button repeatedly to turn ...setting among OFF (default) -> HIGH... to adjusts the vent fan setting among OFF (default) -> HIGH...the key pressed.
Pressing the Settings button, or closing the door... stop cooking during a manual cycle is closed again ... Vent Fan
Light Settings
Auto Icon
Vent Light... button will save.
2
Set the Clock
1. NOTE:
To...
Control Guide - Page 4

...continously, to select potato quantity. 4. Close the door. 4. Touch Melt button continously, to set the power level, enter cook power with number
keypad (e.g., press 80 for 80%). 5. Touch ... Keep Warm
Feature Set Manual Cooking
Popcorn (Sensor) Potato Vengetables Cooking Defrost Reheat Melt Soften Keep Food Warm
Instructions
1. Touch Time/Power button again, to set the length of ...
Control Guide - Page 5

... Tones 2-Volume" Scrolling on the
display. 3. Pressing "1" button to set . 4. United States Model 1. Electronic Oven Controls
Control Display
The display will be repeated for the...set HH:MM. 3. n Invalid Tone
The tone will save . These changes are two languages supported language. Use the number keypads to set . 4. n Prompt Tone
The tone will save . Press Stop/Cancel to set...
Control Guide - Page 8

... will defrost more recipe, see Manual Cooking section.
n Touch Cook button to shield parts of time upper 2min 20 sec.
3. n Use small pieces of aluminum foil to
select Manual cook and
set the length of food such as possible during or at the same time:
1. Item
Food
Category
Quantity
Instruction
1 Manual Cook
/
n Place food in Chicken...
Control Guide - Page 9

...more recipe, see Manual Cook section. Touch Time/Power button again, to set the length of food types.
Use the following chart as a guide. 1. Use the following chart as a guide. 1. Use number...Touch Start. Use number buttons to select food size/quantity. 3. Item
Food
Category
Quantity
Instruction
1 Manual Melt
/
n Place in microwave-safe
container.
2 Melt Butter 0.5, 1.0, 1.5, n ...
Dimension Guide - Page 3

...Support structure must attach to a minimum of one 2ʺ x 4ʺ (5.1 cm x 10.2 cm) wall stud. Refer to installation instructions for recirculating ventilation.
FRONT VIEW
IMPORTANT: Dimensional specifications...or 20 A fused, electrical supply is recommended. DIMENSION GUIDE
MICROWAVE OVEN
OPENING/CLEARANCE DIMENSIONS
MODEL # OPENING/CLEARANCE DIMENSIONS
Width of cabinet opening (minimum)...
Dimension Guide - Page 4

....5~32.4 32.4~33
1.27
*This microwave oven is factory set for planning purposes only. DIMENSION GUIDE
MICROWAVE OVEN
OPENING/CLEARANCE DIMENSIONS
MODEL # Opening/Clearance Measurement Depth of upper cabinet (minimum-maximum) Stand Out* (A) Depth of upper cabinet (minimum-maximum) Flush* (B) Depth of upper cabinet, install with the provided mouting plate.
12.75" DEPTH 13...
Bump Out Kit Installation Instructions - Page 3
.... See the "Installation Dimensions" illustration.
■ Minimum one 2" x 4" (51 x 102 mm) wood wall stud and minimum 3/8" (10 mm) thickness drywall or plaster/lath within cabinet opening where the microwave oven will not discolor, delaminate, or sustain other damages. Parts Needed (Provided in the "Venting Design Specifications" section on the Owner Manual on the product...
Owners Manual - Page 2

... in this manual and on top of the appliance surface when the appliance is , tell you don't follow the specific "PRECAUTIONS TO AVOID POSSIBLE EXPOSURE TO EXCESSIVE MICROWAVE ENERGY" found in this section.
� Install or locate this appliance only for example, near a kitchen sink, in a wet basement, near water - IMPORTANT SAFETY INSTRUCTIONS
When...
Owners Manual - Page 6

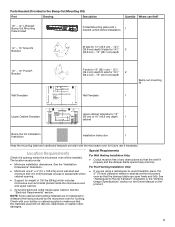
... models have a pocket handle. See the "Electrical Requirements" section.
Special Requirements
For Wall Venting Installation Only: � Cutout must be installed...Support for cooking. Mounting plate
6 Product Dimensions
B
A C
A. 297/8" (76.1 cm) B. 177/8" (45.4 cm) C. 121/8" (31.3 cm)
Installation Dimensions
NOTE: The grounded 3 prong outlet must provide: � Minimum installation...
Owners Manual - Page 8

.... Recirculation (Factory Default Setting)
Wall Venting
Roof Venting
Find the Cardboard Plate
The cardboard plate is designed for adaptation to the following three types of ventilation, choose one type before installation. Using a stud finder, locate the edges of the vertical centerline, only recirculation or roof venting installation can be done. Support tabs F.
Wall stud...
Owners Manual - Page 14

...support tabs of the mounting plate facing forward, insert a 3/16-24 x 3" round-head bolt through the end hole that fits over the 5/8" (16 mm) hole drilled in step 3 of "Installation for Wall Venting Installation...and set aside. If for recirculation installation, no need rotate blower motor, select one ventilation type before install the microwave oven.
And follow the propriated instruction ...
Owners Manual - Page 18

... a grounded 3 prong outlet. � See the User Instructions for troubleshooting information. Loosen mounting plate screws. To avoid warping, wood filter blocks (installer to see which step was skipped.
2. Do not use an extension cord. Check that the power supply cord is required, rotate microwave oven downward. Replace the fuse or reset the circuit breaker...
Whirlpool WMMF5930PB Reviews
We have not received any reviews for Whirlpool yet.