
Installation Instructions
Page 2
... caulking ■■ 3/4" (1.9 cm) hole saw compound ■■ Duct tape Parts supplied For information on model, grease filter and charcoal filter may be installed. See the "Installation Dimensions" illustration. ■■ Minimum one 2" x 4" (5.1 cm x 10.16 ...) diam. Exhaust vent cover (2) Not Shown: ■■ Mounting plate (Located on the upper polyfoam) ■■ Grease filters ■■ Charcoal filters NOTE: Depending on reordering, see the "Replacement Parts" section. Location Requirements IMPORTANT: Check the opening . ■■ Support for...
... caulking ■■ 3/4" (1.9 cm) hole saw compound ■■ Duct tape Parts supplied For information on model, grease filter and charcoal filter may be installed. See the "Installation Dimensions" illustration. ■■ Minimum one 2" x 4" (5.1 cm x 10.16 ...) diam. Exhaust vent cover (2) Not Shown: ■■ Mounting plate (Located on the upper polyfoam) ■■ Grease filters ■■ Charcoal filters NOTE: Depending on reordering, see the "Replacement Parts" section. Location Requirements IMPORTANT: Check the opening . ■■ Support for...

Installation Instructions
Page 5
...that damper blade moves freely, and opens fully. 2. Screws J. Mark the center of airflow, for Wall and Roof venting, remove the charcoal filter from packaging upper foam (see item J in "Parts Supplied" section), attach both wall and upper vent installation) 1. B C B ... 2. Recirculation vent covers C. NOTE: To ensure good performance of each stud and draw a plumb line down each stud center. Screw B. Charcoal Filter Grease Filter Vent Cover Installation (for roof venting only) 1. Keep C for future recirculation vent installation. 5 Take J from the bottom plate before operating...
...that damper blade moves freely, and opens fully. 2. Screws J. Mark the center of airflow, for Wall and Roof venting, remove the charcoal filter from packaging upper foam (see item J in "Parts Supplied" section), attach both wall and upper vent installation) 1. B C B ... 2. Recirculation vent covers C. NOTE: To ensure good performance of each stud and draw a plumb line down each stud center. Screw B. Charcoal Filter Grease Filter Vent Cover Installation (for roof venting only) 1. Keep C for future recirculation vent installation. 5 Take J from the bottom plate before operating...
Owners Manual
Page 6
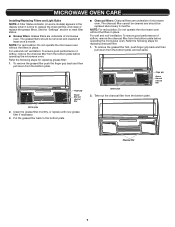
... steps for replacing grease filter: 1. Refer the following steps for replacing charcoal filter: 1. Take out the charcoal filter from the bottom plate before operating the microwave oven. Bottom plate Finger grip Grease filter and charcoal filter 2. Put the grease filter back to the bottom plate. ■■ Charcoal filters: Charcoal filters are underside of microwave oven. Finger grip Grease filter and charcoal filter Bottom plate 2. For...
... steps for replacing grease filter: 1. Refer the following steps for replacing charcoal filter: 1. Take out the charcoal filter from the bottom plate before operating the microwave oven. Bottom plate Finger grip Grease filter and charcoal filter 2. Put the grease filter back to the bottom plate. ■■ Charcoal filters: Charcoal filters are underside of microwave oven. Finger grip Grease filter and charcoal filter Bottom plate 2. For...
Owners Manual
Page 7
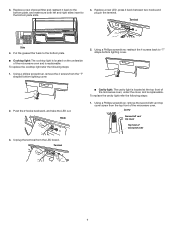
Using a philips screwdriver, remove the 4 screws from the LED board. Put the grease filter back to "T" shape bottom lighting cover. 2. Push the 2 hooks backward, and take the LED out. To replace the cavity light refer the following steps: 1. Using a ... plate. ■■ Cooktop light: The cooktop light is located on the underside of the microwave oven, under the cover, and is replaceable. 3. Replace a new charcoal filter and reattach it back between two hooks and plug in the terminal.
Using a philips screwdriver, remove the 4 screws from the LED board. Put the grease filter back to "T" shape bottom lighting cover. 2. Push the 2 hooks backward, and take the LED out. To replace the cavity light refer the following steps: 1. Using a ... plate. ■■ Cooktop light: The cooktop light is located on the underside of the microwave oven, under the cover, and is replaceable. 3. Replace a new charcoal filter and reattach it back between two hooks and plug in the terminal.

Owners Manual
Page 8
...;■ Affresh® Kitchen Appliance Cleaner ■■ Turntable hub ■■ Affresh® Stainless Steel Cleaner ■■ Grease filter ■■ Affresh® Stainless Steel Wipes ■■ Charcoal filter ■■ Cooktop light bulb ■■ Cavity light bulb 8 Reattach the second top vent cover with the screw removed in...
...;■ Affresh® Kitchen Appliance Cleaner ■■ Turntable hub ■■ Affresh® Stainless Steel Cleaner ■■ Grease filter ■■ Affresh® Stainless Steel Wipes ■■ Charcoal filter ■■ Cooktop light bulb ■■ Cavity light bulb 8 Reattach the second top vent cover with the screw removed in...


