Dimension Guide
Page 1
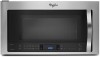
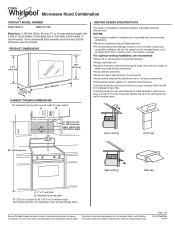
... to open fully. Microwave Hood Combination PRODUCT MODEL NUMBER WMH73521C WMH76719C Electrical: A 120-Volt, 60-Hz, AC-only, 15- or 20-amp electrical supply with product. Grounded 3-prong outlet *30" (76.2 cm) is recommended. A time-delay fuse or time-delay circuit breaker is typical for the damper to change materials and specifications without notice. upper cabinet and side cabinet depth Roof venting Roof cap Wall venting Wall cap A. 2" x 4" wall stud B. For complete details, see Installation...
... to open fully. Microwave Hood Combination PRODUCT MODEL NUMBER WMH73521C WMH76719C Electrical: A 120-Volt, 60-Hz, AC-only, 15- or 20-amp electrical supply with product. Grounded 3-prong outlet *30" (76.2 cm) is recommended. A time-delay fuse or time-delay circuit breaker is typical for the damper to change materials and specifications without notice. upper cabinet and side cabinet depth Roof venting Roof cap Wall venting Wall cap A. 2" x 4" wall stud B. For complete details, see Installation...
Dimension Guide
Page 2
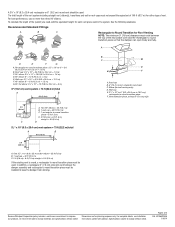
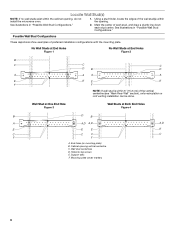
... 1/16/14 A D E F G A. Because Whirlpool Corporation policy includes a continuous commitment to round transition piece F. Vent extensio A. Wall cap E. 3 " x 10" to 6" (8.3 x 25.4 cm to 15.2 cm) rectangular to improve Dimensions are for each vent piece used . Specifications subject to F. Elbow (for wall venting only) D. Vent extension piece, at least 3" (7.6 cm) high 2 ft (0.6 m) C A. Wall cap F E. 3 " x 10" to rectangular to change materials and specifications without notice. Two...
... 1/16/14 A D E F G A. Because Whirlpool Corporation policy includes a continuous commitment to round transition piece F. Vent extensio A. Wall cap E. 3 " x 10" to 6" (8.3 x 25.4 cm to 15.2 cm) rectangular to improve Dimensions are for each vent piece used . Specifications subject to F. Elbow (for wall venting only) D. Vent extension piece, at least 3" (7.6 cm) high 2 ft (0.6 m) C A. Wall cap F E. 3 " x 10" to rectangular to change materials and specifications without notice. Two...

Installation Guide
Page 1
...Parts 2 Remove Cardboard Template 2 Location Requirements 2 Product Dimensions 3 Electrical Requirements 3 INSTALLATION INSTRUCTIONS 4 Remove Mounting Plate 4 Rotate Blower Motor 4 Locate Wall Stud(s 6 Mark Rear Wall 7 Drill Holes in these installation instructions. We have provided many important safety messages in this manual and on your particular model may differ slightly from the illustration in Rear Wall 7 Attach Mounting Plate to Wall 8 Prepare Upper Cabinet 8 Install Damper Assembly 9 Install the Microwave Oven 9 Complete Installation 10 VENTING DESIGN SPECIFICATIONS...
...Parts 2 Remove Cardboard Template 2 Location Requirements 2 Product Dimensions 3 Electrical Requirements 3 INSTALLATION INSTRUCTIONS 4 Remove Mounting Plate 4 Rotate Blower Motor 4 Locate Wall Stud(s 6 Mark Rear Wall 7 Drill Holes in these installation instructions. We have provided many important safety messages in this manual and on your particular model may differ slightly from the illustration in Rear Wall 7 Attach Mounting Plate to Wall 8 Prepare Upper Cabinet 8 Install Damper Assembly 9 Install the Microwave Oven 9 Complete Installation 10 VENTING DESIGN SPECIFICATIONS...

Installation Guide
Page 2
... inside the microwave oven and upper cabinet. ■ Grounded electrical outlet inside the perforation is perforated. Set the cardboard template to the side and refer to exist above the microwave oven so that the vent fits properly, and the damper blade opens freely and fully. For other damages. See User Instructions.) NOTE: Depending on reordering, see "Replacement Parts" section. Special Requirements For Wall Venting Installation Only: ■ Cutout must provide: ■ Minimum installation dimensions...
... inside the microwave oven and upper cabinet. ■ Grounded electrical outlet inside the perforation is perforated. Set the cardboard template to the side and refer to exist above the microwave oven so that the vent fits properly, and the damper blade opens freely and fully. For other damages. See User Instructions.) NOTE: Depending on reordering, see "Replacement Parts" section. Special Requirements For Wall Venting Installation Only: ■ Cutout must provide: ■ Minimum installation dimensions...
Installation Guide
Page 3
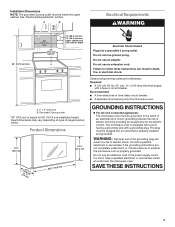
... by providing an escape wire for 66" (167.6 cm) installation height. Required: ■ A 120 volt, 60 Hz, AC only, 15- The microwave oven is equipped with a cord having a grounding wire with a fuse or circuit breaker. upper cabinet and side cabinet depth A. 2" x 4" wall stud B. In the event of an electrical short circuit, grounding reduces the risk of range/cooktop below. SAVE THESE INSTRUCTIONS 3 A B Electrical Requirements WARNING 66" (167...
... by providing an escape wire for 66" (167.6 cm) installation height. Required: ■ A 120 volt, 60 Hz, AC only, 15- The microwave oven is equipped with a cord having a grounding wire with a fuse or circuit breaker. upper cabinet and side cabinet depth A. 2" x 4" wall stud B. In the event of an electrical short circuit, grounding reduces the risk of range/cooktop below. SAVE THESE INSTRUCTIONS 3 A B Electrical Requirements WARNING 66" (167...

Installation Guide
Page 4
... plate and screws together and set for recirculation installation. Wall Venting Installation Only 1. If the mounting plate is being handled. 4. Rotate blower motor 180° so that door does not swing open while the microwave oven is attached to top of microwave oven exterior. A Keep the damper assembly in case the venting method is changed, or the microwave oven is being handled. Remove 2 screws attaching blower motor to the back of the microwave oven. A A. Damper plate 2. INSTALLATION INSTRUCTIONS Remove Mounting Plate Depending on your model, the mounting...
... plate and screws together and set for recirculation installation. Wall Venting Installation Only 1. If the mounting plate is being handled. 4. Rotate blower motor 180° so that door does not swing open while the microwave oven is attached to top of microwave oven exterior. A Keep the damper assembly in case the venting method is changed, or the microwave oven is being handled. Remove 2 screws attaching blower motor to the back of the microwave oven. A A. Damper plate 2. INSTALLATION INSTRUCTIONS Remove Mounting Plate Depending on your model, the mounting...
Installation Guide
Page 6
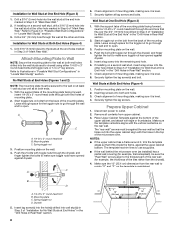
... the mounting plate. Cabinet opening , do not install the microwave oven. 1. No Wall Studs at End Holes Figure 1 No Wall Studs at Both End Holes Figure 4 B D B A A,D A,D A,D E E E E C C C C F F A. Using a stud finder, locate the edges of the wall stud(s) within 6" (15.2 cm) of the vertical centerline (see "Mark Rear Wall" section), only recirculation or roof venting installation can be done. Support tabs F. Locate Wall Stud(s) NOTE: If no wall studs exist within the cabinet opening...
... the mounting plate. Cabinet opening , do not install the microwave oven. 1. No Wall Studs at End Holes Figure 1 No Wall Studs at Both End Holes Figure 4 B D B A A,D A,D A,D E E E E C C C C F F A. Using a stud finder, locate the edges of the wall stud(s) within 6" (15.2 cm) of the vertical centerline (see "Mark Rear Wall" section), only recirculation or roof venting installation can be done. Support tabs F. Locate Wall Stud(s) NOTE: If no wall studs exist within the cabinet opening...

Installation Guide
Page 7
... cabinet, and must be level. ■ The end holes must be 15³⁄₄" (40.0 cm) from the marks made in "Locate Wall Stud(s)" section. Wall Venting Installation Only Upper cabinet bottom ³⁄₈" (1 cm) 4" (10.2 cm) Centerline 6" (15.2 cm) 6" (15.2 cm) 8. Mark Rear Wall The microwave oven must be 14¹⁄₈" (35.9 cm) from the centerline. 5. Remove the cardboard template...
... cabinet, and must be level. ■ The end holes must be 15³⁄₄" (40.0 cm) from the marks made in "Locate Wall Stud(s)" section. Wall Venting Installation Only Upper cabinet bottom ³⁄₈" (1 cm) 4" (10.2 cm) Centerline 6" (15.2 cm) 6" (15.2 cm) 8. Mark Rear Wall The microwave oven must be 14¹⁄₈" (35.9 cm) from the centerline. 5. Remove the cardboard template...
Installation Guide
Page 8
... marked in Step 3 of the microwave oven. Position mounting plate on at least 1 wall stud as well as installed) has a partial wall covering (for example, the thickness of "Installation for Wall Stud at End Holes" in the "Drill Holes in "Locate Wall Stud(s)" section. 3. Securely tighten the lag screws. Remove all lag screws and bolts. The template has trim lines to the wall at both end holes. 3. Drywall...
... marked in Step 3 of the microwave oven. Position mounting plate on at least 1 wall stud as well as installed) has a partial wall covering (for example, the thickness of "Installation for Wall Stud at End Holes" in the "Drill Holes in "Locate Wall Stud(s)" section. 3. Securely tighten the lag screws. Remove all lag screws and bolts. The template has trim lines to the wall at both end holes. 3. Drywall...

Installation Guide
Page 9
... handled. Sheet metal screws 3. Using a keyhole saw, cut out the rectangular area. NOTE: To avoid damage to do not grip or use the door or door handle while the microwave oven is for wall venting only) 1. Install Damper Assembly (for the power supply cord. Rotate microwave oven up toward upper cabinet. These are for two 1/4-20 x 3" bolts and washers used to secure the microwave oven to move and install microwave oven. Mounting plate B. For Roof Venting Installation Only 7. A B C D Install the Microwave Oven WARNING Excessive Weight...
... handled. Sheet metal screws 3. Using a keyhole saw, cut out the rectangular area. NOTE: To avoid damage to do not grip or use the door or door handle while the microwave oven is for wall venting only) 1. Install Damper Assembly (for the power supply cord. Rotate microwave oven up toward upper cabinet. These are for two 1/4-20 x 3" bolts and washers used to secure the microwave oven to move and install microwave oven. Mounting plate B. For Roof Venting Installation Only 7. A B C D Install the Microwave Oven WARNING Excessive Weight...

Installation Guide
Page 10
... the User Instructions for future use an extension cord. A B C D E F A. Damper assembly C. Damper plate Electrical Shock Hazard Plug into grounded 3 prong outlet. 3. Reconnect power. 4. Check the operation of the microwave oven. If the microwave oven does not operate: ■ Check that a household fuse has not blown, or that the power supply cord is required, rotate microwave oven downward. Replace the fuse or reset the circuit breaker. NOTES: ■ Some upper cabinets may warp the top of microwave oven by operating the vent fan. 5. Install filters...
... the User Instructions for future use an extension cord. A B C D E F A. Damper assembly C. Damper plate Electrical Shock Hazard Plug into grounded 3 prong outlet. 3. Reconnect power. 4. Check the operation of the microwave oven. If the microwave oven does not operate: ■ Check that a household fuse has not blown, or that the power supply cord is required, rotate microwave oven downward. Replace the fuse or reset the circuit breaker. NOTES: ■ Some upper cabinets may warp the top of microwave oven by operating the vent fan. 5. Install filters...

Installation Guide
Page 12
... (7.6 m) B. 1 wall cap = 40 ft (12.2 m) C. 2 ft (0.6 m) + 6 ft (1.8 m) straight = 8 ft (2.4 m) 6" (15.2 cm) vent system = 73 ft (22.2 m) total A B 6 ft (1.8 m) 2 ft (0.6 m) C D A. Recommended Vent Length A 3¹⁄₄" x 10" (8.3 x 25.4 cm) rectangular or 6" (15.2 cm) round vent should be found on the model and serial number plate, which is located behind the door. ■ Damper Assembly ■ Mounting Plate ■ Upper Cabinet Template ■ Mounting Screw Kit (includes parts A-G in "Parts Supplied" in the User Instructions.
... (7.6 m) B. 1 wall cap = 40 ft (12.2 m) C. 2 ft (0.6 m) + 6 ft (1.8 m) straight = 8 ft (2.4 m) 6" (15.2 cm) vent system = 73 ft (22.2 m) total A B 6 ft (1.8 m) 2 ft (0.6 m) C D A. Recommended Vent Length A 3¹⁄₄" x 10" (8.3 x 25.4 cm) rectangular or 6" (15.2 cm) round vent should be found on the model and serial number plate, which is located behind the door. ■ Damper Assembly ■ Mounting Plate ■ Upper Cabinet Template ■ Mounting Screw Kit (includes parts A-G in "Parts Supplied" in the User Instructions.

Warranty Information
Page 1
... warranty is effective from warranty coverage. 3. Service calls to correct the installation of your major appliance, to instruct you should ask Whirlpool or your major appliance, to replace or repair house fuses, or to province. Consumable parts are excluded from the date of this major appliance other than the limited warranty that comes with electrical or plumbing codes, or use or when it is used...
... warranty is effective from warranty coverage. 3. Service calls to correct the installation of your major appliance, to instruct you should ask Whirlpool or your major appliance, to replace or repair house fuses, or to province. Consumable parts are excluded from the date of this major appliance other than the limited warranty that comes with electrical or plumbing codes, or use or when it is used...

Use & Care Guide
Page 1
... microwave oven opening, behind the door. All safety messages will need assistance, call us at www.whirlpool.com for purchasing this manual and on your model and serial number located on the front facing of burns, electric shock, fire, injury to persons, or exposure to potential hazards that can happen if the instructions are not followed. for example, closed glass jars are very important. MICROWAVE HOOD COMBINATION...
... microwave oven opening, behind the door. All safety messages will need assistance, call us at www.whirlpool.com for purchasing this manual and on your model and serial number located on the front facing of burns, electric shock, fire, injury to persons, or exposure to potential hazards that can happen if the instructions are not followed. for example, closed glass jars are very important. MICROWAVE HOOD COMBINATION...

Use & Care Guide
Page 2
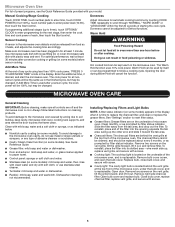
... power cord, or shut off power at the fuse or circuit breaker panel. ■ Use care when cleaning the vent-hood filter. Do not use corrosive chemicals or vapors in use. If materials inside the oven to facilitate cooking. ■ Suitable for use above ranges with the door open since open-door operation can result in the manual. SAVE THESE INSTRUCTIONS PRECAUTIONS TO AVOID POSSIBLE EXPOSURE TO EXCESSIVE MICROWAVE ENERGY (a) Do not attempt to stand in the "Microwave Oven Care...
... power cord, or shut off power at the fuse or circuit breaker panel. ■ Use care when cleaning the vent-hood filter. Do not use corrosive chemicals or vapors in use. If materials inside the oven to facilitate cooking. ■ Suitable for use above ranges with the door open since open-door operation can result in the manual. SAVE THESE INSTRUCTIONS PRECAUTIONS TO AVOID POSSIBLE EXPOSURE TO EXCESSIVE MICROWAVE ENERGY (a) Do not attempt to stand in the "Microwave Oven Care...
Use & Care Guide
Page 3
... installed and grounded. or 20-amp electrical supply with Part 18 of electric shock. WARNING: Improper use an adapter. GROUNDING INSTRUCTIONS ■ For all governing codes and ordinances. If the power supply cord is a 12-hour (12:00-11:59) or 24-hour (0:00-23:59) clock. Repeat to avoid unintended start. Auto Vent Fan (on some models): To keep the microwave oven from the range or cooktop below the microwave oven. Control Lock...
... installed and grounded. or 20-amp electrical supply with Part 18 of electric shock. WARNING: Improper use an adapter. GROUNDING INSTRUCTIONS ■ For all governing codes and ordinances. If the power supply cord is a 12-hour (12:00-11:59) or 24-hour (0:00-23:59) clock. Repeat to avoid unintended start. Auto Vent Fan (on some models): To keep the microwave oven from the range or cooktop below the microwave oven. Control Lock...
Use & Care Guide
Page 4
... to set speed. Filter Alert Reset the filter status after 2-level cooking. Energy Save To conserve energy, the Clock will light up in the microwave oven. 4 Key beep tones may be turned off when the microwave oven goes into standby mode. Scroll Speed Scroll speed of -function signals) may be changed. Touch OPTIONS/CLOCK to activate. The DEMO icon will automatically turn off or on some models) Language of the display text...
... to set speed. Filter Alert Reset the filter status after 2-level cooking. Energy Save To conserve energy, the Clock will light up in the microwave oven. 4 Key beep tones may be turned off when the microwave oven goes into standby mode. Scroll Speed Scroll speed of -function signals) may be changed. Touch OPTIONS/CLOCK to activate. The DEMO icon will automatically turn off or on some models) Language of the display text...
Use & Care Guide
Page 5
... (on some models). wire mesh side up to three), touch OPTIONS/ CLOCK to replace the charcoal filter, and clean or replace the grease filters. Remove two screws on the underside of microwave oven. Manual Cooking/Stage Cooking Doneness Touch COOK TIME, touch number pads to enter time, touch COOK POWER (if not 100%), touch number pads to soil buildup, keep cavity, microwave inlet cover, cooking rack supports, and area where the door touches the frame clean. Sensor Cooking Adjust doneness for all controls are on the vent grille, tilt the grille forward, and...
... (on some models). wire mesh side up to three), touch OPTIONS/ CLOCK to replace the charcoal filter, and clean or replace the grease filters. Remove two screws on the underside of microwave oven. Manual Cooking/Stage Cooking Doneness Touch COOK TIME, touch number pads to enter time, touch COOK POWER (if not 100%), touch number pads to soil buildup, keep cavity, microwave inlet cover, cooking rack supports, and area where the door touches the frame clean. Sensor Cooking Adjust doneness for all controls are on the vent grille, tilt the grille forward, and...
Use & Care Guide
Page 6
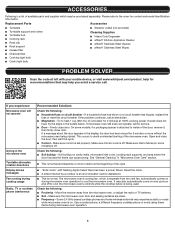
... sure Control Lock is off to heat 1 cup (250 mL) of the microwave oven. Make sure the microwave oven door and sealing surfaces are clean. ■ Frequency - Make sure Demo Mode (on and off . Please refer to cool the microwave oven. Replacement Parts Accessories ■ Turntable ■ Turntable support and rollers ■ Turntable hub ■ Cooking rack ■ Rack clip ■ Rack support ■ Grease filter ■ Charcoal filter ■ Cooktop light bulb ■ Cavity light bulb ■ Steamer vessel (not provided) Cleaning Supplies...
... sure Control Lock is off to heat 1 cup (250 mL) of the microwave oven. Make sure the microwave oven door and sealing surfaces are clean. ■ Frequency - Make sure Demo Mode (on and off . Please refer to cool the microwave oven. Replacement Parts Accessories ■ Turntable ■ Turntable support and rollers ■ Turntable hub ■ Cooking rack ■ Rack clip ■ Rack support ■ Grease filter ■ Charcoal filter ■ Cooktop light bulb ■ Cavity light bulb ■ Steamer vessel (not provided) Cleaning Supplies...

Use & Care Guide
Page 7
... servicing, removal or replacement of the product. Removal or replacement of trim, decorative panels, flooring, cabinetry, islands, countertops, drywall or other built-in fixtures that existed when this warranty. 8. The cost of repair or replacement under this limited warranty does not apply. Repairs when your major appliance, unless such damage results from the date of purchase. 6. DISCLAIMER OF REPRESENTATIONS OUTSIDE OF WARRANTY Whirlpool makes no representations about buying...
... servicing, removal or replacement of the product. Removal or replacement of trim, decorative panels, flooring, cabinetry, islands, countertops, drywall or other built-in fixtures that existed when this warranty. 8. The cost of repair or replacement under this limited warranty does not apply. Repairs when your major appliance, unless such damage results from the date of purchase. 6. DISCLAIMER OF REPRESENTATIONS OUTSIDE OF WARRANTY Whirlpool makes no representations about buying...


