
Installation Instructions
Page 2
...9632;■ 3/4" (1.9 cm) hole saw ■■ Caulking gun and weatherproof caulking compound ■■ Duct tape Parts Needed For information on model, charcoal filters may be sure to back of microwave oven) E. 1/4" x 2" lag screws (2) ■■ Cardboard template... (part of wall structures, be combined. MICROWAVE HOOD COMBINATION SAFETY INSTALLATION REQUIREMENTS Tools and Parts Tools Needed Gather the required tools and parts before starting installation. Washers (2) D. 3/16" toggle nuts (2) ■...
...9632;■ 3/4" (1.9 cm) hole saw ■■ Caulking gun and weatherproof caulking compound ■■ Duct tape Parts Needed For information on model, charcoal filters may be sure to back of microwave oven) E. 1/4" x 2" lag screws (2) ■■ Cardboard template... (part of wall structures, be combined. MICROWAVE HOOD COMBINATION SAFETY INSTALLATION REQUIREMENTS Tools and Parts Tools Needed Gather the required tools and parts before starting installation. Washers (2) D. 3/16" toggle nuts (2) ■...

Installation Instructions
Page 3
...is at least 3 inches of the microwave oven packaging is for 66" (167.6 cm) installation height. Remove Cardboard Template The cardboard piece from Whirlpool. 12" DEEPER 14" 14" DEEPER 15" I bar mounting plate fr om the wall. If installing the microwave near a left sidewall, ...and upper cabinet. ■■ Grounded electrical outlet inside the perforation is perforated. See the "Electrical Requirements" section. The bump out mounting kit (part # W11185746) is at least 6" (15.2 cm) of product will vary slightly depending on door design. 3 Cut along the perforation to it...
...is at least 3 inches of the microwave oven packaging is for 66" (167.6 cm) installation height. Remove Cardboard Template The cardboard piece from Whirlpool. 12" DEEPER 14" 14" DEEPER 15" I bar mounting plate fr om the wall. If installing the microwave near a left sidewall, ...and upper cabinet. ■■ Grounded electrical outlet inside the perforation is perforated. See the "Electrical Requirements" section. The bump out mounting kit (part # W11185746) is at least 6" (15.2 cm) of product will vary slightly depending on door design. 3 Cut along the perforation to it...
Installation Instructions
Page 10
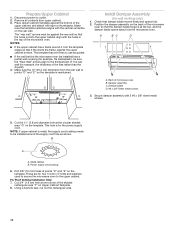
... cabinet. 3. Check that the damper blade hinge is metal, the supply cord bushing needs to be sure the "Rear Wall" arrows align to the thickest part of t he rear wall (for example, the thickness of the shaded rectangular area "F" on Upper Cabinet Template. 8. Back of the microwave oven. Cut the 11...
... cabinet. 3. Check that the damper blade hinge is metal, the supply cord bushing needs to be sure the "Rear Wall" arrows align to the thickest part of t he rear wall (for example, the thickness of the shaded rectangular area "F" on Upper Cabinet Template. 8. Back of the microwave oven. Cut the 11...

Installation Instructions
Page 14
...; Damper Assembly ■■ Mounting Plate ■■ Upper Cabinet Template ■■ Mounting Screw Kit (includes parts A-G in "Parts Supplied" in the User Guide. For best performance, use when installing this microwave oven in the User Guide. You ... oven. ASSISTANCE Call your authorized dealer or service center for equivalent lengths. The filler panels come in the system. The total length of available replacement parts. One 31⁄4" x 10" (8.3 x 25.4 cm) 90° elbow = 25 ft (7.6 m) B. 1 wall cap = 40 ft (12.2 m) C. 2 ft (0.6 m) + 6 ft (1.8 m) ...
...; Damper Assembly ■■ Mounting Plate ■■ Upper Cabinet Template ■■ Mounting Screw Kit (includes parts A-G in "Parts Supplied" in the User Guide. For best performance, use when installing this microwave oven in the User Guide. You ... oven. ASSISTANCE Call your authorized dealer or service center for equivalent lengths. The filler panels come in the system. The total length of available replacement parts. One 31⁄4" x 10" (8.3 x 25.4 cm) 90° elbow = 25 ft (7.6 m) B. 1 wall cap = 40 ft (12.2 m) C. 2 ft (0.6 m) + 6 ft (1.8 m) ...


