
Installation Instructions
Page 3
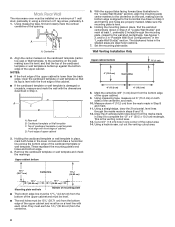
...;■ Cutout must be free of any obstructions so that the door can be purchased from Whirlpool. 12" DEEPER 14" 14" DEEPER 15" I bar mounting plate fr om the wall. Exact dimensions may vary depending on door design. 3 The bump out mounting kit (part # W11185746) ... Requirements" section. Check with your model, skip "Remove Cardboard Template" steps if full carton box is at least 3 inches of installation. See the "Installation Dimensions" illustration. ■■ Minimum one 2" x 4" (5.1 x 10.2 cm) wood wall stud and minimum 3/8" (1 cm) thickness drywall or plaster/lath ...
...;■ Cutout must be free of any obstructions so that the door can be purchased from Whirlpool. 12" DEEPER 14" 14" DEEPER 15" I bar mounting plate fr om the wall. Exact dimensions may vary depending on door design. 3 The bump out mounting kit (part # W11185746) ... Requirements" section. Check with your model, skip "Remove Cardboard Template" steps if full carton box is at least 3 inches of installation. See the "Installation Dimensions" illustration. ■■ Minimum one 2" x 4" (5.1 x 10.2 cm) wood wall stud and minimum 3/8" (1 cm) thickness drywall or plaster/lath ...
Installation Instructions
Page 8
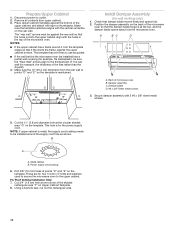
... upper cabinet. Rear wall B. D. These represent the mounting plate's end holes and bottom edge. 4. Top of cardboard template or wall template must align with the dimensions described in Step 4. Remove the cardboard template or wall template and check the markings: Upper cabinet bottom 5. Draw the 2 vertical plumb lines down from the...
... upper cabinet. Rear wall B. D. These represent the mounting plate's end holes and bottom edge. 4. Top of cardboard template or wall template must align with the dimensions described in Step 4. Remove the cardboard template or wall template and check the markings: Upper cabinet bottom 5. Draw the 2 vertical plumb lines down from the...
Installation Instructions
Page 10
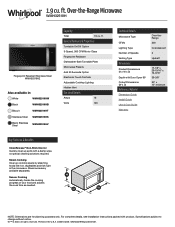
... cord bushing 6. For Roof Venting Installation Only: 7. The template has trim lines to points "D" and "E" on the rear wall. Make sure the 10" (25.4 cm) dimension from upper cabinet. 3. Position the damper assembly on Upper Cabinet Template. 8. B A A. Make sure the template centerline aligns with 2 #6 x 3/8" sheet metal screws. 5. Install Damper Assembly (for...
... cord bushing 6. For Roof Venting Installation Only: 7. The template has trim lines to points "D" and "E" on the rear wall. Make sure the 10" (25.4 cm) dimension from upper cabinet. 3. Position the damper assembly on Upper Cabinet Template. 8. B A A. Make sure the template centerline aligns with 2 #6 x 3/8" sheet metal screws. 5. Install Damper Assembly (for...
Specification Sheet
Page 1
...special cleaning solutions required. D200104XXE. ft. All rights reserved. WMH32519HSpecSheetV01. Over-the-Range Microwave WMH32519H Fingerprint Resistant Stainless Steel WMH32519HZ Also available in the U.S.A. General Features & Properties Turntable On/Off Option 3-Speed, 300 CFM Motor Class Fingerprint Resistant... Technical Details Microwave Type CFMs Lighting Type Number of your food and adjusts the cook time as needed. NOTE: Dimensions are for planning purposes only. Steam accessory available separately. Specifications subject to change without notice. ®/™ &#...
...special cleaning solutions required. D200104XXE. ft. All rights reserved. WMH32519HSpecSheetV01. Over-the-Range Microwave WMH32519H Fingerprint Resistant Stainless Steel WMH32519HZ Also available in the U.S.A. General Features & Properties Turntable On/Off Option 3-Speed, 300 CFM Motor Class Fingerprint Resistant... Technical Details Microwave Type CFMs Lighting Type Number of your food and adjusts the cook time as needed. NOTE: Dimensions are for planning purposes only. Steam accessory available separately. Specifications subject to change without notice. ®/™ &#...


