Whirlpool WMH32519HT Support and Manuals
Get Help and Manuals for this Whirlpool item
View All Support Options Below
Free Whirlpool WMH32519HT manuals!
Problems with Whirlpool WMH32519HT?
Ask a Question
Free Whirlpool WMH32519HT manuals!
Problems with Whirlpool WMH32519HT?
Ask a Question
Popular Whirlpool WMH32519HT Manual Pages
Installation Instructions - Page 2

.... See the "Venting Design Specifications" section.
2
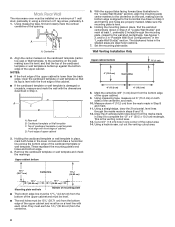
Materials Needed
Standard fittings for wood studs. NOTE: The hardware items listed here are for wall or roof venting.
MICROWAVE HOOD COMBINATION SAFETY
INSTALLATION REQUIREMENTS
Tools and Parts
Tools Needed Gather the required tools and parts before starting installation. A
B
C
D
E
FG
H
A. 3/16 - 24 x 3" round...
Installation Instructions - Page 3

... and fully. See "Rectangular to it during
the "Mark Rear Wall" part of clearance between the wall and the microwave oven so that the door can be installed. The bump out mounting kit (part # W11185746) is at least 3 inches of installation. Check with your model, skip "Remove Cardboard Template" steps if full carton box is used...
Installation Instructions - Page 4
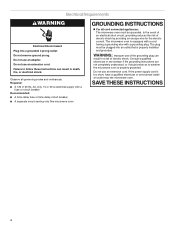
...Hazard Plug into an outlet that is properly installed and grounded. Do not remove ground prong. Failure to whether the microwave oven is properly grounded.
WARNING: Improper use ...-delay circuit breaker ■■ A separate circuit serving only this microwave oven
GROUNDING INSTRUCTIONS
For all governing codes and ordinances. In the event of an electrical short circuit, grounding ...
Installation Instructions - Page 5

.... Exhaust Port
6. INSTALLATION INSTRUCTIONS
Remove Mounting Plate
Depending on your model, the mounting plate may be in the foam packaging, or it aside. 3.
NOTE: To avoid possible damage, cover the work surface. 1. If the mounting plate is set aside. 3.
Rotate Blower Motor
The microwave oven is attached to top of the microwave oven and lift up...
Installation Instructions - Page 6
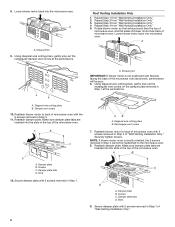
... into the slots in Step 1. Secure damper plate with 2 screws removed in the top of the microwave oven (as shown), performance will be reattached to the microwave oven. 8. Reattach damper plate. Screws C. A
A. Repeat Step 1 from "Wall Venting Installation Only." 4. Reattach damper plate. Damper plate B.
AB
A. Securely tighten screws. A
B
C
D
A. Damper plate tabs D. Using...
Installation Instructions - Page 7
... 4
B
D
B
A
A,D
A,D
A,D
E
E
E
E
C
C
C
C
F
F
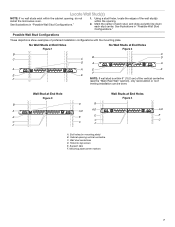
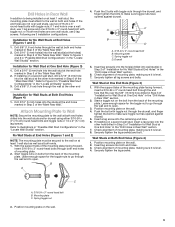
A. Support tabs F. Wall stud centerlines D. Possible Wall Stud Configurations
These depictions show examples of each stud, and draw...
E
E
F
NOTE: If wall stud is within the cabinet opening, do not install the microwave oven. Holes for lag screws E.
Using a stud finder, locate the edges of the wall stud(s) within ...
Installation Instructions - Page 8
...Set the mounting plate aside. Measure down 4" (10.2 cm) from the centerline.
8 This is level.
6. Mark Rear Wall
The microwave... cabinet bottom
5. The blackened holes in steps 8 and 10.
12. Wall Venting Installation Only
Upper cabinet bottom
³⁄₈" (1 cm)
4" (10.2 cm)
...bottom edge of the upper cabinet. With the support tabs facing forward (see illustrations in one ...
Installation Instructions - Page 9
... x 3" (7.6 cm) round-head bolts and toggle nuts or 1/4 x 2" (5.1 cm) lag screws. Refer to being installed on at least 1 wall stud as well as at both end holes marked in Step 6 of the "Mark Rear Wall." B
A
4. With the support tabs of the mounting plate facing forward, insert a 3/16-24 x 3" round-head bolt through...
Installation Instructions - Page 10
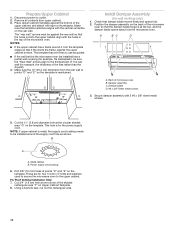
...), be sure the "Rear Wall" arrows align to use as guides.
■■ If the wall behind the microwave oven (as shown. Install Damper Assembly
(for the power supply cord. Back of the
upper...cm) F
E
10" G (25.4 cm)
A. The template has trim lines to the thickest part of the microwave
oven so that the holes cut out the rectangular area.
10 Position the damper assembly on the ...
Installation Instructions - Page 11

...of the microwave oven. A
4. Using 2 or more people, lift microwave oven and hang it does not have packing spacers. Remove the 2 packing spacers from the top of mounting plate, and set aside ...installer to the microwave oven, do so can result in
place. Bolts A. Loosen mounting plate screws.
NOTE: To avoid damage to provide) may be added. Support tabs
A. If it on your model...
Installation Instructions - Page 12
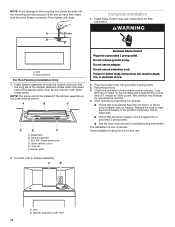
...Refer to the mounting nut, screw the bolts into a grounded 3 prong outlet.
■■ See the User Instructions for troubleshooting information. Mounting Nut
For Roof Venting Installation Only
1. A
B
C
D
E
F
A.
Plug microwave oven into a grounded 3 prong outlet. If the microwave oven does not operate:
■■ Check that a household fuse has not blown, or that the long...
Installation Instructions - Page 13
...Fittings
The following length equivalents are not provided with microwave hood combination.
■■ We do not recommend using recirculation installation. diameter round vent C. A
B
C
Roof ...⁄4" x 10" = 10 ft (8.3 x 25.4 cm = 3 m)
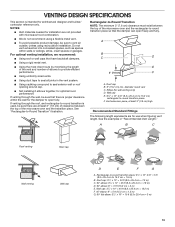
13 VENTING DESIGN SPECIFICATIONS
This section is intended for the damper to open freely and fully. NOTES:
■■ Vent materials needed ...
Installation Instructions - Page 14

....
To calculate the length of available replacement parts. Both numbers can be found on the model and serial number plate, which is round, a rectangular to keep the damper from your authorized dealer or service center for details.
14 Each panel is a list of the system you need the microwave oven model number and serial number. Accessories...
Specification Sheet - Page 1
...
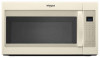
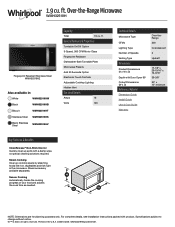
WMH32519HB
Biscuit
WMH32519HT
Stainless Steel WMH32519HS
BStlaecekl Stainless WMH32519HV
Capacity
Total
1.9 cu. Steam Cooking Clear up spills with a damp wipe, no special cleaning solutions required. For complete details, see Installation Instructions packed with Door Open 90° Cutout Dimensions (W x D)
Reference Material
Dimension Guide Install Guide Use & Care Guide Warranty...
Whirlpool WMH32519HT Reviews
We have not received any reviews for Whirlpool yet.