Use & Care Guide
Page 1
...You can be grounded. IMPORTANT SAFETY INSTRUCTIONS When using the microwave oven. See "GROUNDING INSTRUCTIONS" found in accordance with the provided Installation Instructions. Always read and obey all instructions before using electrical appliances basic safety precautions should not be killed or seriously injured if... grounded outlet. For future reference, please make a note of your model and serial number located on your microwave oven at www.whirlpool.com. These words mean: DANGER You can be heated in the shell and sealed containers - I Some products such as whole ...
...You can be grounded. IMPORTANT SAFETY INSTRUCTIONS When using the microwave oven. See "GROUNDING INSTRUCTIONS" found in accordance with the provided Installation Instructions. Always read and obey all instructions before using electrical appliances basic safety precautions should not be killed or seriously injured if... grounded outlet. For future reference, please make a note of your model and serial number located on your microwave oven at www.whirlpool.com. These words mean: DANGER You can be heated in the shell and sealed containers - I Some products such as whole ...
Use & Care Guide
Page 3
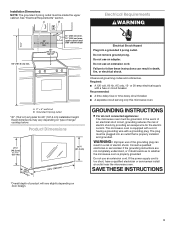
... follow the prompts to cancel Light Timer. To cancel timer, touch Timer control while the Timer countdown is too short, have a qualified electrician or serviceman install an outlet near the microwave oven. Auto Vent Fan (on some models): To keep the microwave oven from overheating, the auto vent fan will automatically... a grounded 3 prong outlet. Touch OPTIONS/CLOCK to avoid unintended start. Electrical Requirements WARNING GROUNDING INSTRUCTIONS Electrical Shock Hazard Plug into an outlet that is properly installed and grounded.
... follow the prompts to cancel Light Timer. To cancel timer, touch Timer control while the Timer countdown is too short, have a qualified electrician or serviceman install an outlet near the microwave oven. Auto Vent Fan (on some models): To keep the microwave oven from overheating, the auto vent fan will automatically... a grounded 3 prong outlet. Touch OPTIONS/CLOCK to avoid unintended start. Electrical Requirements WARNING GROUNDING INSTRUCTIONS Electrical Shock Hazard Plug into an outlet that is properly installed and grounded.
Use & Care Guide
Page 5
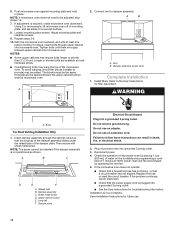
... your model. Enter the additional time, if desired, and start the microwave oven. To avoid damage to the microwave oven caused by Filter Status indicator. Installing/Replacing Filters and Light Bulbs NOTE: A Filter Status indicator (on the underside of the microwave oven. Remove 2 screws on some models): mild soap and water...
... your model. Enter the additional time, if desired, and start the microwave oven. To avoid damage to the microwave oven caused by Filter Status indicator. Installing/Replacing Filters and Light Bulbs NOTE: A Filter Status indicator (on the underside of the microwave oven. Remove 2 screws on some models): mild soap and water...

Use & Care Guide
Page 7
... PROVIDED HEREIN. labor to chemicals. workmanship that comes with servicing, removal or replacement of original purchase date is installed, installation instructions. Service must be addressed without service. This limited warranty is used in the country in 12. the United...limited warranty that existed when this major appliance, you . Service to correct improper product maintenance or installation, installation not in fixtures (i.e. Consumable parts (i.e. WHIRLPOOL® MAJOR APPLIANCE LIMITED WARRANTY ATTACH YOUR RECEIPT HERE. PROOF OF PURCHASE IS REQUIRED TO OBTAIN ...
... PROVIDED HEREIN. labor to chemicals. workmanship that comes with servicing, removal or replacement of original purchase date is installed, installation instructions. Service must be addressed without service. This limited warranty is used in the country in 12. the United...limited warranty that existed when this major appliance, you . Service to correct improper product maintenance or installation, installation not in fixtures (i.e. Consumable parts (i.e. WHIRLPOOL® MAJOR APPLIANCE LIMITED WARRANTY ATTACH YOUR RECEIPT HERE. PROOF OF PURCHASE IS REQUIRED TO OBTAIN ...
Warranty Information
Page 1
... rights that vary from state to state or province to correct improper product maintenance or installation, installation not in materials and workmanship and is installed, installation instructions. Food or medicine loss due to chemicals. This product is provided exclusively by...limitations and exclusions may have other than the limited warranty that comes with the product, Whirlpool Corporation or Whirlpool Canada LP (hereafter "Whirlpool") will be borne by a Whirlpool designated service company. 11. trim, decorative panels, flooring, cabinetry, islands, countertops, ...
... rights that vary from state to state or province to correct improper product maintenance or installation, installation not in materials and workmanship and is installed, installation instructions. Food or medicine loss due to chemicals. This product is provided exclusively by...limitations and exclusions may have other than the limited warranty that comes with the product, Whirlpool Corporation or Whirlpool Canada LP (hereafter "Whirlpool") will be borne by a Whirlpool designated service company. 11. trim, decorative panels, flooring, cabinetry, islands, countertops, ...
Installation Guide
Page 1
... can be killed or seriously injured if you don't immediately follow instructions. This is the safety alert symbol. See "Installation Requirements" section for use above electric or gas cooking products up to potential hazards that can happen if the instructions are... messages will tell you what can kill or hurt you how to Wall 8 Prepare Upper Cabinet 8 Install Damper Assembly 9 Install the Microwave Oven 9 Complete Installation 10 VENTING DESIGN SPECIFICATIONS 11 ASSISTANCE 12 Replacement Parts 12 Accessories 12 MICROWAVE HOOD COMBINATION SAFETY Your safety ...
... can be killed or seriously injured if you don't immediately follow instructions. This is the safety alert symbol. See "Installation Requirements" section for use above electric or gas cooking products up to potential hazards that can happen if the instructions are... messages will tell you what can kill or hurt you how to Wall 8 Prepare Upper Cabinet 8 Install Damper Assembly 9 Install the Microwave Oven 9 Complete Installation 10 VENTING DESIGN SPECIFICATIONS 11 ASSISTANCE 12 Replacement Parts 12 Accessories 12 MICROWAVE HOOD COMBINATION SAFETY Your safety ...
Installation Guide
Page 2
... a rectangular to round transition piece, the 3" (7.6 cm) clearance needs to exist above the microwave oven so that the materials used will be combined. See "Installation Dimensions" illustration. ■■ Minimum one 2" x 4" (50.8 x 101.6 mm) wood wall stud and minimum C\," (10 mm) thickness drywall or... plaster/lath within cabinet opening where the microwave oven will not discolor, delaminate or sustain other types of installation. See "Rectangular to it during the "Mark Rear Wall" part of wall structures, be sure to make sure there is for ...
... a rectangular to round transition piece, the 3" (7.6 cm) clearance needs to exist above the microwave oven so that the materials used will be combined. See "Installation Dimensions" illustration. ■■ Minimum one 2" x 4" (50.8 x 101.6 mm) wood wall stud and minimum C\," (10 mm) thickness drywall or... plaster/lath within cabinet opening where the microwave oven will not discolor, delaminate or sustain other types of installation. See "Rectangular to it during the "Mark Rear Wall" part of wall structures, be sure to make sure there is for ...
Installation Guide
Page 3
... grounding wire with a fuse or circuit breaker. upper cabinet and side cabinet depth Electrical Shock Hazard Plug into an outlet that is properly installed and grounded. Recommended: ■■ A time-delay fuse or time-delay circuit breaker. ■■ A separate circuit serving only ... for the electric current. A. 2" x 4" wall stud B. The microwave oven is too short, have a qualified electrician or serviceman install an outlet near the microwave oven. or 20-amp electrical supply with a grounding plug. Consult a qualified electrician or serviceman if the grounding...
... grounding wire with a fuse or circuit breaker. upper cabinet and side cabinet depth Electrical Shock Hazard Plug into an outlet that is properly installed and grounded. Recommended: ■■ A time-delay fuse or time-delay circuit breaker. ■■ A separate circuit serving only ... for the electric current. A. 2" x 4" wall stud B. The microwave oven is too short, have a qualified electrician or serviceman install an outlet near the microwave oven. or 20-amp electrical supply with a grounding plug. Consult a qualified electrician or serviceman if the grounding...
Installation Guide
Page 4
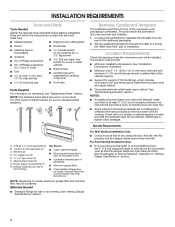
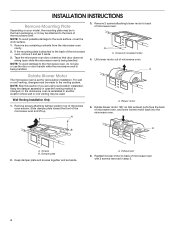
...that exhaust ports face the back of microwave oven exterior. A A. NOTE: Skip this section if you are using recirculation installation. Blower motor 5. Damper plate 2. A. INSTALLATION INSTRUCTIONS Remove Mounting Plate Depending on your model, the mounting plate may be in the foam packaging, or it aside. ... Blower Motor The microwave oven is reinstalled in case the venting method is changed, or the microwave oven is set for recirculation installation. Keep the damper assembly in another location where wall or roof venting may be made to top of microwave oven, and lower...
...that exhaust ports face the back of microwave oven exterior. A A. NOTE: Skip this section if you are using recirculation installation. Blower motor 5. Damper plate 2. A. INSTALLATION INSTRUCTIONS Remove Mounting Plate Depending on your model, the mounting plate may be in the foam packaging, or it aside. ... Blower Motor The microwave oven is reinstalled in case the venting method is changed, or the microwave oven is set for recirculation installation. Keep the damper assembly in another location where wall or roof venting may be made to top of microwave oven, and lower...
Installation Guide
Page 5
... A. Slots 8. A. Securely tighten screws. Reattach damper plate. Damper plate tabs D. Repeat Step 1 from "Wall Venting Installation Only." 4. Repeat Step 3 from "Wall Venting Installation Only." 2. Exhaust port IMPORTANT: If blower motor is not correctly oriented, the 2 screws removed in Step 1. Reattach ...blower motor to the microwave oven. 7. Repeat Step 2 from "Wall Venting Installation Only." 5. Damper plate tabs D. Reattach damper plate. Make sure damper plate tabs are inserted into microwave oven. Rotate...
... A. Slots 8. A. Securely tighten screws. Reattach damper plate. Damper plate tabs D. Repeat Step 1 from "Wall Venting Installation Only." 4. Repeat Step 3 from "Wall Venting Installation Only." 2. Exhaust port IMPORTANT: If blower motor is not correctly oriented, the 2 screws removed in Step 1. Reattach ...blower motor to the microwave oven. 7. Repeat Step 2 from "Wall Venting Installation Only." 5. Damper plate tabs D. Reattach damper plate. Make sure damper plate tabs are inserted into microwave oven. Rotate...
Installation Guide
Page 6
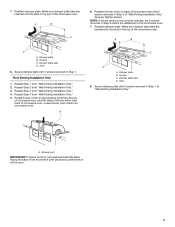
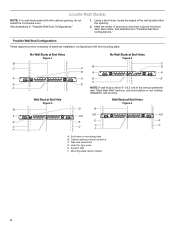
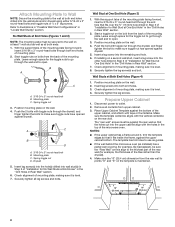
....2 cm) of each stud, and draw a plumb line down each stud center. Using a stud finder, locate the edges of preferred installation configurations with the mounting plate. Possible Wall Stud Configurations These depictions show examples of the wall stud(s) within the opening. 2. Mounting plate center...Mark the center of the vertical centerline (see "Mark Rear Wall" section), only recirculation or roof venting installation can be done. No Wall Studs at End Holes Figure 1 No Wall Studs at End Holes Figure 4 B D B A A,D A,D A,D E E E E C C C F C F A. Holes for lag ...
....2 cm) of each stud, and draw a plumb line down each stud center. Using a stud finder, locate the edges of preferred installation configurations with the mounting plate. Possible Wall Stud Configurations These depictions show examples of the wall stud(s) within the opening. 2. Mounting plate center...Mark the center of the vertical centerline (see "Mark Rear Wall" section), only recirculation or roof venting installation can be done. No Wall Studs at End Holes Figure 1 No Wall Studs at End Holes Figure 4 B D B A A,D A,D A,D E E E E C C C F C F A. Holes for lag ...
Installation Guide
Page 7
... (19 mm) hole in one 3/16-24 x 3" round-head bolt with the dimensions described in steps 8 and 10. 12. Wall Venting Installation Only Upper cabinet bottom ³⁄₈" (1 cm) A. Top of the upper cabinet. Mark the centerline C\," (1 cm) down from the bottom... "Mark Rear Wall." 2. This is level. 4" (10.2 cm) Centerline 6" (15.2 cm) 6" (15.2 cm) 8. If the end holes are 3 installation configurations. if 1 end hole is damaged or unusable, measure and mark the wall with toggle nut; D. Using a straightedge, draw the 2 horizontal, level lines through...
... (19 mm) hole in one 3/16-24 x 3" round-head bolt with the dimensions described in steps 8 and 10. 12. Wall Venting Installation Only Upper cabinet bottom ³⁄₈" (1 cm) A. Top of the upper cabinet. Mark the centerline C\," (1 cm) down from the bottom... "Mark Rear Wall." 2. This is level. 4" (10.2 cm) Centerline 6" (15.2 cm) 6" (15.2 cm) 8. If the end holes are 3 installation configurations. if 1 end hole is damaged or unusable, measure and mark the wall with toggle nut; D. Using a straightedge, draw the 2 horizontal, level lines through...
Installation Guide
Page 8
... section. Prepare Upper Cabinet 1. Make sure the template centerline aligns with tape or thumbtacks. Make sure the 10" (25.4 cm) dimension from the back of "Installation for the toggle nut to go through the wall and to open . 3. Upper-cabinet template D 10" (25.4 cm) F E 10" G (25.4 cm...Mounting plate C. Spring toggle nut 3. Securely tighten all contents from the back of the tiles rather than the drywall). 4. Check alignment of "Installation for the toggle nuts to go through both end holes. 3. Leave enough space for Wall Stud at One End Hole" in the "Drill Holes...
... section. Prepare Upper Cabinet 1. Make sure the template centerline aligns with tape or thumbtacks. Make sure the 10" (25.4 cm) dimension from the back of "Installation for the toggle nut to go through the wall and to open . 3. Upper-cabinet template D 10" (25.4 cm) F E 10" G (25.4 cm...Mounting plate C. Spring toggle nut 3. Securely tighten all contents from the back of the tiles rather than the drywall). 4. Check alignment of "Installation for the toggle nuts to go through both end holes. 3. Leave enough space for Wall Stud at One End Hole" in the "Drill Holes...
Installation Guide
Page 9
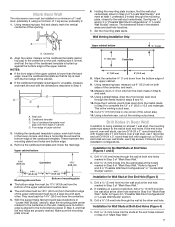
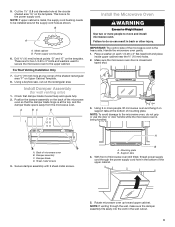
...metal screws 3. Mounting plate B. This hole is metal, the supply cord bushing needs to be installed around the supply cord hole as shown. These are for wall venting only) 1. For Roof Venting Installation Only 7. IMPORTANT: The control side of the microwave oven is at one corner of the upper ...mm) hole at the top, and the damper blade opens away from the microwave oven. Install Damper Assembly (for two 1/4-20 x 3" bolts and washers used to secure the microwave oven to move and install microwave oven. Back of the microwave oven so that damper blade moves freely and opens ...
...metal screws 3. Mounting plate B. This hole is metal, the supply cord bushing needs to be installed around the supply cord hole as shown. These are for wall venting only) 1. For Roof Venting Installation Only 7. IMPORTANT: The control side of the microwave oven is at one corner of the upper ...mm) hole at the top, and the damper blade opens away from the microwave oven. Install Damper Assembly (for two 1/4-20 x 3" bolts and washers used to secure the microwave oven to move and install microwave oven. Back of the microwave oven so that damper blade moves freely and opens ...
Installation Guide
Page 10
...10 A B C D E F A. With the microwave oven centered, and with sheet metal screw. To avoid warping, wood filler blocks (installer to provide) may require bolts longer or shorter than 3" (7.6 cm). A 2. Check the operation of microwave oven by operating the vent fan...Some upper cabinets may be adjusted, skip steps 7-9. 7. Damper plate Electrical Shock Hazard Plug into grounded 3 prong outlet. 3. Save Installation Instructions for troubleshooting information. WARNING A. Raised tabs B. If the problem continues, call an electrician. ■■ Check that the...
...10 A B C D E F A. With the microwave oven centered, and with sheet metal screw. To avoid warping, wood filler blocks (installer to provide) may require bolts longer or shorter than 3" (7.6 cm). A 2. Check the operation of microwave oven by operating the vent fan...Some upper cabinets may be adjusted, skip steps 7-9. 7. Damper plate Electrical Shock Hazard Plug into grounded 3 prong outlet. 3. Save Installation Instructions for troubleshooting information. WARNING A. Raised tabs B. If the problem continues, call an electrician. ■■ Check that the...
Installation Guide
Page 11
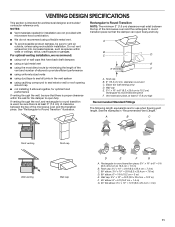
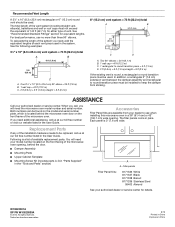
... Rectangular to round transition piece: 3¹⁄₄" x 10" to 6" = 5 ft (8.3 x 25.4 cm to vent air outside, unless using recirculation installation. See the examples in the vent system ■■ using a flexible metal vent. ■■ To avoid possible product damage, be sure to 15.2 ...9632;■ We do not recommend using caulking compound to seal exterior wall or roof opening around cap ■■ not installing 2 elbows together, for installation are for the damper to round transition piece F. Roof cap B. 6" (15.2 cm) min. If venting through the ...
... Rectangular to round transition piece: 3¹⁄₄" x 10" to 6" = 5 ft (8.3 x 25.4 cm to vent air outside, unless using recirculation installation. See the examples in the vent system ■■ using a flexible metal vent. ■■ To avoid possible product damage, be sure to 15.2 ...9632;■ We do not recommend using caulking compound to seal exterior wall or roof opening around cap ■■ not installing 2 elbows together, for installation are for the damper to round transition piece F. Roof cap B. 6" (15.2 cm) min. If venting through the ...
Installation Guide
Page 12
... (7.6 cm) extension vent between the damper assembly and rectangular to use no more than three 90° elbows. Both numbers can be installed to keep the damper from your authorized dealer or service center for equivalent lengths. Todos los derechos reservados. 8/15 Printed in the User ... Cabinet Template ■■ Mounting Screw Kit (includes parts A-G in "Parts Supplied" in the system. Replacement Parts If any of the installation hardware needs to round transition piece must not exceed the equivalent of 140 ft (42.7 m) for either type of the microwave oven opening...
... (7.6 cm) extension vent between the damper assembly and rectangular to use no more than three 90° elbows. Both numbers can be installed to keep the damper from your authorized dealer or service center for equivalent lengths. Todos los derechos reservados. 8/15 Printed in the User ... Cabinet Template ■■ Mounting Screw Kit (includes parts A-G in "Parts Supplied" in the system. Replacement Parts If any of the installation hardware needs to round transition piece must not exceed the equivalent of 140 ft (42.7 m) for either type of the microwave oven opening...
Dimension Guide
Page 1
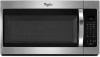
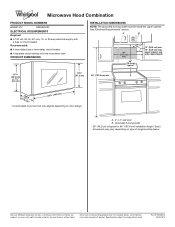
... packed with a fuse or circuit breaker. W10823831A 06/30/2016 PRODUCT DIMENSIONS INSTALLATION DIMENSIONS NOTE: The grounded 3 prong outlet must be inside the upper cabinet. Because Whirlpool Corporation includes a continuous commitment to improve our products, we reserve the right to change ... door design. Dimensions are for 66" (167.6 cm) installation height. A B 30" (76.2 cm) min. 30" (76.2 cm) typical* 12" (30.5 cm) min. 14" (35.6 cm) max. Microwave Hood Combination PRODUCT MODEL NUMBERS WMH31017 WMH32519F ELECTRICAL REQUIREMENTS Required: ■■ A 120 volt, 60...
... packed with a fuse or circuit breaker. W10823831A 06/30/2016 PRODUCT DIMENSIONS INSTALLATION DIMENSIONS NOTE: The grounded 3 prong outlet must be inside the upper cabinet. Because Whirlpool Corporation includes a continuous commitment to improve our products, we reserve the right to change ... door design. Dimensions are for 66" (167.6 cm) installation height. A B 30" (76.2 cm) min. 30" (76.2 cm) typical* 12" (30.5 cm) min. 14" (35.6 cm) max. Microwave Hood Combination PRODUCT MODEL NUMBERS WMH31017 WMH32519F ELECTRICAL REQUIREMENTS Required: ■■ A 120 volt, 60...


