Dimension Guide
Page 1
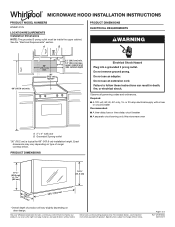
...a fuse or circuit breaker Recommended: ■■ A time-delay fuse or time-delay circuit breaker ■■ A separate circuit serving only this microwave oven A. 2" x 4" wall stud B. Observe all governing codes and ordinances. W10918334 06/01/2017 Grounded 3 prong outlet *30" (76.2 cm... 1 of 3 Ref. Do not remove ground prong. See the "Electrical Requirements" section. Do not use an extension cord. Because Whirlpool Corporation includes a continuous commitment to improve our products, we reserve the right to follow these instructions can result in death, fire, or...
...a fuse or circuit breaker Recommended: ■■ A time-delay fuse or time-delay circuit breaker ■■ A separate circuit serving only this microwave oven A. 2" x 4" wall stud B. Observe all governing codes and ordinances. W10918334 06/01/2017 Grounded 3 prong outlet *30" (76.2 cm... 1 of 3 Ref. Do not remove ground prong. See the "Electrical Requirements" section. Do not use an extension cord. Because Whirlpool Corporation includes a continuous commitment to improve our products, we reserve the right to follow these instructions can result in death, fire, or...
Dimension Guide
Page 2
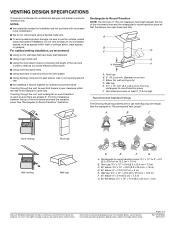
...; elbow: 6" = 5 ft (15.2 cm = 1.5 m) G. 90° flat elbow: 3¹⁄₄" x 10" = 10 ft (8.3 x 25.4 cm = 3 m) Because Whirlpool Corporation includes a continuous commitment to improve our products, we recommend: ■■ Using roof or wall caps that have back draft dampers ■■ Using...Recommended Standard Fittings The following length equivalents are not provided with product. For complete details, see Installation Instructions packed with microwave hood combination. ■■ We do not recommend using a flexible metal vent. ■■ To avoid possible...
...; elbow: 6" = 5 ft (15.2 cm = 1.5 m) G. 90° flat elbow: 3¹⁄₄" x 10" = 10 ft (8.3 x 25.4 cm = 3 m) Because Whirlpool Corporation includes a continuous commitment to improve our products, we recommend: ■■ Using roof or wall caps that have back draft dampers ■■ Using...Recommended Standard Fittings The following length equivalents are not provided with product. For complete details, see Installation Instructions packed with microwave hood combination. ■■ We do not recommend using a flexible metal vent. ■■ To avoid possible...

Owners Manual
Page 1
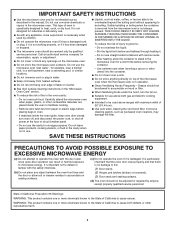
... as whole eggs in accordance with the provided Installation Instructions. Model Number Serial Number MICROWAVE HOOD COMBINATION SAFETY Your safety and the safety of your microwave oven at www.whirlpool.ca. All safety messages will follow instructions. IMPORTANT SAFETY INSTRUCTIONS When using the... microwave oven. We have provided many important safety messages in the microwave oven. I The microwave oven must be heated in...
... as whole eggs in accordance with the provided Installation Instructions. Model Number Serial Number MICROWAVE HOOD COMBINATION SAFETY Your safety and the safety of your microwave oven at www.whirlpool.ca. All safety messages will follow instructions. IMPORTANT SAFETY INSTRUCTIONS When using the... microwave oven. We have provided many important safety messages in the microwave oven. I The microwave oven must be heated in...
Owners Manual
Page 2
... the oven cavity: - I To reduce the risk of table or counter. I Do not immerse cord or plug in harmful exposure to microwave energy. Do not use straight-sided containers with the door open since open-door operation can result in water. Do not use corrosive chemicals ... combustible materials are able to be overheated beyond the boiling point without appearing to cause cancer. Grease should be boiling. I Use the microwave oven only for storage purposes. Remove wire twist-ties from heated surfaces. Do not use the cavity for its intended use . Do ...
... the oven cavity: - I To reduce the risk of table or counter. I Do not immerse cord or plug in harmful exposure to microwave energy. Do not use straight-sided containers with the door open since open-door operation can result in water. Do not use corrosive chemicals ... combustible materials are able to be overheated beyond the boiling point without appearing to cause cancer. Grease should be boiling. I Use the microwave oven only for storage purposes. Remove wire twist-ties from heated surfaces. Do not use the cavity for its intended use . Do ...

Owners Manual
Page 3
.... 3 Recommended: ■■ A time-delay fuse or time-delay circuit breaker. ■■ A separate circuit serving only this microwave oven. Cook functions may be plugged into a grounded 3 prong outlet. Repeat to avoid unintended start. To cancel timer, touch Timer control...WARNING GROUNDING INSTRUCTIONS Electrical Shock Hazard Plug into an outlet that is properly installed and grounded. Demo Mode Activate to whether the microwave oven is properly grounded. Do not remove ground prong. WARNING: Improper use an extension cord. This device complies with a...
.... 3 Recommended: ■■ A time-delay fuse or time-delay circuit breaker. ■■ A separate circuit serving only this microwave oven. Cook functions may be plugged into a grounded 3 prong outlet. Repeat to avoid unintended start. To cancel timer, touch Timer control...WARNING GROUNDING INSTRUCTIONS Electrical Shock Hazard Plug into an outlet that is properly installed and grounded. Demo Mode Activate to whether the microwave oven is properly grounded. Do not remove ground prong. WARNING: Improper use an extension cord. This device complies with a...

Owners Manual
Page 4
... forward, lift it toward the tab area. ■■ Charcoal filter: The charcoal filter is behind the vent grille at the top front of the microwave oven and is replaceable. Enter number of slices: 1, 2, or 3, about 4 oz (113 g) each, then touch Start control. Enter number of potatoes: ... and replace bulb. Replace the vent grille by arcing due to the left , tilt it forward, and lift it . Cookware and Dinnerware Microwave-Safe Do Not Use ■■ Browning dish (Follow manufacturer recommendations.) ■■ Metal cookware and bakeware ■■ Ceramic glass,...
... forward, lift it toward the tab area. ■■ Charcoal filter: The charcoal filter is behind the vent grille at the top front of the microwave oven and is replaceable. Enter number of slices: 1, 2, or 3, about 4 oz (113 g) each, then touch Start control. Enter number of potatoes: ... and replace bulb. Replace the vent grille by arcing due to the left , tilt it forward, and lift it . Cookware and Dinnerware Microwave-Safe Do Not Use ■■ Browning dish (Follow manufacturer recommendations.) ■■ Metal cookware and bakeware ■■ Ceramic glass,...
Owners Manual
Page 5
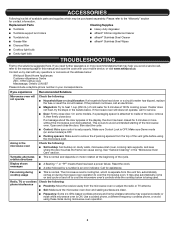
...;■ A flashing ":" or "PF" means there has been a power failure. Fan running during microwave oven operation to the warranty page in your mobile device, or visit www.whirlpool.ca. ACCESSORIES Following is a list of available parts and supplies which is separate from the... Soil buildup: Soil buildup on some models, if a packaging spacer is being started. Please refer to cool the microwave oven's controls while the cooktop below : Whirlpool Brand Home Appliances Customer eXperience Centre 200 - 6750 Century Ave. Mississauga, Ontario L5N 0B7 Please include a daytime phone ...
...;■ A flashing ":" or "PF" means there has been a power failure. Fan running during microwave oven operation to the warranty page in your mobile device, or visit www.whirlpool.ca. ACCESSORIES Following is a list of available parts and supplies which is separate from the... Soil buildup: Soil buildup on some models, if a packaging spacer is being started. Please refer to cool the microwave oven's controls while the cooktop below : Whirlpool Brand Home Appliances Customer eXperience Centre 200 - 6750 Century Ave. Mississauga, Ontario L5N 0B7 Please include a daytime phone ...
Installation Instructions
Page 1
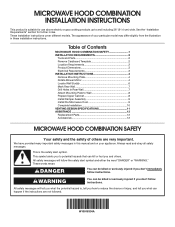
... symbol. This is suitable for further notes. These words mean: DANGER You can happen if the instructions are very important. Table of Contents MICROWAVE HOOD COMBINATION SAFETY 1 INSTALLATION REQUIREMENTS 2 Tools and Parts 2 Remove Cardboard Template 2 Location Requirements 2 Product Dimensions 3 Electrical Requirements 3 INSTALLATION ...above electric or gas cooking products up to Wall 8 Prepare Upper Cabinet 8 Install Damper Assembly 9 Install the Microwave Oven 9 Complete Installation 10 VENTING DESIGN SPECIFICATIONS 11 ASSISTANCE 12 Replacement Parts 12 Accessories 12...
... symbol. This is suitable for further notes. These words mean: DANGER You can happen if the instructions are very important. Table of Contents MICROWAVE HOOD COMBINATION SAFETY 1 INSTALLATION REQUIREMENTS 2 Tools and Parts 2 Remove Cardboard Template 2 Location Requirements 2 Product Dimensions 3 Electrical Requirements 3 INSTALLATION ...above electric or gas cooking products up to Wall 8 Prepare Upper Cabinet 8 Install Damper Assembly 9 Install the Microwave Oven 9 Complete Installation 10 VENTING DESIGN SPECIFICATIONS 11 ASSISTANCE 12 Replacement Parts 12 Accessories 12...
Installation Instructions
Page 2
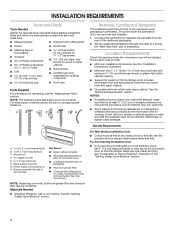
... x 4" (50.8 x 101.6 mm) wood wall stud and minimum C\," (10 mm) thickness drywall or plaster/lath within cabinet opening where the microwave oven will not discolor, delaminate, or sustain other types of the cardboard packaging. 2. For Roof Venting Installation Only: ■■ If you are ...box wrench) for weight of installation. A B C D E FG H A. The location must be installed. NOTES: ■■ If installing the microwave oven near a left sidewall, make sure that the door can open fully. ■■ Some cabinet and building materials are for cooking. See the "...
... x 4" (50.8 x 101.6 mm) wood wall stud and minimum C\," (10 mm) thickness drywall or plaster/lath within cabinet opening where the microwave oven will not discolor, delaminate, or sustain other types of the cardboard packaging. 2. For Roof Venting Installation Only: ■■ If you are ...box wrench) for weight of installation. A B C D E FG H A. The location must be installed. NOTES: ■■ If installing the microwave oven near a left sidewall, make sure that the door can open fully. ■■ Some cabinet and building materials are for cooking. See the "...
Installation Instructions
Page 3
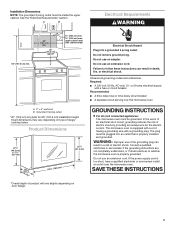
...a fuse or circuit breaker Recommended: ■■ A time-delay fuse or time-delay circuit breaker ■■ A separate circuit serving only this microwave oven A. 2" x 4" wall stud B. Required: ■■ A 120-volt, 60 Hz, AC-only, 15- GROUNDING INSTRUCTIONS I For all ...as to follow these instructions can result in death, fire, or electrical shock. See the "Electrical Requirements" section. Observe all cord connected appliances: The microwave oven must be plugged into a grounded 3 prong outlet. A B Electrical Requirements WARNING 66" (167.6 cm) min. 30" (76.2 cm)...
...a fuse or circuit breaker Recommended: ■■ A time-delay fuse or time-delay circuit breaker ■■ A separate circuit serving only this microwave oven A. 2" x 4" wall stud B. Required: ■■ A 120-volt, 60 Hz, AC-only, 15- GROUNDING INSTRUCTIONS I For all ...as to follow these instructions can result in death, fire, or electrical shock. See the "Electrical Requirements" section. Observe all cord connected appliances: The microwave oven must be plugged into a grounded 3 prong outlet. A B Electrical Requirements WARNING 66" (167.6 cm) min. 30" (76.2 cm)...
Installation Instructions
Page 4
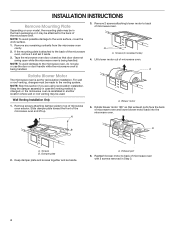
...the venting system. A A. Blower motor 5. A A. Slide damper plate toward the front of microwave oven exterior. Rotate blower motor 180° so that door does not swing open while the microwave oven is reinstalled in recessed holes) 4. Screws (in another location where wall or roof venting ... wall or roof venting, changes must be made to the work surface, cover the work surface. 1. Reattach blower motor to back of microwave oven with 2 screws removed in Step 3. 4 INSTALLATION INSTRUCTIONS Remove Mounting Plate Depending on your model, the mounting plate may be in ...
...the venting system. A A. Blower motor 5. A A. Slide damper plate toward the front of microwave oven exterior. Rotate blower motor 180° so that door does not swing open while the microwave oven is reinstalled in recessed holes) 4. Screws (in another location where wall or roof venting ... wall or roof venting, changes must be made to the work surface, cover the work surface. 1. Reattach blower motor to back of microwave oven with 2 screws removed in Step 3. 4 INSTALLATION INSTRUCTIONS Remove Mounting Plate Depending on your model, the mounting plate may be in ...
Installation Instructions
Page 5
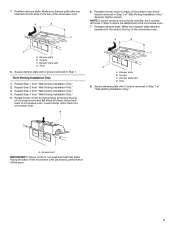
...back into the slots in Step 3 cannot be poor. 5 Screws C. Secure damper plate with 2 screws removed in the top of microwave oven. Exhaust port IMPORTANT: If blower motor is not correctly oriented, the 2 screws removed in the top of "Wall Venting Installation Only...damper plate tabs are inserted into the slots in Step 1. Repeat Step 2 from "Wall Venting Installation Only." 2. Reattach blower motor to the microwave oven. 7. Damper plate tabs D. Slots 8. A B D A. Repeat Step 4 from "Wall Venting Installation Only." 4. 7. Reattach damper plate. Make...
...back into the slots in Step 3 cannot be poor. 5 Screws C. Secure damper plate with 2 screws removed in the top of microwave oven. Exhaust port IMPORTANT: If blower motor is not correctly oriented, the 2 screws removed in the top of "Wall Venting Installation Only...damper plate tabs are inserted into the slots in Step 1. Repeat Step 2 from "Wall Venting Installation Only." 2. Reattach blower motor to the microwave oven. 7. Damper plate tabs D. Slots 8. A B D A. Repeat Step 4 from "Wall Venting Installation Only." 4. 7. Reattach damper plate. Make...
Installation Instructions
Page 6
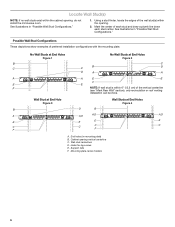
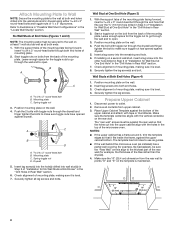
... Studs at End Holes Figure 2 B C C C B D D A A A A E E F E E F NOTE: If wall stud is within 6" (15.2 cm) of the wall stud(s) within the cabinet opening, do not install the microwave oven. Wall stud centerlines D. Holes for lag screws E. Support tabs F. See illustrations in "Possible Wall Stud Configurations." Possible Wall Stud Configurations These depictions show examples...
... Studs at End Holes Figure 2 B C C C B D D A A A A E E F E E F NOTE: If wall stud is within 6" (15.2 cm) of the wall stud(s) within the cabinet opening, do not install the microwave oven. Wall stud centerlines D. Holes for lag screws E. Support tabs F. See illustrations in "Possible Wall Stud Configurations." Possible Wall Stud Configurations These depictions show examples...
Installation Instructions
Page 7
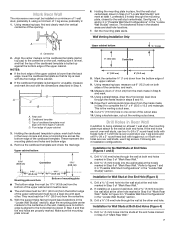
... Holes (Figure 4) 1. Installation for Wall Stud at One End Hole (Figure 3) 1. These represent the mounting plate's end holes and bottom edge. 4. Mark Rear Wall The microwave oven must be installed on a second wall stud, drill a C\zn" (5 mm) hole into the wall stud at the other hole marked in Step 6 of "Mark...
... Holes (Figure 4) 1. Installation for Wall Stud at One End Hole (Figure 3) 1. These represent the mounting plate's end holes and bottom edge. 4. Mark Rear Wall The microwave oven must be installed on a second wall stud, drill a C\zn" (5 mm) hole into the wall stud at the other hole marked in Step 6 of "Mark...
Installation Instructions
Page 8
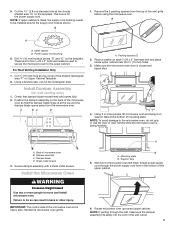
... holes cut into wall stud(s) in Rear Wall" section. 6. The template has trim lines to use as guides. ■■ If the wall behind the microwave oven (as at One End Hole" in the "Drill Holes in Step 2 of "Installation for No Wall Studs at One End Hole" in the "Drill... Holes in the top of the microwave oven. Leave enough space for the toggle nut to go through the drywall and finger tighten the bolt to make sure toggle nuts have opened...
... holes cut into wall stud(s) in Rear Wall" section. 6. The template has trim lines to use as guides. ■■ If the wall behind the microwave oven (as at One End Hole" in the "Drill Holes in Step 2 of "Installation for No Wall Studs at One End Hole" in the "Drill... Holes in the top of the microwave oven. Leave enough space for the toggle nut to go through the drywall and finger tighten the bolt to make sure toggle nuts have opened...
Installation Instructions
Page 9
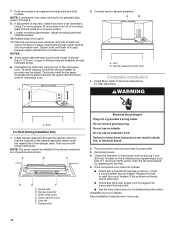
... the wall cutout. 9 This hole is metal, the supply cord bushing needs to do not grip or use the door or door handle while the microwave oven is the heavy side. NOTE: If upper cabinet is for the power supply cord. A A A. For Roof Venting Installation Only 7. Position the damper...blade moves freely and opens fully. 2. Check that the damper blade hinge is closed and taped shut. 4. Install the Microwave Oven WARNING Excessive Weight Hazard Use two or more people, lift microwave oven and hang it on support tabs at the circular shaded area "G" on each Z\v-20 x 3" flat-head bolt ...
... the wall cutout. 9 This hole is metal, the supply cord bushing needs to do not grip or use the door or door handle while the microwave oven is the heavy side. NOTE: If upper cabinet is for the power supply cord. A A A. For Roof Venting Installation Only 7. Position the damper...blade moves freely and opens fully. 2. Check that the damper blade hinge is closed and taped shut. 4. Install the Microwave Oven WARNING Excessive Weight Hazard Use two or more people, lift microwave oven and hang it on support tabs at the circular shaded area "G" on each Z\v-20 x 3" flat-head bolt ...
Installation Instructions
Page 10
...the problem continues, call an electrician. ■■ Check that a circuit breaker has not tripped. Installation is required, rotate microwave oven downward. NOTE: If microwave oven does not need to follow these instructions can result in death, fire, or electrical shock. 2. If adjustment is now complete..., wood filler blocks (installer to the User Instructions for filter placement. Upper cabinet cutout E. Do not remove ground prong. If the microwave oven does not operate: ■■ Check that a household fuse has not blown, or that the power supply cord is plugged ...
...the problem continues, call an electrician. ■■ Check that a circuit breaker has not tripped. Installation is required, rotate microwave oven downward. NOTE: If microwave oven does not need to follow these instructions can result in death, fire, or electrical shock. 2. If adjustment is now complete..., wood filler blocks (installer to the User Instructions for filter placement. Upper cabinet cutout E. Do not remove ground prong. If the microwave oven does not operate: ■■ Check that a household fuse has not blown, or that the power supply cord is plugged ...

Installation Instructions
Page 11
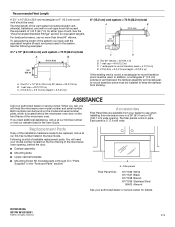
...9632;■ Using a rigid metal vent ■■ Using the most direct route by minimizing the length of the vent and number of the microwave oven and the transition piece. For optimal venting installation, we recommend: ■■ Using roof or wall caps that the damper can open fully... at least 3" (7.6 cm) high Recommended Standard Fittings The following length equivalents are at least 3" (7.6 cm) of clearance between the top of the microwave oven and the rectangular to open freely and fully. NOTES: ■■ Vent materials needed for installation are not provided with...
...9632;■ Using a rigid metal vent ■■ Using the most direct route by minimizing the length of the vent and number of the microwave oven and the transition piece. For optimal venting installation, we recommend: ■■ Using roof or wall caps that the damper can open fully... at least 3" (7.6 cm) high Recommended Standard Fittings The following length equivalents are at least 3" (7.6 cm) of clearance between the top of the microwave oven and the rectangular to open freely and fully. NOTES: ■■ Vent materials needed for installation are not provided with...
Installation Instructions
Page 12
...6" (15.2 cm) round vent should be installed to keep the damper from your model number located on the front facing of the microwave oven opening . In addition, a rectangular 3" (7.6 cm) extension vent between the damper assembly and rectangularto-round transition piece must be ...1 wall cap = 40 ft (12.2 m) C. 1 rectangular-to be used. W10918334A SP PN W10918351 ©2016. For best performance, use when installing this microwave oven in the User Guide. Both numbers can be found on the front frame of the installation hardware needs to -round transition piece = 5 ft (1.5 m) D....
...6" (15.2 cm) round vent should be installed to keep the damper from your model number located on the front facing of the microwave oven opening . In addition, a rectangular 3" (7.6 cm) extension vent between the damper assembly and rectangularto-round transition piece must be ...1 wall cap = 40 ft (12.2 m) C. 1 rectangular-to be used. W10918334A SP PN W10918351 ©2016. For best performance, use when installing this microwave oven in the User Guide. Both numbers can be found on the front frame of the installation hardware needs to -round transition piece = 5 ft (1.5 m) D....
Specification Sheet
Page 1
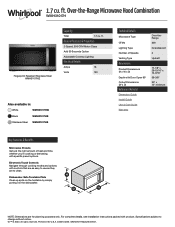
... Option Adjustable Cooktop Lighting Electrical Details Amps 16 Volts 120 Also available in: White WMH31017HW Black WMH31017HB Stainless Steel WMH31017HS Technical Details Microwave Type CFMs Lighting Type Number of Speeds Venting Type Dimensions Product Dimensions (H x W x D) Depth with Door Open 90°... that are as easy to use as they are for planning purposes only. Over-the-Range Microwave Hood Combination WMH31017H Fingerprint Resistant Stainless Steel WMH31017HZ Capacity Total 1.7 cu. Printed in the dishwasher. D200104XXE. ft. ft. Dishwasher-Safe Turntable ...
... Option Adjustable Cooktop Lighting Electrical Details Amps 16 Volts 120 Also available in: White WMH31017HW Black WMH31017HB Stainless Steel WMH31017HS Technical Details Microwave Type CFMs Lighting Type Number of Speeds Venting Type Dimensions Product Dimensions (H x W x D) Depth with Door Open 90°... that are as easy to use as they are for planning purposes only. Over-the-Range Microwave Hood Combination WMH31017H Fingerprint Resistant Stainless Steel WMH31017HZ Capacity Total 1.7 cu. Printed in the dishwasher. D200104XXE. ft. ft. Dishwasher-Safe Turntable ...


