Dimension Guide
Page 1
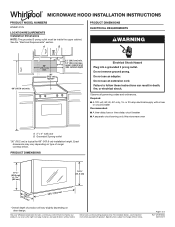
... notice. Required: ■■ A 120-volt, 60 Hz, AC-only, 15- or 20-amp electrical supply with product. Because Whirlpool Corporation includes a continuous commitment to improve our products, we reserve the right to follow these instructions can result in death, fire, or ...electrical shock. Page 1 of range/ cooktop below. MICROWAVE HOOD INSTALLATION INSTRUCTIONS PRODUCT MODEL NUMBERS WMH31017H LOCATION REQUIREMENTS Installation Dimensions NOTE: The grounded 3 prong outlet must be inside the upper cabinet. See the "Electrical ...
... notice. Required: ■■ A 120-volt, 60 Hz, AC-only, 15- or 20-amp electrical supply with product. Because Whirlpool Corporation includes a continuous commitment to improve our products, we reserve the right to follow these instructions can result in death, fire, or ...electrical shock. Page 1 of range/ cooktop below. MICROWAVE HOOD INSTALLATION INSTRUCTIONS PRODUCT MODEL NUMBERS WMH31017H LOCATION REQUIREMENTS Installation Dimensions NOTE: The grounded 3 prong outlet must be inside the upper cabinet. See the "Electrical ...

Owners Manual
Page 1
Model Number Serial Number MICROWAVE HOOD COMBINATION SAFETY Your safety and the safety of others . This is , tell you how to ... follow the specific "PRECAUTIONS TO AVOID POSSIBLE EXPOSURE TO EXCESSIVE MICROWAVE ENERGY" found in this section. for purchasing this manual and on your model and serial number located on the front facing of burns, electric shock, fire, injury to persons, or exposure to properly grounded outlet. All... important safety messages in the shell and sealed containers - WARNING You can be grounded. Register your microwave oven at www.whirlpool.ca.
Model Number Serial Number MICROWAVE HOOD COMBINATION SAFETY Your safety and the safety of others . This is , tell you how to ... follow the specific "PRECAUTIONS TO AVOID POSSIBLE EXPOSURE TO EXCESSIVE MICROWAVE ENERGY" found in this section. for purchasing this manual and on your model and serial number located on the front facing of burns, electric shock, fire, injury to persons, or exposure to properly grounded outlet. All... important safety messages in the shell and sealed containers - WARNING You can be grounded. Register your microwave oven at www.whirlpool.ca.

Owners Manual
Page 3
... equipped with a cord having the turntable in death, fire, or electrical shock. Failure to deactivate. Repeat to avoid unintended start. To turn back on some models): Set vent fan to run for only 30 minutes more (off programming tones, touch and hold the Cancel control for about 3 seconds until a confirmation tone...
... equipped with a cord having the turntable in death, fire, or electrical shock. Failure to deactivate. Repeat to avoid unintended start. To turn back on some models): Set vent fan to run for only 30 minutes more (off programming tones, touch and hold the Cancel control for about 3 seconds until a confirmation tone...

Owners Manual
Page 4
... and water, or glass cleaner applied to paper towel ■■ Control panel: sponge or soft cloth and water ■■ Stainless steel (on some models): mild soap and water, then rinse with clean water and dry with soft cloth, or use the dish in the microwave oven. Program 1 minute of...
... and water, or glass cleaner applied to paper towel ■■ Control panel: sponge or soft cloth and water ■■ Stainless steel (on some models): mild soap and water, then rinse with clean water and dry with soft cloth, or use the dish in the microwave oven. Program 1 minute of...
Owners Manual
Page 5
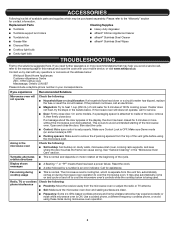
...filter ■■ Cooktop light bulb ■■ Cavity light bulb TROUBLESHOOTING First try the steps in your mobile device, or visit www.whirlpool.ca. Mississauga, Ontario L5N 0B7 Please include a daytime phone number in the bullets below. If water does not heat, try the solutions ... not operate, call an electrician. ■■ Magnetron: Try to inside of the door, remove it, then firmly close door. On some models) is OFF. ■■ Packing spacers: Make sure to cool the microwave oven. The microwave oven's cooling fan, which may experience static...
...filter ■■ Cooktop light bulb ■■ Cavity light bulb TROUBLESHOOTING First try the steps in your mobile device, or visit www.whirlpool.ca. Mississauga, Ontario L5N 0B7 Please include a daytime phone number in the bullets below. If water does not heat, try the solutions ... not operate, call an electrician. ■■ Magnetron: Try to inside of the door, remove it, then firmly close door. On some models) is OFF. ■■ Packing spacers: Make sure to cool the microwave oven. The microwave oven's cooling fan, which may experience static...
Owners Manual
Page 6
Some questions can be provided by our authorized Whirlpool Service Providers. All warranty service is intended for in 12. In Canada, call the Customer eXperience Center: ■■ Name, address and telephone number ■■ Model number and serial number ■■ A clear, detailed description of the problem ■■ Proof of purchase...
Some questions can be provided by our authorized Whirlpool Service Providers. All warranty service is intended for in 12. In Canada, call the Customer eXperience Center: ■■ Name, address and telephone number ■■ Model number and serial number ■■ A clear, detailed description of the problem ■■ Proof of purchase...

Installation Instructions
Page 2
... for wood studs. Power supply cord bushing (1) ■■ Aluminum grease filters H. Damper assembly (for wall or roof venting) ■■ Charcoal filters (Depending on model, charcoal filters may be included. NOTE: The hardware items listed here are for wall or roof venting. A B C D E FG H A. 3/16 - 24 x 3" round-... drill bits ■■ 3/4" (1.9 cm) hole saw ■■ Caulking gun and weatherproof caulking compound ■■ Duct tape Parts Needed For information on model, aluminum grease filter and charcoal filter may not be combined.
... for wood studs. Power supply cord bushing (1) ■■ Aluminum grease filters H. Damper assembly (for wall or roof venting) ■■ Charcoal filters (Depending on model, charcoal filters may be included. NOTE: The hardware items listed here are for wall or roof venting. A B C D E FG H A. 3/16 - 24 x 3" round-... drill bits ■■ 3/4" (1.9 cm) hole saw ■■ Caulking gun and weatherproof caulking compound ■■ Duct tape Parts Needed For information on model, aluminum grease filter and charcoal filter may not be combined.

Installation Instructions
Page 3
... or plaster/lath within cabinet opening where the microwave oven will vary slightly depending on your builder or cabinet supplier to separate the template from Whirlpool. 12" DEEPER 14" 14" DEEPER 15" I bar mounting plate fr om the wall. See the "Electrical Requirements" section. Depending on door...product will be inside the perforation is not provided but no more than 14" (35.6 cm) but can open fully. ■■ Some models have a pocket handle. For Roof Venting Installation Only: ■■ If you can open freely and fully. But use the bump out ...
... or plaster/lath within cabinet opening where the microwave oven will vary slightly depending on your builder or cabinet supplier to separate the template from Whirlpool. 12" DEEPER 14" 14" DEEPER 15" I bar mounting plate fr om the wall. See the "Electrical Requirements" section. Depending on door...product will be inside the perforation is not provided but no more than 14" (35.6 cm) but can open fully. ■■ Some models have a pocket handle. For Roof Venting Installation Only: ■■ If you can open freely and fully. But use the bump out ...

Installation Instructions
Page 5
... the microwave oven is reinstalled in recessed holes) A B A. Remove any remaining contents from the microwave oven cavity. 2. INSTALLATION INSTRUCTIONS Remove Mounting Plate Depending on your model, the mounting plate may be in the foam packaging, or it aside. 3. Damper plate 2.
... the microwave oven is reinstalled in recessed holes) A B A. Remove any remaining contents from the microwave oven cavity. 2. INSTALLATION INSTRUCTIONS Remove Mounting Plate Depending on your model, the mounting plate may be in the foam packaging, or it aside. 3. Damper plate 2.

Installation Instructions
Page 11
... microwave oven gently. 1. Remove the 2 packing spacers from the top of mounting plate. Using 2 or more people, lift microwave oven and hang it on your model, it does not have packing spacers. With the microwave oven centered, and with step 2. 2. NOTE: To avoid damage to move and install microwave oven. Mounting...
... microwave oven gently. 1. Remove the 2 packing spacers from the top of mounting plate. Using 2 or more people, lift microwave oven and hang it on your model, it does not have packing spacers. With the microwave oven centered, and with step 2. 2. NOTE: To avoid damage to move and install microwave oven. Mounting...

Installation Instructions
Page 14
... section) Filler Panel Kits: A A. See the "Recommended Standard Fittings" section for either type of the microwave oven. Both numbers can be found on the model and serial number plate, which is round, a rectangular to -round transition piece = 5 ft (1.5 m) D. 2 ft (0.6 m) + 6 ft (1.8 ...(0.6 m) C D A. In addition, a rectangular 3" (7.6 cm) extension vent between the damper assembly and rectangular to keep the damper from your model and serial numbers located on the front frame of vent. Replacement Parts If any of the installation hardware needs to be installed to round transition...
... section) Filler Panel Kits: A A. See the "Recommended Standard Fittings" section for either type of the microwave oven. Both numbers can be found on the model and serial number plate, which is round, a rectangular to -round transition piece = 5 ft (1.5 m) D. 2 ft (0.6 m) + 6 ft (1.8 ...(0.6 m) C D A. In addition, a rectangular 3" (7.6 cm) extension vent between the damper assembly and rectangular to keep the damper from your model and serial numbers located on the front frame of vent. Replacement Parts If any of the installation hardware needs to be installed to round transition...


