Dimension Guide
Page 1
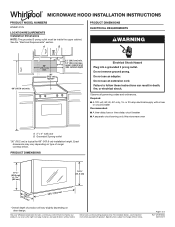
MICROWAVE HOOD INSTALLATION INSTRUCTIONS PRODUCT MODEL NUMBERS WMH31017H LOCATION REQUIREMENTS Installation Dimensions NOTE: The grounded 3 prong outlet must be inside the upper cabinet. See the "Electrical Requirements" section. upper...subject to change materials and specifications without notice. Grounded 3 prong outlet *30" (76.2 cm) is typical for planning purposes only. Page 1 of 3 Ref. Because Whirlpool Corporation includes a continuous commitment to improve our products, we reserve the right to follow these instructions can result in death, fire, or electrical shock. Failure...
MICROWAVE HOOD INSTALLATION INSTRUCTIONS PRODUCT MODEL NUMBERS WMH31017H LOCATION REQUIREMENTS Installation Dimensions NOTE: The grounded 3 prong outlet must be inside the upper cabinet. See the "Electrical Requirements" section. upper...subject to change materials and specifications without notice. Grounded 3 prong outlet *30" (76.2 cm) is typical for planning purposes only. Page 1 of 3 Ref. Because Whirlpool Corporation includes a continuous commitment to improve our products, we reserve the right to follow these instructions can result in death, fire, or electrical shock. Failure...

Owners Manual
Page 1
Model Number Serial Number MICROWAVE HOOD COMBINATION SAFETY Your safety and the safety of the microwave oven opening, behind the door. This is , tell you how ... should not be heated in the microwave oven. I Read and follow instructions. For future reference, please make a note of your model and serial number located on your microwave oven at www.whirlpool.ca. User Guide Microwave Hood Combination THANK YOU for example, closed glass jars are able to explode and should be...
Model Number Serial Number MICROWAVE HOOD COMBINATION SAFETY Your safety and the safety of the microwave oven opening, behind the door. This is , tell you how ... should not be heated in the microwave oven. I Read and follow instructions. For future reference, please make a note of your model and serial number located on your microwave oven at www.whirlpool.ca. User Guide Microwave Hood Combination THANK YOU for example, closed glass jars are able to explode and should be...

Owners Manual
Page 3
... sounds. To turn off programming tones, touch and hold the Cancel control for about 3 seconds until a tone sounds and the vent fan turns on some models): Set vent fan to run for exactly 30 minutes or to Standby Power mode and dim the LED brightness after 30 minutes). Do not use...
... sounds. To turn off programming tones, touch and hold the Cancel control for about 3 seconds until a tone sounds and the vent fan turns on some models): Set vent fan to run for exactly 30 minutes or to Standby Power mode and dim the LED brightness after 30 minutes). Do not use...

Owners Manual
Page 4
... left , tilt it forward, lift it to paper towel ■■ Control panel: sponge or soft cloth and water ■■ Stainless steel (on some models): mild soap and water, then rinse with clean water and dry with screws. ■■ Cavity light: The cavity light bulb is located behind the...
... left , tilt it forward, lift it to paper towel ■■ Control panel: sponge or soft cloth and water ■■ Stainless steel (on some models): mild soap and water, then rinse with clean water and dry with screws. ■■ Cavity light: The cavity light bulb is located behind the...
Owners Manual
Page 5
...the problem continues, call an electrician. ■■ Magnetron: Try to inside of the door, remove it, then firmly close door. On some models) is OFF. ■■ Packing spacers: Make sure to remove the 2 packing spacers from the microwave oven or adjust the radio or TV .... If water does not heat, try the solutions suggested here. If a message about the door appears in your mobile device, or visit www.whirlpool.ca. Reset the clock. ■■ A letter followed by mail with your correspondence. Turntable alternates ■■ This is normal and depends...
...the problem continues, call an electrician. ■■ Magnetron: Try to inside of the door, remove it, then firmly close door. On some models) is OFF. ■■ Packing spacers: Make sure to remove the 2 packing spacers from the microwave oven or adjust the radio or TV .... If water does not heat, try the solutions suggested here. If a message about the door appears in your mobile device, or visit www.whirlpool.ca. Reset the clock. ■■ A letter followed by mail with your correspondence. Turntable alternates ■■ This is normal and depends...
Owners Manual
Page 6
...Name, address and telephone number ■■ Model number and serial number ■■ A clear, detailed description of the problem ■■ Proof of God or use inconsistent with products not approved by a Whirlpool designated service company. 11. ONE YEAR LIMITED WARRANTY...: 1. trim, decorative panels, flooring, cabinetry, islands, countertops, drywall, etc.) that comes with the product, Whirlpool Corporation or Whirlpool Canada LP (hereafter "Whirlpool") will be borne by the use your appliance will pay for service in materials and workmanship and is valid only...
...Name, address and telephone number ■■ Model number and serial number ■■ A clear, detailed description of the problem ■■ Proof of God or use inconsistent with products not approved by a Whirlpool designated service company. 11. ONE YEAR LIMITED WARRANTY...: 1. trim, decorative panels, flooring, cabinetry, islands, countertops, drywall, etc.) that comes with the product, Whirlpool Corporation or Whirlpool Canada LP (hereafter "Whirlpool") will be borne by the use your appliance will pay for service in materials and workmanship and is valid only...

Installation Instructions
Page 2
...■■ Stud finder ■■ 7⁄16" (1.1 cm) socket wrench (or box wrench) for wall or roof venting) ■■ Charcoal filters (Depending on model, aluminum grease filter and charcoal filter may not be combined. Materials Needed Standard fittings for wood studs. See the "Venting Design Specifications" section. 2 A B C D E FG... - 20 x 3" flat-head bolts (2) ■■ Upper cabinet template C. Power supply cord bushing (1) ■■ Aluminum grease filters H. See User Instructions.) NOTE: Depending on model, charcoal filters may be included.
...■■ Stud finder ■■ 7⁄16" (1.1 cm) socket wrench (or box wrench) for wall or roof venting) ■■ Charcoal filters (Depending on model, aluminum grease filter and charcoal filter may not be combined. Materials Needed Standard fittings for wood studs. See the "Venting Design Specifications" section. 2 A B C D E FG... - 20 x 3" flat-head bolts (2) ■■ Upper cabinet template C. Power supply cord bushing (1) ■■ Aluminum grease filters H. See User Instructions.) NOTE: Depending on model, charcoal filters may be included.

Installation Instructions
Page 3
...15" (38.1 cm), use as a rear wall template. 1. For Roof Venting Installation Only: ■■ If you can open fully. ■■ Some models have a pocket handle. See "Rectangular to exist above the microwave oven so that the vent fit properly and the damper blade opens freely and fully...) wall stud B. If cabinets are not designed to it during the "Mark Rear Wall" part of range/cooktop below. The location must be purchased from Whirlpool. 12" DEEPER 14" 14" DEEPER 15" I bar mounting plate fr om the wall. NOTES: ■■ If installing the microwave oven near a ...
...15" (38.1 cm), use as a rear wall template. 1. For Roof Venting Installation Only: ■■ If you can open fully. ■■ Some models have a pocket handle. See "Rectangular to exist above the microwave oven so that the vent fit properly and the damper blade opens freely and fully...) wall stud B. If cabinets are not designed to it during the "Mark Rear Wall" part of range/cooktop below. The location must be purchased from Whirlpool. 12" DEEPER 14" 14" DEEPER 15" I bar mounting plate fr om the wall. NOTES: ■■ If installing the microwave oven near a ...

Installation Instructions
Page 5
.... Slide damper plate toward the front of microwave oven. NOTE: To avoid damage to the venting system. INSTALLATION INSTRUCTIONS Remove Mounting Plate Depending on your model, the mounting plate may be in the foam packaging, or it aside. 3.
.... Slide damper plate toward the front of microwave oven. NOTE: To avoid damage to the venting system. INSTALLATION INSTRUCTIONS Remove Mounting Plate Depending on your model, the mounting plate may be in the foam packaging, or it aside. 3.

Installation Instructions
Page 11
... may warp the top of the upper cabinet. If it may not have packing spacers, begin with at least one person holding it on your model, it does not have packing spacers. Rotate microwave oven up toward upper cabinet. Using 2 or more people to move and install microwave oven. Repeat steps...
... may warp the top of the upper cabinet. If it may not have packing spacers, begin with at least one person holding it on your model, it does not have packing spacers. Rotate microwave oven up toward upper cabinet. Using 2 or more people to move and install microwave oven. Repeat steps...

Installation Instructions
Page 14
... 25.4 cm) vent system = 73 ft (22.2 m) total A B 6 pi (1.8 m) 2 pi (0.6 m) C A. ASSISTANCE Call your model and serial numbers located on the front frame of available replacement parts. Each panel is a list of the microwave oven. Recommended Vent Length A 31&#... ft (6.1 m) B. 1 wall cap = 40 ft (12.2 m) C. 1 rectangular-to round transition piece must be used in pairs. If you need the microwave oven model number and serial number. In addition, a rectangular 3" (7.6 cm) extension vent between the damper assembly and rectangular to -round transition piece = 5 ft (1.5 m) D. ...
... 25.4 cm) vent system = 73 ft (22.2 m) total A B 6 pi (1.8 m) 2 pi (0.6 m) C A. ASSISTANCE Call your model and serial numbers located on the front frame of available replacement parts. Each panel is a list of the microwave oven. Recommended Vent Length A 31&#... ft (6.1 m) B. 1 wall cap = 40 ft (12.2 m) C. 1 rectangular-to round transition piece must be used in pairs. If you need the microwave oven model number and serial number. In addition, a rectangular 3" (7.6 cm) extension vent between the damper assembly and rectangular to -round transition piece = 5 ft (1.5 m) D. ...


