Installation Guide
Page 1
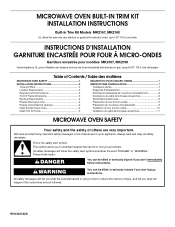
MICROWAVE OVEN BUILT-IN TRIM KIT INSTALLATION INSTRUCTIONS Built-In Trim Kit Models MK2167, MK2160 UL listed for use over any electric or gas built-in this manual and on your appliance. All safety messages will follow the safety alert symbol and either the word "DANGER" or "WARNING." Always ... 9 Préparation de l'ouverture d'encastrement 9 Installation du four à micro-ondes 10 Installation du cadre de la trousse de garniture 11 MICROWAVE OVEN SAFETY Your safety and the safety of injury, and tell you what the potential hazard is the safety alert symbol. W10434122A
MICROWAVE OVEN BUILT-IN TRIM KIT INSTALLATION INSTRUCTIONS Built-In Trim Kit Models MK2167, MK2160 UL listed for use over any electric or gas built-in this manual and on your appliance. All safety messages will follow the safety alert symbol and either the word "DANGER" or "WARNING." Always ... 9 Préparation de l'ouverture d'encastrement 9 Installation du four à micro-ondes 10 Installation du cadre de la trousse de garniture 11 MICROWAVE OVEN SAFETY Your safety and the safety of injury, and tell you what the potential hazard is the safety alert symbol. W10434122A
Use & Care Guide
Page 2
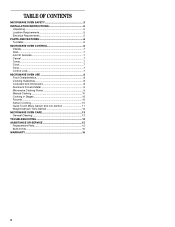
... 3 INSTALLATION INSTRUCTIONS 5 Unpacking 5 Location Requirements 5 Electrical Requirements 5 PARTS AND FEATURES 6 Turntable 6 MICROWAVE OVEN CONTROL 6 Display 7 Start 7 Add 30 Seconds 7 Cancel 7 Tones 7 Clock 7 Timer 7 Control Lock 7 MICROWAVE OVEN USE 8 Food Characteristics 8 Cooking Guidelines 8 Cookware and Dinnerware 8 Aluminum Foil and Metal 9 Microwave Cooking Power 9 Manual Cooking 10 Cooking in Stages 10 Favorite 10 Sensor Cooking 10...
... 3 INSTALLATION INSTRUCTIONS 5 Unpacking 5 Location Requirements 5 Electrical Requirements 5 PARTS AND FEATURES 6 Turntable 6 MICROWAVE OVEN CONTROL 6 Display 7 Start 7 Add 30 Seconds 7 Cancel 7 Tones 7 Clock 7 Timer 7 Control Lock 7 MICROWAVE OVEN USE 8 Food Characteristics 8 Cooking Guidelines 8 Cookware and Dinnerware 8 Aluminum Foil and Metal 9 Microwave Cooking Power 9 Manual Cooking 10 Cooking in Stages 10 Favorite 10 Sensor Cooking 10...
Use & Care Guide
Page 3
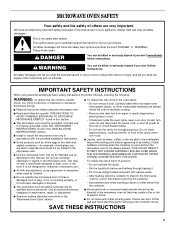
... beyond the boiling point without appearing to stand in this manual. SAVE THESE INSTRUCTIONS 3 It is not designed for examination, repair, or adjustment. ■ See door surface cleaning instructions in this section. ■ The microwave oven must be killed or seriously injured if you don't... of burns, electric shock, fire, injury to persons, or exposure to potential hazards that can be inserted in the microwave oven as whole eggs in this manual and on your appliance. Do not overheat the liquid. - Use extreme care when inserting a spoon or other combustible...
... beyond the boiling point without appearing to stand in this manual. SAVE THESE INSTRUCTIONS 3 It is not designed for examination, repair, or adjustment. ■ See door surface cleaning instructions in this section. ■ The microwave oven must be killed or seriously injured if you don't... of burns, electric shock, fire, injury to persons, or exposure to potential hazards that can be inserted in the microwave oven as whole eggs in this manual and on your appliance. Do not overheat the liquid. - Use extreme care when inserting a spoon or other combustible...
Use & Care Guide
Page 6
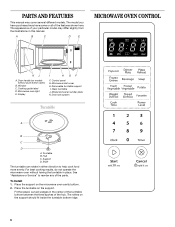
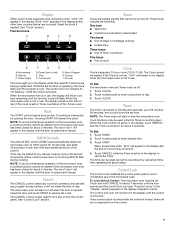
... the support on the support. Place the turntable on the microwave oven cavity bottom. 2. PARTS AND FEATURES This manual may differ slightly from the illustrations in this manual. A B C D E MICROWAVE OVEN CONTROL Oz lbs K J A. Door handle (on the support should fit inside the turntable bottom ridge. 6 Microwave oven light E. The model you have purchased may have...
... the support on the support. Place the turntable on the microwave oven cavity bottom. 2. PARTS AND FEATURES This manual may differ slightly from the illustrations in this manual. A B C D E MICROWAVE OVEN CONTROL Oz lbs K J A. Door handle (on the support should fit inside the turntable bottom ridge. 6 Microwave oven light E. The model you have purchased may have...
Use & Care Guide
Page 7
..." will sound. 4. See "Clock" section. while the control is unlocked. Add 30 Seconds The ADD 30 SEC control (START pad) automatically starts the microwave oven at the current power level, by opening the door, touching START will remain lit in the display, touch TIMER to mid) E. Touch START. The...The word "door" will appear in the display. Close the door and touch START to any manual cooking cycle in the display. While the set time. Time may be started if the microwave oven door has been closed for 30 seconds, and adds 30 seconds of cook time with each...
..." will sound. 4. See "Clock" section. while the control is unlocked. Add 30 Seconds The ADD 30 SEC control (START pad) automatically starts the microwave oven at the current power level, by opening the door, touching START will remain lit in the display, touch TIMER to mid) E. Touch START. The...The word "door" will appear in the display. Close the door and touch START to any manual cooking cycle in the display. While the set time. Time may be started if the microwave oven door has been closed for 30 seconds, and adds 30 seconds of cook time with each...
Use & Care Guide
Page 9
...will briefly show the current power level, then will flash during manual cooking, depending on some metal can occur and cause damage to use oven mitts or pot holders when removing dishes from the microwave oven. Heating cream soups. 80%, PL8 Heating rice, pasta ...and Clay Follow manufacturer's recommendations. MATERIAL RECOMMENDATIONS Melamine Follow manufacturer's recommendations. Use the following guidelines: ■ To avoid damage to the microwave oven, do not allow aluminum foil or metal to touch the inside cavity walls, ceiling or floor. ■ Always use . Place...
...will briefly show the current power level, then will flash during manual cooking, depending on some metal can occur and cause damage to use oven mitts or pot holders when removing dishes from the microwave oven. Heating cream soups. 80%, PL8 Heating rice, pasta ...and Clay Follow manufacturer's recommendations. MATERIAL RECOMMENDATIONS Melamine Follow manufacturer's recommendations. Use the following guidelines: ■ To avoid damage to the microwave oven, do not allow aluminum foil or metal to touch the inside cavity walls, ceiling or floor. ■ Always use . Place...
Use & Care Guide
Page 10
...not exceed 95°F (35°C). ■ If the door is opened while the sensor is displayed. 2. "00:00" will appear in the microwave oven detects humidity released from the food as it will appear in Stages: 1. "00:00" will cycle first. Touch FAVORITE. Touch START. Microwavesafe ..." section). In the event of -cycle tones will sound. 6. To Use FAVORITE: 1. Place food on the turntable, and close the door. 2. Manual Cooking NOTE: To cook at 100% power, begin the programmed cycle. If cooking with loose-fitting lids are recommended. Touch START. Cooking in Stages" ...
...not exceed 95°F (35°C). ■ If the door is opened while the sensor is displayed. 2. "00:00" will appear in the microwave oven detects humidity released from the food as it will appear in Stages: 1. "00:00" will cycle first. Touch FAVORITE. Touch START. Microwavesafe ..." section). In the event of -cycle tones will sound. 6. To Use FAVORITE: 1. Place food on the turntable, and close the door. 2. Manual Cooking NOTE: To cook at 100% power, begin the programmed cycle. If cooking with loose-fitting lids are recommended. Touch START. Cooking in Stages" ...

Use & Care Guide
Page 12
...a preset program, but uses only 30% (PL3) cooking power. When the cycle ends, "End" will appear in "Manual Cooking" section, and use 30% cooking power. When the cycle ends, "End" will appear in microwave-safe baking dish. The cycle may be interrupted briefly to clear the display. To Defrost... Manually: Follow direction in the display, and the end-of -cycle tones will appear in the display. Weight Defrost ...
...a preset program, but uses only 30% (PL3) cooking power. When the cycle ends, "End" will appear in "Manual Cooking" section, and use 30% cooking power. When the cycle ends, "End" will appear in microwave-safe baking dish. The cycle may be interrupted briefly to clear the display. To Defrost... Manually: Follow direction in the display, and the end-of -cycle tones will appear in the display. Weight Defrost ...


