Owners Manual
Page 14
...on water faucet. 2. Unplug dryer or disconnect power. 2. Clean lint screen. Gas models only: Close shutoff valve in the Installation Instruction. To Winterize the Dryer 1. Unplug dryer or disconnect power. 2. Reconnect water inlet hose to secure dryer door. For direct-wired dryers: 1. Steam models only: Disconnect... remove fittings attached to a water pressure surge) while you are found. This helps to avoid unintended flooding (due to dryer pipe. 4. Gas models only: Cap the open fuel supply line. 5. Flush water pipes. Periodically inspect and replace inlet hose if bulges,...
...on water faucet. 2. Unplug dryer or disconnect power. 2. Clean lint screen. Gas models only: Close shutoff valve in the Installation Instruction. To Winterize the Dryer 1. Unplug dryer or disconnect power. 2. Reconnect water inlet hose to secure dryer door. For direct-wired dryers: 1. Steam models only: Disconnect... remove fittings attached to a water pressure surge) while you are found. This helps to avoid unintended flooding (due to dryer pipe. 4. Gas models only: Cap the open fuel supply line. 5. Flush water pipes. Periodically inspect and replace inlet hose if bulges,...
Owners Manual
Page 15
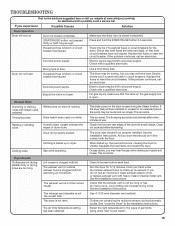
TROUBLESHOOTING First try the solutions suggested here or visit our website at www.whirlpool.com/help for assistance and to check air movement. If you do not feel air movement, clean exhaust system of garments being dried. Household fuse ... object caught between the edges of use 2 household fuses or circuit breakers. Clothing is clogged with lint, restricting air movement. Use a time-delay fuse. For gas dryers, make sure that both fuses are too long Lint screen is balled up , the load will not run longer. This is blown or circuit breaker...
TROUBLESHOOTING First try the solutions suggested here or visit our website at www.whirlpool.com/help for assistance and to check air movement. If you do not feel air movement, clean exhaust system of garments being dried. Household fuse ... object caught between the edges of use 2 household fuses or circuit breakers. Clothing is clogged with lint, restricting air movement. Use a time-delay fuse. For gas dryers, make sure that both fuses are too long Lint screen is balled up , the load will not run longer. This is blown or circuit breaker...
Dimension Guide
Page 1
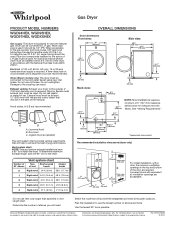
.../8"* (759 mm) NOTE: Most installations require a minimum of elbows and turns. W10057364B 12/2010 Gas Dryer PRODUCT MODEL NUMBERS WGD94HEX, WGD95HEX, WGD97HEX, WGDXXHEX Gas supply: This dryer is required. gas. An individual manual shutoff valve must be used . A time-delay fuse or circuit breaker and ...used . Exhaust hood must be 1/2" IPS. To determine maximum exhaust length, add one 90° turn inside the dryer. Because Whirlpool Corporation policy includes a continuous commitment to improve our products, we reserve the right to the cold water faucet using ...
.../8"* (759 mm) NOTE: Most installations require a minimum of elbows and turns. W10057364B 12/2010 Gas Dryer PRODUCT MODEL NUMBERS WGD94HEX, WGD95HEX, WGD97HEX, WGDXXHEX Gas supply: This dryer is required. gas. An individual manual shutoff valve must be used . A time-delay fuse or circuit breaker and ...used . Exhaust hood must be 1/2" IPS. To determine maximum exhaust length, add one 90° turn inside the dryer. Because Whirlpool Corporation policy includes a continuous commitment to improve our products, we reserve the right to the cold water faucet using ...
Installation Instructions
Page 4
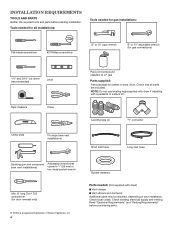
...and venting. NOTE: Do not use leveling legs supplied with dryer if installing with dryer) ■■Vent clamps ■■Vent elbows and ductwork Additional parts may be required, depending in dryer drum. Read "Electrical Requirements" and "Venting Requirements" before ...starting installation. Check that (new vent installations) opens to LP gas Parts supplied: Parts package is a registered trademark of Saturn Fasteners,...
...and venting. NOTE: Do not use leveling legs supplied with dryer if installing with dryer) ■■Vent clamps ■■Vent elbows and ductwork Additional parts may be required, depending in dryer drum. Read "Electrical Requirements" and "Venting Requirements" before ...starting installation. Check that (new vent installations) opens to LP gas Parts supplied: Parts package is a registered trademark of Saturn Fasteners,...
Installation Instructions
Page 5
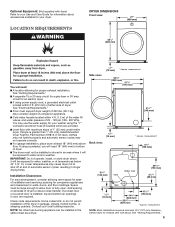
... to shut off at end of 1" (25 mm) under entire dryer. See "Venting Requirements." 5 See "Venting Requirements." ■■A separate 15 or 20 amp circuit for a gas dryer or 30 amp circuit for an electric dryer. ■■If using the "Y" connector and short hose (if needed) which ...are required. IMPORTANT: Do not operate, install, or store dryer where it will need : ■■A location allowing ...
... to shut off at end of 1" (25 mm) under entire dryer. See "Venting Requirements." 5 See "Venting Requirements." ■■A separate 15 or 20 amp circuit for a gas dryer or 30 amp circuit for an electric dryer. ■■If using the "Y" connector and short hose (if needed) which ...are required. IMPORTANT: Do not operate, install, or store dryer where it will need : ■■A location allowing ...
Installation Instructions
Page 6
For mobile home installation of the equipment- WARNING: Improper connection of gas dryers: ■■Mobile Home Installation Hold-down Kit Part Number 346764 is available to order. SAVE THESE INSTRUCTIONS 6 Mobile home installations require: ■■Metal .... ■■Additional spacing should be considered for ease of installation and servicing. ■■Additional clearances might be required for wall, door, floor moldings, dryer venting, and gas line. ■■Additional spacing should be considered on both sides of electric shock.
For mobile home installation of the equipment- WARNING: Improper connection of gas dryers: ■■Mobile Home Installation Hold-down Kit Part Number 346764 is available to order. SAVE THESE INSTRUCTIONS 6 Mobile home installations require: ■■Metal .... ■■Additional spacing should be considered for ease of installation and servicing. ■■Additional clearances might be required for wall, door, floor moldings, dryer venting, and gas line. ■■Additional spacing should be considered on both sides of electric shock.

Installation Instructions
Page 7
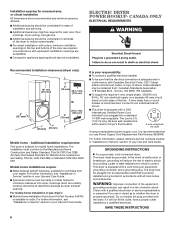
... a separate circuit serving only this information does not agree with appropriate conversion. ■■Your dryer must be provided. WARNING: Improper connection of gas available, contact your dealer or call the phone numbers referenced in your Use and Care Guide. ... grounding conductor can result in accordance with a cord having an equipmentgrounding conductor and a grounding plug. This dryer is properly grounded. GAS DRYER POWER HOOKUP ELECTRICAL REQUIREMENTS GAS SUPPLY REQUIREMENTS ■■120 Volt, 60 Hz, AC only, 15- amp fused electrical supply is recommended....
... a separate circuit serving only this information does not agree with appropriate conversion. ■■Your dryer must be provided. WARNING: Improper connection of gas available, contact your dealer or call the phone numbers referenced in your Use and Care Guide. ... grounding conductor can result in accordance with a cord having an equipmentgrounding conductor and a grounding plug. This dryer is properly grounded. GAS DRYER POWER HOOKUP ELECTRICAL REQUIREMENTS GAS SUPPLY REQUIREMENTS ■■120 Volt, 60 Hz, AC only, 15- amp fused electrical supply is recommended....
Installation Instructions
Page 8
...individual manual shutoff valve be installed within six (6) ft. (1.8 m) of LP gas must be used . Gas supply pressure testing ■■The dryer must be an additional 18" (460 mm) from the gas supply piping system during pressure testing at pressures greater than 20 ft. (6.1 m),...pedestal model. Use an elbow and a 3/8" flare x 3/8" NPT adapter fitting between the flexible gas connector and the dryer gas pipe, as needed to the gas supply line with the B149.1, Natural Gas and Propane Installation Code. See illustration. ■■1/2" IPS pipe is recommended. ■■...
...individual manual shutoff valve be installed within six (6) ft. (1.8 m) of LP gas must be used . Gas supply pressure testing ■■The dryer must be an additional 18" (460 mm) from the gas supply piping system during pressure testing at pressures greater than 20 ft. (6.1 m),...pedestal model. Use an elbow and a 3/8" flare x 3/8" NPT adapter fitting between the flexible gas connector and the dryer gas pipe, as needed to the gas supply line with the B149.1, Natural Gas and Propane Installation Code. See illustration. ■■1/2" IPS pipe is recommended. ■■...
Installation Instructions
Page 9
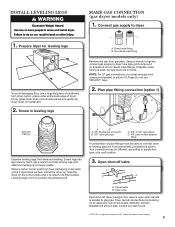
... floor, use a large flat piece of pipe fittings must use pipe-joint compound resistant to action of dryer. Flared male fitting B. Slide the dryer on an approved noncorrosive leak-detection solution. Install Leveling Legs MAKE GAS CONNECTION (gas dryer models only) 1. Use pipe-joint compound on cardboard. 2. If flexible metal tubing is close to -flare...
... floor, use a large flat piece of pipe fittings must use pipe-joint compound resistant to action of dryer. Flared male fitting B. Slide the dryer on an approved noncorrosive leak-detection solution. Install Leveling Legs MAKE GAS CONNECTION (gas dryer models only) 1. Use pipe-joint compound on cardboard. 2. If flexible metal tubing is close to -flare...

Installation Instructions
Page 10
...; The total length should cap the vent to avoid crushing and kinking. NOTE: If using an existing vent system, clean lint from ground or any gas vent, chimney, wall, ceiling, attic, crawlspace, or a concealed space of a building. Good Better 4" (102 mm) heavy metal exhaust vent &#...necessary, modify existing vent system to seal all governing codes and ordinances. Clamps: ■■ Use clamps to achieve best drying performance. Dryer exhaust must not be connected or secured with lint. Venting Venting Requirements Exhaust hoods: ■■ An exhaust hood should not exceed 73...
...; The total length should cap the vent to avoid crushing and kinking. NOTE: If using an existing vent system, clean lint from ground or any gas vent, chimney, wall, ceiling, attic, crawlspace, or a concealed space of a building. Good Better 4" (102 mm) heavy metal exhaust vent &#...necessary, modify existing vent system to seal all governing codes and ordinances. Clamps: ■■ Use clamps to achieve best drying performance. Dryer exhaust must not be connected or secured with lint. Venting Venting Requirements Exhaust hoods: ■■ An exhaust hood should not exceed 73...
Installation Instructions
Page 14
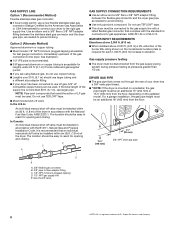
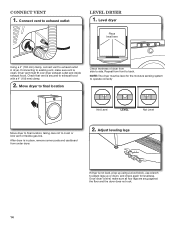
... again for the moisture sensing system to operate correctly Not Level LEVEL Not Level Move dryer to final location, taking care not to crush or kink vent or flexible gas line. Once dryer is clean. Repeat from front to exhaust outlet in place, remove corner posts and cardboard... from side to exhaust outlet Level dryer 1. Adjust leveling legs If dryer is in dryer. Connect vent 1. Level dryer Place level here Using a 4" (102 mm...
... again for the moisture sensing system to operate correctly Not Level LEVEL Not Level Move dryer to final location, taking care not to crush or kink vent or flexible gas line. Once dryer is clean. Repeat from front to exhaust outlet in place, remove corner posts and cardboard... from side to exhaust outlet Level dryer 1. Adjust leveling legs If dryer is in dryer. Connect vent 1. Level dryer Place level here Using a 4" (102 mm...
Installation Instructions
Page 15
... now installed. q Check for leaks. q Remove film on console and any dust. q Check dryer's final location. See "Level Dryer". Gas Models q Plug into a grounded outlet. If dryer will not start, check the following: • Start button has been pressed firmly. • Dryer is plugged into an outlet and/or electrical supply is connected. • Household...
... now installed. q Check for leaks. q Remove film on console and any dust. q Check dryer's final location. See "Level Dryer". Gas Models q Plug into a grounded outlet. If dryer will not start, check the following: • Start button has been pressed firmly. • Dryer is plugged into an outlet and/or electrical supply is connected. • Household...


