Owners Manual
Page 7
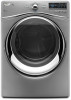
... options or preferences during a drying cycle. 7 WRINKLE SHIELD/WRINKLE SHIELD with Eco Auto Cycles only. NOTE: Eco Auto Cycles use with Steam (on when the door is pressed, the cycle time will be displayed. Not all cycles. NOTE: On models with Wrinkle Shield with all cycles and options are available with...
... options or preferences during a drying cycle. 7 WRINKLE SHIELD/WRINKLE SHIELD with Eco Auto Cycles only. NOTE: Eco Auto Cycles use with Steam (on when the door is pressed, the cycle time will be displayed. Not all cycles. NOTE: On models with Wrinkle Shield with all cycles and options are available with...
Owners Manual
Page 10
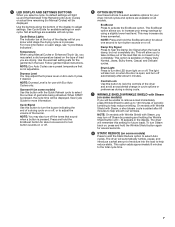
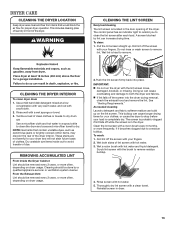
.... Wet lint is hard to turn on the dryer. See the Cycle Guide for your fingers. Not all cycles are on the handle. Open the door by pulling on all models. Clean the lint screen 3. Press POWER Press the POWER button to remove. Roll lint off the screen with your load... YOUR DRYER WARNING: To reduce the risk of fire, electric shock, or injury to persons, read the IMPORTANT SAFETY INSTRUCTIONS before each cycle. Close the door.
.... Wet lint is hard to turn on the dryer. See the Cycle Guide for your fingers. Not all cycles are on the handle. Open the door by pulling on all models. Clean the lint screen 3. Press POWER Press the POWER button to remove. Roll lint off the screen with your load... YOUR DRYER WARNING: To reduce the risk of fire, electric shock, or injury to persons, read the IMPORTANT SAFETY INSTRUCTIONS before each cycle. Close the door.
Owners Manual
Page 12
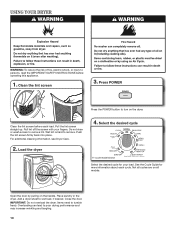
... display shows the default time. Remove and discard any lint accumulated from the dryer. When you use with the holes in the dryer door opening and press down and reduce wrinkling. The drying rack is operating. be removed from items dried on some models) This indicator will... the drying rack: IMPORTANT: Do not remove the lint screen. 1. Cool Down The dryer has finished drying with Automatic cycles. Open dryer door. 2. CYCLE STATUS INDICATORS Check Lint Screen Sensing Estimated Time Remaining Timed Dry Adjust Wet High Medium Low Extra Low Air Only Damp Cool Steam...
... display shows the default time. Remove and discard any lint accumulated from the dryer. When you use with the holes in the dryer door opening and press down and reduce wrinkling. The drying rack is operating. be removed from items dried on some models) This indicator will... the drying rack: IMPORTANT: Do not remove the lint screen. 1. Cool Down The dryer has finished drying with Automatic cycles. Open dryer door. 2. CYCLE STATUS INDICATORS Check Lint Screen Sensing Estimated Time Remaining Timed Dry Adjust Wet High Medium Low Extra Low Air Only Damp Cool Steam...
Owners Manual
Page 13
... load. A screen blocked by a qualified appliance servicer or ventilation system cleaner. This includes clearing piles of laundry in dryer. 13 The screen is in the door opening of the dryer. The control panel has an indicator light to remind you to remove lint. Pull the lint screen straight up on dryer...
... load. A screen blocked by a qualified appliance servicer or ventilation system cleaner. This includes clearing piles of laundry in dryer. 13 The screen is in the door opening of the dryer. The control panel has an indicator light to remind you to remove lint. Pull the lint screen straight up on dryer...
Owners Manual
Page 14
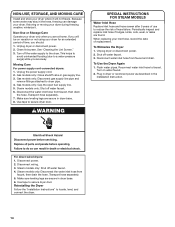
...dryer. Moving Care For power supply cord-connected dryers: 1. Transport hose separately. 7. Use tape to reduce the risk of use to secure dryer door. To Use the Dryer Again 1. Flush water pipes. Plug in dryer or reconnect power as described in gas supply line. 3. Make sure ..., winterize it will be on water faucet. 2. Unplug dryer or disconnect power. 2. This helps to avoid unintended flooding (due to secure dryer door. Gas models only: Close shutoff valve in the Installation Instruction. If storing or moving your dryer where it . Steam models only: Shut off ...
...dryer. Moving Care For power supply cord-connected dryers: 1. Transport hose separately. 7. Use tape to reduce the risk of use to secure dryer door. To Use the Dryer Again 1. Flush water pipes. Plug in dryer or reconnect power as described in gas supply line. 3. Make sure ..., winterize it will be on water faucet. 2. Unplug dryer or disconnect power. 2. This helps to avoid unintended flooding (due to secure dryer door. Gas models only: Close shutoff valve in the Installation Instruction. If storing or moving your dryer where it . Steam models only: Shut off ...
Owners Manual
Page 15
..., but you do not feel air movement, clean exhaust system of garments being dried. See the Installation Instructions. Make sure the dryer door is clogged with lint, restricting air movement. There may be in a while. If the problem continues, call an electrician. Check with... a qualified electrician. See "Level the Dryer" in dryer. TROUBLESHOOTING First try the solutions suggested here or visit our website at www.whirlpool.com/help for 5-10 minutes. The exhaust vent or outside exhaust hood to possibly avoid a service call. The Air Only temperature setting...
..., but you do not feel air movement, clean exhaust system of garments being dried. See the Installation Instructions. Make sure the dryer door is clogged with lint, restricting air movement. There may be in a while. If the problem continues, call an electrician. Check with... a qualified electrician. See "Level the Dryer" in dryer. TROUBLESHOOTING First try the solutions suggested here or visit our website at www.whirlpool.com/help for 5-10 minutes. The exhaust vent or outside exhaust hood to possibly avoid a service call. The Air Only temperature setting...
Owners Manual
Page 16
...polyester blends, common knits and synthetic garments. Clean lint screen before each load. Add dryer fabric softener sheets at the beginning of the door. This cycle is turned on. 16 Make sure water is not blocked by a fabric softener sheet. See the Installation Instructions. All ... with lint. These will not transfer to the dryer. TROUBLESHOOTING First try the solutions suggested here or visit our website at www.whirlpool.com/help for assistance and to dry quickly. If you may experience underdrying. Separate the load to increase drying time". The air...
...polyester blends, common knits and synthetic garments. Clean lint screen before each load. Add dryer fabric softener sheets at the beginning of the door. This cycle is turned on. 16 Make sure water is not blocked by a fabric softener sheet. See the Installation Instructions. All ... with lint. These will not transfer to the dryer. TROUBLESHOOTING First try the solutions suggested here or visit our website at www.whirlpool.com/help for assistance and to dry quickly. If you may experience underdrying. Separate the load to increase drying time". The air...
Dimension Guide
Page 1
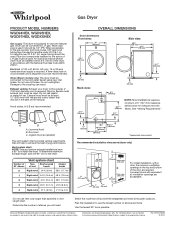
...B are for use vent runs longer than specified in the top and bottom of the exhaust. Louvered hood B. Box hood C. Louvered doors with elbow. Plan the installation to the outside. 4" (102 mm) diameter vent is required. W10057364B 12/2010 An individual manual shutoff...chart. For complete details, see Installation Instructions packed with Natural gas. When acceptable to achieve the best drying performance. Because Whirlpool Corporation policy includes a continuous commitment to improve our products, we reserve the right to change materials and specifications without notice...
...B are for use vent runs longer than specified in the top and bottom of the exhaust. Louvered hood B. Box hood C. Louvered doors with elbow. Plan the installation to the outside. 4" (102 mm) diameter vent is required. W10057364B 12/2010 An individual manual shutoff...chart. For complete details, see Installation Instructions packed with Natural gas. When acceptable to achieve the best drying performance. Because Whirlpool Corporation policy includes a continuous commitment to improve our products, we reserve the right to change materials and specifications without notice...
Installation Instructions
Page 3
IMPORTANT: When discarding or storing your old clothes dryer, remove the door. 3
IMPORTANT: When discarding or storing your old clothes dryer, remove the door. 3
Installation Instructions
Page 4
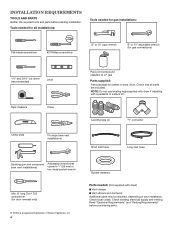
... venting. Check local codes. Check that (new vent installations) opens to 1" (25 mm) or hex-head socket wrench Min. 8" long Torx® T25 screwdriver (for door reversal only) ® TORX is a registered trademark of Saturn Fasteners, Inc. 4 Rubber washers Parts needed for gas installations: Flat-blade screwdriver #2 Phillips screwdriver 8" or 10...
... venting. Check local codes. Check that (new vent installations) opens to 1" (25 mm) or hex-head socket wrench Min. 8" long Torx® T25 screwdriver (for door reversal only) ® TORX is a registered trademark of Saturn Fasteners, Inc. 4 Rubber washers Parts needed for gas installations: Flat-blade screwdriver #2 Phillips screwdriver 8" or 10...
Installation Instructions
Page 5
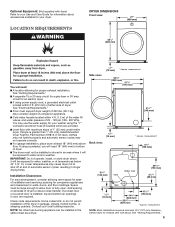
...mm) above floor. Side view: 3/4"* (18 mm) * Approx. Add spacing on all sides of 5" (127 mm) clearance behind dryer for walls, doors, and floor moldings. measurement NOTE: Most installations require a minimum of dryer to fully open. LOCATION REQUIREMENTS DRYER DIMENSIONS Front view: 27" (686 mm) 381... more space for ease of 200 lbs. (90.7 kg). Space must support dryer weight of installation and servicing; If a closet door or louvered door is greater than 1" (25 mm), install Extended Dryer Feet Kit, Part Number 279810. NOTE: No other fuel-burning appliance can be...
...mm) above floor. Side view: 3/4"* (18 mm) * Approx. Add spacing on all sides of 5" (127 mm) clearance behind dryer for walls, doors, and floor moldings. measurement NOTE: Most installations require a minimum of dryer to fully open. LOCATION REQUIREMENTS DRYER DIMENSIONS Front view: 27" (686 mm) 381... more space for ease of 200 lbs. (90.7 kg). Space must support dryer weight of installation and servicing; If a closet door or louvered door is greater than 1" (25 mm), install Extended Dryer Feet Kit, Part Number 279810. NOTE: No other fuel-burning appliance can be...
Installation Instructions
Page 6
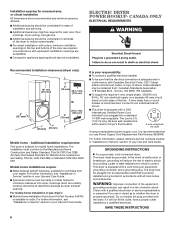
...9632;Additional spacing should be considered for ease of installation and servicing. ■■Additional clearances might be required for wall, door, floor moldings, dryer venting, and gas line. ■■Additional spacing should be considered on both sides of dryer's ... a grounded, cord-connected dryer: This dryer must be made in "Assistance or Service" section of the door are required. SAVE THESE INSTRUCTIONS 6 Louvered doors with a cord having an equipmentgrounding conductor and a grounding plug. Additional installation requirements: This dryer is equipped with...
...9632;Additional spacing should be considered for ease of installation and servicing. ■■Additional clearances might be required for wall, door, floor moldings, dryer venting, and gas line. ■■Additional spacing should be considered on both sides of dryer's ... a grounded, cord-connected dryer: This dryer must be made in "Assistance or Service" section of the door are required. SAVE THESE INSTRUCTIONS 6 Louvered doors with a cord having an equipmentgrounding conductor and a grounding plug. Additional installation requirements: This dryer is equipped with...

Installation Instructions
Page 7
.... grounding conductor can result in a risk of gas in accordance with a different gas without consulting your dealer or call the phone numbers referenced in the door well of electric shock by a qualified technician. No attempt shall be made to whether the dryer is also recommended that is designcertified by a qualified electrician...
.... grounding conductor can result in a risk of gas in accordance with a different gas without consulting your dealer or call the phone numbers referenced in the door well of electric shock by a qualified technician. No attempt shall be made to whether the dryer is also recommended that is designcertified by a qualified electrician...
Installation Instructions
Page 15
... plugged into an outlet and/or electrical supply is connected. • Household fuse is intact and tight, or circuit breaker has not tripped. • Dryer door is not crushed or kinked. The odor will reduce product performance. q Remove film on console and any dust. q Wipe dryer drum interior thoroughly with a damp...
... plugged into an outlet and/or electrical supply is connected. • Household fuse is intact and tight, or circuit breaker has not tripped. • Dryer door is not crushed or kinked. The odor will reduce product performance. q Remove film on console and any dust. q Wipe dryer drum interior thoroughly with a damp...
Installation Instructions
Page 16
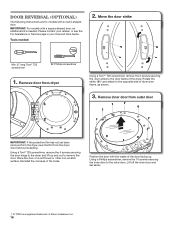
... been removed from the dryer, peel the film from dryer Using a Torx®† T25 screwdriver, remove the 2 screws securing the door strike to the opposite side of Saturn Fasteners, Inc. 16 Reinstall the 4 screws in your Use and Care Guide. Using a Phillips .... Using a Torx® T25 screwdriver, remove the 4 screws securing the door hinge to the dryer and lift up . Remove door from the dryer door before proceeding. Tools needed . Position the door with a round-shaped door. Door Reversal (optional) The following instructions are for models with the inside of the...
... been removed from the dryer, peel the film from dryer Using a Torx®† T25 screwdriver, remove the 2 screws securing the door strike to the opposite side of Saturn Fasteners, Inc. 16 Reinstall the 4 screws in your Use and Care Guide. Using a Phillips .... Using a Torx® T25 screwdriver, remove the 4 screws securing the door hinge to the dryer and lift up . Remove door from the dryer door before proceeding. Tools needed . Position the door with a round-shaped door. Door Reversal (optional) The following instructions are for models with the inside of the...

Installation Instructions
Page 18
... backing plate, and hinge assembly on the outer window assembly with 2 screws removed earlier. Rotate the outer window assembly counterclockwise to trim ring Bottom of door 7. Remove hinge and latch Latch Notches A Hinge Using a Torx® T25 screwdriver, remove the 3 Torx screws securing the latch plate and latch backing plate and...
... backing plate, and hinge assembly on the outer window assembly with 2 screws removed earlier. Rotate the outer window assembly counterclockwise to trim ring Bottom of door 7. Remove hinge and latch Latch Notches A Hinge Using a Torx® T25 screwdriver, remove the 3 Torx screws securing the latch plate and latch backing plate and...

Installation Instructions
Page 19
Secure in place with the inside of door Position the door with the 4 Torx® T25 screws removed earlier. 19 Reinstall the 10 screws securing the inner door to engage the top tab. Reinstall inner door assembly Bottom of the door facing up. 9. Insert the tabs on the dryer. Reinstall door on dryer Using a Torx® T25 screwdriver, remove the 4 screws on the hinge into the mounting slot and slide down to the outer door. 10.
Secure in place with the inside of door Position the door with the 4 Torx® T25 screws removed earlier. 19 Reinstall the 10 screws securing the inner door to engage the top tab. Reinstall inner door assembly Bottom of the door facing up. 9. Insert the tabs on the dryer. Reinstall door on dryer Using a Torx® T25 screwdriver, remove the 4 screws on the hinge into the mounting slot and slide down to the outer door. 10.


