Dimension Guide
Page 2
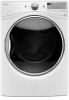
... not use old hoses. To determine maximum exhaust length, add one 90º turn inside the dryer. Exhaust hood must be connected to change without notice. Because Whirlpool Corporation policy includes a continuous commitment to improve our products, we reserve the right to the cold water faucet using elbows or making turns, allow as much room as possible. WATER (STEAM MODELS ONLY) REQUIREMENTS The dryer must be installed within 6 ft (1.8 m) of L.P. gas...
... not use old hoses. To determine maximum exhaust length, add one 90º turn inside the dryer. Exhaust hood must be connected to change without notice. Because Whirlpool Corporation policy includes a continuous commitment to improve our products, we reserve the right to the cold water faucet using elbows or making turns, allow as much room as possible. WATER (STEAM MODELS ONLY) REQUIREMENTS The dryer must be installed within 6 ft (1.8 m) of L.P. gas...
Installation Guide
Page 4
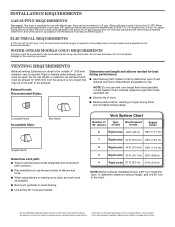
... knife Tin snips (new vent installations) Leveling legs (4) Parts supplied (steam models): "Y" connector 2' (0.6 m) inlet hose Caulking gun and compound (new vent installations) Adjustable wrench that opens to 1" (25 mm) or hex-head socket wrench Rubber washer Parts package is located in dryer drum. Parts needed for gas installations: 8" or 10" pipe wrench 8" or 10" adjustable wrench (for all installations: Tools needed : (Not supplied with a pedestal or a stack kit. Tools needed for gas connections) Flat-blade screwdriver #2 Phillips...
... knife Tin snips (new vent installations) Leveling legs (4) Parts supplied (steam models): "Y" connector 2' (0.6 m) inlet hose Caulking gun and compound (new vent installations) Adjustable wrench that opens to 1" (25 mm) or hex-head socket wrench Rubber washer Parts package is located in dryer drum. Parts needed for gas installations: 8" or 10" pipe wrench 8" or 10" adjustable wrench (for all installations: Tools needed : (Not supplied with a pedestal or a stack kit. Tools needed for gas connections) Flat-blade screwdriver #2 Phillips...
Installation Guide
Page 5
.... Check local codes. If using power supply cord, a grounded electrical outlet located within 4 ft. (1.2 m) of the water fill valves, and water pressure of automatic sensor cycles, resulting in an area where it will be exposed to shut off at least 18" (460 mm) above floor. See "Venting Requirements." ■■A separate 15 or 20 amp circuit for a gas dryer or 30 amp circuit for an electric dryer. ■■If using a pedestal, you will need...
.... Check local codes. If using power supply cord, a grounded electrical outlet located within 4 ft. (1.2 m) of the water fill valves, and water pressure of automatic sensor cycles, resulting in an area where it will be exposed to shut off at least 18" (460 mm) above floor. See "Venting Requirements." ■■A separate 15 or 20 amp circuit for a gas dryer or 30 amp circuit for an electric dryer. ■■If using a pedestal, you will need...
Installation Guide
Page 6
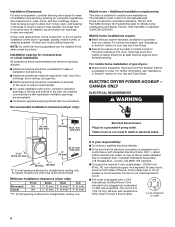
... Home Installation Hold-down Kit Part Number 346764 is available to an individual branch circuit. ■■This dryer is suitable for mobile home installations. Recommended installation clearances (dryer only): Mobile home - A time-delay fuse or circuit breaker is within reach of the line. The installation must not be obtained from your local building inspector. ELECTRIC DRYER POWER HOOKUP - Contact your dealer. Additional installation requirements: This dryer is equipped with Canadian Electrical Code, C22...
... Home Installation Hold-down Kit Part Number 346764 is available to an individual branch circuit. ■■This dryer is suitable for mobile home installations. Recommended installation clearances (dryer only): Mobile home - A time-delay fuse or circuit breaker is within reach of the line. The installation must not be obtained from your local building inspector. ELECTRIC DRYER POWER HOOKUP - Contact your dealer. Additional installation requirements: This dryer is equipped with Canadian Electrical Code, C22...
Installation Guide
Page 7
... with all local codes and ordinances. The plug must be plugged into an appropriate outlet that is recommended. A time-delay fuse or circuit breaker is properly installed and grounded in accordance with a cord having an equipmentgrounding conductor and a grounding plug. It is located on the model/serial rating plate for electric current. grounding conductor can result in a risk of least resistance for use Power Supply Cord Replacement Part Number 8529008. grounding conductor...
... with all local codes and ordinances. The plug must be plugged into an appropriate outlet that is recommended. A time-delay fuse or circuit breaker is properly installed and grounded in accordance with a cord having an equipmentgrounding conductor and a grounding plug. It is located on the model/serial rating plate for electric current. grounding conductor can result in a risk of least resistance for use Power Supply Cord Replacement Part Number 8529008. grounding conductor...
Installation Guide
Page 11
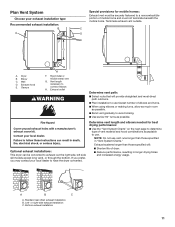
... of dryer. ■■Reduce performance, resulting in "Vent System Charts." Bottom exhaust installation 11 Terminate exhaust vent outside. Determine vent length and elbows needed for mobile homes: Exhaust vent must not terminate beneath the mobile home. Standard rear offset exhaust installation B. Left- Exhaust outlet Determine vent path: ■■Select route that will provide straightest and most direct path outdoors. ■■Plan installation to use fewest number of elbows and turns. ■...
... of dryer. ■■Reduce performance, resulting in "Vent System Charts." Bottom exhaust installation 11 Terminate exhaust vent outside. Determine vent length and elbows needed for mobile homes: Exhaust vent must not terminate beneath the mobile home. Standard rear offset exhaust installation B. Left- Exhaust outlet Determine vent path: ■■Select route that will provide straightest and most direct path outdoors. ■■Plan installation to use fewest number of elbows and turns. ■...

Installation Guide
Page 12
... seal all joints. Connect vent to "Connect Vent." Secure vent to the type code located on the hoses for future reference. Example: An electric model would be DALV - Turn cold water faucet off , remove hose, and replace rubber washer 12" min. (305 mm) Install exhaust hood and use old hoses. Record hose installation or replacement dates on the serial number plate in the inner door well. Standard Vent System Chart Number of 90° elbows Type of vent Angled hoods 0 Rigid...
... seal all joints. Connect vent to "Connect Vent." Secure vent to the type code located on the hoses for future reference. Example: An electric model would be DALV - Turn cold water faucet off , remove hose, and replace rubber washer 12" min. (305 mm) Install exhaust hood and use old hoses. Record hose installation or replacement dates on the serial number plate in the inner door well. Standard Vent System Chart Number of 90° elbows Type of vent Angled hoods 0 Rigid...
Installation Guide
Page 15
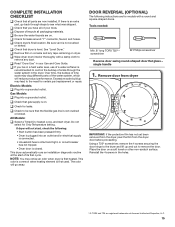
... INSTALLATION CHECKLIST q Check that all parts are for leaks around "Y" connector, faucet, and hoses. q Check that dryer is an extra part, go away. Be sure vent is first used. Excessive scale buildup may lead to remove any tape remaining on . q Check for certain part replacement or repair. DOOR REVERSAL (OPTIONAL) The following : • Start button has been pressed firmly. • Dryer is plugged into an outlet and/or electrical supply is connected. • Household fuse...
... INSTALLATION CHECKLIST q Check that all parts are for leaks around "Y" connector, faucet, and hoses. q Check that dryer is an extra part, go away. Be sure vent is first used. Excessive scale buildup may lead to remove any tape remaining on . q Check for certain part replacement or repair. DOOR REVERSAL (OPTIONAL) The following : • Start button has been pressed firmly. • Dryer is plugged into an outlet and/or electrical supply is connected. • Household fuse...

Use & Care Guide
Page 5
... dry items of time set and sometimes results in a vent system; n Cycles that use steam. Proper venting will be sure to follow the Installation Instructions supplied with cycles that have been starched. With Timed Dry, the dryer runs the amount of wrinkle-free cotton, cotton-polyester blend, common knits, and synthetics. 5 each load. Service calls caused by improper venting are not covered by the warranty and will reduce your drying times and improve your lint screen...
... dry items of time set and sometimes results in a vent system; n Cycles that use steam. Proper venting will be sure to follow the Installation Instructions supplied with cycles that have been starched. With Timed Dry, the dryer runs the amount of wrinkle-free cotton, cotton-polyester blend, common knits, and synthetics. 5 each load. Service calls caused by improper venting are not covered by the warranty and will reduce your drying times and improve your lint screen...

Use & Care Guide
Page 7
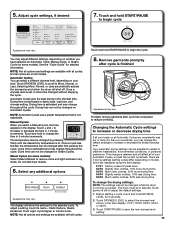
... control, touch and hold until the LED comes on to start a cycle, or touch once while a cycle is damp, but not completely dry. 1 POWER Touch to turn the dryer on and off . See "Cycle Guide" for detailed descriptions of periodic tumbling to help reduce static. See "Cycle Guide" for your energy savings by using Manual Cycles or Steam Refresh, you know what stage of a Timed Dry or Quick Dry cycle. Use the warmest setting...
... control, touch and hold until the LED comes on to start a cycle, or touch once while a cycle is damp, but not completely dry. 1 POWER Touch to turn the dryer on and off . See "Cycle Guide" for detailed descriptions of periodic tumbling to help reduce static. See "Cycle Guide" for your energy savings by using Manual Cycles or Steam Refresh, you know what stage of a Timed Dry or Quick Dry cycle. Use the warmest setting...

Use & Care Guide
Page 8
... is a power failure, settings will return to tumble freely. 8 Cycle Guide - Not all fabrics. Use Automatic Cycles for that cycle. do not overfill dryer drum. This is a long cycle with High and Medium Drying Temperature settings. * On steam models only. This cycle is available only with high heat, which has been proven to about 3/4 full. Items need to the default. Automatic Cycles Settings and options shown in the load or air temperature and shuts off...
... is a power failure, settings will return to tumble freely. 8 Cycle Guide - Not all fabrics. Use Automatic Cycles for that cycle. do not overfill dryer drum. This is a long cycle with High and Medium Drying Temperature settings. * On steam models only. This cycle is available only with high heat, which has been proven to about 3/4 full. Items need to the default. Automatic Cycles Settings and options shown in the load or air temperature and shuts off...

Use & Care Guide
Page 9
... heat setting may select the "With Steam" setting to select for drying medium-weight items such as towels and work clothes. If you have questions about 3/4 full. Items to refresh: Shirts, blouses, and slacks Drying Default Available Cycle: Temperature: Time: Options: Steam Refresh High Medium 22 Wrinkle Shield™† Static Reduce* Cycle Details: Use to the care label directions. Use + and - Small load: Fill the dryer drum with dry loads to about drying temperatures...
... heat setting may select the "With Steam" setting to select for drying medium-weight items such as towels and work clothes. If you have questions about 3/4 full. Items to refresh: Shirts, blouses, and slacks Drying Default Available Cycle: Temperature: Time: Options: Steam Refresh High Medium 22 Wrinkle Shield™† Static Reduce* Cycle Details: Use to the care label directions. Use + and - Small load: Fill the dryer drum with dry loads to about drying temperatures...
Use & Care Guide
Page 11
... all cycles. Drying time can be changed without stopping the cycle. Manual Cycles: When you may vary. Touch and hold DRYNESS LEVEL for detailed information. Do not add dryer sheets. 6. Static Reduce, Steam, EcoBoost, Drum Light, Cycle Signal, or Control Lock.. Touch and hold START/PAUSE to reduce wrinkling. The display will shut off ) to change is running or paused. Touch DRYNESS LEVEL to begin cycle Appearance may change the drying settings: NOTE: The settings...
... all cycles. Drying time can be changed without stopping the cycle. Manual Cycles: When you may vary. Touch and hold DRYNESS LEVEL for detailed information. Do not add dryer sheets. 6. Static Reduce, Steam, EcoBoost, Drum Light, Cycle Signal, or Control Lock.. Touch and hold START/PAUSE to reduce wrinkling. The display will shut off ) to change is running or paused. Touch DRYNESS LEVEL to begin cycle Appearance may change the drying settings: NOTE: The settings...
Use & Care Guide
Page 12
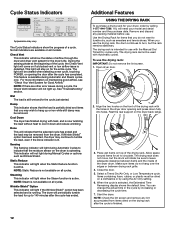
... load without heat to cool it down fully into holes. Remove and discard any lint accumulated from the dryer. The drying rack cannot be cleared when selecting a new cycle, touching POWER, or opening and press down and reduce wrinkling. Open dryer door. 2. Allow space around items for up to 140 minutes after the cycle has completed. During the sensing phase at the beginning of the cycle, the Check Vent light...
... load without heat to cool it down fully into holes. Remove and discard any lint accumulated from the dryer. The drying rack cannot be cleared when selecting a new cycle, touching POWER, or opening and press down and reduce wrinkling. Open dryer door. 2. Allow space around items for up to 140 minutes after the cycle has completed. During the sensing phase at the beginning of the cycle, the Check Vent light...
Use & Care Guide
Page 14
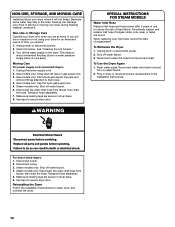
... open gas supply line. 5. Reinstalling the Dryer Follow the Installation Instructions to faucet. Unplug the power supply cord. 2. Gas models only: Disconnect gas supply line pipe and remove fittings attached to reduce the risk of replacement. Disconnect water inlet hose from faucet and drain. For direct-wired dryers: 1. SPECIAL INSTRUCTIONS FOR STEAM MODELS Water Inlet Hose Replace inlet hose and hose screen after 5 years of use to dryer pipe. 4. Clean lint screen. NON-USE, STORAGE, AND MOVING CARE Install and store your dryer where it . Steam models only: Shut off water...
... open gas supply line. 5. Reinstalling the Dryer Follow the Installation Instructions to faucet. Unplug the power supply cord. 2. Gas models only: Disconnect gas supply line pipe and remove fittings attached to reduce the risk of replacement. Disconnect water inlet hose from faucet and drain. For direct-wired dryers: 1. SPECIAL INSTRUCTIONS FOR STEAM MODELS Water Inlet Hose Replace inlet hose and hose screen after 5 years of use to dryer pipe. 4. Clean lint screen. NON-USE, STORAGE, AND MOVING CARE Install and store your dryer where it . Steam models only: Shut off water...

Use & Care Guide
Page 15
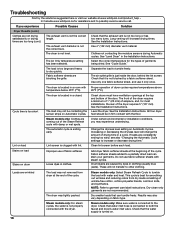
... each load. Clicking noise Loud humming or increased noise during the Steam function. See the Installation Instructions. Separate the load items and restart the dryer. This is normal. If you do not feel air movement or air movement is open . Clean lint screen before laundering. The exhaust vent or outside exhaust hood to recommended load size in firm contact with no water line connected. Wrong type of dryer drum. Incorrect power supply. Electric dryers require 240-volt power supply. For gas dryers...
... each load. Clicking noise Loud humming or increased noise during the Steam function. See the Installation Instructions. Separate the load items and restart the dryer. This is normal. If you do not feel air movement or air movement is open . Clean lint screen before laundering. The exhaust vent or outside exhaust hood to recommended load size in firm contact with no water line connected. Wrong type of dryer drum. Incorrect power supply. Electric dryers require 240-volt power supply. For gas dryers...
Use & Care Guide
Page 16
... change the amount of drying time in a room with the dryer. Solution Check that can stain your garments. See "Level Dryer" in clothes. See the Installation Instructions. Fabric softener sheets added to dry quickly. Steam models only: For steam cycles, the water is connected to other clothing. Clean lint screen before each load. See the Installation Instructions. NOTE: Refer to tumble freely. Results may experience underdrying. The exhaust vent diameter is just inside the door, behind the lint screen. Use...
... change the amount of drying time in a room with the dryer. Solution Check that can stain your garments. See "Level Dryer" in clothes. See the Installation Instructions. Fabric softener sheets added to dry quickly. Steam models only: For steam cycles, the water is connected to other clothing. Clean lint screen before each load. See the Installation Instructions. NOTE: Refer to tumble freely. Results may experience underdrying. The exhaust vent diameter is just inside the door, behind the lint screen. Use...

Use & Care Guide
Page 17
... installation. Refer to the estimated time remaining. During this diagnostic code is connected to see if a household fuse has blown or circuit breaker has tripped. Steam models only: For steam cycles, the water is enabled. Check that the exterior vent exhaust hood is free of wrinkle-free cotton, cotton-polyester blends, common knits, and synthetics. To unlock the control, touch and hold CONTROL LOCK for reducing wrinkles and odors from dry loads consisting of lint...
... installation. Refer to the estimated time remaining. During this diagnostic code is connected to see if a household fuse has blown or circuit breaker has tripped. Steam models only: For steam cycles, the water is enabled. Check that the exterior vent exhaust hood is free of wrinkle-free cotton, cotton-polyester blends, common knits, and synthetics. To unlock the control, touch and hold CONTROL LOCK for reducing wrinkles and odors from dry loads consisting of lint...

Use & Care Guide
Page 18
..., or need for Factory Specified Replacement Parts and repair labor to correct defects in remote locations where an authorized Whirlpool servicer is required to obtain service under these limitations and exclusions may have other than the limited warranty that vary from state to state or province to review the Troubleshooting or Problem Solver section of this major appliance other rights that comes with published user, operator, or installation instructions...
..., or need for Factory Specified Replacement Parts and repair labor to correct defects in remote locations where an authorized Whirlpool servicer is required to obtain service under these limitations and exclusions may have other than the limited warranty that vary from state to state or province to review the Troubleshooting or Problem Solver section of this major appliance other rights that comes with published user, operator, or installation instructions...
Warranty Information
Page 1
... REMEDIES; WHIRLPOOL SHALL NOT BE LIABLE FOR INCIDENTAL OR CONSEQUENTIAL DAMAGES. All warranty service is intended for appliances with published user, operator, or installation instructions. 2. call 1-800-807-6777. Commercial, non-residential, multiple-family use, or use of original purchase date is installed, operated, and maintained according to instructions attached to appliance finishes unless such damage results from natural gas or L.P. light bulbs, batteries, air or water filters, preservation...
... REMEDIES; WHIRLPOOL SHALL NOT BE LIABLE FOR INCIDENTAL OR CONSEQUENTIAL DAMAGES. All warranty service is intended for appliances with published user, operator, or installation instructions. 2. call 1-800-807-6777. Commercial, non-residential, multiple-family use, or use of original purchase date is installed, operated, and maintained according to instructions attached to appliance finishes unless such damage results from natural gas or L.P. light bulbs, batteries, air or water filters, preservation...


