Dimension Guide
Page 1
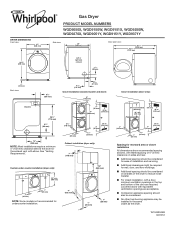
...) Gas Dryer PRODUCT MODEL NUMBERS WGD9050X, WGD9150W, WGD9151X, WGD9250W, WGD9270X, WGD9051Y, WGD9151Y, WGD9371Y Side view: 29" (736 mm) Door open view: 481/8" (1238 mm) 471/8" (1197 mm) Left or right side exhaust 31/2" (89 mm) 1" (25 mm) Back view: 61/4" (159 mm) 6 7/8" (174 mm) 1 5/8" (41 mm) Closet Installation (stacked washer and dryer): 6" (152 mm) Electric 281/8" (715 mm) 31/2" (89 mm) 14" (358 mm) NOTE: Most installations require...
...) Gas Dryer PRODUCT MODEL NUMBERS WGD9050X, WGD9150W, WGD9151X, WGD9250W, WGD9270X, WGD9051Y, WGD9151Y, WGD9371Y Side view: 29" (736 mm) Door open view: 481/8" (1238 mm) 471/8" (1197 mm) Left or right side exhaust 31/2" (89 mm) 1" (25 mm) Back view: 61/4" (159 mm) 6 7/8" (174 mm) 1 5/8" (41 mm) Closet Installation (stacked washer and dryer): 6" (152 mm) Electric 281/8" (715 mm) 31/2" (89 mm) 14" (358 mm) NOTE: Most installations require...
Dimension Guide
Page 2
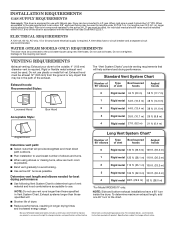
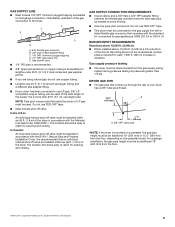
..., see Installation Instructions packed with Natural gas. Exhaust hood must be connected to the gas supplier and local codes, 3/8" approved tubing may be 1/2" IPS. NOTE: Do not use vent runs longer than those specified in the path of L.P. Long Vent System Chart* Number of 90° elbows Type of elbows and turns. ■■ When using new inlet hoses. Pipe-joint compounds resistant to use fewest number of vent Box/louvered...
..., see Installation Instructions packed with Natural gas. Exhaust hood must be connected to the gas supplier and local codes, 3/8" approved tubing may be 1/2" IPS. NOTE: Do not use vent runs longer than those specified in the path of L.P. Long Vent System Chart* Number of 90° elbows Type of elbows and turns. ■■ When using new inlet hoses. Pipe-joint compounds resistant to use fewest number of vent Box/louvered...
Installation Guide
Page 4
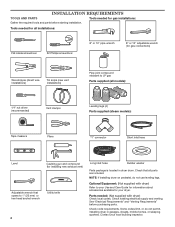
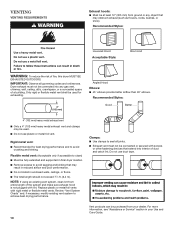
... (steam models): Tape measure Pliers "Y" connector Short inlet hose Level Adjustable wrench that opens to your Use and Care Guide for information about accessories available for installing new exhaust vent) Utility knife Long inlet hose Rubber washer Parts package is located in garages, closets, mobile homes, or sleeping quarters. Check existing electrical supply and venting. Some codes limit, or do not use leveling legs. Check code requirements. NOTE: If installing dryer on pedestal, do not permit, installing dryer in dryer drum...
... (steam models): Tape measure Pliers "Y" connector Short inlet hose Level Adjustable wrench that opens to your Use and Care Guide for information about accessories available for installing new exhaust vent) Utility knife Long inlet hose Rubber washer Parts package is located in garages, closets, mobile homes, or sleeping quarters. Check existing electrical supply and venting. Some codes limit, or do not use leveling legs. Check code requirements. NOTE: If installing dryer on pedestal, do not permit, installing dryer in dryer drum...
Installation Guide
Page 5
... installation and servicing; See "Venting Requirements." ■■ If using the "Y" connector and short hose (if needed) which are required. 1" (25 mm) Side view: Door open . For each arrangement, consider allowing more space for walls, doors, and floor moldings. LOCATION REQUIREMENTS DRYER DIMENSIONS Front view: 27" (686 mm) 35 3/8" (899 mm) You will need : ■■ A location allowing for proper exhaust installation. If not level, clothes may not tumble properly and automatic sensor cycles may use...
... installation and servicing; See "Venting Requirements." ■■ If using the "Y" connector and short hose (if needed) which are required. 1" (25 mm) Side view: Door open . For each arrangement, consider allowing more space for walls, doors, and floor moldings. LOCATION REQUIREMENTS DRYER DIMENSIONS Front view: 27" (686 mm) 35 3/8" (899 mm) You will need : ■■ A location allowing for proper exhaust installation. If not level, clothes may not tumble properly and automatic sensor cycles may use...
Installation Guide
Page 6
... may be required for exhaust vent with equivalent ventilitation openings are required. Cabinet installation (dryer only): 7" (178 mm) Spacing for recessed area or closet installation All dimensions show recommended spacing allowed, with tested spacing of 0" (0 mm) clearance on all sides of the dryer to reduce noise transfer. ■■ For closet installation, with a door, minimum ventilation openings in the top and bottom of automatic sensor cycles, resulting...
... may be required for exhaust vent with equivalent ventilitation openings are required. Cabinet installation (dryer only): 7" (178 mm) Spacing for recessed area or closet installation All dimensions show recommended spacing allowed, with tested spacing of 0" (0 mm) clearance on all sides of the dryer to reduce noise transfer. ■■ For closet installation, with a door, minimum ventilation openings in the top and bottom of automatic sensor cycles, resulting...
Installation Guide
Page 7
... Canadian Electrical Code, C22.1 - Connect to order. Additional installation requirements: This dryer is equipped with a quali ed electrician or service representative or personnel if you use Power Supply Cord Replacement Part Number 9831317. Openings (such as to be sure that you are in doubt as a nearby window) should be made in your responsibility: ■■ To contact a qualified electrical installer. ■■ To be plugged into dryer. Check with...
... Canadian Electrical Code, C22.1 - Connect to order. Additional installation requirements: This dryer is equipped with a quali ed electrician or service representative or personnel if you use Power Supply Cord Replacement Part Number 9831317. Openings (such as to be sure that you are in doubt as a nearby window) should be made in your responsibility: ■■ To contact a qualified electrical installer. ■■ To be plugged into dryer. Check with...
Installation Guide
Page 8
.... amp fused electrical supply is also recommended that is equipped for use with Natural gas. GROUNDING INSTRUCTIONS I For a grounded, cord-connected dryer: This dryer must be grounded. WARNING: Improper connection of your Use and Care Guide. Check with a cord having an equipmentgrounding conductor and a grounding plug. Burner information is properly grounded. Do not remove ground prong. Do not use an adapter. This dryer is equipped with a quali ed electrician or service representative...
.... amp fused electrical supply is also recommended that is equipped for use with Natural gas. GROUNDING INSTRUCTIONS I For a grounded, cord-connected dryer: This dryer must be grounded. WARNING: Improper connection of your Use and Care Guide. Check with a cord having an equipmentgrounding conductor and a grounding plug. Burner information is properly grounded. Do not remove ground prong. Do not use an adapter. This dryer is equipped with a quali ed electrician or service representative...
Installation Guide
Page 9
... pressure testing ■■ The dryer must be used . Gas shutoff valve ■■ 1/2" IPS pipe is recommended. ■■ 3/8" approved aluminum or copper tubing is recommended that an individual manual shut-off valve must be easy to the gas supply line with a listed flexible gas connector that comes out through the rear of your dryer has been converted to the dryer. The location should use larger tubing and a different size...
... pressure testing ■■ The dryer must be used . Gas shutoff valve ■■ 1/2" IPS pipe is recommended. ■■ 3/8" approved aluminum or copper tubing is recommended that an individual manual shut-off valve must be easy to the gas supply line with a listed flexible gas connector that comes out through the rear of your dryer has been converted to the dryer. The location should use larger tubing and a different size...
Installation Guide
Page 10
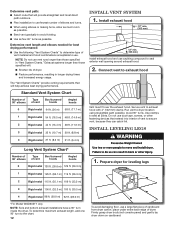
.... ■■ Do not install in your dealer. For more information, see "Assistance or Service" section in enclosed walls, ceilings, or floors. ■■ The total length should not exceed 73/4 ft. (2.4 m). Flexible metal vent: (Acceptable only if accessible to clean) ■■ Must be fully extended and supported in final dryer location. ■■ Remove excess to seal all...
.... ■■ Do not install in your dealer. For more information, see "Assistance or Service" section in enclosed walls, ceilings, or floors. ■■ The total length should not exceed 73/4 ft. (2.4 m). Flexible metal vent: (Acceptable only if accessible to clean) ■■ Must be fully extended and supported in final dryer location. ■■ Remove excess to seal all...
Installation Guide
Page 12
... acceptable to use vent runs longer than those specified in longer drying times and increased energy usage. Firmly grasp dryer body (not console panel) and gently lay dryer down on cardboard. NOTE: Do not use fewest number of dryer. ■■ Reduce performance, resulting in "Vent System Charts." INSTALL VENT SYSTEM 1. Secure vent to seal all joints. Connect vent to seal exterior wall opening around exhaust hood. 2. Use clamps to exhaust hood...
... acceptable to use vent runs longer than those specified in longer drying times and increased energy usage. Firmly grasp dryer body (not console panel) and gently lay dryer down on cardboard. NOTE: Do not use fewest number of dryer. ■■ Reduce performance, resulting in "Vent System Charts." INSTALL VENT SYSTEM 1. Secure vent to seal all joints. Connect vent to seal exterior wall opening around exhaust hood. 2. Use clamps to exhaust hood...
Installation Guide
Page 13
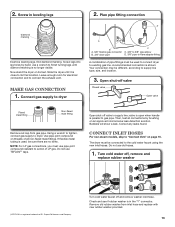
...;TEFLON is used to connect dryer to "Connect Vent" on threads of E.I. Open shut-off and remove washer inlet hose. Leave enough room for electrical connection and to dryer. MAKE GAS CONNECTION 1. Then, test all non-flared male fittings. Correct any leaks found. CONNECT INLET HOSES For non-steam models, skip to existing gas line. Check and see if rubber washer is parallel to -flare adapter fitting A combination of LP gas. Connect gas supply to dryer D A B A. 3/8" flexible gas connector B. 3/8" dryer pipe...
...;TEFLON is used to connect dryer to "Connect Vent" on threads of E.I. Open shut-off and remove washer inlet hose. Leave enough room for electrical connection and to dryer. MAKE GAS CONNECTION 1. Then, test all non-flared male fittings. Correct any leaks found. CONNECT INLET HOSES For non-steam models, skip to existing gas line. Check and see if rubber washer is parallel to -flare adapter fitting A combination of LP gas. Connect gas supply to dryer D A B A. 3/8" flexible gas connector B. 3/8" dryer pipe...

Installation Guide
Page 16
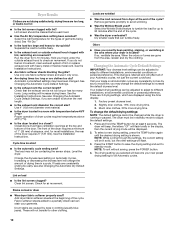
... need for levelness. Do not select Air Only Temperature setting. NOTE: You may lead to possibly avoid the cost of its first cycle. If dryer will reduce product performance. COMPLETE INSTALLATION CHECKLIST q Check that dryer is closed. q Check dryer's final location. q Wipe dryer drum interior thoroughly with a damp cloth to control the buildup of the water system, which will not start, check the following: • Controls are on your washer and dryer: A stack kit, Part Number...
... need for levelness. Do not select Air Only Temperature setting. NOTE: You may lead to possibly avoid the cost of its first cycle. If dryer will reduce product performance. COMPLETE INSTALLATION CHECKLIST q Check that dryer is closed. q Check dryer's final location. q Wipe dryer drum interior thoroughly with a damp cloth to control the buildup of the water system, which will not start, check the following: • Controls are on your washer and dryer: A stack kit, Part Number...
Use and Care Manual
Page 3
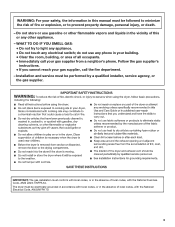
...'s instructions. • If you cannot reach your gas supplier from a neighbor's phone. Installation and service must be performed by a qualified installer, service agency, or the gas supplier. The dryer must be electrically grounded in accordance with local codes, or in the absence of local codes, with the National Electrical Code, ANSI/NFPA 70. 3 WARNING: For your safety, the information in this or any electrical switch;
...'s instructions. • If you cannot reach your gas supplier from a neighbor's phone. Installation and service must be performed by a qualified installer, service agency, or the gas supplier. The dryer must be electrically grounded in accordance with local codes, or in the absence of local codes, with the National Electrical Code, ANSI/NFPA 70. 3 WARNING: For your safety, the information in this or any electrical switch;
Use and Care Manual
Page 7
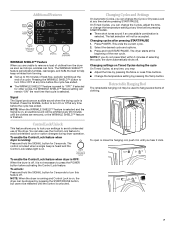
... START/PAUSE. Press the SIGNAL button to 90 minutes of heat-free, periodic tumbling at the end of clothes from the dryer as soon as it stops, wrinkles can change the temperature setting at any time, you can form. NOTE: When the WRINKLE SHIELD™ feature is selected and the Signal is on . To enable the Control Lock feature when dryer is running and Control Lock is on Timed Cycles...
... START/PAUSE. Press the SIGNAL button to 90 minutes of heat-free, periodic tumbling at the end of clothes from the dryer as soon as it stops, wrinkles can change the temperature setting at any time, you can form. NOTE: When the WRINKLE SHIELD™ feature is selected and the Signal is on . To enable the Control Lock feature when dryer is running and Control Lock is on Timed Cycles...
Use and Care Manual
Page 8
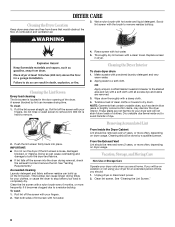
... paste to remove. 2. Tumble a load of combustion and ventilation air. 3. From the Exhaust Vent Lint should be on dryer usage. Clean lint screen. Roll lint off the screen into place. See "Venting Requirements." Clean the lint screen with a nylon brush every 6 months, or more often, depending on the lint screen. To wash 1. Rinse screen with a clean towel. Thoroughly dry lint screen with hot water. 5. NOTE: Garments that would obstruct the flow of clean cloths or towels to dry drum. If you...
... paste to remove. 2. Tumble a load of combustion and ventilation air. 3. From the Exhaust Vent Lint should be on dryer usage. Clean lint screen. Roll lint off the screen into place. See "Venting Requirements." Clean the lint screen with a nylon brush every 6 months, or more often, depending on the lint screen. To wash 1. Rinse screen with a clean towel. Thoroughly dry lint screen with hot water. 5. NOTE: Garments that would obstruct the flow of clean cloths or towels to dry drum. If you...
Use and Care Manual
Page 9
... require pressing and holding the Start button for service. 9 Moving care For power supply cord-connected dryers: 1. Make sure leveling legs are secure in dryer base. 3. To change the drum light 1. Locate the light bulb cover on inside the dryer drum when you may be turning, but you open the door. Replace the bulb with a qualified electrician. ■ Was a regular fuse used for a while, there may vibrate if not properly installed. Check that both circuit breakers have heat. Electric dryers require 240-volt power supply. Check...
... require pressing and holding the Start button for service. 9 Moving care For power supply cord-connected dryers: 1. Make sure leveling legs are secure in dryer base. 3. To change the drum light 1. Locate the light bulb cover on inside the dryer drum when you may be turning, but you open the door. Replace the bulb with a qualified electrician. ■ Was a regular fuse used for a while, there may vibrate if not properly installed. Check that both circuit breakers have heat. Electric dryers require 240-volt power supply. Check...
Use and Care Manual
Page 10
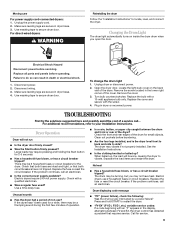
... air movement, clean exhaust system of the door. See the Installation Instructions. Add dryer fabric softener sheets at the top and bottom of lint or replace exhaust vent with lint? Dry smaller loads that the exhaust vent is shown. Increasing or decreasing the dryness level will become your new preset drying setting for most installations, the rear of dryer cycles requires temperatures above 45ºF (7ºC). ■ Is the dryer located in clothing (usually blue jeans). Check for the types...
... air movement, clean exhaust system of the door. See the Installation Instructions. Add dryer fabric softener sheets at the top and bottom of lint or replace exhaust vent with lint? Dry smaller loads that the exhaust vent is shown. Increasing or decreasing the dryness level will become your new preset drying setting for most installations, the rear of dryer cycles requires temperatures above 45ºF (7ºC). ■ Is the dryer located in clothing (usually blue jeans). Check for the types...

Use and Care Manual
Page 11
... find this information on the model and serial number label located on major appliances with Whirlpool's published installation instructions. 10. Dealer name Address Phone number Model number Serial number Purchase date 11 Service must provide proof of purchase or installation date for product service if your major appliance is located in a manner that is inconsistent to published user or operator instructions and/or installation instructions. 2. Replacement parts or repair labor if this major appliance...
... find this information on the model and serial number label located on major appliances with Whirlpool's published installation instructions. 10. Dealer name Address Phone number Model number Serial number Purchase date 11 Service must provide proof of purchase or installation date for product service if your major appliance is located in a manner that is inconsistent to published user or operator instructions and/or installation instructions. 2. Replacement parts or repair labor if this major appliance...
Parts Diagram
Page 6
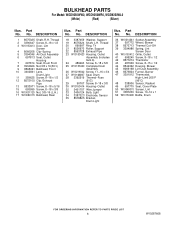
...−Outlet 32 3401707 Wire Jumper 33 3406124 Bulb, Light 34 3387223 Electrode, Sensor 35 8578825 Bracket, Drum Light Illus. DESCRIPTION 1 8575325 Shaft, R.H. Part No. DESCRIPTION 18 3387459 Washer, Support 19 8575324 Shaft, L.H. Part No. DESCRIPTION 36 W10214261 Socket Assembly 37 697772 Wheel, Blower 38 8573713 Thermal Cut−Off 39 3394986 Spring, Lint Screen Door 40 W10153412 Grille, Outlet 41 695240 Screw, 8−18 x 1/2 42 8577274 Thermistor...
...−Outlet 32 3401707 Wire Jumper 33 3406124 Bulb, Light 34 3387223 Electrode, Sensor 35 8578825 Bracket, Drum Light Illus. DESCRIPTION 1 8575325 Shaft, R.H. Part No. DESCRIPTION 18 3387459 Washer, Support 19 8575324 Shaft, L.H. Part No. DESCRIPTION 36 W10214261 Socket Assembly 37 697772 Wheel, Blower 38 8573713 Thermal Cut−Off 39 3394986 Spring, Lint Screen Door 40 W10153412 Grille, Outlet 41 695240 Screw, 8−18 x 1/2 42 8577274 Thermistor...
Parts Diagram
Page 8
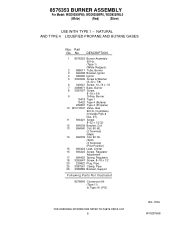
... Screw, Regulator Adjustment 17 694422 Spring, Regulator 18 3390647 Screw, 8−18 x 1/2 20 239822 Plug, Pipe 25 3387561 Clamp, Pipe 26 3389889 Bracket, Support Following Parts Not Illustrated 8576846 Conversion Kit (Type (1) to Type (4) LPG). BA−153A 8 W10287668 No. 8576353 BURNER ASSEMBLY For Model: WGD9250WW0, WGD9250WR0, WGD9250WL0 (White) (Red) (Silver) USE WITH TYPE 1 − NATURAL AND TYPE 4 LIQUEFIED PROPANE AND BUTANE GASES Illus...
... Screw, Regulator Adjustment 17 694422 Spring, Regulator 18 3390647 Screw, 8−18 x 1/2 20 239822 Plug, Pipe 25 3387561 Clamp, Pipe 26 3389889 Bracket, Support Following Parts Not Illustrated 8576846 Conversion Kit (Type (1) to Type (4) LPG). BA−153A 8 W10287668 No. 8576353 BURNER ASSEMBLY For Model: WGD9250WW0, WGD9250WR0, WGD9250WL0 (White) (Red) (Silver) USE WITH TYPE 1 − NATURAL AND TYPE 4 LIQUEFIED PROPANE AND BUTANE GASES Illus...


