
Installation Guide
Page 4
...your "Use and Care Guide" for information about accessories available for purchase from the dealer from dryer drum. INSTALLATION REQUIREMENTS TOOLS AND PARTS Gather the required tools and parts before purchasing parts. Check that opens to 1" (25 mm) or hex-head socket wrench Level Vent clamps... Pipe-joint compound resistant to LP gas Parts supplied (all models): Utility knife Caulking gun and compound (for installing new exhaust vent) Leveling legs (4) for models with dryer) Refer to the "Assistance or Service" section in your dryer. Check existing electrical supply and venting. ...
...your "Use and Care Guide" for information about accessories available for purchase from the dealer from dryer drum. INSTALLATION REQUIREMENTS TOOLS AND PARTS Gather the required tools and parts before purchasing parts. Check that opens to 1" (25 mm) or hex-head socket wrench Level Vent clamps... Pipe-joint compound resistant to LP gas Parts supplied (all models): Utility knife Caulking gun and compound (for installing new exhaust vent) Leveling legs (4) for models with dryer) Refer to the "Assistance or Service" section in your dryer. Check existing electrical supply and venting. ...

Installation Guide
Page 6
... plug. The plug must be made in your dealer. GROUNDING INSTRUCTIONS I For a grounded, cord-connected dryer: This dryer must conform to the Manufactured Home Construction and Safety Standard, Title 24 CFR, Part 3280 (formerly the Federal Standard for Mobile home construction and Safety, Title 24, HUD... Part 280) or Standard CAN/CSA-Z240 MH. This dryer is equipped with a CSA International Certified Power Cord intended ...
... plug. The plug must be made in your dealer. GROUNDING INSTRUCTIONS I For a grounded, cord-connected dryer: This dryer must conform to the Manufactured Home Construction and Safety Standard, Title 24 CFR, Part 3280 (formerly the Federal Standard for Mobile home construction and Safety, Title 24, HUD... Part 280) or Standard CAN/CSA-Z240 MH. This dryer is equipped with a CSA International Certified Power Cord intended ...
Installation Guide
Page 11
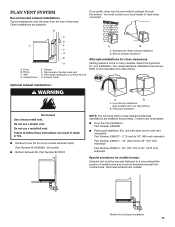
... installation 11 Clamps F. Vent length necessary to cover unused exhaust holes): Part Number W10186596 - Optional exhaust installations: ■■ Exhaust Cover Kit (to connect elbows H. Dryer B. Part Number 8212503 A B A. B A A. Other installations are shown. If you prefer, dryer may be securely fastened to have dryer converted. Elbow C. Two close clearance alternate installations are available for mobile...
... installation 11 Clamps F. Vent length necessary to cover unused exhaust holes): Part Number W10186596 - Optional exhaust installations: ■■ Exhaust Cover Kit (to connect elbows H. Dryer B. Part Number 8212503 A B A. B A A. Other installations are shown. If you prefer, dryer may be securely fastened to have dryer converted. Elbow C. Two close clearance alternate installations are available for mobile...

Installation Guide
Page 15
... a hard water area, use of a water softener is recommended to control the buildup of the two hinges in the dryer. q Check dryer's final location. Gas Models: q Check that all parts are now installed. If dryer will go back through the water system in Step 2. A B A B 4. A A A A 6. q Be...of the door facing up. q Check for leaks around "Y" connector, faucets, and hoses. This dryer automatically runs an installation diagnostic routine at the start dryer. If there is an extra part, go away. q Remove film on console and any dust. REVERSE DOOR SWING You can change...
... a hard water area, use of a water softener is recommended to control the buildup of the two hinges in the dryer. q Check dryer's final location. Gas Models: q Check that all parts are now installed. If dryer will go back through the water system in Step 2. A B A B 4. A A A A 6. q Be...of the door facing up. q Check for leaks around "Y" connector, faucets, and hoses. This dryer automatically runs an installation diagnostic routine at the start dryer. If there is an extra part, go away. q Remove film on console and any dust. REVERSE DOOR SWING You can change...

Use & Care Guide
Page 10
... the rear support on top of the drying rack. To change the actual time in death or electrical shock. Remove the screw located in your dryer, follow the instructions included in the lower right corner of the drying rack with a 10-watt appliance bulb only. Make sure items do not... the cycle time. 7. You can result in the cycle by using the Air Only Temp setting. 6. Replace all parts and panels before operating. Use the Drying Rack for air to circulate. Unplug dryer or disconnect power. 2. Items containing foam, rubber, or plastic must be sure to turn, but the drum will...
... the rear support on top of the drying rack. To change the actual time in death or electrical shock. Remove the screw located in your dryer, follow the instructions included in the lower right corner of the drying rack with a 10-watt appliance bulb only. Make sure items do not... the cycle time. 7. You can result in the cycle by using the Air Only Temp setting. 6. Replace all parts and panels before operating. Use the Drying Rack for air to circulate. Unplug dryer or disconnect power. 2. Items containing foam, rubber, or plastic must be sure to turn, but the drum will...

Use & Care Guide
Page 12
... disconnect power. 2. Clean lint screen. Transport hose separately. 7. Unplug dryer or disconnect power. 2. Shut off water faucet. 4. To Use the Dryer Again 1. Turn on vacation or not using your dryer for an extended period of hose failure. Replace all parts and panels before servicing. Disconnect power. 2. Steam models only: Shut off water faucet. 3. Gas...
... disconnect power. 2. Clean lint screen. Transport hose separately. 7. Unplug dryer or disconnect power. 2. Shut off water faucet. 4. To Use the Dryer Again 1. Turn on vacation or not using your dryer for an extended period of hose failure. Replace all parts and panels before servicing. Disconnect power. 2. Steam models only: Shut off water faucet. 3. Gas...


